Advertisement
Quick Links
INSTALLATION MANUAL
Level of Difficulty
Moderate
Installation difficulty levels are based on time
and effort involved and may vary depending on
the installer level of expertise, condition of the
vehicle and proper tools and equipment.
Installed Attachment Tabs
Height
17"
Width
24"
Parts List
Item Qty Description
1
1
Tow bar base plate
2
2
Spacer plate, 1" x 5/8"
3
2
Tow bar mounting tab
4
2
Safety cable, 7,500 lbs.
5
4
Square hole spacer,
1/4" x 1" x 2-1/2"
6
4
Carriage bolt,
1/2"-13 x 2", grade 8
7
4
Flange nut, 1/2"-13, grade 8
8
2
Square hole spacer,
3/8" x 1-1/4" x 2-1/2"
9
2
Carriage bolt,
5/8"-11 x 2", grade 8
10
2
Flange nut, 5/8"-11, grade 8
11
2
Quick link, 1/4"
12
2
Socket plug
Tools Required
Torque wrench
Drill
Socket, 3/4"
Drill bit, 17/32"
Socket, 5/16"
Tape measure
Socket, 15mm
Large vise grip
Socket, 18mm
Reciprocating saw
Fishwire, 1/2"
--
(includes four)
CURTMFG.COM
•
PRODUCT SUPPORT: 877.287.8634
WARNING
Never exceed the vehicle manufacturer's recommended gross vehicle weight rating (GVWR).
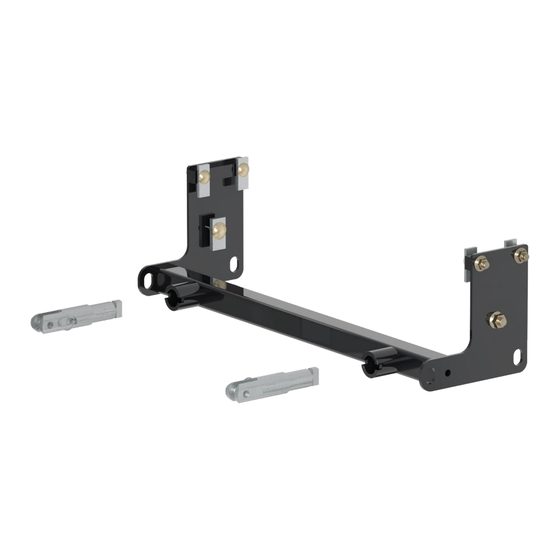
Product Photo
Not pictured: Safety cables, quick links and socket plugs
CAUTION
Take care when cutting any plastic or metal as injury may occur if done improperly.
NOTICE
Visit www.curtmfg.com for a full-color copy of this
instruction manual, as well as helpful videos, guides and much more!
Before you begin installation, read all instructions thoroughly.
Proper tools will improve the quality of installation and reduce the time required.
This installation requires the front underbody panel and metal bumper
to be removed and reinstalled. Some drilling and trimming are required.
To help prevent damage to the product or vehicle, refer to the specified
torque specifications when securing hardware during the installation process.
If equipped, we recommend removing the base plate attachment tabs when not in use.
SAFETY INSTRUCTIONS
Safety glasses should be worn at all times while installing this product.
Product Registration and Warranty
CURT stands behind our products with industry-leading warranties. To get copies of the product
warranties, register your purchase or provide feedback, visit: warranty.curtgroup.com/surveys
•
70110-INS-RC
•
04/14/2020
•
ECN6926
•
PAGE 1
70110
Advertisement

Related Manuals for curt 70110


Summary of Contents for curt 70110
- Page 1 Safety glasses should be worn at all times while installing this product. Product Registration and Warranty CURT stands behind our products with industry-leading warranties. To get copies of the product warranties, register your purchase or provide feedback, visit: warranty.curtgroup.com/surveys CURTMFG.COM •...
- Page 2 Square hole spacer, 3/8" x 1-1/4" x 2-1/2" Carriage bolt, 5/8"-11 x 2", grade 8 Flange nut, 5/8"-11, grade 8 Quick link, 1/4" Socket plug Included fishwire CURTMFG.COM • PRODUCT SUPPORT: 877.287.8634 • 70110-INS-RC • 04/14/2020 • ECN6926 • PAGE 2...
- Page 3 – two on either side. Step 3 Carefully remove the factory bumper, disconnecting the fog light wiring harnesses before complete removal. Set the bumper aside to be reinstalled later. CURTMFG.COM • PRODUCT SUPPORT: 877.287.8634 • 70110-INS-RC • 04/14/2020 • ECN6926 • PAGE 3...
- Page 4 1/2" flange nuts (#7). Repeat on the other side of the vehicle and torque all 1/2" fasteners to 110 lb-ft. CURTMFG.COM • PRODUCT SUPPORT: 877.287.8634 • 70110-INS-RC • 04/14/2020 • ECN6926 • PAGE 4...
- Page 5 When ready to tow, install the tow bar mounting tabs (#3). When not towing, insert the socket plugs (#12) into the ends of the tow bar base plates (#1). CURTMFG.COM • PRODUCT SUPPORT: 877.287.8634 • 70110-INS-RC • 04/14/2020 • ECN6926 • PAGE 5...
- Page 6 Do not tow with worn or damaged parts. Towing vehicle and trailer Review the owner's manual for your towing vehicle and trailer manufacturer's recommendations for specific recommendations, capacities and requirements. CURTMFG.COM • PRODUCT SUPPORT: 877.287.8634 • 70110-INS-RC • 04/14/2020 • ECN6926 • PAGE 6...
Need help?
Do you have a question about the 70110 and is the answer not in the manual?
Questions and answers