Advertisement
Quick Links
Advertisement

Related Manuals for infobit iSwitch 401HK


Summary of Contents for infobit iSwitch 401HK
- Page 1 401HK 4K60 4x1 KVM Switcher VER 1.0 www.infobitav.com info@infobitav.com...
- Page 2 Thank you for purchasing this product For optimum performance and safety, please read these instructions carefully before connecting, operating or adjusting this product. Please keep this manual for future reference. Surge protection device recommended This product contains sensitive electrical components that may be damaged by electrical spikes, surges, electric shock, lighting strikes, etc.
- Page 3 1. Introduction This is a 4x1 KVM Switcher with hotkey switching. It supports resolutions up to 4K@60Hz 4:4:4 8bit and can also transmit USB 3.0 signal up to 5Gbps for KVM function. The switcher features virtual interaction function, so that it can automatically wake up the connected PC that is in standby mode, which can reduce the switching time.
- Page 4 3. Package Contents ① 1 x 4K60 4x1 KVM Switcher ② 1 x IR Remote ③ 1 x 3pin-3.81mm Phoenix Connector (male) ④ 1 x Fixed Frequency 38KHz IR Receiver Cable (1.5 meters) ⑤ 4 x USB Cable (USB 3.0, AM to BM, 1.8 meters) ⑥...
- Page 5 IEC 61000-4-2: ESD Protection ±8kV (Air-gap discharge), ±4kV (Contact discharge) Connection Input ports 4 x HDMI input [Type A, 19-pin female] 1 x HDMI output [Type A, 19-pin female] Output ports 1 x L/R audio output [3.5mm Stereo Mini-jack] 1 x RS-232 [3pin-3.81mm phoenix connector] 1 x IR EXT [3.5mm Stereo Mini-jack] Control ports 4 x USB HOST [USB Type B]...
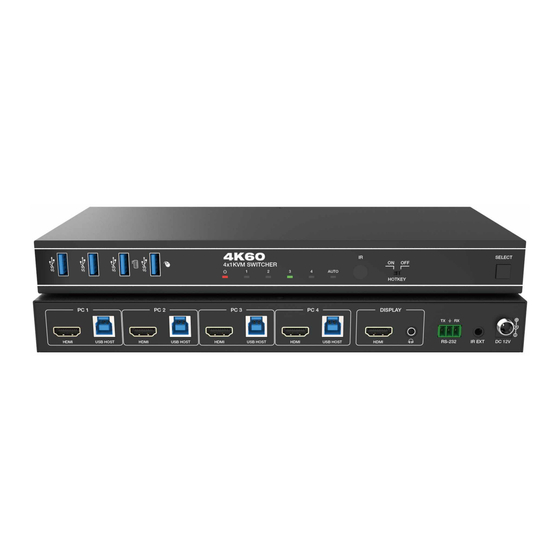
- Page 6 5. Operation Controls and Functions 5.1 Front Panel Name Function Description USB 3.2 Gen 1 device ports, connected to USB 3.0 flash disk, USB 3.0 ports camera, printer etc. ▪ When Hotkey switch to OFF mode, these two ports support USB 3.0 ports USB 3.2 Gen 1 device.
- Page 7 5.2 Rear Panel Name Function Description HDMI: HDMI signal input port, connected to HDMI source device such as PC with HDMI cable. PC 1/2/3/4 ports USB HOST: USB Host port, connected to the same PC along with HDMI port. (Note: The PC 1 USB HOST port can be used for firmware upgrade.) DISPLAY HDMI signal output port, connected to HDMI display device...
- Page 8 6. IR Remote ① Power on or Standby: Press this button to power on the switcher or set it to standby mode. ② Auto: Press this button to enable/disable the auto switching function. ③ 1/2/3/4: Press 1/2/3/4 button to select the HDMI input port 1/2/3/4 as the input channel, and the corresponding channel LED on the front panel will light in green.
- Page 9 8. Keyboard & Mouse Hotkey Function When the hotkey mode is enabled, you can use keyboard and mouse hot keys to operate and control the product. (1) Keyboard hotkeys are as following: Scroll Scroll Switch to input 1 Ctrl Ctrl Lock Lock Scroll...
- Page 10 9. ASCII Commands The product also supports ASCII commands control. Connect the RS-232 port of the product to a PC with a 3-pin phoenix connector cable and an RS-232 to USB cable. The connection method is as follows. Ground 3-pin Phoenix Connector RS-232 RS-232 to USB cable Then, open a Serial Command tool on PC to send ASCII commands to...
- Page 11 Command Code Function Description Example Feedback Default Setting Set output 1 stream enable/ output 1 stream: output 1 stream: disable (x=0~1) s output 1 s output 1 enable enable 0. disable output stream stream x! stream 1! 1. enable output stream r output 1 r output 1 output 1 stream:...
- Page 12 10. Application Example Keyboard Camera Mouse Flash Disk Power Supply Speakers IR Receiver PC 1 PC 2 PC 3 PC 4 TV or Monitor The terms HDMI and HDMI High-Definition Multimedia interface, and the HDMI Logo are trademarks or registered trademarks of HDMI Licensing LLC in the United States and other countries.
Need help?
Do you have a question about the iSwitch 401HK and is the answer not in the manual?
Questions and answers