
Related Manuals for infobit iShare+


Summary of Contents for infobit iShare+
- Page 1 User Manual iShare 4 x 2 Presentation Switcher with local sources and BYOD Version: V2020.01...
-
Page 2: Important Safety Information
Important Safety Information 1. Read, follow, and keep these instructions. 2. Heed all warnings. 3. Do not use this product near water. Keep away from wet places, such as: spas, pools, sinks, laundries, wet basements, etc. 4. When cleaning, unplug the switcher and wipe with a dry cloth. Do not use damp cloths, cleaning fluids, or aerosols which may result in electric shock, fire, or switcher damage. -
Page 3: Table Of Contents
Contents Important Safety Information ............................2 1. Introduction ................................. 1 2. Features ..................................1 3. Package Contents ..............................1 4. Panel Description ............................... 1 Front Panel ................................. 1 Rear Panel .................................. 3 5. Specifications ................................4 6. Installation and Wiring .............................. 5 Installation .................................. -
Page 4: Introduction
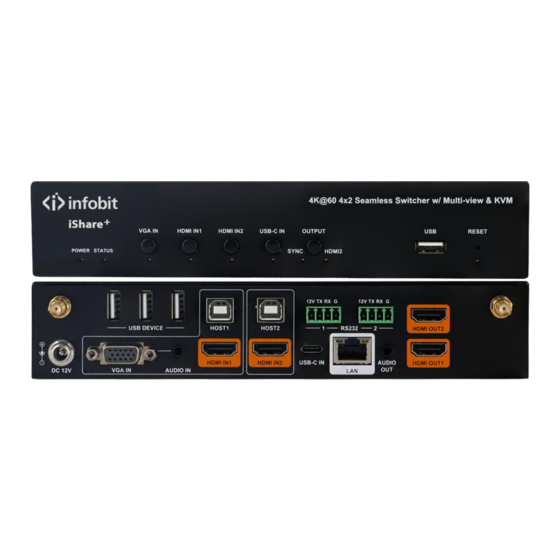
1. Introduction The iShare Plus is a high-performance BYOD presentation switcher with wireless presentation capability. It equips the built-in Wi-Fi module and supports multiple access approaches, including Airplay Mirroring, Miracast, physical interfaces (HDMI, VGA and USB-C) and USB Dongle, with which you can project screen contents of your computer (Mac/Windows) or mobile device (iPhone/iPad/Android) to a display in Multiview mode. - Page 5 Name Description On: The switcher is powered on. Power LED Off: The switcher is powered off. On: The switcher is outputting at least one video source. Blinking: The switcher is in standby mode. Status LED Off: The switcher is outputting Guide Screen. ...
-
Page 6: Rear Panel
Rear Panel Name Description Antenna Connect to the antenna pair provided for the access to Miracast and soft AP function. DC 12V Connect to the power adapter provided. VGA In Connect to a VGA source for video input as well as analog audio input. HDMI In 1-2 Connect to an HDMI source device. -
Page 7: Specifications
5. Specifications Technical 1 x VGA; 2 x HDMI; 1 x USB-C; Input Video Port 1 x LAN, 10/100/1000 Mbps Ethernet; 1 x WLAN VGA: 640x480 , 720x480 , 720x576 , 800x600 , 1024x768 , 1280x720 , 1280x800 , 1280x1024 1360x768 8,9, 1366x768... -
Page 8: Installation And Wiring
6. Installation and Wiring Installation Note: Before installation, please ensure the switcher is disconnected from the power supply. It is recommended that you remove other WiFi hotspot devices nearby (if any) so to prevent potential interferences on screen projection. Attaching Antennas 6.1 Attach the antenna provided to the threaded connector, and screw it down in clockwise. -
Page 9: Key Function
Note: If you connect the switcher to an Ethernet Switch, please ensure the switch is able to forward messages from the 224.0.0.251 multicast group. Most non-management switches meet this requirement. If a management switch is employed, you must contact with the network administrator or switch ... -
Page 10: Automatic Signal Switching
By default, the screen layout switching mode is set as automatic switching for the switcher, and the preset screen layouts allows for up to sixteen video sources to be displayed on a screen as the following:] 1 image 2 images 4 images 4 images 6 images... -
Page 11: Screen Mirroring Over Miracast
right of the display screen; by default, it is set as iShare. Password: set through Web GUI or API and can be obtained from OSD at the bottom right of the display screen; by default, it is set as 12345678. B. - Page 12 3. The Smart View window will appear and start to search Miracast receiver. Click the device name in the search result, the display will output the the mobile’ screen. 4. To disconnect mobile from the switcher: click the icon on the mobile screen, and choose Disconnect in the Smart View window.
- Page 13 Note: The icon, instruction and entrance of the Miracast function may vary on different Android mobile • phones, please refer to your mobile phone’s manual to get accurate instruction. If you fail to use Miracast function, please disable the mobile’s Wi-Fi and enable it later, or restart the •...
-
Page 14: Screen Mirroring Over Usb Dongle
Tip: Both the Airplay mirroring and Miracast support access code. If you see the PIN entry window appears on your devices, input the access code that can be obtained through OSD. (See “OSD” section for more information.) (3) Screen Mirroring over USB Dongle USB Dongle allows you to share content from your laptop on the display screen in a simple way –... -
Page 15: Guide Screen
Guide Screen The switcher uses a Guide Screen to convey the basic connection instructions for user access. The Guide Screen can be personalized to allow custom connection instructions on the switcher’s Web UI page. The Guide Screen is accessible in the following cases: Automatic switching: disconnect all video sources from the switcher, the Guide Screen will appear •... - Page 16 Example 2: Multiview mode Note: When the switcher outputs Guide Screen picture, the OSD will display all the time. • When the switcher outputs specific video sources, the OSD will display on the display device’s screen •...
-
Page 17: Web Ui
for 10 seconds and then disappear. By default, the access code is set as blank, therefore the OSD doesn’t display the access code. If you • want to set access code, please refer to Access Code section for more information. Web UI The Web UI provides basic controls and advanced settings. -
Page 18: General Tab
General Tab Device Name UI Element Description Redefine the device name to names easy to remember. Note: The name must be 1~20 characters in length, including letters, numbers, “_” or Device Name “-”. By default, it’s set as iShare. Apply Click to perform current settings. -
Page 19: Access Code
Access Code UI Element Description Enter a four-digit access code to help prevent users from accidentally connecting to an unintended device and protect from an unauthorized access. When an access code is configured, it appears on the upper right corner of the ... -
Page 20: Output
Output UI Element Description Set the output timing for the HDMI output ports. Two operation methods are offered in the following: Auto: select to output the maximum resolution supported by display based on the Output display’s EDID. E.g. If display supports up to 4K@60Hz, the switcher will output Timing 4K@60Hz. -
Page 21: Password
UI Element Description Sink Power Set display to enter standby mode or to return to their normal working state through Management CEC capability or RS232 commands. both: Enable both CEC and RS232 mode to manage the sink power. Sink Power cec: Enable CEC to manage the sink power. -
Page 22: Guide Screen Picture
Guide Screen Picture UI Element Description Browse For changing a picture for Guide Screen. Click to upload the picture file to the switcher. Apply Note: The picture must be in jp(e)g format that has 1920 x 1080 pixels. Maintenance UI Element Description Click to browse for the local upgrade file and upload for firmware upgrade. -
Page 23: Video Source Tab
Video Source Tab State & Switch UI Element Description For displaying the video signal status (including video source name, video resolution State & Switch and video format) and setting the display mode. Click the button (turns from white to blue) to display the video source(s) on the screen Primary connected to HDMI Out 1. -
Page 24: Video Source Tab
Therefore, please use this method with caution. Contact Us United Kingdom Singapore China INFOBIT AV LTD. INFOBIT AV PTE. LTD. INFOBIT AV LTD. +44 (0)7430 051848 +65 9711 9648 +86 135 5217 1787 info@infobitav.com info@infobitav.com info@infobitav.com...
Need help?
Do you have a question about the iShare+ and is the answer not in the manual?
Questions and answers