
Related Manuals for infobit iTrans UC-HUB2U


Summary of Contents for infobit iTrans UC-HUB2U
- Page 1 UC-HUB2U Dual USB and HDMI Cameras Mixer Hub User Manual V1.0 INFOBIT AV www.infobitav.com info@infobitav.com...
-
Page 2: Table Of Contents
11.2.2 HDMI Resolution ..........................22 11.2.3 Layout ..............................22 11.2.4 UVC Output (Video Mute) ........................24 11.2.5 Customize Home Screen ........................25 11.3 Audio settings ............................26 11.4 System settings ............................29 11.4.1 Date & Time ............................29 INFOBIT AV www.infobitav.com info@infobitav.com... - Page 3 11.4.3 Configuration file ..........................32 11.4.4 Auto Standby ............................34 11.4.5 Login Password ........................... 35 11.4.6 Developer tools ........................... 36 11.4.7 Factory reset............................38 11.5 Firmware Updates ............................. 39 11.6 About Device ............................. 42 12. DRAWGING ..............................43 INFOBIT AV www.infobitav.com info@infobitav.com...
- Page 4 Be careful that water never gets into the unit through any hole. Never use alcohol, benzine, solvents or abrasive substances to clean this unit. WARNING: This product must not be discarded, under any circumstance, as unsorted urban waste. Take to the nearest electrical and electronic waste treatment center. INFOBIT AV www.infobitav.com info@infobitav.com...
-
Page 5: Overview
1. OVERVIEW The iTrans UC-HUB2U is an USB and HDMI source switcher and mixer, it enables fast switching between 3 sources (1x USB 3.0, 1x USB 2.0, 1x HDMI), and mixing 2 of them into 1 image, it provides one HDMI output for the local monitor, and one USB-C output for the PC to do web conferencing or live broadcasting. -
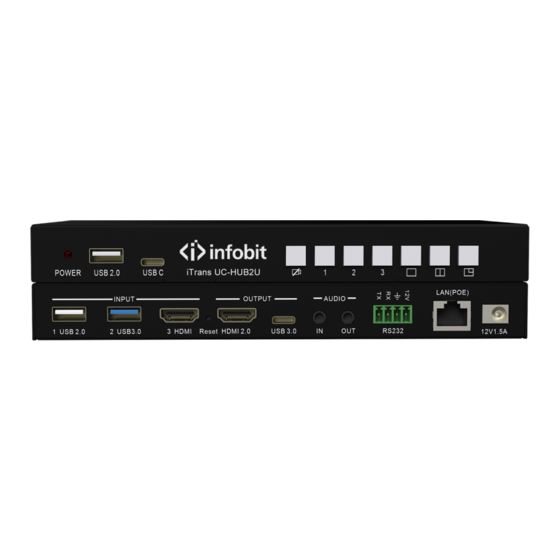
Page 6: Interfaces
Video 2 Button Switch the source from USB 3.0 Video 3 Button Switch the source from HDMI Single Video Button Single view layout PBP Mode Button Side by side layout PIP Mode Button Big & small layout INFOBIT AV www.infobitav.com info@infobitav.com... -
Page 7: Rear Panel
USB 3.0 OUTPUT 1x USB-C output for PC IN AUDIO 1x line in OUT AUDIO 1x line out RS232 1x RS232 for control LAN (POE) 1x 1,000M LAN for control Power 12V 1.5A power input 3. DIAGRAMS INFOBIT AV www.infobitav.com info@infobitav.com... -
Page 8: Power Supply
UC-HUB2U 4. POWER SUPPLY Local Power Source Plug the power connector to the power adapter to the power input connector of the iTrans UC- HUB2U. Choose the appropriate power plug (US, UK, EU or AU) to be installed on the power adapter. -
Page 9: Package List
3.5mm Phoenix terminal / RS232 interface LAN port RJ45 x1: 1,000Mbps, POE option (802.3af) Control method Web GUI, Telnet, RS232, Buttons Dimension (W x D x H) 180mm x 95mm x 18mm Weight Operating Temperature 0° C to +45° C INFOBIT AV www.infobitav.com info@infobitav.com... -
Page 10: Default Configurations
Ø Preview Ø HDMI Resolution: Auto • Layout Ø Signal Source: USB 1 • UVC Output (Video Mute) Ø Mute Output OFF • Customize Home screen. • Audio Setting Ø Speaker: USB 1 Ø Microphone: USB 1 INFOBIT AV www.infobitav.com info@infobitav.com... -
Page 11: Uc Software Connection
• About Device C SOFTWARE CONNECTION Launch video conference client (such as Zoom, Microsoft Teams, etc.) to use the camera connected to the iTrans UC-HUB2U device, select the camera name HUB2U Camera. Refer to the following figure: INFOBIT AV www.infobitav.com... -
Page 12: Switching
9. SWITCHING 9.1 Single Screen Display By pressing the button to enter Single Screen mode, press the button to select the video source you want to output as shown in the following example: INFOBIT AV www.infobitav.com info@infobitav.com... -
Page 13: Dual Screen Display
HDMI 3 port. 9.2 Dual Screen Display 9.2.1 PBP Mode By pressing the button to enter PBP (Picture-By-Picture) mode, press the button to select two video sources you want to output as shown in the following example: INFOBIT AV www.infobitav.com info@infobitav.com... -
Page 14: Pip Mode
9.2.2 PIP Mode By pressing the button to enter the PIP (Picture-In-Picture) mode, press the button to select two video sources you want to output as shown in the following example: INFOBIT AV www.infobitav.com info@infobitav.com... -
Page 15: Mute Uvc Output
During the PIP on display, press the PIP control button again, it will swap the large and the small video source display from each other. 9.3 Mute UVC output By pressing the button to enter the Mute UVC output as shown in the following example: INFOBIT AV www.infobitav.com info@infobitav.com... - Page 16 This function can be used to debug the local camera device before the meeting, so that the remote participants will not be able to see the process of debugging the local camera, to protect the user’s privacy. INFOBIT AV www.infobitav.com info@infobitav.com...
-
Page 17: Home Page
10. HOME PAGE Attention: You can access the web management page through this IP address. Also you can use Telnet function via this kind of IP as below photo example IP 192.168.3.89 showed: INFOBIT AV www.infobitav.com info@infobitav.com... -
Page 18: Web Page
The login page will be shown when enter the IP that showed on the home page. The default password is admin. Note: It doesn’t need to enter the password again when you ticked on the Remember me after the first time login. INFOBIT AV www.infobitav.com info@infobitav.com... -
Page 19: Network Settings
11.1 Network settings 11.1.1 Ethernet Network Configuration Here you can set to automatically obtain the LAN IP or manually. The DHCP function is turned on by default. The Wired Authentication Status has the following four states: l EAP-TLS INFOBIT AV www.infobitav.com info@infobitav.com... - Page 20 EAP-TTLS l PEAP l No Authentication Note: The default is No Authentication, which means no authentication is required. The LAN network with network cable can be plug-and-play. INFOBIT AV www.infobitav.com info@infobitav.com...
-
Page 21: Display Settings
HDMI signals. Attention: If the camera is occupied by video conferencing software or the computer system camera, the video output test and preview will not be possible here, and the following red font error will be prompted. INFOBIT AV www.infobitav.com info@infobitav.com... -
Page 22: Hdmi Resolution
The default mode is Auto. The resolution in the drop-down list is the resolution that the monitor is connected to and can use. Note: If the display only supports 1080P, the 4K output resolution will not appear in the above resolution list. 11.2.3 Layout l Single Screen INFOBIT AV www.infobitav.com info@infobitav.com... -
Page 23: Pbp Mode
After clicking the "Change" button, Signal Source 1 and Signal Source 2 will be swapped as below photo showed: l PIP Mode INFOBIT AV www.infobitav.com info@infobitav.com... -
Page 24: Uvc Output (Video Mute)
Layout 3-6 are all PIP modes with the small window in different position. After clicking the "Change" button, Signal Source 1 and Signal Source 2 will be swapped as below photo showed: 11.2.4 UVC Output (Video Mute) INFOBIT AV www.infobitav.com info@infobitav.com... -
Page 25: Customize Home Screen
Select an image (supports jpg, bmp, png, gif image formats, resolution is 1920 * 1080P) to change. Of course, users can also return to the original main interface every time. INFOBIT AV www.infobitav.com info@infobitav.com... -
Page 26: Audio Settings
In the Speaker drop-down options, you can test the following four options. After selecting the corresponding option, click the "Detect speakers" button to test whether it is available and can output sound. As below device interface diagram showed: Ø USB 1 corresponds to the audio output of ⑨ INFOBIT AV www.infobitav.com info@infobitav.com... - Page 27 Ø USB 1 corresponds to the audio input of ⑨ Ø USB 2 corresponds to the audio input of ⑩ Ø HDMI In corresponds to the audio input of ⑪ Ø Line In corresponds to the audio input of ⑮ INFOBIT AV www.infobitav.com info@infobitav.com...
- Page 28 The volume bar under Master can adjust the microphone input volume of the ticked microphone source, which has a multiplicative effect. When you click the "Mute" button to take effect, a red background frame will appear , indicates that the function is enabled. INFOBIT AV www.infobitav.com info@infobitav.com...
-
Page 29: System Settings
Time server address is synchronized to the Google server 2.android.pool.ntp.org of the Android platform by default. Note: If you have your own server, you can also set it here to synchronize the time with your own server address INFOBIT AV www.infobitav.com info@infobitav.com... - Page 30 Use time server (online). Set time zone. Here you can manually set the desired time zone. After syncing to the Internet time, it will be displayed in local time. The default time zone is (GMT+02:00) Amsterdam. INFOBIT AV www.infobitav.com info@infobitav.com...
-
Page 31: Language
Here you can choose and define the language you want to display on the home page and web client. l Home screen language Here is to set the language displayed on the Home Page, which supports the languages of many countries. l Web-GUI language INFOBIT AV www.infobitav.com info@infobitav.com... -
Page 32: Configuration File
Here is to set the language displayed on the web side, currently English and Chinese are supported. 11.4.3 Configuration file l Upload configuration INFOBIT AV www.infobitav.com info@infobitav.com... -
Page 33: Download Configuration
Note: After uploading and configuring, it needs to re-login automatically to the web page to take effect. l Download configuration. Here you can download the configuration file Config.dat for the current web settings. Click the "Download" button as shown below. INFOBIT AV www.infobitav.com info@infobitav.com... -
Page 34: Auto Standby
Ø 15 minutes: enter standby mode after 15 minutes. Ø 30 minutes: enter standby mode after 30 minutes. Note: The default standby time setting is Never. The device will wake up automatically when the video conferencing software calls the camera. INFOBIT AV www.infobitav.com info@infobitav.com... -
Page 35: Login Password
You can change your password here and the minimum required password is 5 characters. Otherwise, the following error message will appear: After ticking No password, enter the current login password for confirming, no password is required to enter the web in the future. INFOBIT AV www.infobitav.com info@infobitav.com... -
Page 36: Developer Tools
After click the button Confirm settings 11.4.6 Developer tools INFOBIT AV www.infobitav.com info@infobitav.com... - Page 37 The downloaded log file is shown in the figure below: Note: More log content will be captured during 24-hour period when ticked “Enable the maximum storage space for system logs and automatically turn off after 24 hours”. It means richer log content will be captured. INFOBIT AV www.infobitav.com info@infobitav.com...
-
Page 38: Factory Reset
When the device encounters some problems that cannot be solved conventionally, you can restore the factory settings to eliminate some faults. Click the "Confirm settings" button to enter the following page. After clicking the "OK" button, the device begins to enter the factory settings restoration process. INFOBIT AV www.infobitav.com info@infobitav.com... -
Page 39: Firmware Updates
There is a reset button on the back panel of the device. Use a pointed object (such as an unbent paper clip) to press this button for at least 2 seconds until the "Factory Reset" page appears as shown below. 11.5 Firmware Updates INFOBIT AV www.infobitav.com info@infobitav.com... -
Page 40: Automatic Upgrades
If not, it will automatically update and upgrade. Click the button "Checking for updates" to check and find that it is the latest firmware. There will be a red font prompt as shown below: INFOBIT AV www.infobitav.com info@infobitav.com... - Page 41 Note: In addition to the above method of upgrading the device firmware through the web, you can also upgrade it through a USB flash drive. Copy the upgrade file "update.img" to the root directory of the USB flash drive. The USB flash drive needs to be in FAT 32 format. INFOBIT AV www.infobitav.com info@infobitav.com...
-
Page 42: About Device
11.6 About Device Here you can see the relevant information of the device and the web version information, including below: Ø Model Number Ø Firmware Version Ø Web server version Ø Serial number of the base INFOBIT AV www.infobitav.com info@infobitav.com... -
Page 43: Drawging
12. DRAWGING INFOBIT AV www.infobitav.com info@infobitav.com...
Need help?
Do you have a question about the iTrans UC-HUB2U and is the answer not in the manual?
Questions and answers