
Subscribe to Our Youtube Channel
Related Manuals for infobit iSwitch 402UC


Summary of Contents for infobit iSwitch 402UC
- Page 1 402UC 4K60 4x2 UC Switcher with Dante User Manual V1.0 iSwitch 402UC (TX) iSwitch 402UC (RX) INFOBIT AV www.infobitav.com info@infobitav.com...
-
Page 2: Table Of Contents
4.1 INSTALL ISWITCH 402UC TX ........................21 4.2 INSTALL ISWITCH 402UC RX ........................21 5. WIRING ..............................22 5.1 INSTALL ISWITCH 402UC TX & RX ....................... 22 5.2 INSTALL ISWITCH 402UC RX ONLY ......................24 5.3 DIP SETTINGS (ISWITCH 402UC RX) ......................25 6. - Page 3 6.7.5 Network ............................. 47 6.7.6 System ............................... 50 7. DANTE ..............................54 INFOBIT AV www.infobitav.com info@infobitav.com...
-
Page 4: Safety Instructions
(if there are any). • The devices shall not be exposed to dripping or splashing, and no objects filled with liquids, such as vases, shall be placed on the devices. INFOBIT AV www.infobitav.com info@infobitav.com... -
Page 5: Iswitch 402Uc (Tx)
5 Gbps under the USB 3.1 Gen1 and allowing video resolution capabilities up to 4K@60Hz at 4:4:4. The iSwitch 402UC is designed to be a centerpiece of any collaboration space and can be connected to USB peripherals via USB-A type connectors. The series allows the hosts to be connected to the system and also ensures quick and easy switching between these hosts, making this universal switcher a perfect fit for small to large meeting rooms. -
Page 6: Features
• Provides two independent RJ-45 ports for ethernet switch or VLAN Setting. help prevent unauthorized access to the INFOBIT device. Ensure company network and guest network are separate. • Supports one RJ-45 port for 2x2 Dante. -
Page 7: Package Contents
1.3 PACKAGE CONTENTS (Note: The Rx and Tx are in one box by default.) • 1 x iSwitch 402UC (Tx and Rx) • 1 x DC 20V/10A Power Adapter • 1 x AC Power Cord with US Pins •... -
Page 8: Usb Device
Front Panel Buttons, RS232, LAN (Telnet & Web UI) Operating 0°C to 45°C (32°F to 113°F) Temperature Storage Temperature -20°C to 70°C (-4°F to 158°F) Humidity 10% to 90%, non-condensing ESD Protection Human-body Model: ±8kV (Air-gap discharge)/±4kV (Contact discharge) Power Supply DC 20V, 10A INFOBIT AV www.infobitav.com info@infobitav.com... -
Page 9: Transmission Distance
4K@60Hz 4:4:4 24bpp 40m/131ft 4K@60Hz 4:2:2 36bpp 4K@60Hz (All) USB-C USB C to C 2m/7ft 4K@30Hz (All) 1080P@60Hz (All) 4K@60Hz 4:2:0 24bpp Input/Output: 4K@30Hz (All) 10m/33ft HDMI HDMI cable 1080P@60Hz (All) Input/Output: 4K@60Hz 4:4:4 24bpp 5m/16ft INFOBIT AV www.infobitav.com info@infobitav.com... -
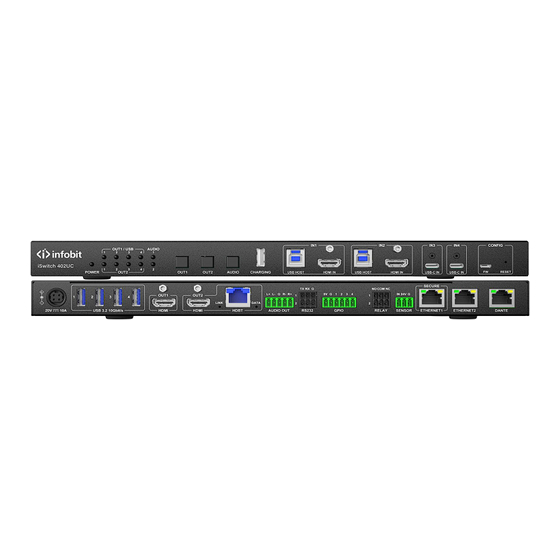
Page 10: Panel Description
Press the button to select input source for HDMI OUT Button 1/2. AUDIO OUT Selection Press the button to switch the audio source between the Button de-embedded audio from HDMI OUT 1 and HDMI OUT 2 for AUDIO OUT port. INFOBIT AV www.infobitav.com info@infobitav.com... - Page 11 Press and hold it for about 5s: Reset the IP settings, including reset the IP mode to DHCP, and reset the login password to “admin”. Press and hold it for about 15s: Reset the device to factory defaults. INFOBIT AV www.infobitav.com info@infobitav.com...
- Page 12 2 rows and 1 column of audio indicator LEDs on the front panel. Ø All LED lights support Three colors: green, red and yellow. Ø The color of the LED indicator is as follows: INFOBIT AV www.infobitav.com info@infobitav.com...
- Page 13 Note: USB Switch does not have independent switch button. When USB follows video, USB will use the video button to switch. Ø Example 1: USB Follow HDMI OUT 1. Ø Example 1: USB Follow HDMI OUT 1. INFOBIT AV www.infobitav.com info@infobitav.com...
-
Page 14: Rear Panel
HDMI OUT (1~2) Connect to the HDMI display devices. HDMI OUT 2 is mirrored with HDBT port. HDBT Connect to an HDBT 3.0 receiver (iSwitch 402UC-Rx) AUDIO OUT Connect to an audio receiver. RS232 1 & 2 RS232 1: Connect to a RS232 control device for API control or connect to a 3rd party device for RS232 routing. -
Page 15: Iswitch 402Uc (Rx)
2. ISWITCH 402UC (RX) 2.1 OVERVIEW The iSwitch 402UC (Rx) is an HDBT 3.0 extender based on the new generation of HDBT 3.0 platform, which can transmit the uncompressed HDMI2.0 video signal up to 4K@60Hz 4:4:4 8-bit over 100m Cat 6a cable. -
Page 16: Specifications
• 1 x Broadband IR Receiver (30kHz-50kHz) • 2 x Phoenix Male Connectors (3.5mm, 3 Pins) • 2 x Mounting Brackets (with Screws) 2.4 SPECIFICATIONS Model iSwitch 402UC (Rx) Name 4K60 4x2 UC Switcher Rx Video Input Receiver mode: 1 x HDMI, 1 x HDBT... -
Page 17: Panel Description
±8kV (Air-gap discharge)/±4kV (Contact discharge) Power Supply DC12V 3A Power Consumption (Max) Device Dimension (W x H x D) 215mm x 25mm x 120mm/8.46” x 0.98” x 4.72” Product Net Weight 0.60kg/1.32lbs 2.5 PANEL DESCRIPTION 2.5.1 FRONT PANEL Name Description INFOBIT AV www.infobitav.com info@infobitav.com... -
Page 18: Rear Panel
“DIP Switch Settings” section. USB Host USB 2.0 Type-B port. Connect to a USB host device (e.g. PC). USB Device USB 2.0 Type-A port. Connect to USB slave devices (e.g. keyboard, mouse, etc.). 2.5.2 REAR PANEL INFOBIT AV www.infobitav.com info@infobitav.com... -
Page 19: Diagrams
Connect to an audio receiver (e.g. speaker) for audio de-embedding output. Ethernet Connect either side to the wireless router for Ethernet pass-through. 3. DIAGRAMS 3.1 DIAGRAM #1 With Room PC, laptops, PTZ camera and Dante audio. INFOBIT AV www.infobitav.com info@infobitav.com... -
Page 20: Diagram #2
3.2 DIAGRAM #2 With Room PC, iShare X400 (BYOD/BYOM), laptops, camera videobar and Dante audio. INFOBIT AV www.infobitav.com info@infobitav.com... -
Page 21: Installation
4. INSTALLATION 4.1 INSTALL ISWITCH 402UC TX Warnings: • Before installation and wiring, disconnect power from the device. • During wiring, connect and disconnect the cables gently. 1. Attach the bracket to one side of the enclosure using the screws provided. The bracket is attached to the enclosure as shown. -
Page 22: Wiring
4. Attach the brackets to the surface you want to hold the device against using the screws (not included). 5. WIRING 5.1 INSTALL ISWITCH 402UC TX & RX Wiring 1: 4x2 Presentation Switch with Dual Screen mode INFOBIT AV www.infobitav.com... - Page 23 Note: In this mode, the USB-C IN 4 can transmit two video signals with 4K each to the two HDMI outputs respectively.(Only USB-C IN 4 support DP MST, no available for macOS devices). Wiring 2: 4x2 Presentation Switch with matrix mode INFOBIT AV www.infobitav.com info@infobitav.com...
-
Page 24: Install Iswitch 402Uc Rx Only
U/FTP or F/FTP Receiver Display 1 HDMI Device Camera Power Adapter (12V/3A) Display 2 5.2 INSTALL ISWITCH 402UC RX ONLY The iSwitch 402UC Rx is HDMI 4K60 over HDBaseT 3.0 Transceiver, which can used standalone as extenders. INFOBIT AV www.infobitav.com info@infobitav.com... -
Page 25: Dip Settings (Iswitch 402Uc Rx)
Speaker 5.3 DIP SETTINGS (ISWITCH 402UC RX) The iSwitch 402UC Rx equips a 4-pin DIP switch for settings of working mode (transmitter/receiver), USB mode (USB Host/USB Device), Audio In/Out and RS-232 working mode (RS232 pass-through, API control or firmware update). -
Page 26: Control
RS232 for HDBT update down down Reserved When connect to iSwitch 402UC Tx, please set the DIP as UP-UP-DOWN-DOWN. 6. CONTROL 6.1 AUTO SWITCHING The device supports automatic switching (HDMI and USB-C video and USB) and provides two modes: •... -
Page 27: Buttons Control
Before sending API commands to control the device, ensure the serial ports between this device and the PC are configured correctly. A professional RS232 serial interface software (e.g., Serial Assist) may be needed as well. Parameters Default Value Baud Rate 115200 bps Data bits 8 bits INFOBIT AV www.infobitav.com info@infobitav.com... -
Page 28: Control The
6.3.2 CONTROL THE 3 -PARTY DEVICES (RS232-1 & 2) Advanced users may need to control the 3rd-party device to perform automated operations, such as automatically turning the projector on/off. The iSwitch 402UC provides "RS232 automatic/manual control". RS232 automatic/manual control RS232 control is performed by pre-stored instructions in the device. When the trigger condition is met, the configuration command is automatically sent out through the RS232 port. -
Page 29: Tcp To Rs232 Routing (Rs232-1 & 2)
The TCP to RS232 routing function provides a tunnel from the network to the RS232 port, which can bypass the network control commands to the RS232 port. This function makes it easier for third-party devices such as a central-control device to control other devices connected to iSwitch 402UC. TCP port number: • RS232-1: 5000. -
Page 30: Log In To The Web Ui
5. Input a new password in the dialog box and click “Apply” to enter the main page. The password must be 4 to 16 characters long, alphanumeric, and include at least one uppercase letter, one lowercase letter, and one number. INFOBIT AV www.infobitav.com info@infobitav.com... -
Page 31: Reset Password And Ip Address
• Send the API command “RESET<CR><LF>” to reset the device to factory defaults, which includes resetting the password. 6.7 WEB UI 6.7.1 MAIN PAGE The main page consists of five tabs: Switch, General, Control, Network and System. INFOBIT AV www.infobitav.com info@infobitav.com... -
Page 32: Switch
6.7.2 SWITCH This page mainly contains switching settings. 1. Switch INFOBIT AV www.infobitav.com info@infobitav.com... - Page 33 When set USB Mode to “Independently”, users can manually switch the USB host for the USB devices to be connected to by clicking the corresponding button in the table. • ALL: Click to select one input for all Video outputs and USB-A devices. INFOBIT AV www.infobitav.com info@infobitav.com...
- Page 34 (From VIDEO OUT 1 and From VIDEO OUT 2) and click “Apply” to take effect. Default setting: From VIDOE OUT 1. • Audio Mute (ON/OFF): Click to set the corresponding audio output to mute/unmute. 3. USB-C MST INFOBIT AV www.infobitav.com info@infobitav.com...
- Page 35 • MST is supported by Windows 11, 10, Windows 8/8.1, Windows 7, and Chrome OS. • MST is currently not supported by macOS or Mac OS X. INFOBIT AV www.infobitav.com info@infobitav.com...
- Page 36 Default setting: OFF. When enabling this function, the USB-C IN 4 will occupy another input channel (USB C IN 3 or HDMI IN 2), check the box from the following inputs to set which input channel is occupied. 3. Auto-Switch INFOBIT AV www.infobitav.com info@infobitav.com...
- Page 37 Ø When the USB Switch mode is set to follow video out 1/2, it will follow the corresponding video output to switch. Ø When the USB Switch mode is set to independently, USB device switching also follows LIFO mode, and can set priority. INFOBIT AV www.infobitav.com info@infobitav.com...
-
Page 38: General
This section allows users to set the down-scaler function for each output. • Down-Scaler: Select the mode from the drop-down menu, and click “Apply” to take effect. • Auto (Default): Automatically convert 4K resolution to 1080P when connected to a 1080P display. INFOBIT AV www.infobitav.com info@infobitav.com... - Page 39 Ø Custom EDID: Select a customized EDID from the drop-down menu. Ø Read: Click to read the selected customized EDID. The result is shown on the table of the page. Ø Write: Click to write the opened EDID to the selected customized EDID space. INFOBIT AV www.infobitav.com info@infobitav.com...
- Page 40 Ø Read: Click to read the EDID of the selected output. The result is shown on the table of the page. Ø Save As: Click to save the EDID as a bin file to the local PC. Ø Status: Shows the status of reading EDID. INFOBIT AV www.infobitav.com info@infobitav.com...
-
Page 41: Control
3. HDCP This section allows users to enable/disable the HDCP capability. 6.7.4 Control This page mainly contains control settings, such as CEC, RS232, RELAY, SENSOR, USB device control and GPIO. INFOBIT AV www.infobitav.com info@infobitav.com... - Page 42 1. CEC INFOBIT AV www.infobitav.com info@infobitav.com...
- Page 43 Ø Auto-CEC: Enable/disable the auto-CEC function of the selected output. Ø Delay Time: Delay time for CEC "Display OFF" command. When the CEC display-off conditions are met, the command will not be issued until the set time arrives. Default setting: 2 minutes. 2. RS232 INFOBIT AV www.infobitav.com info@infobitav.com...
- Page 44 “HEX” button and input the Hex command in the field, otherwise, check the “String” button. Ø Save: Click to save the input command to the iSwitch 402UC. Ø Test: Click to send the input command to the 3rd device directly to test it.
- Page 45 • VBUS Mode: Select VBUS mode. Ø Pass-through: If the selected USB Host is not connected, all USB device ports will have no VBUS output. Ø Always High: The USB device ports always provide VBUS output. 6. GPIO INFOBIT AV www.infobitav.com info@infobitav.com...
- Page 46 4x GPIO pins. Each GPIO can be independently set as Digital Input or Digital Output, and the default is Digital Input. GPIO output limitations: GPIO Voltage & Current 5V/500mA GPIO 5V/50mA (each) When select "Input":(See below picture) INFOBIT AV www.infobitav.com info@infobitav.com...
- Page 47 • GPIO Status: Shows the current GPIO type and status. 6.7.5 Network This page mainly contains Network Setting, such as IP mode, Service Capability, USB NIC, VLAN Mode and 802.1x. INFOBIT AV www.infobitav.com info@infobitav.com...
- Page 48 Note: • When "Static" is selected, please ensure your PC is in the same network segment as the iSwitch 402UC. • Please wait for 2-3 minutes for the LAN module to reboot and reconnect after the network setting is changed.
- Page 49 USB C ports of the iSwitch 402UC will have ethernet access without need to connect other ethernet cables or WiFi connections. The iSwitch 402UC provides four USB network cards on USB-C and USB-B ports. This section allows users to enable/disable the USB NIC function for each port.
- Page 50 • 802.1x: Click to enable/disable 802.1x Authentication service. supports "EAP-TLS" and "EAP-MSCHAP V2" two mode. 6.7.6 System This page mainly contains system settings such as Login Password, FW Update, Configuration import and export, Restore Factory, Log. INFOBIT AV www.infobitav.com info@infobitav.com...
- Page 51 1. Login Password INFOBIT AV www.infobitav.com info@infobitav.com...
- Page 52 • Click “Upgrade” to start the upgrading. • When the upgrade is successful, the following window pops up. Click “OK” and refresh the web page to re-login web UI. Note: DO NOT power off the device during the updating process. INFOBIT AV www.infobitav.com info@infobitav.com...
- Page 53 • Import Settings: Click to import the settings file from the local PC and apply the imported settings. 4. Restore Factory Factory Default: Click to set the device to factory defaults. Reboot: Click to reboot the device. 5. Version This section shows the device’s firmware version information. 6. LOG INFOBIT AV www.infobitav.com info@infobitav.com...
- Page 54 • Export Log: Click to download the log file to the local PC. Note: Please wait for a few moments for log retrieval. 7. Dante The iSwitch 402UC supports a 2x2 Dante audio transmission. Before using the Dante function, please: • Connect all Dante devices to the same network.
Need help?
Do you have a question about the iSwitch 402UC and is the answer not in the manual?
Questions and answers