Advertisement
Quick Links
Advertisement

Subscribe to Our Youtube Channel
Related Manuals for NATHAN JAMES Jasper Bookshelf


Summary of Contents for NATHAN JAMES Jasper Bookshelf
- Page 1 Let’s build the Jasper Bookshelf SKU 67501 Scan me! Free Lifetime Warranty 24-0112...
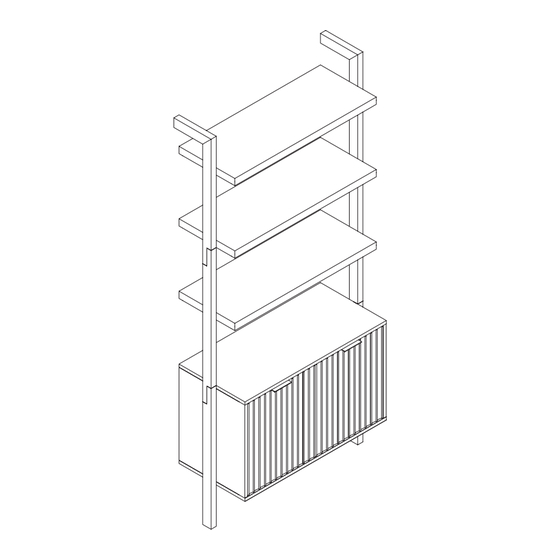
- Page 2 Ok, let’s What’s included get rolling Description Top Open Shelf Panel This should be easy, just follow Cabinet Top Panel our instructions and you will be back to Netflix in no time. Cabinet Right Side Panel Cabinet Left Side Panel Estimated time for assembly Cabinet Bottom Panel 80:00...
- Page 3 The goods...
- Page 4 What’s included Description M6*35mm Cam Bolt 1/4”*32mm Hex Button Head Bolt Flat Washer Allen key M8*30mm Wooden Dowel 15*10mm Cam Lock M4*35mm Screw 1/4”*55mm Hex Button Head Bolt Barrel Nuts Shelf Pin M4*50mm Screw Wall Anchor M3*15mm Screw Magnetic catch Hinge M4*14mm Screw M4*14mm Screw...
- Page 5 Step 1 Excited to build your new bookshelf? Let’s get started! Pick up the Right Side Panel (C) and Left Side Panel (D) and insert the M6*35mm Cam Bolts (1) into the designated holes as shown below.
- Page 6 Step 2 Now, connect the Right (C) and Left (D) Side Panels to the Top Panel (B). Use the 1/4”*32mm Hex Button Head Bolts (2), Flat Washers (3), M8*30mm Wooden Dowels (5), and the Allen Key (4) for this. Tighten them to about 75% - we’ll fully secure these later.
- Page 7 Step 3 Find the Top Stretcher (Front) (R) and attach the Magnetic Catch (14) using the M3*15mm Screws (13) x4 and your screwdriver. Tip! Door Catcher can be adjusted from front to back for proper door alignment.
- Page 8 Step 4 Take the Top Stretcher (Back) (H) and ensure the “UP” text faces towards you, not the ground. Then, See the following page for slide in both the Back (H) and Front a quick guide on how to use (R) Top Stretchers.
- Page 9 How to use Did you know? Cam locks are used to join two panels together, usually the edge of one to the flat side of another. First, your cam bolt (or cam pin) will need to be properly inserted into the flat side of the board. Important Note: Only tighten the cam bolt until it is secure.
- Page 10 Step 5 Now locate the M4*3 5mm Screws (7) x6 and screw them into their designated holes as illustrated below.
- Page 11 Step 6 Next, slide the Bottom Stretcher (Back) (I) into its place on the assembly. Secure using 15*10mm Cam Locks (6) x2.
- Page 12 Step 7 The fun part! Slide the Back Panel (G) into its slots - it fits just like a puzzle piece. Quite satisfying, isn’t it?
- Page 13 Step 8 Insert the M8*30mm Wooden Dowels (5) x4 to the top of the assembly you’ve been working on. Next insert the Barrel Nuts (9) x4 into its corresponding holes. Now grab the Cabinet Bottom Panel (E) and push it into place. You will use the Flat Washers (3) and the 1/4”*55mm Hex Button Head Bolts (8) x4 on the shorter...
- Page 14 Step 9 Let’s get the frame built! Secure the Top Vertical Support (Right) (K), Middle Vertical Support (Right) (M), and Bottom Vertical Support (Right) (O) together. Next join the Top Vertical Support (Left) (J), Middle Vertical Support (Left) (L), Bottom Vertical Support (Left) using the 1/4”*32mm Hex Button Head Bolts (2) and Flat Washers (3).
- Page 15 Step 10 Attach the assembled vertical supports to the bookshelf using M8*30mm Wooden Dowel (5), 1/4”*32mm Hex Button Head Bolts (2), and Flat Washers (3) x2. Secure them with the Allen Key (4).
- Page 16 Step 11 Secure the Top Open Shelf Panels (A) to the right supports. Ensure the holes are at the back before fastening with 1/4”*32mm Hex Button Head Bolts (2) and Flat Washers (3).
- Page 17 Step 12 It’s all coming together! Now secure the left supports using 1/4”*32mm Hex Button Head Bolts (2), Flat Washers (3), and the Allen Key (4).
- Page 18 Step 13 Choose your desired height and place the Shelf Pins (10). Then, carefully set the Shelf (F) on them. *filt shelf 35 degrees before trying to place inside the cabinet on shelf pins...
- Page 19 Step 14 Grab the Right Door (Q) and the Left Door (P). Attach the Hinges (15) x4 over the larger holes using M4*14mm Screw (16) x8 and your screwdriver.
- Page 20 Step 15 First, fix the back end of the Hinges (15) inside the bookshelf with M4*14mm Screws (16). Then, attach the Handles (18) using M4*14mm Screws (17).
- Page 21 Is your cabinet door looking crooked or unevenly spaced? Then you’ve come to the right place. Follow the illustrations below to get your cabinet door aligned and ready for action.
- Page 22 Step 16 Looking good! If the bookcase seems wobbly or uneven when placed against the wall, adjust the feet accordingly. Please check if the two doors are aligned. If they are not aligned, adjust the hinges or adjust the Wobbly or unlevel? levelers to make the doors align Adjust feet until stable! before fixing the cabinet to the wall.
- Page 23 Is your cabinet door looking crooked or unevenly spaced? (Cont.) If you’re still having trouble lining everything up, your next step should be to adjust the leveling glides to square up the cabinet and doors and make sure things are level. Follow the instructions below: If the right door appears to be hanging low, you can adjust the...
- Page 24 Step 17 Safety first! Drill three 1/4” holes in the wall, spaced 338mm apart. Position the bottom IMPORTANT NOTE: Anchor 983mm from the Drill & 1/4” drill bit are required to make the a hole to accomodate Wall Anchor (13) ground.
- Page 25 Step 18 Last but not least, grab a friend and carefully line up your bookshelf to the Wall Anchors (12) and secure using the M4*50mm Screws (11).
- Page 26 No heartburn, when we handle the return Give us a call 1-866-619-1004 or shoot us a message at help@nathanjames.com we will issue you a free replacement with zero hassle. Our way Their way Give us a call Re-package item Replacement Schedule pick up Track package Replacement...
- Page 27 Any modifications will Nathan James and its parent companies cannot present the risk of creating significant safety be held legally responsible for any injuries or issues which NJ will not be responsible for.
- Page 28 If you are happy with your product, tell your friends and family about us or even better leave us a review online. Spreading the word gives us the opportunity to make more people happy and keep our prices low for your next purchase. Brooklyn Burdon Founder, Nathan James...
Need help?
Do you have a question about the Jasper Bookshelf and is the answer not in the manual?
Questions and answers