Table of Contents
Advertisement
Available languages
Available languages
Quick Links
Technical Support
If you need any technical help, please visit our official support site and
contact our support team before returning the products:
https://support.reolink.com.
Technische Unterstützung
Wenn Sie technische Hilfe benötigen, besuchen Sie bitte unsere
offizielle Support-Website und kontaktieren Sie unser Support-Team,
bevor Sie die Produkte zurückschicken, https://support.reolink.com.
Support technique
Si vous avez besoin d'aide, veuillez contacter Reolink avant de
retourner votre produit. La plupart des questions peuvent être
répondues via notre centre de support en ligne à l'adresse
https://support.reolink.com.
Assistenza Tecnica
Se avete bisogno di assistenza tecnica, visitate il nostro sito ufficiale di
Centro Assistenza e contattate il team di supporto prima di restituire i
prodotti, https://support.reolink.com.
Soporte técnico
Si necesita cualquier ayuda técnica, por favor, consulte nuestro sitio
oficial de soporte y póngase en contacto con nuestro equipo de
soporte antes de devolver el producto: https://support.reolink.com.
REOLINK INNOVATION LIMITED
FLAT/RM 705 7/F FA YUEN COMMERCIAL BUILDING 75-77 FA YUEN
STREET MONG KOK KL HONG KONG
Product Ident GmbH
EU REP
Hoferstasse 9B, 71636 Ludwigsburg, Germany
Email: prodsg@libelleconsulting.com
APEX CE SPECIALISTS LIMITED
UK REP
Addr.: 89 Princess Street, Manchester, M14HT, UK
Email: info@apex-ce.com
May 2023
QSG1_A
58 . 03 . 0 0 5 . 0 1 0 4
Operational Instruction
Apply to: Reolink TrackMix Wired LTE
@ R e o l i n kTe c h
E N/D E /FR /I T/E S
h t t p s ://re o l i n k . c o m
Advertisement
Chapters
Table of Contents

Related Manuals for Reolink TrackMix WIRED LTE


Summary of Contents for Reolink TrackMix WIRED LTE
- Page 1 Support-Website und kontaktieren Sie unser Support-Team, bevor Sie die Produkte zurückschicken, https://support.reolink.com. Support technique Si vous avez besoin d’aide, veuillez contacter Reolink avant de retourner votre produit. La plupart des questions peuvent être répondues via notre centre de support en ligne à l’adresse https://support.reolink.com.
-
Page 2: Table Of Contents
Contents What's in the Box What's in the Box · · · · · · · · · · · · · · · · · · · · · · · · · · · · · · · · · · · · · · · · · · · · · · · · · · · 2 Camera Introduction ·... -
Page 3: Camera Introduction
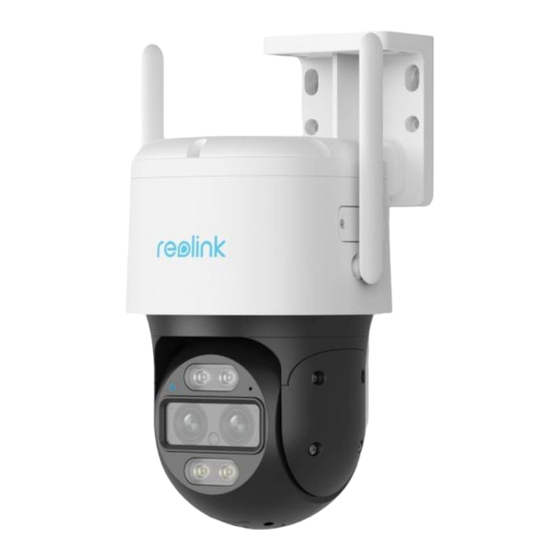
Camera Introduction Antenna Nano SIM Card Slot Mount Built-in Mic lnfrared Light Status LED Lens Daylight Sensor Spotlight Speaker Ethernet Cable Micro SD Card Slot Power Port Reset Button * Press and hold the reset button for 5s with a pin to restore factory settings. -
Page 4: Set Up The Camera
Set up the Camera Activate SIM Card for the Camera • Choose a Nano SIM card that supports WCDMA and FDD LTE. • Some SIM cards have a PIN code. You may use your smartphone to disable the PIN first. NOTE: Do not insert the IoT or M2M SIM into your smartphone. - Page 5 Register the SIM Card Step 2 Use the power adapter provided to power on the camera. With the SIM card inserted, Wait a few seconds and a red light will be on and solid for a Devices Cloud couple of seconds. Then, it will go out.
-
Page 6: Set Up The Camera On Phone
1. Check if the SIM card is facing Camera cannot “SIM card cannot be the reverse direction. Step 1 Scan to download the Reolink App from the App Store or Google recognize recognized” 2. Check if the SIM card is not Play store. -
Page 7: Install The Camera
Set up the Camera on PC (Optional) Step 1 Download and install the Reolink Client: Go to https://reolink.com > Support > App & Client. Step 2 Launch the Reolink Client, click the “... -
Page 8: Troubleshooting
• Please check whether the DC adapter is working or not. If you have another 12V DC power adapter which is working, please use another power adapter and see if it works. If these won’t work, please contact Reolink Support https://support.reolink.com Specification Dimension: 228*147*129mm Weight: 1.211KG... -
Page 9: Notification Of Compliance
Simplified EU Declaration of Conformity measures: Reolink declares that this device is in compliance with the essential • Reorient or relocate the receiving antenna. requirements and other relevant provisions of Directive 2014/53/EU. - Page 10 ISED Radiation Exposure statement Use of the product is subject to your agreement to the Terms of Service and Privacy Policy at reolink.com. Keep out of reach of children. This equipment complies with IC RSS-102 radiation exposure limits set forth for an uncontrolled environment. This equipment should be installed and operated with minimum distance 20 cm between the radiator and your body.
- Page 11 Katalog Lieferumfang Lieferumfang · · · · · · · · · · · · · · · · · · · · · · · · · · · · · · · · · · · · · · · · · · · · · · · · · · · · · · 20 Über die Kamera ·...
-
Page 12: Über Die Kamera
Über die Kamera Antenne Nano-SIM-Kartenslot Halterung Einbau-Mikrofon Infrarot-LED Status-LED Objektiv Tageslichtsensor Spotlight Lautsprecher Netzwerkkabel MicroSD-Kartenslot Strom-Port Reset-Taste *Zurück auf Werkseinstellungen: Reset-Taste mit einer Nadel etw. 5s drücken. Deutsch Deutsch... -
Page 13: Einrichten Der Kamera
Einrichten der Kamera SIM-Karte für die Kamera aktivieren • Wählen Sie eine Nano-SIM-Karte, die WCDMA und FDD LTE unterstützt. • Einige SIM-Karten haben einen PIN-Code. Sie können die PIN zuerst mit Ihrem Smartphone deaktivieren. HINWEIS: Setzen Sie die IoT- oder M2M-SIM nicht in Ihr Smartphone ein. SIM-Karte einlegen Schritt 1. - Page 14 Die SIM-Karte registrieren Schritt 2 Verwenden Sie den mitgelieferten Netzadapter, um die Kamera einzuschalten. Wenn die SIM-Karte eingelegt ist, können Sie die Kamera einschalten. Warten Sie ein paar Sekunden und ein rotes Devices Cloud Licht leuchtet für ein paar Sekunden dauerhaft auf. Dann erlischt es.
-
Page 15: Einrichten Der Kamera Auf Dem Smartphone
2. Überprüfen Sie, ob die SIM-Karte erkannt werden” nicht vollständig eingelegt ist und erkennen. Schritt 1 Scannen Sie den QR-Code, um die Reolink App aus dem App stecken Sie sie erneut ein. Store oder Google Play Store herunterzuladen. “Die SIM-Karte ist mit... -
Page 16: Kamera Montieren
Einrichten der Kamera auf dem PC (optional) Schritt 1 Laden Sie den Reolink Client herunter und installieren Sie ihn: Gehen Sie zu https://reolink.com > Support > App & Client. Schritt 2 Starten Sie den Reolink Client, klicken Sie auf die Schaltfläche 1. -
Page 17: Fehlersuche
Sie einen anderen Netzadapter und prüfen Sie, ob die Kamera funktioniert. Bleibt es ungelöst, kontaktieren Sie bitte Reolink Support: https://support.reolink.com Spezifikation Dimensionen: 228*147*129mm Gewicht: 1,211kg Arbeitstemperature: -10°C~+55°C (14°F~131°F) Arbeitsfeuchtigkeit: 10%~90% Weitere Spezifikationen finden Sie auf der offiziellen Website von Reolink. Deutsch Deutsch... -
Page 18: Konformitätserklärung
Störungen auftreten. Wenn das Gerät zu Störungen des Radio- oder Fernsehempfangs führt, was durch Ein- und Ausschalten des Geräts Reolink erklärt, dass dieses Gerät mit den grundlegenden Anforderungen festgestellt werden kann, sollte der Benutzer versuchen, die Störungen und anderen relevanten Bestimmungen der Richtlinien 2014/53/EU und durch eine oder mehrere der folgenden Maßnahmen zu beheben:... - Page 19 Dieses Produkt wird mit einer eingeschränkten 2-Jahres-Garantie gelief- lizenzbefreiten RSS-Standard(s) von Innovation, Science and Economic ert, die nur gültig ist, wenn es im offiziellen Reolink-Shop oder bei einem Development Canada entsprechen. Der Betrieb unterliegt den folgenden autorisierten Reolink-Händler gekauft wird. Mehr: zwei Bedingungen: https://reolink.com/warranty-and-return/.
- Page 20 Table des Matières Contenu de la boîte Contenu de la boîte · · · · · · · · · · · · · · · · · · · · · · · · · · · · · · · · · · · · · · · · · · · · · · · · 38 Présentation de la caméra ·...
-
Page 21: Présentation De La Caméra
Présentation de la caméra Antenne fentes pour cartes Nano SIM Support Micro intégré Lumière infrarouge LED d’état Lentille Capteur de lumière du jour Intervenants Spot Fente pour carte micro SD Câble Ethernet Bouton de réinitialisation * Appuyez sur le bouton de Port d’alimentation réinitialisation et maintenez-le enfoncé... -
Page 22: Mise En Place De La Caméra
Mise en place de la caméra Activer la carte SIM pour la caméra • Choisissez une carte Nano SIM qui prend en charge WCDMA et FDD LTE. • Certaines cartes SIM ont un code PIN. Vous pouvez utiliser votre smartphone pour désactiver le code PIN en premier lieu. REMARQUE : N’insérez pas la carte SIM IoT ou M2M dans votre smartphone. - Page 23 Enregistrer la carte SIM Étape 2 Utilisez l’adaptateur d’alimentation fourni pour mettre la caméra sous tension. Une fois la carte SIM insérée, attendez quelques secondes et un voyant rouge s’allume et reste allumé pendant Devices Cloud quelques secondes. Il s’éteint ensuite. You haven't added any device.
-
Page 24: Configuration De La Caméra Sur Téléphone
La carte SIM ne peut reconnaître cette carte 2. Vérifiez si la carte SIM n’est » pas être reconnue Étape 1 Téléchargez l’application Reolink à partir de l’App Store ou du SIM. pas complètement insérée et insérez-la à nouveau. Google Play Store. -
Page 25: Installation La Caméra
Installation de la caméra sur un PC (en option) Étape 1 Téléchargez et installez le Reolink Client : Allez sur https://reolink. com > Support > App & Client. Étape 2 Lancez le client Reolink, cliquez sur le bouton “... -
Page 26: Dépannage
Si cela ne fonctionne pas, veuillez contacter le service d’assistance de Reolink à l’adresse https://support.reolink.com. Caractéristiques Dimension : 228*147*129mm Poids : 1.211KG Température de fonctionnement : -10°C~+55°C (14°F~131°F) Humidité de fonctionnement : 10%~90% Pour plus de détails, visitez le site officiel de Reolink. Français Français... -
Page 27: Notification De Conformité
• Réorienter ou déplacer l’antenne de réception. • Augmenter la distance entre l’équipement et le récepteur. Reolink déclare que ce produit est conforme aux réglementations sur les • Brancher l’appareil sur une prise de courant d’un circuit différent de équipements radio 2017 et sur la compatibilité électromagnétique 2016. - Page 28 Ce produit est assorti d’une garantie limitée de 2 ans qui n’est valable (1) Cet appareil ne doit pas provoquer d’interférences. que s’il est acheté dans la boutique officielle de Reolink ou auprès d’un (2) Cet appareil doit accepter toute interférence, y compris les revendeur agréé...
- Page 29 Indice Cosa c’è nella confezione Cosa c’è nella confezione · · · · · · · · · · · · · · · · · · · · · · · · · · · · · · · · · · · · · · · · · · · 56 Introduzione alla telecamera ·...
-
Page 30: Introduzione Alla Telecamera
Introduzione alla telecamera Antenna Slot per scheda Nano SD Supporto Microfono incorporato Luce infrarossa LED di stato Obiettivo Sensore di luce diurna Faretto Altoparlante Cavo Ethernet Slot per scheda Micro SD Porta di alimentazione Pulsante di reset * Tenere premuto il pulsante di reset per 5 secondi con uno spillo per ripristinare le impostazioni di fabbrica. -
Page 31: Configurazione Della Telecamera
Configurazione della telecamera Attivare la scheda SIM per la telecamera • Scegliete una scheda Nano SIM che supporti WCDMA e FDD LTE. • Alcune schede SIM dispongono di un codice PIN. È possibile utilizzare lo smartphone per disattivare il PIN. NOTA: Non inserire la SIM IoT o M2M nello smartphone. - Page 32 Registrazione della scheda SIM Step 2 Per accendere la telecamera, utilizzare l’adattatore di alimentazione fornito in dotazione. Con la scheda SIM inserita, attendere qualche secondo e una luce rossa si accenderà e rimarrà fissa per un Devices Cloud paio di secondi. Poi si spegnerà.
-
Page 33: Configurazione Della Telecamera Sul Telefono
2.Controlla che la scheda SIM riconosciuta” questa scheda SIM. non sia completamente inserita e Step 1 Eseguire la scansione per scaricare l’applicazione Reolink dall’App inseriscila di nuovo. Store o da Google Play Store. Inserisci la scheda SIM nel “La scheda SIM è... -
Page 34: Installazione Della Telecamera
Impostazione della telecamera sul PC (facoltativo) Step 1 Scaricare e installare il client Reolink: Accedere a https://reolink. com > Supporto > App e client. Step 2 Avviare il client Reolink, fare clic sul pulsante “... -
Page 35: Risoluzione Dei Problemi
Se non funzionano, contattare l’assistenza Reolink https://support.reolink.co.m Specifiche tecniche Dimensione: 228*147*129mm Peso: 1.211KG Temperatura di funzionamento: -10°C~+55°C (14°F~131°F) Umidità di funzionamento: 10%~90% Per ulteriori specifiche, visitare il sito Web ufficiale di Reolink. Italiano Italiano... -
Page 36: Avviso Di Conformità
Dichiarazione di conformità CE Tuttavia, non vi è alcuna garanzia che non si verifichino interferenze Reolink dichiara che questo dispositivo è conforme ai requisiti essenziali in una particolare installazione. Se questa apparecchiatura causa e alle altre disposizioni pertinenti della Direttiva 2014/53/UE e della interferenze dannose alla ricezione radio o televisiva, che possono essere Direttiva 2014/30/UE. - Page 37 Questo prodotto è dotato di una garanzia limitata di 2 anni, valida solo che sono conformi agli RSS esenti da licenza di Innovation, Science and se acquistato presso lo store ufficiale Reolink o un rivenditore autorizzato Economic Development Canada. Il funzionamento è soggetto alle due Reolink.
- Page 38 Índice Contenido de la caja Contenido de la caja · · · · · · · · · · · · · · · · · · · · · · · · · · · · · · · · · · · · · · · · · · · · · · · 74 Presentación de la cámara ·...
-
Page 39: Presentación De La Cámara
Presentación de la cámara Antena Ranura para tarjeta Nano SIM Base Micrófono incorporado Luz infrarroja LED de estado Objetivo Sensor de luz diurna Foco Altavoz Cable Ethernet Ranura para tarjeta micro SD Puerto de alimentación Botón de restablecimiento * Mantenga pulsado el botón de restablecimiento durante 5s con una aguja para restablecer la configuración de fábrica. -
Page 40: Configurar La Cámara
Configurar la cámara Activar la tarjeta SIM para la cámara • Elija una tarjeta Nano SIM compatible con WCDMA y FDD LTE. • Algunas tarjetas SIM tienen un código PIN. Puede utilizar su teléfono inteligente para desactivar primero el PIN. NOTA: No inserte la SIM IoT o M2M en su teléfono inteligente. - Page 41 Registrar la tarjeta SIM Paso 2 Utilice el adaptador de corriente suministrado para encender la cámara. Con la tarjeta SIM insertada, espere unos segundos y una luz roja estará encendida y fija Devices Cloud durante par de segundos. Después se apagará. You haven't added any device.
-
Page 42: Configurar La Cámara En El Teléfono
1. Compruebe si la tarjeta SIM está La cámara no puede orientada en sentido inverso. “No se reconoce la Paso 1 Escanee para descargar la App Reolink desde la App Store o reconocer esta tarjeta 2. Compruebe si la tarjeta SIM no tarjeta SIM.”... -
Page 43: Instalar La Cámara
3. Para ajustar la dirección de la cámara, puede controlar el movimiento horizontal y vertical de la cámara a través de la App o Client Reolink. NOTA: Utilice los anclajes para paneles de yeso incluidos en el paquete si es necesario. -
Page 44: Solución De Problemas
• Compruebe si el adaptador de CC funciona correctamente. Si tiene otro adaptador de corriente de 12 V CC que funcione, utilice otro adaptador de adaptador de corriente y compruebe si funciona. Si no funciona, por favor póngase en contacto con el Soporte de Reolink https://support.reolink.com Especificaciones Dimensión: 228*147*129 mm... -
Page 45: Notificación De Cumplimiento
Sin embargo, no hay ninguna garantía de que no habrá interferencias en una instalación determinada. Si el equipo causa interferencia dañina a la Reolink declara que este dispositivo cumple los requisitos esenciales y recepción de radio o televisión, lo cual se puede determinar encendiendo... - Page 46 El uso del producto está sujeto a la aceptación de los Términos de deseado. Servicio y la Política de Privacidad en reolink.com. Mantenga el producto fuera del alcance de los niños. Declaración de exposición a la radiación ISED Este equipo cumple con los límites de exposición a la radiación IC RSS-...
Need help?
Do you have a question about the TrackMix WIRED LTE and is the answer not in the manual?
Questions and answers