Table of Contents
Advertisement
Item# 1001748812
Model# A102023900
USE AND CARE GUIDE
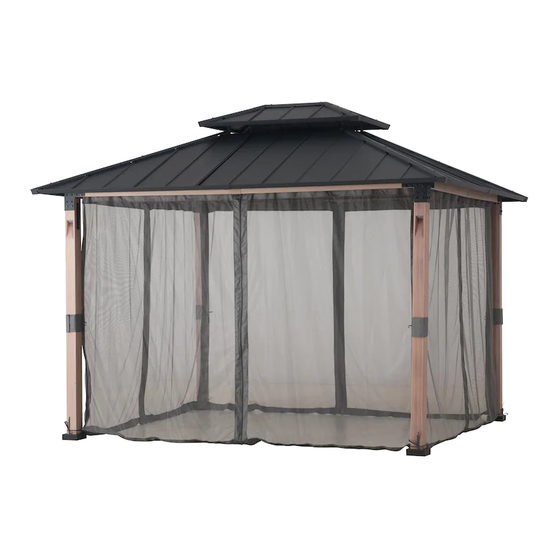
WINFIELD 12 FT X 10 FT HARDTOP GAZEBO
WITH NETTING AND LED LIGHTS
Questions, problems, missing parts? Before returning to the store,
call Hampton Bay Customer Service
8 a.m. - 7 p.m., EST, Monday-Friday, 9 a.m. - 6 p.m., EST, Saturday
1-800-841-1350
WWW.HOMEDEPOT.CA
THANK YOU
We appreciate the trust and confidence you have placed in Hampton Bay through the purchase of this gazebo. We strive to continually create quality products
designed to enhance your home. Visit us online to see our full line of products available for your home improvement needs. Thank you for choosing Hampton
Bay!
Advertisement
Table of Contents

Related Manuals for HAMPTON BAY WINFIELD A102023900


Summary of Contents for HAMPTON BAY WINFIELD A102023900
- Page 1 THANK YOU We appreciate the trust and confidence you have placed in Hampton Bay through the purchase of this gazebo. We strive to continually create quality products designed to enhance your home. Visit us online to see our full line of products available for your home improvement needs. Thank you for choosing Hampton...
-
Page 2: Table Of Contents
Table of Contents Table of Contents ............2 Hardware Included ................. 5 Important Safety Instructions ........2 Package Contents ................6 Warranty ................. 2 Assembly ............... 9 Pre-Assembly ..............4 Care and Cleaning ............34 Planning Assembly ................. 4 Important Safety Instructions SAVE THESE INSTRUCTIONS READ ALL INSTRUCTIONS BEFORE USE To reduce the risk of injury to persons:... -
Page 3: Pre-Assembly
2 YEAR WARRANTY WHAT IS COVERED This limited warranty is extended to the original purchaser and applies to defects in materials and workmanship of your item provided the item is maintained with care and used only for personal, residential purposes. The item is warranted to be free from defects in material or workmanship for a period of 2 years. -
Page 4: Hardware Included
Pre-Assembly (continued) HARDWARE INCLUDED NOTE: Hardware not shown to actual size. Part Part Number Description Quantity H100010047 Bolt M6*20 with Washer 262+13 H100010059 Bolt M6*45 with Washer 12+1 H100010100 Bolt M8*20 with Washer 40+2 H050050018 M6 Rubber Washer 12+1 H990010010 Plastic Buckle 12+1 H990050001... -
Page 5: Package Contents
Pre-Assembly (continued) PACKAGE CONTENTS WWW.HOMEDEPOT.CA Please contact 1-800-841-1350 for further assistance. - Page 6 Pre-Assembly (continued) PACKAGE CONTENTS WWW.HOMEDEPOT.CA Please contact 1-800-841-1350 for further assistance.
- Page 7 Pre-Assembly (continued) PACKAGE CONTENTS Part Number Part Description Quantity P00020073001 Post 1 P00020073101 Post 2 P00610026601 Base Cover P00010025401 Post Base P00040136601 Long Cross Beam for Short Side P00040136701 Short Cross Beam for Short Side P00040136801 Long Cross Beam for Long Side P00040136901 Short Cross Beam for Long Side P00050175901...
- Page 8 Pre-Assembly (continued) PACKAGE CONTENTS Part Number Part Description Quantity P00060309901 Small Roof Long Panel Flashing P00070117101 Small Roof Side Roof Panel 1 P00070116901 Small Roof Side Roof Panel 2 P00080042801 Small Roof Rafter Cap P00090018901 Top Cover P00060310201 Big Roof Short Small Beam P00060310301 Big Roof Long Small Beam P00570054801...
-
Page 9: Assembly
Assembly Attaching the Post Base □ Put the base cover (C) on the post 1/2/3 (A/B/BB). □ Insert the post base (D) to the post 1/2/3 (A/B/BB) using bolts (H1). □ Use the wrench (HW1) to tighten the bolts. NOTE: To avoid destroying the finish, do not put the parts on the ground directly. STEP 1 STEP 2 WWW.HOMEDEPOT.CA... - Page 10 Assembly (continued) Connecting the Rafter Beam Connector and Post Cap □ Insert the rafter beam connector (L) into the post 1/2/3 (A/B/BB). □ Connect the rafter beam connector (L), the post cap (M), and post the 1/2/3 (A/B/BB) using bolts (H3) □...
- Page 11 Assembly (continued) Connecting the Beams □ Insert the cross beam connector (K) into the short cross beam for the short side (F) using bolts (H1). □ Connect the assembled cross beam connector (K) with the long cross beam for the short side (E) using bolts (H1). □...
- Page 12 Assembly (continued) Attaching the Cross Beam and Post and Post Cap □ Connect the long cross beam for the short side (E) to the post 2/3 (B/BB), connect the short cross beam for the short side (F) to the post 1 (A) using bolts (H1), use the wrench (HW1) to tighten the bolts.
- Page 13 Assembly (continued) Attaching the Cross Beam and Post and Post Cap □ Connect the short cross beam for the long side (J) with the post 2/3(B/BB), connect the long cross beam for the long side (G) with the post 1 (A) using bolts (H1), use the wrench (HW1) to tighten the bolts.
- Page 14 Assembly (continued) Attaching the Big Roof Long Frame and Big Roof Short Frame and Big Roof Corner Frame □ Insert the big roof corner frame (Q) into the big roof short frame (P), the big roof corner frame (Q), connect them using bolts (H1), use the wrench (HW1) to tighten the bolts NOTE: To avoid destroying the finish, do not put the parts on the ground directly.
- Page 15 Assembly (continued) Attaching the Rafter and Beam Connector 1 □ Connect the rafter (R) with beam connector 1 (BD) using bolts (H1). □ Use wrench (HW1) to tighten the bolts. NOTE: To avoid destroying the finish, do not put the parts on the ground directly. WWW.HOMEDEPOT.CA Please contact 1-800-841-1350 for further assistance.
- Page 16 Assembly (continued) Attaching the Rafter □ Connect the rafter (R) with the rafter beam connector (L) using bolts (H1) □ Connect the rafter (R) with the big roof long/short beam (P/N), big roof corner frame (Q) using bolts (H1). □ Use wrench (HW1) to tighten the bolts.
- Page 17 Assembly (continued) Attaching the Middle Beam and Middle Beam Connector □ Connect the middle beam (S) with the middle beam connector (T) using bolts (H1). □ Use wrench (HW1) to tighten the bolts. NOTE: To avoid destroying the finish, do not put the parts on the ground directly. WWW.HOMEDEPOT.CA Please contact 1-800-841-1350 for further assistance.
- Page 18 Assembly (continued) Attaching the Middle Beam and Middle Beam Connector □ Connect the middle beam (S) with the long/short cross beam for the short side (E/F), long/short cross beam for the long side (G/J) using bolts (H1). □ Connect the middle beam (S) with the big roof long/short frame (N/P) using the bolts (H1). □...
- Page 19 Assembly (continued) Attaching the Small Roof Rafter and Small Connector and Hook □ Insert the small roof rafter (U) into the small connector (V) using bolts (H1). □ Connect the hook (W) with the small connect (V). □ Use wrench (HW1) to tighten the bolts. NOTE: To avoid destroying the finish, do not put the parts on the ground directly.
- Page 20 Assembly (continued) Attaching the Small Roof Rafter and Big Roof Corner Frame Insert and connect the small roof rafter (U) to the big roof corner frame (Q) using bolts (H1). □ Use wrench (HW1) to tighten the bolts. □ NOTE: To avoid destroying the finish, do not put the parts on the ground directly. STEP 2 STEP 1 WWW.HOMEDEPOT.CA...
- Page 21 Assembly (continued) Attaching the Small Roof Short Panel Flashing and Small Roof Long Panel Flashing □ Connect the small roof rafter (U) with the small roof short/long panel flashing (X/Y) using bolts (H1), □ Use wrench (HW1) to tighten the bolts. NOTE: To avoid destroying the finish, do not put the parts on the ground directly.
- Page 22 Assembly (continued) Attaching the Small Roof Side Roof Panel 1/2 □ Connect the small roof side roof panel 1 (AA) with the small roof long panel flashing (Y) using the bolts (H1). □ Connect the small roof side roof panel 2 (AB) with the small roof short panel flashing (X) using the bolts (H1). □...
- Page 23 Assembly (continued) Attaching the Small Roof Rafter Cap and Top Cover □ Connect the small roof rafter cap (AC) with the small roof rafter (U) using plastic buckle (HH2), bolts (H2). □ Connect the top cover (AD) with the small connector (V) using bolts (H1). □...
- Page 24 Assembly (continued) Attaching the Big Roof Short Small Beam and Big Roof Long Small Beam □ Connect the big beam connector 2 (BE) with the big roof short/long small beam (AE/AF), the middle beam (S) using bolts (H1). □ Connect the big beam connector 1 (BD) with the big roof short/long small beam (AE/AF) using bolts (H1). □...
- Page 25 Assembly (continued) Attach the Mosquito Netting Rod □ Connect the short mosquito netting rod 1/2 (AG/AJ) with the rafter (R), middle beam (S) using bolts (H1). □ Connect the long mosquito netting rod 1/2 (AK/AL) with the rafter (R), middle beam (S) using bolts (H1). □...
- Page 26 Assembly (continued) Attaching the Panel Flashing □ Insert the bean connector 2 (BE) into big roof left/right short panel flashing (AM/AN), big roof left/right long panel flashing (AP/AQ). □ Connect the bean connector 2 (BE) and middle beam cap (BF) with the middle beam (S) using bolts (H1). □...
- Page 27 Assembly (continued) Attaching the Roof Panel □ As shown in the picture, place the big roof left/right small roof panel (AR/AS), the big roof left/right middle roof panel (AT/AU), the big roof left/right roof panel (AV/AW), the big roof middle roof panel (AX) are stacked one after the other. NOTE: To avoid destroying the finish, do not put the parts on the ground directly.
- Page 28 Assembly (continued) Attaching the Roof Panel □ Connect the big roof right/left small roof panel (AR/AS), the big roof left/right middle roof panel (AT/AU), the big roof left/right roof panel (AV/AW) with the big roof left/right short panel flashing (AM/AN) using bolts (H1). □...
- Page 29 Assembly (continued) Attaching the Big Roof Rafter Cap □ Connect the big roof rafter cap (AY) with rafter (R) using rubber washer (HH1) and the bolts (H2). □ Use wrench (HW1) to tighten the bolts. NOTE: To avoid destroying the finish, do not put the parts on the ground directly. STEP 1 STEP 2 WWW.HOMEDEPOT.CA...
- Page 30 Assembly (continued) Attaching the Mosquito Netting □ Hang the ring (HR) on the mosquito net (BA), and then hang them on the short mosquito net rod 1/2 (AG/AJ) and the long mosquito net rod 1/2 (AK/AL). □ Tie the strap of the mosquito net (BA) to the post 1/2/3 (A/B/BB). □...
- Page 31 Assembly (continued) Attaching the Stake Bases □ Lift the base covers (D) and secure the assembled gazebo using stakes (HS). NOTE: To avoid destroying the finish, do not put the parts on the ground directly. WWW.HOMEDEPOT.CA Please contact 1-800-841-1350 for further assistance.
- Page 32 Assembly (continued) Attaching the Remote Control □ Attach the remote control (BC) to the post 3 (BB) using screw (pre-assembled on BC) NOTE: To avoid destroying the finish, do not put the parts on the ground directly. WWW.HOMEDEPOT.CA Please contact 1-800-841-1350 for further assistance.
- Page 33 Assembly (continued) Attaching the Batteries □ Slide down the battery cover on each post (A/B/BB) and put (3) AA batteries into the battery case. NOTE: The batteries are not included and needs to be purchased by the customer. Total of (12) AA batteries are required for gazebo. (3) AA A/B/BB WWW.HOMEDEPOT.CA...
-
Page 34: Care And Cleaning
Care and Cleaning □ Steel components for this gazebo are treated with rust inhibiting paint that protects it from rusting. However, due to the nature of steel, surface oxidation (rusting) will occur if these protective coatings are scratched. This is not a defect and thus not covered by the warranty. - Page 35 Questions, problems, missing parts? Before returning to the store, call Hampton Bay Customer Service 8 a.m. – 7 p.m., EST, Monday – Friday, 9 a.m. – 6 p.m., EST, Saturday 1-800-841-1350 WWW.HOMEDEPOT.CA Retain this manual for future use.
Need help?
Do you have a question about the WINFIELD A102023900 and is the answer not in the manual?
Questions and answers
Where does the plastic buckle go HH2 on page 23 section 15
The plastic buckle (HH2) is used to connect the small roof rafter cap (AC) with the small roof rafter (U).
This answer is automatically generated
i have a damaged roof panel (based on the manual looks like the AN) how can i get a replacement part?
To get a replacement roof panel for the HAMPTON BAY WINFIELD A102023900, contact Hampton Bay Customer Service at 1-800-841-1350. They are available Monday–Friday from 8 a.m. to 7 p.m. EST and Saturday from 9 a.m. to 6 p.m. EST.
This answer is automatically generated