Table of Contents
Advertisement
Quick Links
Item# 1005759467
Model# A101014900
USE AND CARE GUIDE
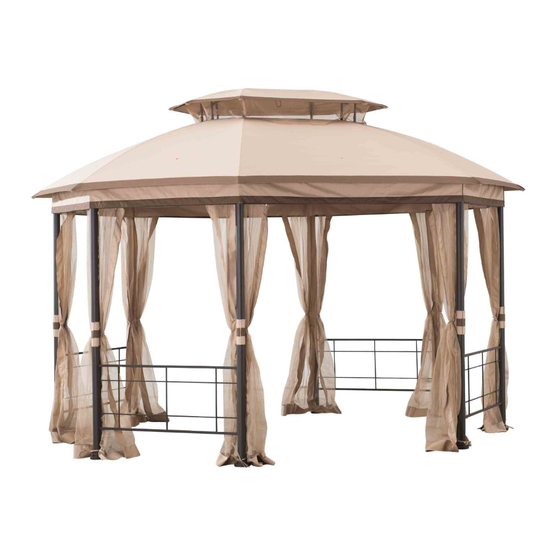
SEAGROVE 10 FT. X 12 FT. OCTAGONAL GAZEBO
Questions, problems, missing parts? Before returning to the store,
call Hampton Bay Customer Service
8 a.m. - 7 p.m., EST, Monday-Friday, 9 a.m. - 6 p.m., EST, Saturday
1-800-841-1350
HAMPTONBAY.COM
THANK YOU
We appreciate the trust and confidence you have placed in Hampton Bay through the purchase of this gazebo. We strive to continually create quality products
designed to enhance your home. Visit us online to see our full line of products available for your home improvement needs. Thank you for choosing Hampton
Bay!
Advertisement
Table of Contents

Related Manuals for HAMPTON BAY SEAGROVE A101014900


Summary of Contents for HAMPTON BAY SEAGROVE A101014900
- Page 1 THANK YOU We appreciate the trust and confidence you have placed in Hampton Bay through the purchase of this gazebo. We strive to continually create quality products designed to enhance your home. Visit us online to see our full line of products available for your home improvement needs. Thank you for choosing Hampton...
-
Page 2: Table Of Contents
Table of Contents Table of Contents............... 2 Hardware Included ............4 Safety Information ............2 Package Contents .............. 5 Warranty ................. 3 Assembly ................. 7 Pre-Assembly ..............3 Care and Cleaning ............22 Planning Assembly ............3 Safety Information SAVE THESE INSTRUCTIONS READ ALL INSTRUCTIONS BEFORE USE 13. -
Page 3: Warranty
Warranty 2 YEAR WARRANTY WHAT IS COVERED This limited warranty is extended to the original purchaser and applies to defects in materials and workmanship of your item provided the item is maintained with care and used only for personal, residential purposes. The item is warranted to be free from defects in material or workmanship for a period of 2 years. -
Page 4: Hardware Included
Pre-Assembly (continued) HARDWARE INCLUDED NOTE: Hardware not shown to actual size. Part Part Number Description Quantity H100010057 Bolt M6*20 56+3 H050030001 Flat Washer M6 H070010003 Stake Φ8*180 P005100264 Ring 52+3 H100010058 Bolt M6*50 H040010004 Nut M6 H090010017 Wrench M6 HAMPTONBAY.COM Please contact 1-800-841-1350 for further assistance. -
Page 5: Package Contents
Pre-Assembly (continued) PACKAGE CONTENTS HAMPTONBAY.COM Please contact 1-800-841-1350 for further assistance. - Page 6 Pre-Assembly (continued) PACKAGE CONTENTS Part Number Part Description Quantity P000200224 Top Post P000200338 Bottom post 1 P000200409 Bottom post 2 P000401120 Left long screen P000401121 Right long screen P000400709 Short screen P000600366 Upper oblique beam P000600788 Bottom oblique beam P005700788 Adjust tube P000400288 Large roof short tube...
-
Page 7: Assembly
Assembly Assembling the Post □ Insert the bottom post (A2&A3) to the top posts (A1) using bolts (AA). Tighten them the bolts using the wrench (Z1). NOTE: To avoid destroying the finish, do not put the parts on the ground directly. HAMPTONBAY.COM Please contact 1-800-841-1350 for further assistance. - Page 8 Assembly (continued) Overview of assembling the 4 sets of Short Screens and Panels □ Please review below picture for the overview position of the parts in the following step. NOTE: Please pay close attention to the post direction and follow the instruction carefully before connecting the panels with the post. Toward snap hole inside Toward “Out”...
- Page 9 Assembly (continued) Continuing Assembly of the 4 sets of Short Screens and Panels □ Assemble the panels (L) to the post (A2&A3) using bolts (AA). Tighten them the bolts using the wrench (Z1). □ Assemble the short screens (C) to the top post (A1) using bolt (AA). Tighten them the bolts using the wrench (Z1). NOTE: Please note there are total six of short screens (C) for the whole gazebo, but you only need to assemble four of them at this The remaining two will be assembled in Step 4.
- Page 10 Assembly (continued) Assembling the Long Screens □ Connect the left long screen (B1) with right long screen (B2) using a bolt (EE), washer (BB) and nut (FF), tighten using the wrench (Z1). NOTE: To avoid destroying the finish, do not put the parts on the ground directly. HAMPTONBAY.COM Please contact 1-800-841-1350 for further assistance.
- Page 11 Assembly (continued) Attaching the assembled Long Screen and Short Screen □ Attach the assembled long screen (B1&B2) and the remaining two short screens (C) to the top post (A1) using bolts (AA). Tighten using the wrench (Z1). NOTE: To avoid destroying the finish, do not put the parts on the ground directly. HAMPTONBAY.COM Please contact 1-800-841-1350 for further assistance.
- Page 12 Assembly (continued) Assembling the Large Roof Frame □ Lock the large roof tubes (E1&E2) and large roof connectors (F) together until they click into place. NOTE: To avoid destroying the finish, do not put the parts on the ground directly. HAMPTONBAY.COM Please contact 1-800-841-1350 for further assistance.
- Page 13 Assembly (continued) Assembling the Upper Oblique Tube and Bottom Oblique Tube □ Lock each upper oblique tube (D1) and the bottom oblique tube (D2) together until they click into place. Then lock the end of each bottom oblique tube (D2) and the adjust tube (D3) together until they click into place.
- Page 14 Assembly (continued) Attaching the Big Roof □ Lock the assembled upper oblique beams (D1) and the large roof connector (F) together until they click into place. Then lock the assembled bottom oblique tubes (D2) and the upper posts (A1) together until they click into place. NOTE: To avoid destroying the finish, do not put the parts on the ground directly.
- Page 15 Assembly (continued) Attaching the Large Roof Canopy □ Put the large roof canopy (N) on the assembled big roof, do not tighten the canopy. NOTE: To avoid destroying the finish, do not put the parts on the ground directly. HAMPTONBAY.COM Please contact 1-800-841-1350 for further assistance.
- Page 16 Assembly (continued) Assembling the Small Roof □ Lock the small roof oblique beams (G) to the small roof connector (H) until they click into place. NOTE: To avoid destroying the finish, do not put the parts on the ground directly. HAMPTONBAY.COM Please contact 1-800-841-1350 for further assistance.
- Page 17 Assembly (continued) Attaching the Small Roof Canopy □ Put the small roof canopy (M) on the small roof and align the corners. NOTE: Remove canopy during harsh weather including high winds, rain and snow. HAMPTONBAY.COM Please contact 1-800-841-1350 for further assistance.
- Page 18 Assembly (continued) Attaching the Assembled Small Roof and Hook □ Attach the assembled small roof on the big roof, lock the small roof oblique beam (G) and the large roof connector (F) until they click into place. Screw the hook (I) into the small roof connector (H).
- Page 19 Assembly (continued) Spreading the Big Canopy □ To begin to spread the canopy (N), locate the sewing label and place in center as illustrated below. □ Spread the large roof canopy (N), attach the corner (without handle) to the adjust tube (D3), then attach the final canopy corner (with handle) to the adjust tube (D3).
- Page 20 Assembly (continued) Attaching the Mosquito Netting □ Hang the mosquito netting (O) to the netting tube with rings (DD). NOTE: Ensure you match the zippers for the different panels as shown. Match the zipper for different panels as shown HAMPTONBAY.COM Please contact 1-800-841-1350 for further assistance.
- Page 21 Assembly (continued) Securing the Gazebo □ Secure the assembled gazebo to the lawn with the stakes (EE). □ It is recommended for anchoring on wood or concreate surface for more stability using setscrews (Purchased separately). NOTE: To avoid destroying the finish, do not put the parts on the ground directly. HAMPTONBAY.COM Please contact 1-800-841-1350 for further assistance.
-
Page 22: Care And Cleaning
Care and Cleaning □ Check all screws and nuts periodically for tightness, fastening them again as required. □ Disassemble the gazebo in the reverse order of the assembly steps. Always disassemble the gazebo completely. A partially disassembled gazebo is not stable enough to resist wind and bad weather, and therefore can be damaged and/or cause damage. □... - Page 23 Questions, problems, missing parts? Before returning to the store, call Hampton Bay Customer Service 8 a.m. – 7 p.m., EST, Monday – Friday, 9 a.m. – 6 p.m., EST, Saturday 1-800-841-1350 HAMPTONBAY.COM Retain this manual for future use.
Need help?
Do you have a question about the SEAGROVE A101014900 and is the answer not in the manual?
Questions and answers