Advertisement
Quick Links
Item# 1000 812 320
Model# A103000201
USE AND CARE GUIDE
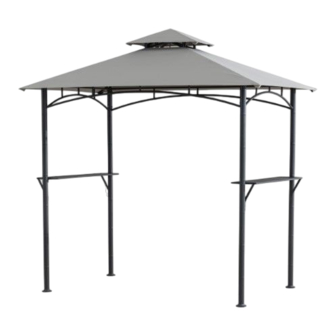
HB-TIKI GRILL GAZEBO
Questions, problems, missing parts? Before returning to the store,
call Hampton Bay Customer Service
8 a.m. - 7 p.m., EST, Monday-Friday, 9 a.m. - 6 p.m., EST, Saturday
1-800-841-1350
WWW.HOMEDEPOT.CA
THANK YOU
We appreciate the trust and confidence you have placed in Hampton Bay through the purchase of this Gazebo. We strive to continually create quality
products designed to enhance your home. Visit us online to see our full line of products available for your home improvement needs. Thank you for
choosing Hampton Bay!
Advertisement

Related Manuals for HAMPTON BAY A103000201


Summary of Contents for HAMPTON BAY A103000201
- Page 1 THANK YOU We appreciate the trust and confidence you have placed in Hampton Bay through the purchase of this Gazebo. We strive to continually create quality products designed to enhance your home. Visit us online to see our full line of products available for your home improvement needs. Thank you for...
-
Page 2: Table Of Contents
Table of Contents Table of Contents ............2 Hardware Included ..............4 Important Safety Instructions ........2 Package Contents ..............5 Warranty ................. 3 Assembly ............... 7 Pre-Assembly ..............4 Care and Cleaning ............19 Planning Assembly ..............4 Important Safety Instructions SAVE THESE INSTRUCTIONS WARNING: Keep all flame and heat sources away from the tent fabric. -
Page 3: Warranty
Warranty 2 YEAR WARRANTY WHAT IS COVERED This limited warranty is extended to the original purchaser and applies to defects in materials and workmanship of your item provided the item is maintained with care and used only for personal, residential purposes. The item is warranted to be free from defects in material or workmanship for a period of 2 years. -
Page 4: Pre-Assembly
Pre-Assembly PLANNING ASSEMBLY Before beginning assembly of this product, make sure all parts are present. Compare parts with the Hardware Included and Package Contents lists. If any part is missing or damaged, do not attempt to assemble the product. Contact customer service for replacement parts. -
Page 5: Package Contents
Pre-Assembly (continued) PACKAGE CONTENTS WWW.HOMEDEPOT.CA Please contact 1-800-841-1350 for further assistance. - Page 6 Pre-Assembly (continued) Part Part Number Description Quantity P000200349 Pole 1 P000200350 Pole 2 P000400733 Long Screen P000400734 Short Screen P000601114 Oblique Pole P000500890 Big Center Connector P000500889 Small Center Connector P000601113 Small Top Pole P002100228 Shelf P005000295 Support Bar P005800001 Hook P001100436 Small Canopy...
-
Page 7: Assembly
Assembly Assembling the Post and Long Screen □ Connect the long screen (B) to the poles (A1&A2) using bolts (AA), spring washers (HH) and flat washers (BB).. NOTE: To avoid destroying the finish, do not put the parts on the ground directly. WWW.HOMEDEPOT.CA Please contact 1-800-841-1350 for further assistance. - Page 8 Assembly (continued) Assembling the Short Screen □ Connect the short screens (C) to the poles (A1&A2) using bolts (AA), spring washers (HH) and flat washers (BB). NOTE: To avoid destroying the finish, do not put the parts on the ground directly. WWW.HOMEDEPOT.CA Please contact 1-800-841-1350 for further assistance.
- Page 9 Assembly (continued) Attaching the Upper post □ Insert the oblique poles (D) into the big center connector (E). NOTE: To avoid destroying the finish, do not put the parts on the ground directly. WWW.HOMEDEPOT.CA Please contact 1-800-841-1350 for further assistance.
- Page 10 Assembly (continued) Attaching the Big Roof □ Connect the oblique poles (D) to the poles (A1&A2) using bolts (CC), flat washers (BB) and screw caps (DD). NOTE: To avoid destroying the finish, do not put the parts on the ground directly. WWW.HOMEDEPOT.CA Please contact 1-800-841-1350 for further assistance.
- Page 11 Assembly (continued) Assembling the Small Roof □ Insert the small top poles (G) to the small center connector (F). NOTE: To avoid destroying the finish, do not put the parts on the ground directly. WWW.HOMEDEPOT.CA Please contact 1-800-841-1350 for further assistance.
- Page 12 Assembly (continued) Assembling the Small Canopy □ Cover the small roof with the small canopy (K) by pulling the corners of the small canopy (K) over the ends of the Small top poles NOTE: To avoid destroying the finish, do not put the parts on the ground directly. WWW.HOMEDEPOT.CA Please contact 1-800-841-1350 for further assistance.
- Page 13 Assembly (continued) Putting on the Big Canopy □ Putting on the Big Canopy. NOTE: To avoid destroying the finish, do not put the parts on the ground directly. WWW.HOMEDEPOT.CA Please contact 1-800-841-1350 for further assistance.
- Page 14 Assembly (continued) Attaching the Small Roof □ Attach the small top poles (G) to the oblique poles (D) using flat washers (BB), bolts (CC) and screw caps (DD). NOTE: To avoid destroying the finish, do not put the parts on the ground directly. WWW.HOMEDEPOT.CA Please contact 1-800-841-1350 for further assistance.
- Page 15 Assembly (continued) Spreading the Big Canopy □ Spread the big canopy (L) on the big roof and cover the four corners. NOTE: To avoid destroying the finish, do not put the parts on the ground directly. WWW.HOMEDEPOT.CA Please contact 1-800-841-1350 for further assistance.
- Page 16 Assembly (continued) Assembling the Shelves □ Attach the shelves (H) to the post, using bolts (AA) and Flat washers (BB). Attach the support bar (I) to the shelves (H) and poles (A1&A2) using bolts (II) and flat washers (BB). NOTE: To avoid destroying the finish, do not put the parts on the ground directly. WWW.HOMEDEPOT.CA Please contact 1-800-841-1350 for further assistance.
- Page 17 Assembly (continued) Attaching the Hook □ Screw the hook (J) into the big center connector (E). NOTE: To avoid destroying the finish, do not put the parts on the ground directly. WWW.HOMEDEPOT.CA Please contact 1-800-841-1350 for further assistance.
- Page 18 Assembly (continued) Securing the Gazebo □ Secure the completely assembled gazebo into the ground using the stakes (FF). □ It is recommended for anchoring on wood or concreate surface for more stability using setscrew (Purchased separately). NOTE: To avoid destroying the finish, do not put the parts on the ground directly. WWW.HOMEDEPOT.CA Please contact 1-800-841-1350 for further assistance.
-
Page 19: Care And Cleaning
Care and Cleaning □ □ □ □ □ □ □ WWW.HOMEDEPOT.CA Please contact 1-800-841-1350 for further assistance. - Page 20 Questions, problems, missing parts? Before returning to the store, call Hampton Bay Customer Service 8 a.m. - 7 p.m., EST, Monday-Friday, 9 a.m. - 6 p.m., EST, Saturday 1-800-841-1350 WWW.HOMEDEPOT.CA Retain this manual for future use.
Need help?
Do you have a question about the A103000201 and is the answer not in the manual?
Questions and answers