NuWave BRAVO XL PRO (20812) - SMART OVEN & AIR FRYER Manual
- Owner's manual (24 pages) ,
- Owner's manual (24 pages) ,
- Owner's manual (24 pages)
Advertisement
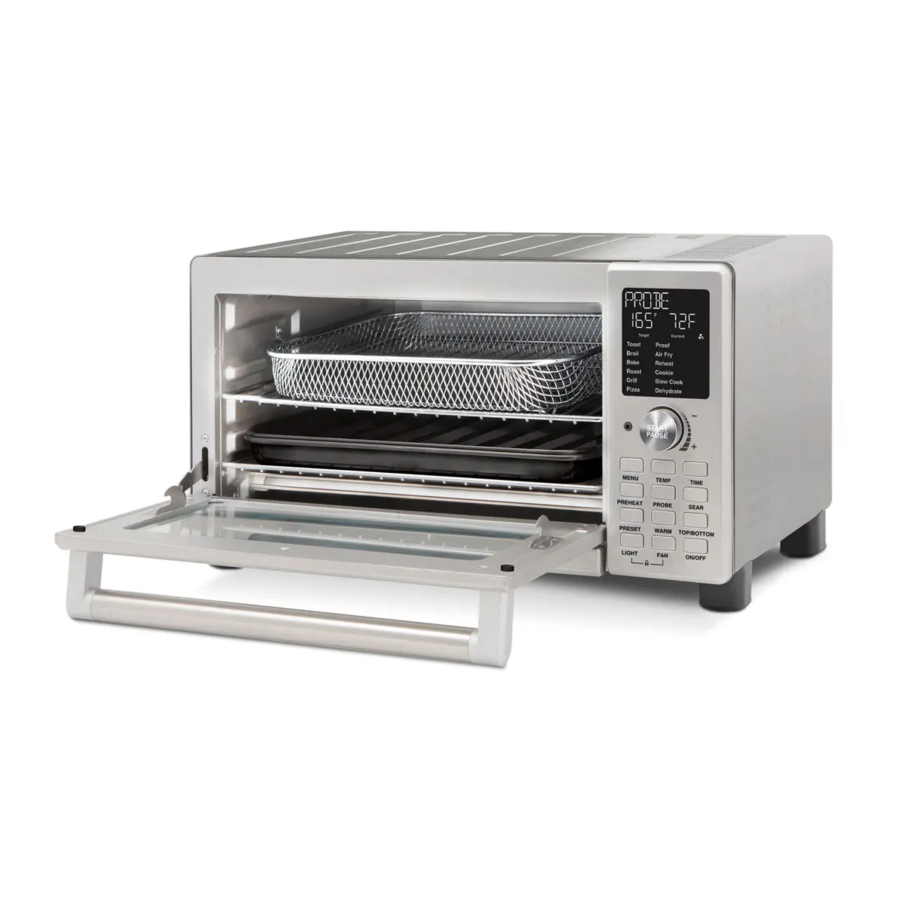
PARTS & ACCESSORIES

- Base
Part #: BRA46 - Pull-Out Crumb Tray
Part #: BRA17 - 2 Heavy-Duty Cooking Racks
Part #: BRA18 - Enamel Baking Pan and Enamel Broiler Rack
Part #: BRA20 - Air Fry Basket
Part #: BRA25 - Light Bulb
Part#: BRP1 - Light Bulb Cover
Part#: BRP2 - Temperature Probe
Part # BRP4
ORDERING PARTS
Need a new part or accessory for your Bravo XL Pro? We have you covered! Simply visit Nuwavenow.com or contact Customer Service to order the part you need.
For Amazon Purchases: support@Nuwavenow.com
For All Other Purchases: help@Nuwavenow.com
You can even order directly online. Just visit www.Nuwavenow.com
ASSEMBLY GUIDE

Before First Use
- Remove and discard any packaging material, tape, and stickers, from the unit.
- Remove all accessories from their packaging and wash them in warm, soapy water or in the dishwasher, top rack only, except for the Probe.NEVER submerge the main unit in water.
While most of the accessories are dishwasher-safe, the Probe is not. Hand washing is recommended. Frequent dishwasher cleaning may lead to premature wear.
- Place the Bravo on a level, even, and stable heat resistant surface.
- Slide the Cooking Rack into Position 1, 2, 3, or 4 of the Bravo.
- Place Baking Pan with Broiler Rack on Cooking Rack in Position 1.
- Place the Air Fry Basket above the Baking Pan. We recommend you use the Air Fry Basket with the Baking Pan to optimize cooking results..
- Place Crumb Tray into position by sliding it into slot at bottom of the Bravo. To remove, push it down slightly and pull it out.
- Plug the appliance into a standard wall socket. The power cord is located at the rear of the Bravo.
NOTE:
It is perfectly normal for your new unit to produce a heated plastic smell when used for the first time. This will go away after the first few uses.

DO NOT cover or block the air vents on the Bravo, as doing so can prevent proper ventilation.
DO NOT place the unit on or near a hot gas burner, electric burner, or in a heated oven or on a stovetop.
CONTROL PANEL

MENU (LED DISPLAY)
Toast: Evenly toast bread, bagels, waffles and more.
Broil: Cooks your food with 100% top heat.
Bake: Evenly bakes cookies, brownies, cakes and more.
Roast: Cooking it evenly on all sides perfect for vegetables and meats.
Grill: Cooks your food using 50% top heat and 50% bottom heat.
Pizza: Your pizza gets a crispy crust. You can also use the pizza setting for other dishes like a quiche.
Proof: Keeps resting raw dough at the right temperature to rise before baking.
Air Fry: Produce foods that are crispy outside and moist and tender inside without actual frying.
Reheat: Heat leftovers without over cooking.
Cookie: Quickly and evenly bake a variety of small baked goods.
Slow Cook: It's great for breaking down and tenderizing large pieces of meat like pot roasts or beef stews.
Dehydrate: Preserving fruits, vegetables, herbs, and meats by removing moisture.
OPERATING BUTTONS FUNCTIONS

LOCK
- Press and hold Light and Fan to lock the control panel.
- Repeat to unlock the control
NOTE:
- If the control panel is locked while the Bravo XL Pro is cooking, you can press On/Off to unlock.

MUTE
Press and hold Top/Bottom until you hear 2 beeps. Repeat to unmute.

ON/OFF
- Press ON/OFF to turn on the oven.
- Press again to turn off and cancel all programmed functions.

START/PAUSE
- Press START/PAUSE to begin cooking. "Cooking" will scroll on the display.
- While cooking, press START/PAUSE once to pause the oven. Press it again to resume cooking.
- The START/PAUSE dial can be turned to adjust the TEMP, TIME, TOP/BTM, MENU, PRESET, or FAN settings.

MENU
- Press Menu and turn the START/PAUSE dial to your desired Menu Sear selection.
- Press START/PAUSE to begin cooking. The selected menu function will scroll on the display
NOTE:
- You can adjust the cooking temperature and during the cooking if desired.
- You can add the Preheat and Probe functions to your selected Menu function, but these settings will not be saved for future use.
- The default cooking temperature and time can be changed. Simply set your desired settings, then press and hold MENU until you hear 2 beeps.
- The new default temperature and time will remain in place even after the unit is unplugged.

TEMP
The default cooking temperature is 350°F. Cooking temperature can be adjusted in 5°F increments any time during the cooking process.
- Press Temp and turn the START/PAUSE dial to adjust the cooking temperature.
- Once set, press START/PAUSE to cook at the new temperature.
NOTE:
- To change the temperature display from Fahrenheit to Celsius, press and hold Temp for 4 seconds until you hear 2 beeps. Repeat to switch back to Fahrenheit.
- The default cooking temperature can be changed. Simply set your desired temperature, then press and hold START/PAUSE until you hear 2 beeps.
- The new default temperature will remain in place even after the unit is unplugged.

TIME
The default cooking time is 15 minutes. Adjustments can be made in 1-minute increments any time during the cooking process.
- Press Time and turn the START/ PAUSE dial to adjust the cooking time.
- When adjustments are made, press START/PAUSE to begin the cooking.
NOTE:
- The displayed time can be changed from hours and minutes to minutes and seconds by pressing and holding Time for 4 seconds until you hear 2 beeps, Sec will display.
- The default cooking time can be changed. Simply set your desired time, then press and hold START/PAUSE until you hear 2 beeps.
- The new default time will remain in place even after the unit is unplugged.

PREHEAT
- Set your desired cooking temperature and time.
- Press PREHEAT to enable the Preheat function. Then press START/PAUSE to begin preheating. "Preheat" will scroll on the display.
- Once the Bravo XL Pro reaches the set temperature, it will beep and show "READY" on the display.
- Add your food to the oven and press START/PAUSE to begin cooking. If you do not press START/PAUSE after 10 seconds, the unit will beep once and begin cooking automatically.
NOTE:
- Press PREHEAT at any point to cancel the preheat process.
- Some Presets will automatically preheat.
- The Bravo XL Pro can be set to preheat automatically by pressing and holding PREHEAT until you hear 2 beeps. Repeat to disable.

PROBE
The digital temperature probe can be inserted into your food to measure its internal temperature as it cooks.
- Plug the probe into the jack on the control panel, PROBE will be on the display and the current and target temperatures will be shown.
![]()
- Insert the other end into the thickest part of the food. Be sure the probe wire is at the top of the door before closing.
- Set your desired cooking function. Press PROBE. The default target temperature of 165°F will be shown. Turn the START/PAUSE dial to set the target temperature between 50°F and 212°F. Press START/PAUSE to begin cooking.
- When the probe's measured temperature reaches the target temperature, the Bravo XL Pro will stop cooking.
- NOTE:
- Ensure the probe does not touch any bones when inserted.
- Press PROBE at any time to adjust the target temperature by turning the START/PAUSE dial.
- The Bravo XL Pro will beep 3 times when the probe temperature is within 10°F of the target temperature.
- If the set cooking time has ended and the target temperature has not been reached, the Bravo XL Pro will continue to cook until reached.
- If not displayed, press PROBE to display the Probe temperature.


SEAR
The Bravo XL Pro can sear food at high heat. The default is 500°F for 5 minutes up to 30 minutes.
- Press SEAR and make any adjustments to the default cooking temperature and time.
- Press START/PAUSE to begin cooking.
- You can press and hold SEAR to begin searing.
- The temperature and time can be adjusted at any point during the searing process.
NOTE:
- When the Bravo XL Pro is searing, SEAR will be shown on the display and (:) will flash.

PRESET
The Bravo XL Pro has 100 preprogrammed recipes which can be found in the Quick Start Guide and Recipe Book. There are 30 user presets.
To recall the 100 preset recipes:
- Press Preset. 1 will be shown on the display.
- Turn the START/PAUSE dial to select your desired preset.
- Press START/PAUSE to begin cooking and the preset name will scroll.
NOTE:
- Each preset will show the recommended rack level on the display.
- Some presets have specific times to flip, shake or rotate your food. The Bravo XL Pro will beep and show this on the display at the appropriate time.

Making your own presets
- Set your desired temperature and time.
- Preheat can be added.
- Press and hold PRESET.
- Use the START/PAUSE dial to select custom preset (101-130).
- Press and hold PRESET to save your custom settings. The Bravo XL will beep twice and show the preset number and SAVE on the display.
- Press to begin cooking.
Making Presets from adjusted 100 presets
User preset are 101-130.
- Press PRESET once, "1" and the preset name will scroll on the display.
- Use the START/PAUSE dial to select the preset number for the recipe you want to adjust.
- Once the selection is made, press TEMP/TIME once to display the temperature and time and adjust to your desired settings.
- Press and hold PRESET to save your custom settings. The Bravo XL will beep twice and show the preset number and SAVE on the display.
- Press to begin cooking.
NOTE:
- Presets can be saved before, during, and after cooking.
- Wattage can be adjusted for any preset.
- User presets can be overridden.
- Custom presets cannot be named.

WARM
Press Warm. By default, the Bravo XL Pro will heat at 140°F for 1 hour.
- If desired, adjust the temperature between 140°F and 200°F and adjust the time up to 3 hours.
- Press START/PAUSE to begin warming.
NOTE:
- You can press and hold Warm to automatically begin warming at the default settings.

TOP/BOTTOM
By default, both the top and bottom heaters are set to cook at 50% each. You can adjust the percentage between the top and bottom heaters but the total will always equal 100%.
- Press TOP/BOTTOM. Both Top and Btm will be shown on the display
- Turn the START/PAUSE dial to adjust the heating percentage, then press START/PAUSE to begin cooking at this setting.
NOTE:
- The heating percentages can be adjusted at any point before or during the cooking process.

LIGHT
Turns the internal light on and off. Top/Bottom

FAN
The default fan speed is 3, the highest setting.
- Press Fan to lower the fan speed until you reach 0, which turns off the fan. When the fan is off, the icon no longer appears on the display.
- Press Fan again to return to fan speed 3.
TEMPERATURE CHARTS
Probe Temperatures
| Meats Temp. | Oven | Rare | Med Rare | Med | Med Well | Well |
| Chicken, breast Turkey, breast Duck, breast | 360 | 165* | ||||
| Chicken, whole Turkey, whole Duck, whole | 360 | 165* | ||||
| Chicken, thigh Turkey, thigh Duck, thigh | 360 | 165* | ||||
| Steak 1" thick (25mm) | 450 | 125 | 135 | 145* | 150* | 160* |
| Burgers ½ lb (227g) | 450 | 125 | 135 | 145* | 155* | 160* |
| Roast Beef (bone-in) Roast Beef (boneless) | 350 | 125 | 135 | 145* | 150* | 160* |
| Roast Lamb (bone-in) Lamb (boneless) | 350 | 125 | 135 | 145* | 150* | 160* |
| Pork (bone-in) Pork (boneless) | 350 | 145* | 150* | 160* | ||
| Salmon, Tuna, Halibut, Swordfish | 450 | 145* | 150* | 160* | ||
| Fish Steaks 1" thick (25mm) | 450 | 145* | 150* | 160* | ||
| Sausage | 450 | 160* | ||||
| Note: Times may vary depending on cooking preference. Consuming raw or undercooked meats, poultry, or seafood may increase your risk of food borne illness. *To reduce the risk, cook your food to USDA-safe temperatures. | ||||||
Measurement Chart
| Teaspoon = t | Fahrenheit = °F | Minute = min |
| Tablespoon = T | Celsius = °C | Second = sec |
| Cup = c | Fluid Ounces = fl oz | Inch = in |
| Ounce = oz | Liter = L | Dozen = doz |
| Pound = lb(s) | Milliliter = ml | Hour = hr |
| Quart = qt | Package = pkg. | Gram = g |
| Pint = pt | Gallon = gal | Kilogram = kg |
Cooking Time
| Cooking Temperature | Selectable Cooking Time |
| 50°F–275°F | 00:01–99:59 |
| 280°F–350°F | 00:01–24:00 |
| 355°F–400°F | 00:01–04:00 |
| 405°F–450°F | 00:01–01:00 |
| 455°F–500°F | 00:01–00:30 |
USING THE MENU FUNCTIONS
- Press the ON/OFF button to turn the unit on.
![]()
- Press the MENU button.
![]()
- Turn the START/PAUSE dial to make a Menu selection
![]()
- Adjust the settings if desired, then press START/PAUSE to begin.


TOAST
- Default Temp: 425°F
- Default Time: 5 min.
- Temp Range: 50°F-500°F
- Heat Source: Top/Bottom (50/50)
- Rack Position: 3
![]()

- Press TOAST. The LED display will show "TOAST 5" To adjust the toasting level between "1" and "10," press the TIME button, then turn START/PAUSE to select our desired toast level. Toasting levels are in minutes and seconds at 425°F, see chart below.
- 03:00
- 03:30
- 04:00
- 04:30
- 05:00
- 05:30
- 06:00
- 06:30
- 07:00
- 07:30
- Add up to 9 slices of bread and begin toasting.
PROOF
- Default Temp: 90°F
- Default Time: 30 min.
- Temp Range: 50°F-450°F
- Heat Source: Top/Bottom (50/50)
- Rack Position: 2
![]()

BROIL
- Default Temp: 500°F
- Default Time: 5 min. adjustable 30 minutes.
- Temp Range: 50°F-500°F
- Heat Source: Top (100/0)
- Rack Position: 2 or 3
![]()

NOTES:
- Flip food or rotate pans halfway through the cooking cycle.
- PROBE: The temperature probe and the Probe function can be used with the Broil function.
AIR FRY
- Default Temp: 360°F
- Default Time: 15 min.
- Temp Range: 50°F-450°F
- Heat Source: Top/Bottom (50/50)
- Rack Position: 1 and 3
![]()

NOTES:
- Use the Baking Pan to catch drippings from the Air Fry Basket.
BAKE
- Default Temp: 350°F
- Default Time: 25 min.
- Temp Range: 50°F-450°F
- Heat Source: Top/Bottom (50/50)
- Rack Position: 1, 2, or 3
![]()

NOTES:
- Flip food or rotate pans halfway through the cooking cycle.
- PROBE: The temperature probe and the Probe function can be used with the Bake function.
REHEAT
- Default Temp: 350°F
- Default Time: 10 min.
- Temp Range: 50°F-450°F
- Heat Source: Top/Bottom (50/50)
- Rack Position: Any
![]()

NOTES:
- Flip food or rotate pans halfway through the cooking cycle.
- Ensure you reheat your leftovers to an internal temperature of 165F.
ROAST
- Default Temp: 375°F
- Default Time: 30 min.
- Temp Range: 50°F-450°F
- Heat Source: Top/Bottom (50/50)
- Rack Position: 1
![]()

NOTES:
- Flip food or rotate pans halfway through the cooking cycle.
- PROBE: The temperature probe and the Probe function can be used with the Roast function.
COOKIE
- Default Temp: 350°F
- Default Time: 10 min.
- Temp Range: 50°F-450°F
- Heat Source: Top/Bottom (50/50)
- Rack Position: 2
![]()

NOTES:
- Rotate the baking pan halfway through baking for even browning.
GRILL
- Default Temp: 425°F
- Default Time: 15 min
- Temp Range: 50°F-500°F.
- Heat Source: Top/Bottom (50/50)
- Rack Position: 3 or 4
![]()

NOTES:
- Flip food or rotate pans halfway through the cooking cycle.
- PROBE: The temperature probe and the Probe function can be used with the Grill function.
SLOW COOK
- Default Temp: 165°F
- Default Time: 1 hour
- Temp Range: 275°F-325°F
- Probe: 165°F
- Heat Source: Top/Bottom (50/50)
- Rack Position: 1, 2, or 3
![]()

NOTES:
- Flip food or rotate pans halfway through the cooking cycle.
- PROBE: The temperature probe and the Probe function must be used with the Slow Cook function.
PIZZA
- Default Temp: 400°F
- Default Time: 15 min.
- Temp Range: 50°F-500°F.
- Heat Source: Top/Bottom (30/70)
- Rack Position: 1 (For crispier results use position 1.)
![]()

NOTES:
- Rotate your pizza halfway through the cooking cycle.
DEHYDRATE
- Default Temp: 100°F
- Default Time: 2 hours
- Temp Range: 50°F-450°F
- Heat Source: Top/Bottom (50/50)
- Rack Position: Any
![]()

NOTES:
- Flip food or rotate pans halfway through the cooking cycle.
CARE & MAINTENANCE
BEFORE FIRST USE
Wash all removable parts in warm, soapy water or in the dishwasher, top rack only.
- Remove all the packaging materials.
- Remove the glue and labels on the appliance.
- Clean the Baking Pan, Broiler Rack, Air Fry Basket, Cooking Racks, and Crumb Tray thoroughly with hot water, a nonabrasive sponge, and mild dish detergent, or in the dishwasher, top rack only.

- Wipe the insides and outside of the Bravo with a damp dishcloth or wet cloth and dry thoroughly.

- DO NOT put the Probe in the dishwaher.


CLEAN AFTER EACH USE
- Allow the Bravo to cool completely before cleaning.
- ALWAYS unplug the Bravo from the electrical outlet. NEVER clean the unit while it is plugged in.
- NEVER use harsh abrasive or corrosive product cleaners, as they may damage the finish of oven surface.
- Clean the interior using a damp cloth, scour pad or dish brush along with mild liquid soap and a clean cloth or towel. Dry thoroughly.
- For the exterior apply the cleaning agent directly to a cloth towel, not directly to the unit. Dry thoroughly. NEVER use steel wool pads, etc., on the interior or exterior of the Bravo
- When the glass window is completely cool, spray glass cleaner on a clean cloth towel. Clean both inside and outside of window. Use a damp cloth to rinse the window then dry completely with a clean dry towel.
- NEVER use steel wool pads, etc., on the interior or exterior of the Bravo.
- To remove crumbs, slide out the Crumb Tray and discard crumbs. Wipe clean and replace. Crumb Tray should be emptied and cleaned after each use. Never operate the oven without the Crumb Tray in place.
- To remove baked-on grease, soak Baking Pan, Broiler Rack, Air Fry Basket, Cooking Racks, and Crumb Tray, in hot, soapy water. Dry thoroughly.
- Clean the probe with a towel using warm soapy water.
Storage
- Unplug the Bravo and let unit cool down completely.
- Make sure that all parts are cleaned and dry.
- NEVER wrap the cord around the Bravo.

DO NOT immerse the Bravo in water or attempt to cycle through dishwasher. The outer surface may be cleaned by wiping carefully with a damp dishcloth or sponge. Make sure unit has cooled completely prior to cleaning.
REPLACING THE LIGHT BULB

Replacing the Light Bulb
- Unscrew the light bulb cover turning counter-clockwise (turning to left).
- Then unscrew the light bulb turning counter-clockwise(turning to left).
- With the replacement bulb, screw turning clockwise (turning to the right) until tightened.
- Then screw in the light bulb cover clockwise (turning to the right).
TROUBLESHOOTING GUIDE
The Bravo XL Pro is engineered with an automatic shut-off feature to prevent overheating during use. If the Bravo XL Pro shuts off to cool itself down, an odor may be detected. Unplug the Bravo XL Pro and wait for it to completely cool down. To prevent the Bravo XL Pro from overheating, do not cook foods at higher temperatures or for longer times than recommended.
The Device Does Not Work | |
| |
The Unit Door Will Not Close Completely | |
| |
The Food is Fried Unevenly | |
| |
| The Crumb Tray Does Not Fit Properly in the Bravo XL Pro | |
| |
White Smoke is Coming Out of the Unit | |
| |
The LED Display is Blank | |
| |
The Appliance is Not Heating | |
| |
| For further assistance, please contact Nuwave's Customer Service Department. | |
| Error Message: | Solution(s): |
| Add Probe | Probe not connected to the unit. Plug the Probe into the Bravo. |
| Replace Probe | The Probe circuit has short-circuited. Contact Customer Service |
| Error 1 | The Probe temperature hasn't changed for 60 minutes. Ensure the Bravo XL Pro is cooking. |
| Error 2 | The Bravo XL Pro's cooking temperature is lower than the Probe target temperature. |
| Error 3 | NTC Temperature Sensor overheated. Turn unit off to cool. If the Bravo is not working after it cools down, contact Customer Service. |
| Error 4 | NTC Temperature Sensor short circuit. Contact Customer Service. |
| Error 5 | NTC Temperature Sensor is open. Contact Customer Service. |
| Key Jam | A button may be jammed and not operating. Contact Customer Service. |
SAFEGUARDS & INFORMATION
ALWAYS KEEP THIS MANUAL HANDY FOR FUTURE REFERENCE.
IMPORTANT SAFEGUARDS
When using electrical appliances, basic safety precautions should always be followed including the following:
- Read all instructions.
- DO NOT touch hot surfaces. Use handles or knobs.
![shock hazard]() To protect against electrical shock do not immerse cord, plugs, or (state specific part or parts in question) in water or other liquid.
To protect against electrical shock do not immerse cord, plugs, or (state specific part or parts in question) in water or other liquid.- Close supervision is necessary when any appliance is used by or near children.
- Unplug from outlet when not in use and before cleaning. Allow to cool before putting on or taking off parts.
- DO NOT operate any appliance with a damaged cord or plug or after the appliance malfunctions or has been damaged in any manner. Any service MUST be done by Nuwave LLC or authorized by the manufacturer for repairs.
- The use of accessory attachments not recommended by the appliance manufacturer may cause injuries.
- DO NOT use outdoors (this item may be omitted if the product is specifically intended for outdoor use).
- DO NOT let cord hang over edge of table or counter, or touch hot surfaces.
- DO NOT place on or near a hot gas or electric burner, or in a heated oven.
- Extreme caution must be used when moving an appliance containing hot oil or other hot liquids.
- ALWAYS attach plug to appliance first, then plug cord into the wall outlet. To disconnect, turn any control to "off", then remove plug from wall outlet.
- DO NOT use appliance for other than intended use.
- Save these Instructions
- Ensure the Bravo XL Pro and all parts are clean and dry before each use.
- Discard the protective plastic covering.
- This appliance is not intended for use by persons with reduced physical, sensory or mental capabilities, children, or persons with a lack of experience or knowledge, unless supervised or instructed in the use of the appliance by one responsible for their safety.
- Use only on a clean, stable, dry, and level surface.
- DO NOT cover or block the intake air vents located in the back and sides of the Bravo XL Pro, as doing so can prevent proper ventilation. There should be at least 5 inches of free space behind, to the sides of, and on top of the Bravo XL Pro.
![burn hazard]() Use aluminum foil to wrap foods that produce oil or juice when operating the Drip/Baking Pan to catch drippings and prevent fire.
Use aluminum foil to wrap foods that produce oil or juice when operating the Drip/Baking Pan to catch drippings and prevent fire.![burn hazard]() To prevent fire, do not allow any foil to touch the heating elements.
To prevent fire, do not allow any foil to touch the heating elements.- Avoid placing your face near the glass door during use.
- Never touch the insides of the Bravo XL Pro while it is operating.
- Never leave the Bravo XL Pro unattended during use.
- DO NOT disassemble the Bravo XL Pro.
- Allow the Bravo XL Pro to cool before putting in or pulling out items or before cleaning.
- Keep this manual handy for future reference.
 To protect against electrical shock do not immerse cord, plugs, or (state specific part or parts in question) in water or other liquid.
 Use aluminum foil to wrap foods that produce oil or juice when operating the Drip/Baking Pan to catch drippings and prevent fire.
Toaster Oven Warnings (UL Standard 1026, Section 71.7):
![burn hazard]()
![shock hazard]()
Oversize foods or metal utensils must not be inserted in a toaster oven as they may create a fire or risk of electric shock.![burn hazard]() A fire may occur if the toaster-oven is covered or touching flammable material, including curtains, draperies, walls, and the like, when in operation.DO NOT store any item on top of the appliance when in operation.
A fire may occur if the toaster-oven is covered or touching flammable material, including curtains, draperies, walls, and the like, when in operation.DO NOT store any item on top of the appliance when in operation.![shock hazard]() DO NOT clean with metal scouring pads. Pieces can break off the pad and touch electrical parts creating a risk of electric shock.
DO NOT clean with metal scouring pads. Pieces can break off the pad and touch electrical parts creating a risk of electric shock.- Extreme caution should be exercised when using containers constructed of materials other than metal or glass.
- DO NOT store any materials, other than the manufacturers recommended accessories, in this oven when not in use.
- DO NOT place any of the following materials in the oven: paper, cardboard, plastic, cloth, wood, flammable materials, sealed containers, and the like.
- DO NOT cover the crumb tray or any part of the oven with metal foil. This will cause overheating of the oven.
- Turn off the Bravo XL Pro by pressing theOn/Off Button before unplugging the unit from the wall socket.
Power-Supply Cords
A short power-supply cord (or detachable power-supply cord) is provided to reduce the risk of becoming entangled in, or tripping over, a longer cord. Longer detachable power-supply cords or extension cords are available and may be used if care is exercised in their use. If a longer detachable power-supply cord or extension cord is used:
- The marked electrical rating of the extension cord should be at least as great as the electrical rating of the appliance.
- The longer cord should be arranged so that it will not drape over any countertop or tabletop where it could be pulled on or tripped over unintentionally.
- The Bravo XL Pro should be operated on a separate electrical outlet from other operating appliances due to wattage limitations.

To reduce the risk of electric shock, do not perform any servicing other than that which is contained in these instructions.
To disconnect the Bravo XL Pro, turn it off by pressing the ON/OFF button and then remove the plug from the wall outlet.
NEVER use the Bravo XL Pro with loose, damaged, or missing parts.
While cooking, ALWAYS use oven mitts and allow accessories to cool before washing.
LIMITED WARRANTY
TO OBTAIN SERVICE
Include in the package the owner's name, address, daytime telephone number, a detailed description of the problem, and RGA (Return Goods authorization number). To obtain the RGA number, email us at:
For Amazon Purchases: support@nuwavenow.com
For All Other Purchases: help@nuwavenow.com
Provide the product model & serial number and proof of date of purchase (a copy of the receipt) when making claims under this warranty.
If you still have any questions about operation or warranty of this product, please contact Nuwave LLC
For Amazon Purchases: support@nuwavenow.com
For All Other Purchases: help@nuwavenow.com
www.nuwavenow.com

Scan the code to find recipes, how-to videos and more!
Questions or Concerns?
Amazon Purchases: support@nuwavenow.com
1-888-502-7805
All Other Purchases: help@nuwavenow.com
1-877-689-2838
Mon-Fri 7:30am-4:30pm CST
Please feel free to reach out with any feedback or comments that could improve your experience. We would also enjoy hearing about your successes. Scan the QR code below to email us.

For Amazon Purchases
support@Nuwavenow.com

For All Other Purchases
help@Nuwavenow.com
Register Today!
Use your smartphone or device to scan the QR code located on the back of your unit to register your product, or visit Nuwavenow.com/register.
Connect with Us!

#Nuwavenow
Visit Nuwavenow.com to see other great products and accessories.
FOR HOUSEHOLD USE ONLY
120VAC / 60 Hz / 1800W
Designed & Developed in USA
Nuwave LLC
560 Bunker Ct.
Vernon Hills, IL 60061, U.S.A.
Documents / Resources
References
Download manual
Here you can download full pdf version of manual, it may contain additional safety instructions, warranty information, FCC rules, etc.
Download NuWave BRAVO XL PRO (20812) - SMART OVEN & AIR FRYER Manual
Advertisement


Need help?
Do you have a question about the BRAVO XL PRO and is the answer not in the manual?
Questions and answers