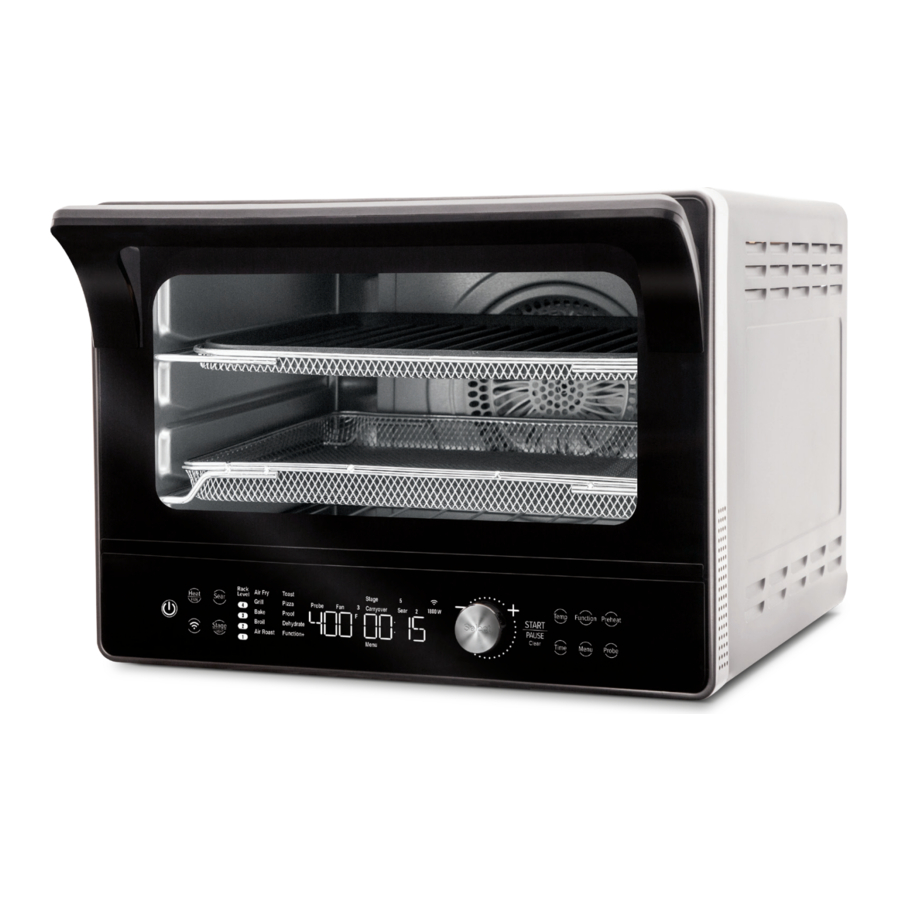
NuWave TODD ENGLISH PRO-SMART 20902/20901/20906/20905 - OVEN Manual
- User manual ,
- Owner's manual (126 pages)
Advertisement
- 1 PARTS & ACCESSORIES
- 2 ASSEMBLY GUIDE
- 3 CONNECTIVITY
- 4 GETTING STARTED
- 5 BASIC FUNCTIONS
- 6 ADVANCED FUNCTIONS
- 7 CARE AND MAINTENANCE
- 8 Error Messages
- 9 TROUBLESHOOTING
- 10 SAFEGUARDS & INFORMATION
- 11 Documents / Resources
PARTS & ACCESSORIES

ORDERING PARTS
Over the lifetime of your Todd English Pro-Smart Oven, you may find yourself needing a new part or accessory, and if you do, NuWave has you covered.
Ordering new parts and accessories is quick and easy. Simply take down the name and number for the part you want, then contact Customer Service. You can do that by:
- Phone at 877-689-2838 (M‒F, 7:30am‒4:30pm CST), or
- Email at help@nuwavenow.com
You can even order directly online. Just visit www.nuwavenow.com
ASSEMBLY GUIDE
Before First Use
- Remove and discard any packaging material from the unit.
- Remove all accessories from their packaging and wash them in warm, soapy water or in the dishwasher, top rack only, except for the Probe. NEVER submerge the main unit in water.
While most of the accessories are dishwasher-safe, the Probe is not. Hand washing is, therefore, highly recommended. Frequent dishwasher cleaning may lead to premature wear.
Accessories
Grill/Griddle
For grilling steaks and roasting vegetables.
Flip it to the Griddle side for baking. The Grill/Griddle must be used with the Grill/ Griddle Rack.

Grill/Griddle Rack
½-inch depth is ideal for dehydrating.

Air Fry Basket
1-inch depth is perfect for making crispy chicken, fries, and more.

Wire Rack
Can be used to hold cooking or baking pans, or simply place your food directly on the rack.

Crumb Tray
Catches crumbs and drippings and must remain in the unit at all times while cooking.

Baking and Drip Tray
Ideal for baking, roasting, and as a drip pan when air frying, protecting the bottom heating elements from dripping oils and fats.

Temperature Probe
Eliminates the guesswork of cooking. Consult the temperature guide in the Probe section for more information.

Rack Positions
The Todd English Pro-Smart Oven has 4 rack positions, with Position 1 at the bottom and Position 4 at the top, where most of your accessories can slide into the unit.
When you select a cooking function, the appropriate rack number(s) will illuminate on the control panel. These numbers coincide with those on the frame of the unit.

Position numbers on the frame of the unit.

CONNECTIVITY
With the NuWave Connect App, you can operate your Todd English Pro-Smart Oven with your Smart Device using your home Wi-Fi network.
NuWave Connect App
Downloading the NuWave Connect App Using the built-in QR reader in your Camera App:
- Scan the QR code below. It will take you to the App's download page on either the Google Play Store or the Apple AppStore.

- Follow the app download and installation instructions.
If your phone does not have QR scanning capability built-in, simply download a third-party QR Scanning App before scanning the NuWave QR code and you are ready to go.
- Open your mobile app store (App Store, Google Play).


- Search for "QR code readers."
![]()
- Simply download the QR code reader to your phone, open it, scan the code, and you are ready to go.

WiFi Activation
Once the NuWave Connect App is downloaded and properly installed, make sure that your smart device is connected to your home Wi-Fi 2.4GHz network and that the Pro-Smart Oven is in Standby Mode. Then, follow these steps:
- On the Oven, press and hold WIFI for up to 5 second to activate the built-in WiFi.
![]() will be blinking rapidly.
will be blinking rapidly. - Open the app and follow the in-app verification instructions.
- Once the verification is complete, press the + in the upper right hand corner, then press the Pro-Smart Oven icon.
- Press the WIFI icon until the WIFI icons is rapidly blinking. Once successful, press Done.
- Enter the WIFI password. touch Next and the pairing will begin.
If the connection process fails, or the WiFi is disconnected, the Wi-Fi light will turn off.
Notes
- Sometimes the user may need to hold the WiFi button again to return to Wi-Fi pairing mode even if there was previously a successful connection.
- If the incorrect WIFI network appears, go to your smart device settings to select the correct WIFI network.
- Make sure the Pro-Smart Oven Wi-Fi is active and connected with your WiFi 2.4GHz network.
Extending Control
Controlling the Pro-Smart Oven with your smart device is both easy and convenient with the NuWave Connect App.

- Make sure that the NuWave Connect App is installed on your smart device.
- Make sure the Pro-Smart Oven Wi-Fi is active and connected with your WiFi 2.4GHz network.
- Press WIFI. This will extend control of the Pro-Smart Oven to the NuWave Connect App.
Notes
You will only have to do this once. After control has been extended, it will remain extended, and to use it, you will only have to bring up the Pro-Smart Oven on the NuWave Connect App.
GETTING STARTED
The easy-to-use functionality of the Pro-Smart Oven is divided into Basic and Advanced functions, with the former offering the full cooking functionality of the unit and the latter giving you control over fan and heat strength and allowing you to program different cooking stages, features you will primarily use to create your own cooking Presets.
KEY FEATURES

CONTROL PANEL

Heat:
Controls Top, Bottom and Rear heat.
FAN:
Choose between 3 fan speeds.
Power:
Turns the oven on.
Wi-Fi:
Connects the oven to your home Internet network, allowing you to connect to the NuWave Connect App.
Light:
Press Light /STAGE to turn the oven's light on and off.
STAGE:
Press and hold Light / STAGE to program up to 5 cooking stages.
Rack Level:
The oven will highlight a rack corresponding to the selected preset.
Cooking Functions:
Choose between 9 programmed functions, plus an additional 11 with Function+.
Sear:
Choose between 3 Sear settings.
The LED Function Indicators — Preheat, Ready, Stage, Probe, Fan, Carryover, Sear, Rear, Top, Bottom, Menu, Shade and Slice — will light when that function is selected.

Cooking Temperature:
The default will be set to Fahrenheit, but it can be changed to Celsius.
Wi-Fi:
Operate your NuWave Pro-Smart Oven with your Smart Device.
Watts:
The selected wattage will be displayed on the screen.
Cooking Time:
HOURS:MINUTES
The Time format can be changed.

START/PAUSE:
Initiates and pauses and clears cooking process.
Select Dial:
The Select dial adjusts the cooking time and temperature, scrolls between the cooking functions and menu presets.
Temp:
Adjusts the cooking temperature.
Function:
Scrolls through the 20 functions.
Preheat:
Preheats your oven for better results.
Time:
Adjusts the cooking time.
Menu:
Select up to 100 presets and save up 50 of your own.
Probe:
Cooks by the food's internal temperature.
Helpful Tips
- To add more time during the current cooking cycle, turn the Select dial clockwise. Monitor your food to ensure it doesn't overcook.
- Some moisture may appear on the Pro-Smart Oven's door during certain cooking cycles. This is normal and no cause for worry.
- When air-frying, food can be lightly coated with oil beforehand to boost crispiness and browning.
- When using your own recipes, especially those written for a conventional oven, cooking times can be different. So, until you know how your recipe will work in the Pro-Smart Oven, make sure to check on your food to keep it from overcooking.
Primary Controls
| Control | Function | |
 | Power | The Power button turns the Pro-Smart Oven on and off. |
 | Heat/FAN | Heat: Press Heat/FAN until the heater to be changed appears, then adjust the rear, top, and/or bottom heat using the Select dial. The odd percentage of Top/Bottom heat defaults to the bottom. Fan: Press and hold Heat/FAN and use the Select dial to adjust the fan speed from 0–3. Note: If you are using the rear heater, the fan speed must be 1 or more. |
 | WiFi | Press WiFi to connect to your local wi-fi network and, through that, to the NuWave Connect App. |
 | Sear | Press Sear, then adjust the Sear temperature and time, if desired, and press START/PAUSE to begin cooking. Sear defaults to 450°F for 5 minutes. |
 | Light/STAGE | Light: Press Light/STAGE once to turn on the oven lamp. Press it again to turn it off. STAGE: Press and hold Light/STAGE to access Stage Cooking. You can program up to 5 cooking stages. |
 | Select Dial | Used to change cooking times and temperatures, as well as to scroll through and select cooking functions and presets. |
 | START/ PAUSE Clear | Once the cooking parameters are set, this starts and pauses the cooking process. Pressing and holding the button allows you to clear any selections. |
 | Temp | Allows you to adjust the cooking temperature before and during the cooking process. Press Temp and use the Select dial to adjust the temperature. |
 | Time | Allows you to adjust the cooking time before and during the cooking process. Press Time and use the Select dial to adjust the time. |
 | Function | Allows you to choose from among 20 cooking functions, 9 on the LED display and 11 under "Function+". Press Function and scroll through the cooking functions. At "Function+", press the Select dial for functions 10–20. Continue scrolling until you reach the Function you want, then press the Select dial and START/PAUSE to begin cooking. |
 | Menu | Provides access to the unit's Cooking Presets. Press Menu once for Presets 1–100, or twice for Presets 101–150. Once the Preset is selected press START/PAUSE to begin cooking. Refer to the 100 Presets on the back of the Quick Start Guide. You can save 50 of your own. |
 | Preheat | Ensures the Pro-Smart Oven is at the set cooking temperature at the start of the main cooking cycle, giving you better results. The default is 400°F (default cooking temperature). Once the set temperature is reached, the Pro-Smart Oven will beep twice, countdown for 10 seconds, beep once more, and then start cooking automatically. To deactivate automatic Preheat, press Menu + Preheat prior to cooking. Repeat to reactivate automatic Preheat. |
 | Probe | Allows you to accurately cook your food to a set internal temperature. The Probe jack is on the upper right-hand side of the cooking chamber. The default is 165°F. Plug the Probe into the jack, then press and hold Probe for 1 second to set the Probe target temperature using the Select dial. Insert the other end of the Probe into your food at the thickest part not touching the bone. Press START/PAUSE to begin cooking. |
Basic Key Functions
| Function | Button(s) |
| Slow Cook | Probe + Menu |
| Probe Target Temperature | Press and hold Probe |
| Sear (as an independent function) | Press and hold Sear |
| Automatic Preheat | Preheat + Menu |
| Mute/Unmute | Sear + STAGE |
| Mute/Unmute Door | Press and hold Function |
| Clock | Preheat + Time |
| Lock | Menu + STAGE |
| Time Format Change ‒ Min: Sec | Press and hold Time (4 sec.) |
| Temperature Format Change ˚F to ˚C | Press and hold Temp (4 sec.) |
| Wattage | WiFi + Light |
Using the Accessories
| Function | Grill/Griddle | Grill/Griddle Rack | Air Fry Basket | Wire Rack |
| Air Fry | Yes | Yes | ||
| Grill | Yes | |||
| Bake* | Yes | Yes | ||
| Broil* | Yes | Yes | ||
| Air Roast | Yes | Yes | Yes | |
| Toast | Yes | Yes | Yes | |
| Pizza* | Yes | Yes | ||
| Proof | Yes | |||
| Dehydrate | Yes | Yes | ||
| Cookie* | Yes | Yes | ||
| Defrost* | Yes | Yes | Yes | |
| D.I.Y. | Yes | Yes | Yes | Yes |
| Oven Poach* | Yes | Yes | Yes | |
| Rawtarian* | Yes | Yes | Yes | |
| Reheat* | Yes | Yes | Yes | |
| Sanitize* | Yes | Yes | Yes | |
| Slow Cook* | Yes | Yes | Yes | |
| Slow Roast* | Yes | Yes | Yes | |
| Warm* | Yes | Yes | Yes | |
| Whole Roast* | Yes | Yes | Yes | Yes |
| *Use an oven-safe baking/cooking pan when using the Wire Rack. For best results, use the Grill/Griddle and Grill/Griddle Rack. Flip the Grill/Griddle to the Griddle side. | ||||
Selectable Cooking Time
| Cooking Temperature | Selectable Cooking Time |
| 50°F–275°F | 00:00–99:59 |
| 280°F–350°F | 00:00–24:00 |
| 355°F–400°F | 00:00–04:00 |
| 405°F–450°F | 00:00–01:00 |
| 455°F–500°F | 00:00–00:30 |
Quick Start

- Press the Power button to turn the ProSmart Oven on or off.
- Each function will flash in turn before defaulting to Air Fry.
- The default cooking time and temperature will be displayed.
- If that function has Preheat, then "Preheat" will be lit.
- Press Light/STAGE to turn on the lamp inside the Oven and press it again to turn the lamp off.
- Press Temp, then turn the Select dial to adjust the cooking temperature. Press Time and turn the Select dial to adjust the cooking time.
- Temperature, time, and heating source(s) can be adjusted before and while cooking.
- Open the oven door and place your food in the Pro-Smart Oven.
- While cooking, opening the door will pause cooking and turn on the oven lamp.
- Closing the door again will resume cooking and turn off the oven light.
- If the door remains open for 30 minutes or more, the Oven will turn off.
- Press START/PAUSE. The Oven will begin cooking and the screen will show the cooking temperature and countdown Time. ":" will flash.
- Press START/PAUSE again to pause cooking, and again to resume it.
- Press and hold START/PAUSE to clear all settings. The unit will display "END". Press it again to return to the default settings.
- Once the Pro-Smart Oven has finished cooking, it will beep 3 times and the screen will show "END".
Adjusting Default Temp & Time Formats
Default Temperature Format
To change the default temperature format from Fahrenheit to Celsius and back again, press and hold Temp.
The Pro-Smart Oven will switch from "F" (Fahrenheit) to "C" (Celsius), and the temperature figure will change with the temperature format.
- The temperature format cannot be switched while cooking.
- The temperature format can only be switched when the temperature is displayed.
- If you switch the format, the unit will maintain that format, even if unplugged, until you change it back.
Default Time Format
To change the default Time format from hours: minutes (hh: mm) to minutes: seconds (mm: ss:) and back again, press and hold Time.
- The time format cannot be switched while cooking.
- The time format can only be switched when the time is displayed.
- If you switch time formats, the Pro- Smart Oven will maintain that format, even if unplugged, until you change it back.
- The maximum time setting in hh: mm format is 99-hrs.; 59 min.
BASIC FUNCTIONS
With its numerous Cooking Presets and features, the Pro-Smart Oven's suite of Basic Functions offers you all you need to make delicious, healthy meals quickly and easily.
Time and Temperature

You should, of course, set the cooking time and temperature before cooking, but you can always adjust them while you are cooking as well.
To Set the Cooking Temperature and Time Before Cooking:
- Press the Power button. The screen will show a cooking function, the cooking temperature, the cooking count down time (i.e., "00:15"), and "Preheat" (if active). The ":" will also be lit.
- Press Temp. Turn the Select dial to adjust the cooking temperature.
- Press Time. Turn the Select dial to adjust the cooking time.
- Press START/PAUSE to begin cooking at the set temperature and time.
- When finished, the screen will show "END" and the Pro-Smart Oven will beep 3 times.
To Adjust the Cooking Temperature and Time While Cooking:
- Press Temp. Use the Select dial to adjust the cooking temperature.
- Press Time. Use the Select dial to adjust the cooking time.
- The Pro-Smart Oven will now cook at the new temperature and time.
- When finished, the screen will show "END" and Oven will beep 3 times.
Heat and Fan

The Todd English Pro-Smart Oven has three heat sources, Top, Bottom, and Rear. The Rear heater is part of the large rear fan assembly.
The default heat settings are, in order: 80% (rear) / 10% (top) / 10% (bottom). All 3 heaters combined will always equal 100%. To adjust these settings:
- Press Heat/FAN for the defaults to appear. Continue to press HEAT/FAN until the heater you wish to change appears on the LED display.
- Turn the Select dial to adjust the power for the selected heater from 0–100%, in 5% increments.
- Once all adjustments are made, press START/PAUSE to begin.
The default fan setting is 3. To adjust that:
- Press and hold Heat/FAN until the fan speed flashes.
- Turn the Select dial to adjust the fan speed from 3 to OFF.
- Press the Select dial to lock in the change.
Notes
- Changing the power of one heater will automatically adjust one or both of the others, so they always total 100%.
- When the difference is only ±5%:
- Rear Heater: The difference is applied to the bottom heater.
- Top Heater: The difference is applied to the rear heater.
- Bottom Heater: The difference is applied to the rear heater.
- Whenever the percentage is 10% or more, the difference is split between the 2 remaining heaters.
- The fan can only be turned off if the rear heater is off.
Cooking Functions

The Pro-Smart Oven has 20 Cooking Functions to help take the guesswork out of cooking.
Air Fry is the default function, but to access the remaining 11, begin by pressing Function.
- The highlighted function will change from "Air Fry" to "Grill". Now, turn the Select dial or continue to press Function until you reach the Cooking Function you want.
- To reach Cooking Functions 10–20, turn the Select dial until "Function+" is lit. Then, press the Select dial. "10" will appear on the screen. Continue scrolling until you find the function you want and press the Select dial again. You will see the cooking time and temperature, and the fan speed for that Cooking Function.
- Once the desired Cooking Function is chosen, press START/PAUSE to start cooking.
The Cooking Functions operate according to the following parameters:
| #1 Air Fry To fry with superheated circulating air while using little to no oil. | |||
| Defaults | Heat | Fan | Rack Position |
| Temp: 400°F Time: 15 min. | Top: 10% Bottom: 10% Rear: 80% | 3 | 2 or 3 |
| #2. Grill To use contact and radiant heat to cook foods quickly on a direct heat source. | |||
| Defaults | Heat | Fan | Rack Position |
| Temp: 450°F Time: 15 min. | Top: 25% Bottom: 25% Rear: 50% | 3 | 3 |
| #3. Bake To cook rising foods in an oven using high heat. | |||
| Defaults | Heat | Fan | Rack Position |
| Temp: 350°F Time: 25 min. | Top: 40% Bottom: 40% Rear: 20% | 1 | 2 |
| #4. Broil To cook at high heat, top side only. | |||
| Defaults | Heat | Fan | Rack Position |
| Temp: 500°F Time: 5 min. | Top: 80% Bottom: 0% Rear: 20% | 3 | 4 |
| #5. Air Roast Using superheated air surrounding the food to cook it evenly. | |||
| Defaults | Heat | Fan | Rack Position |
| Temp: 350°F Time: 30 min. | Top: 30% Bottom: 30% Rear: 40% | 3 | 2 |
| #6. Toast To brown bread slices on both sides. | |||
| Defaults | Heat | Fan | Rack Position |
| Temp: 425°F Time: 5 min. | Top: 50% Bottom: 50% Rear: 0% | 1 | 3 |
| #7. Pizza Flattened dough with a combination of toppings that is baked. | |||
| Defaults | Heat | Fan | Rack Position |
| Temp: 400°F Time: 15 min. | Top: 0% Bottom: 70% Rear: 30% | 3 | 1 or 2 |
| #8. Proof Resting raw, kneaded dough to allow it to rise before baking. | |||
| Defaults | Heat | Fan | Rack Position |
| Temp: 90°F Time: 30 min. | Top: 50% Bottom: 50% Rear: 0% | 0 | 2 or 3 |
| #9. Dehydrate To remove moisture from food to preserve and store it. | |||
| Defaults | Heat | Fan | Rack Position |
| Temp: 100°F Time: 2 hrs. | Top: 50% Bottom: 50% Rear: 0% | 1 | ANY |
| #10. Cookie Small baked goods made from a variety of ingredients. | |||
| Defaults | Heat | Fan | Rack Position |
| Temp: 325°F Time: 15 min. | Top: 40% Bottom: 40% Rear: 20% | 2 | 2 or 3 |
| #11. Defrost To thaw frozen foods to prepare them for cooking. | |||
| Defaults | Heat | Fan | Rack Position |
| Temp: 50°F Time: 30 min. | Top: 50% Bottom: 50% Rear: 0% | 3 | ANY |
| #12. D.I.Y. Allows you to create your own Cooking Function. | |||
| Defaults | Heat | Fan | Rack Position |
| Temp: 350°F Time: 15 min. | Top: 50% Bottom: 50% Rear: 0% | 3 | ANY |
| #13. Oven Poach To cook with a small amount of liquid. | |||
| Defaults | Heat | Fan | Rack Position |
| Temp: 300°F Time: 20 min. | Top: 50% Bottom: 50% Rear: 0% | 0 | 2 or 3 |
| #14. Rawtarian To cook foods at temperatures between 104F–118F. | |||
| Defaults | Heat | Fan | Rack Position |
| Temp: 115°F Time: 60 min. | Top: 50% Bottom: 50% Rear: 0% | 1 | ANY |
| #15. Reheat To heat through previously cooked foods, such as leftovers. | |||
| Defaults | Heat | Fan | Rack Position |
| Temp: 350°F Time: 10 min. | Top: 50% Bottom: 50% Rear: 0% | 3 | 1 or 2 |
| #16. Sanitize Used to ensure that vessels used for canning and fermenting foods are clean. | |||
| Defaults | Heat | Fan | Rack Position |
| Temp: 200°F Time: 20 min. | Top: 50% Bottom: 50% Rear: 0% | 1 | 1 |
| #17. Slow Cook To cook at a low temperature for a long period of time. | |||
| Defaults | Heat | Fan | Rack Position |
| Temp: 190°F Probe: 165°F Time: 60 min. | Top: 50% Bottom: 50% Rear: 0% | 3 | 1 or 2 |
| #18. Slow Roast To cook food from all sides, with minimal moisture loss. | |||
| Defaults | Heat | Fan | Rack Position |
| Temp: 275°F Probe: 165°F Time: 60 min. | Top: 50% Bottom: 50% Rear: 0% | 3 | 1 |
| #19. Warm To keep food heated at a low temperature until served. | |||
| Defaults | Heat | Fan | Rack Position |
| Temp: 140°F Time: 60 min. | Top: 50% Bottom: 50% Rear: 0% | 0 | 1 or 2 |
| #20. Whole Roast To cook food whole, not cut up. | |||
| Defaults | Heat | Fan | Rack Position |
| Temp: 325°F Time: 60 min. | Top: 30% Bottom: 30% Rear: 40% | 2 | 1 |
Notes
- To change the default Temp and Time in D.I.Y. (#12), press Temp or Time and adjust to the new default. Then press and hold the Select dial for 1 second.
- With the Toast Function (#6), use the Select dial to choose the shade from 1 (lightest) to 10 (darkest) and then press Select to lock in your choice. The default is 5. Turn the Select dial again for the number of slices (1–6). The default is 2.
- All defaults (Temp, Time, Heat, Fan, and Rack Position) are guides. You may need to adjust one or more to reach your desired results.
The Menu Function

The Menu button allows you to save and recall pre-programmed cooking sequences called Presets. They are stored with a unique number, which you can access by pressing Menu.
- NuWave Presets 1–100: These are for our most popular recipes. They can be temporarily adjusted but not changed or overwritten.
- User Presets 101–150: These are open memory slots in which you can save your own Presets. They can be overwritten.
Using the Menu Function
- Press Menu. The screen will show (Nuwave Presets 1–100) "Menu" and "1". Press Menu again will show "101" and "Menu" (for User Presets 101–150).
- Choose the Preset number by turning the Select dial to scroll through the Menu, then pressing Select to choose.
- Once the Preset is chosen, press START/PAUSE. The Pro-Smart Oven will cook according to the selected Preset's programming.
Notes
When a Preset uses stage cooking, all stages will show as solid except for the current or selected stage, which will flash.
Programming Your Own Preset
You can program your own Presets into memory slots 101–150.
- Select your Cooking Function and adjust your settings (Temp, Time, Preheat, Sear, etc.)
- Press Menu twice. The screen will show "Menu" and "101".
- Choose the Preset number from the Menu (101–150) by turning the Select dial.
- Once the desired Preset number is chosen, press and hold Menu again to save it. "SAVE" and the Preset number will be displayed.
- Press START/PAUSE and the ProSmart Oven will begin cooking. You will be able to recall your new Preset as long as you don't overwrite it with a different one.
Notes
If stage cooking, see ADVANCED FUNCTIONS.
Memory Recall
- Press Menu. The screen will show "Menu" and "1". Press Menu again and it will show "Menu" and "101".
- Scroll through the Menu using the Select dial until you find the Preset number (1–150) you want.
- Press START/PAUSE. The Oven will cook according to the selected Preset's programming.
Notes
While the screen shows "Menu" and a Preset number, press Menu again to switch the number between 1 and 101.
To Review Menu Presets
You can verify the preset cooking cycle before cook begins or while cooking (":" will flash).
- Press Menu and select the Preset number from 1–150.
- Press the Select dial, then press and hold for Light/STAGE, to view details or make any adjustments to the Temp or Time.
- If the Preset has multiple stages, press and hold Light/STAGE repeatedly until you reach the stage to review or adjust.
- Once the cooking has finished, "END" is displayed, and the unit will beep three times.
Notes
If there is only one cooking phase, "Stage" will not appear.
Modifying Previously Saved Presets While Cooking
- Press Menu twice and select the saved Preset from 101–150.
- Press START/PAUSE to see the temperature and Time.
- To adjust these, press and hold Light/ STAGE, then turn the Select dial to make the adjustment.
- When cooking is finished, the Pro- Smart Oven will display "END", beep three (3) times, and then display "SAVE".
- Press Menu twice, choose the Preset number to which to save the changes, then press and hold Menu. The changed preset will be saved.
Notes
If you are Stage cooking, press and hold Light/STAGE repeatedly until the stage number you wish to review or modify shows on the display. Do this for each stage to be modified.
Save an Edited Preset Before Cooking
- Press Menu and select the preset number to edit.
- Press and hold Light/STAGE to the cooking stage to be changed. Use the Select dial to make adjustments for the cooking temperature and/or time.
- Continue as above if other stages need to be modified.
- The functions Sear and Preheat can be taken off by pressing that function. The Heat//Fan can also be adjusted.
- Press Menu twice, then choose the Preset number to which the changes will be saved.
- Press and hold Menu, the Menu number and "SAVE" will display.
Notes
- If a Preset is edited during cooking, at the end of cooking, the Pro-Smart Oven will display "SAVE". The user will then press Menu twice, choose a Preset number, and press and hold Menu again.
- If you choose to save a Preset in a slot that is already taken by another user-saved Preset, the new Preset will overwrite the old one.
- NuWave Presets 1–100 cannot be overwritten.
The Preheat Function

Preheating your oven, whether it is this Todd English Pro-Smart Oven or a conventional gas or electric model, is important. It allows your food to go into the oven at the correct temperature, makes it easier and faster for foods to reach a safe internal temperature, gives your food better texture and taste, and is absolutely mandatory for baking.
That said, with the Pro-Smart Oven, whether you Preheat or not, do it for some recipes and not for others, is entirely your call.
Using Preheat
- If the Preheat function does not automatically come on, press Preheat before cooking.
- Set the cooking temperature and time.
- Press START/PAUSE and the Pro-Smart Oven will begin preheating to the set cooking temperature.
- "Preheat" will flash while the Pro-Smart Oven is Preheating.
- When the Pro-Smart Oven reaches the set cooking temperature, it will go into a 10-second hold to allow you to put in your food, after which the Pro-Smart Oven will begin cooking.
- During the hold, the Pro-Smart oven will beep twice, the screen will show a 10-second countdown and "Ready", and then, when the countdown finishes, the Pro-Smart Oven will beep once.
- When the Pro-Smart Oven has finished cooking, the screen will show "END" and the Pro-Smart Oven will beep three (3) times.
Automatic Preheat
The default Preheat setting for the ProSmart Oven is ON for those functions and Menu Presets that have Preheat, and OFF for those that do not.
- Press Menu + Preheat at the same time to turn off the Automatic Preheat function. The Pro-Smart Oven will beep twice.
- Press Menu + Preheat at the same time again to turn on the Automatic Preheat function. The Pro-Smart Oven will beep twice.
- If Automatic Preheat is engaged, press Preheat to cancel it.
- If the Pro-Smart Oven is turned off and unplugged, it will retain the last Preheat setting used when it is plugged back in and turned on again.
- Pressing Preheat will add or remove Preheat.
The Probe Function

The Pro-Smart Oven's digital Probe lets you cook according to the internal temperature of the food. The default Probe target temperature is 165°F with a setting range between of 50°F–212°F, which is adjustable in 1°F increments, or it can be turned off. The Pro-Smart Oven will cook until the Probe target temperature is reached, even if the cooking Time ends first.
Using the Probe
- Press Temp and set the cooking temperature.
- Connect the Probe (component) to the Pro-Smart Oven. (See Illustration).
- To read the temperature of the Probe at any time, press Probe once and the screen will show the current Probe temperature, regardless of the Cooking Function.
- To set the Probe target temperature, press and hold Probe. The screen will show "Probe", and "165°F". Turn the Select dial to adjust the Probe target temperature.
- Insert the Probe into the food, then push START/PAUSE. The Pro-Smart Oven will start to cook to the set Probe target temperature.
Notes
- While cooking, the current Probe temperature will be displayed along with "Probe".
- Press Temp and the set oven temperature will be displayed.
- Press and hold Probe. The screen will show the set Probe target temperature, which is adjustable using the Select dial before or while cooking.
Carryover Cooking & Crispy Finish
When the Pro-Smart Oven reaches a set temperature (10°F default) under the Probe target temperature, it will alert you with 3 sets of short beeps, 2 beeps each. This will happen every time the Probe is in use.

Using the Probe with Stage Cooking
Each stage can have a different Probe target temperature and cooking temperature. Simply set the Probe target temperature for each stage and the Pro-Smart Oven will cook each stage until that temperature is achieved and then move on to the next stage. Once the Probe target temperature of the last stage is reached, the Pro-Smart Oven will shut-off.
Probe Temperature Guide
| Meats | Temp | Rare | Med. Rare | Med. | Med. Well | Well |
| Chicken, breast Turkey, breast Duck, breast | 360°F | 165°F | ||||
| Chicken, whole Turkey, whole Duck, whole | 360°F | 165°F | ||||
| Chicken, thigh Turkey, thigh Duck, thigh | 360°F | 165°F | ||||
| Steak, 1-inch thick* | 450°F | 120°F | 130°F | 135°F | 145°F | 165°F |
| Burgers, ½ lb.* | 450°F | 120°F | 130°F | 135°F | 145°F | 165°F |
| Roast Beef (bone-in)* Roast Beef (boneless)* | 350°F | 120°F | 130°F | 135°F | 145°F | 165°F |
| Lamb (bone-in)* Lamb (boneless) * | 350°F | 125°F | 135°F | 145°F | 150°F | 160°F |
| Pork (bone-in)* Pork (boneless)* | 350°F | 145°F | 150°F | 165°F | ||
| Salmon, Tuna, Halibut, Swordfish* | 450°F | 145°F | 150°F | 160°F | ||
| Fish Steaks, 1-inch thick* | 450°F | 145°F | 150°F | 160°F | ||
| Sausage | 450°F | 160°F | ||||
| Cooking times may vary. Consuming raw or undercooked meat, poultry, or seafood may increase your risk of food borne illness. *To reduce the risk, cook your food to USDA-safe temperatures. | ||||||
Notes
Avoid touching any bone when inserting the Probe. When air frying, make sure to insert the Probe directly into the center (from the side) of any meat you plan to flip. Avoid inserting the Probe at an angle.
The Mute Feature
To mute or unmute the Pro-Smart Oven's alert sounds, press Sear + STAGE. To mute or unmute the door alarm sounds, press and hold Function.
Notes
The alert sounds for the end of a cooking cycle and carryover cooking cannot be muted.
The Clock Feature
Setting the Clock
- Press Preheat + Time. The screen will show 12:00pm.
- Turn the Select dial to the right for pm or to the left for am to select the time.
- Press Select to lock in the selected time or wait for 3 seconds for it to lock automatically.
- The clock may be set as long as the Pro-Smart Oven is plugged in, wheth er it is on or off.
- While cooking, press Preheat + Time to show the clock time.
Setting the Clock While Cooking or in Standby Mode
- Press Preheat + Time to display the current time.
- Adjust the clock time by turning the Select dial.
- To stop the clock display, press Preheat + Time again.
The Lock Feature
The Lock Feature is used to disable the ProSmart Oven's keypad, preventing it from responding to most actions until either the keypad is unlocked or cooking has finished.
- To activate the keypad lock, press Menu + STAGE. The screen will show "LOCk" in the temperature section, indicating that the keypad is now locked.
- While the keypad is locked, no buttons will function except Light, Power, and the Menu + STAGE combination (to unlock).
The Wattage Feature
To change the wattage used by the ProSmart Oven from its 1,800W default:
- Press and hold STAGE + WiFi.
- Turn the Select dial to the desired wattage from 1,800 to 1,500 to 700 Watts.
- Press the Select dial to confirm the new wattage setting.
The Pro-Smart Oven will remain at that wattage until it is changed again.
ADVANCED FUNCTIONS
The Todd English Pro-Smart Oven's Advanced Features are primarily for experienced cooks who are trying to achieve specific results by using stage or slow cooking for juciest and tastiest results, or searing the outside for that delicious crisp. They are not needed to achieve amazing results with this unit.
These features are complex and are not for novices. Those who choose to use them do so at their own risk.
Stage Cooking

You can program up to 5 cooking stages to ensure your meals are cooked the way you want.
- Press Function. Use the Select dial to choose a function. For example, "Air Fry". This is Stage 1. The cooking temperature and time can be adjusted by pressing Temp or Time and turning the Select dial.
- Press and hold Light/STAGE. "Stage 2" will flash. The time will show 00:00 minutes while the temperature is retained from Stage 1. Adjust the time and temperature as needed. You can add a total of 5 cooking stages. When finished, press START/PAUSE..
- To return to Stage 1, press and hold Light/STAGE until "Stage 1" flashes.
Notes
- In this example, Air Fry was the cooking function, but you can select any of the 20 cooking functions and follow the same steps.
- If the temperature in Stage 1 is changed, the default temperature for all other stages will be that function's default temperature, not the changed temperature.
- If a time is not entered in a Stage but other stages are set, it will skip to the next Stage.
Stage with Probe
Each stage can have a different Probe target temperature and cooking temperature. Set the Probe target temperature for each stage and the Pro-Smart Oven will cook each stage until that temperature is achieved and then move on to the next stage. Once the Probe target temperature of the last stage is reached, the Pro-Smart Oven will shut-off.
- When setting the Probe temperature, you do not need to set a cooking time.
- To view Probe settings for each stage, press Probe twice to view the present stage and probe temperature. Press Stage for all stages used. The unit will display the Probe temperature until another function is pressed.
- If you do not want a Probe setting for a stage, press and hold Probe, turn the Select dial to the left, past 50°F, until "OFF" is displayed.
The Sear Function

The Sear Function uses the Top and Bottom heaters to seal in flavor and juices. You can sear your meat before, after, or both before and after, the regular cooking stages. Sear Function temperatures and times can easily be adjusted prior to, and during, the searing process.
- Sear Default Settings: 450°F for 5-minutes.
- Selectable Sear Temperature Range: 50°F–500°F
- Selectable Sear Time Range: 0–30 minutes (00:00–00:30)
The Three Sear Settings
- Sear 1: ALWAYS the function right BEFORE the regular cooking stages.
- Sear 1 & 2: ALWAYS right BEFORE and right AFTER the regular cooking stages.
- Sear 2: ALWAYS right AFTER the regular cooking stages.
Using the Sear Function
- Press Sear once for Sear 1, press twice for Sear 1 & 2 and three times for Sear 2.
- Select the cooking function and make any changes to the temperature and time, if needed. This can be done before or during the cooking cycle.
- Press the START/PAUSE to begin the cooking cycle. When the cooking cycle has finished the unit will beep 3 times and display "END".
Preheating with the Sear Function
If you are Preheating, that will precede Sear, which begins the cooking cycle. The unit will always cook in the following sequence:
- Preheat
- Cooking Cycle Begins
- Sear 1 / Toast
- Function / Menu / Probe / Stage 1–5 (Function/Menu can be one of stages)
- Sear 2
- Cooking Cycle Ends
- Warm
Sear as an Independent Function
Sear temperatures and times can be adjusted prior to, and during, the searing process.
- Press and hold Sear.
- The Pro-Smart Oven will begin to sear at 450°F for 5 minutes (00:05).
- The user can then adjust the Sear temperature and time.
- The screen will show "Sear".
- The Pro-Smart Oven will sear at the set temperature and time, and then beep three times and display "END".
Notes
To set the main cooking time or temperature after pressing Sear, press and hold STAGE. The screen will show "Stage 1", "350°F", "00:15". Even though the Pro-Smart Oven is no longer in Sear mode, it remembers that Sear 1 has been set.
Slow Cook
The Slow Cook function gives you tender, flavorful results by cooking at lower temperatures for longer periods of time. The default Slow Cook temperature is 190°F. The Slow Cook Probe target temperature range is 50°F–212°F and the Slow Cook temperature range is 175°F–235°F.
You may set the Slow Cook Function to cook for a set amount of time AFTER reaching the Slow Cook Probe target temperature:
- Press and hold Probe. It will show the Probe target temperature default of 165°F.
- If needed, adjust the Probe target temperature with the Select dial. Press Probe + Menu. the Oven will beep twice, one short and one long, and the screen will show the default 1 hour cooking time (01:00).
- Use the Select dial to adjust the amount of time, up to 02:00 (2 hours), you want the food to maintain the Probe temperature.
Notes
The Pro-Smart Oven will automatically cook at a temperature 25°F higher than the set target Slow Cook Probe temperature. In this example it will cook at 190°F.
If the user wants to change the Slow Cook cooking temperature:
- Press the Temp button. The screen will read 190°F. This is the default Slow Cook cooking temperature.
- Use the Selectdial to adjust the Slow Cook cooking temperature between 180°F–235°F.
- The Slow Cook cooking temperature shall be at least 10°F higher than the Probe target temperature. If the Probe target temperature was set at 170°F, then the cook temperature range that user can choose from is 180°F–235°F (The user cannot choose between 50°F–175°F).
- Press START/PAUSE. The Oven will reach the Probe target temperature of 170°F and then maintain that temperature for 02:00 (2 hours).
- Once the time runs out, the ProSmart Oven will display "END" and beep 3 times.
- IF THE TARGET TEMPERATURE IS NOT REACHED AFTER 6 HRS OF COOKING, THE PRO-SMART OVEN WILL AUTOMATICALLY TURN OFF TO AVOID CONTINUAL COOKING.
- If the user unplugs the probe during the Slow Cook Function, the Pro-Smart Oven will continue cooking with the set cook temperature until time runs out. If the user plugs in the probe, the Pro-Smart Oven will verify the food temperature and go back to the Slow Cook Function.
CARE AND MAINTENANCE
Before First Use
- Remove all the packaging materials.
- Remove the tape and labels on the appliance.
- Clean the Wire Rack, Grill/Griddle Rack, Grill/Griddle, Air Fry Basket, Crumb Tray, Baking and Drip Pan thoroughly with hot water, a nonabrasive sponge, and mild dish detergent, or in the dishwasher, top rack only.
- Wipe the Digital Temperature Probe and the inside and outside of the Pro-Smart Oven with a damp dishcloth or wet cloth and dry thoroughly.
After Each Use
- Allow the Pro-Smart Oven to cool completely before cleaning.
- Always unplug the Pro-Smart Oven from the electrical outlet prior to cleaning. NEVER clean the Pro-Smart Oven while it is plugged in.
- Never use harsh abrasive or corrosive cleaning products, as they may damage the finish or oven surface. Wipe the exterior with a clean, damp cloth and dry thoroughly. NEVER spray a solution directly on the unit, especially the control panel.
- Apply the cleaning agent directly to a cloth towel.
- To clean the interior, use a damp cloth, mild liquid soap, and a clean cloth.
- Never use steel wool pads, etc., on the interior or exterior of the Pro-Smart Oven.
- NEVER HANDLE A HOT GRILL/ GRIDDLE. Allow the Grill/Griddle to completely cool before cleaning. Once cooled, wipe it with a clean damp towel then rinse it in a sink with cool water and dry it completely.
![]()
NEVER submerge or rinse a hot Grill/ Griddle in water. The Grill/Griddle may warp or break underwater. - When the glass window is completely cool, spray glass cleaner on a clean cloth towel. Clean both the inside and outside of the window. Use a damp cloth to rinse the window then dry it completely with a clean dry towel.
- To remove crumbs, slide out the Crumb Tray and discard the crumbs. Wipe it clean and replace it after each use. Never operate the oven without the Crumb Tray in place.
- To remove baked-on grease, soak the Wire Rack, Grill/Griddle Rack, Grill/ Griddle, Air Fry Basket, and/or Crumb Tray, Baking and Drip Pan, in hot, soapy water for a minimum of 10 minutes. Rinse and dry thoroughly.


Do not put the Digital Temperature Probe in the dishwasher or immerse in water. Doing so can damage the components. HAND WASH ONLY.
Storage
- Unplug the Pro-Smart Oven and let it cool down completely.
- Make sure that all parts are clean and dry.
- Never wrap the cord around the ProSmart Oven.
Do not immerse the Pro-Smart Oven in water or attempt to put it through the dishwasher. The outer surface may be cleaned by wiping it carefully with a damp dishcloth or sponge. Make sure the Pro-Smart Oven has cooled completely prior to cleaning.
Replacing the Lightbulb
Allow the interior of the oven to fully cool before replacing the oven's halogenlight bulb. Failure to do so could result in burns or damage to the glass cover or the light bulb itself. Always wear rubber gloves when changing the lightbulb and be careful of sharp edges.
- Using a Phillips head screwdriver, unscrew the retaining bolt halfway.

- Using your fingers, manually unscrew it the rest of the way.
- Gently press on the lower corner of the glass cover to swing it open.

- Pull the bulb straight out from the socket to remove it.


Error Messages
| Error Message | Solution(s) |
| Er1 | The NTC Temperature Sensor has overheated. Turn the Pro-Smart Oven off and allow it to cool. If the Pro-Smart Oven is still not working after it cools down, contact NuWave Customer Service. |
| Err1 | The NTC Temperature Sensor has short circuited. Contact NuWave. |
| Err2 | The NTC Temperature Sensor is open. Contact NuWave. |
| Err8 | A button may be jammed. |
| No PRB | The Probe is unplugged when Probe was pressed, or the Probe was unplugged while cooking. Plug in the Probe. |
| Prb2 | The Probe target temperature is set higher than the set cooking temperature. |
| Prb3 | The Probe has short-circuited. Contact NuWave Customer Service |
| Prb4 | The Probe sensor has detected no temperature increase. |
| |
TROUBLESHOOTING
The Pro-Smart Oven is engineered with an automatic shut-off feature to prevent overheating during use. If the Pro-Smart Oven shuts off to cool itself down, an odor may be detected. Unplug the Pro-Smart Oven and wait for it to completely cool down. To prevent the Pro-Smart Oven from overheating, do not cook foods at higher temperatures or for longer times than recommended.
The Pro-Smart Oven Does Not Work
The Pro-Smart Oven may not be plugged-in or turned on.
Insert the plug into an appropriate grounded power socket. Press Power. If the Pro-Smart Oven is still not working, contact Customer Service.
The Pro-Smart Oven Door Will Not Close Completely
The food item you are trying to cook is too large, or the Oven Racks or accessories are not properly set in place.
Decrease the size or amount of food being cooked. Make sure the Racks and Pans are properly placed and pushed to the back of the Pro-Smart Oven.
The Food is Fried Unevenly
The food you are cooking needs to be shaken or flipped halfway through the process.
Halfway through cooking, open the Oven and shake or flip your food.
The Crumb Tray Does Not Fit Properly in the Pro-Smart Oven
The Crumb Tray may not be correctly placed into the slot, or something may be blocking it.
Remove the Crumb Tray and clean away any food items that may have accumulated in the back of the Pro-Smart Oven.
White Smoke is Coming Out of the Pro-Smart Oven
You are cooking greasy foods, or the Cooking Rack, Chrome Mesh Rack and/or Grill/Griddle may be carrying greasy residue from previous uses.
Clean the Cooking Rack, Chrome Mesh Rack, Grill/Griddle and Crumb Tray regularly between uses.
The LED Display is Blank
The Pro-Smart Oven may have overheated and then shut down to cool off, or some required action was not taken and the Oven shut down. Finally, the Control Panel itself may not be working correctly.
Unplug the Pro-Smart Oven and allow it to completely cool. Plug it in and see if it is working. If the screen remains blank, contact Customer Service.
The Pro-Smart Oven is Not Heating
The Pro-Smart Oven may be unplugged. It may have also overheated or the heating elements may not be working.
Make sure the Pro-Smart Oven is plugged in and has completely cooled. Start a cooking cycle and see if the unit comes up to the correct temperature. If the Pro-Smart Oven still fails to heat up, contact Customer Service.
For further assistance, please contact NuWave's Customer Service Department at 1-877-689-2838 (Mon–Fri 7:30am–4:30pm CST), or at help@nuwavenow.com.
SAFEGUARDS & INFORMATION
ALWAYS KEEP THIS MANUAL HANDY FOR FUTURE REFERENCE.
READ ALL INSTRUCTIONS and WARNINGS The failure to follow any of the important safeguards, warnings, or instructions for safe use is a misuse of the Todd English Pro-Smart Oven that can void your warranty and create the risk of serious injury. When using the Pro-Smart Oven, only use the appliance as intended and for no other use, and always follow basic safety precautions.
- Read all instructions.
- Ensure the Pro-Smart Oven and all parts are clean and dry before each use.
- Do not touch hot surfaces. The appliance's surfaces may be hot during and after use. Use handles.
- Discard the protective plastic covering the power plug before use.
- Do not let the electrical cord touch hot surfaces or hang over any edge.
- Do not immerse cord, plug, or appliance in water or other liquid.
- Close supervision is necessary when any appliance is used near children. This appliance is not intended for use by persons with reduced physical, sensory or mental capabilities, children, or persons with a lack of experience or knowledge, unless supervised or instructed in the use of the appliance by one responsible for their safety.
- Do not operate if the Pro-Smart Oven or cord malfunctions or has been damaged in any way. Return the unit to the nearest authorized service facility for examination, repair, or adjustment.
- Use only on a clean, stable, dry, and level surface.
- Do not use accessories or attachments not recommended by the manufacturer.
- DO NOT USE OUTDOORS. FOR INDOOR USE ONLY.
- Do not place on or near a hot gas or electric burner, or in a heated oven.
- Unplug the appliance when not in use and allow the appliance to cool completely before cleaning or removing/replacing parts.
- Do not cover or block the intake air vents located in the back and sides of the Pro- Smart Oven, as doing so can prevent proper ventilation. There should be at least 5 inches of free space behind, to the sides of, and on top of the Pro-Smart Oven.
- Use aluminum foil to wrap foods that produce oil or juice when operating and attach the Grill/Griddle or use the Drip/Baking Pan to catch drippings and prevent fire.
- To prevent fire, do not allow any foil to touch the heating elements.
- Do not alter or modify any part of the Pro-Smart Oven or use attachments or accessories not recommended by the manufacturer.
- It is normal for some smoke to escape the Pro-Smart Oven when heating for the first time.
- If excess smoke is escaping from the air vent during operation, unplug the Pro-Smart Oven immediately and contact NuWave Customer Service at 1-877-689-2838 or email help@nuwavenow.com
- During use, steam may be released from the air outlet vents. Keep your hands and face away from these vents. Be careful of hot steam escaping when opening the Pro- Smart Oven.
- Avoid placing your face near the glass door during use.
- Never touch the insides of the Pro-Smart Oven while it is operating.
- Use extreme caution when moving an appliance containing hot oil or other hot liquids.
- Never leave the Pro-Smart Oven unattended during use.
- Do not disassemble the Pro-Smart Oven.
- Allow the Pro-Smart Oven to cool before putting in or pulling out items or before cleaning.
- Keep this manual handy for future reference.
- Always make sure your fingers are clean and dry when pressing the buttons.
Toaster Oven Warnings (UL Standard 1026):
- Oversize foods or metal utensils must not be inserted in a toaster oven as they may create a fire or risk of electric shock.
- A fire may occur if the toaster-oven is covered or touching flammable material, including curtains, draperies, walls, and the like, when in operation. Do not store any item on top of the appliance when in operation.
- Do not clean with metal scouring pads. Pieces can break off the pad and touch electrical parts creating a risk of electric shock.
- Extreme caution should be exercised when using containers constructed of materials other than metal or glass.
- Do not store any materials, other than the manufacturers recommended accessories, in this oven when not in use.
- Do not place any of the following materials in the oven: paper, cardboard, plastic, cloth, wood, flammable materials, sealed containers, and the like.
- Do not cover the crumb tray or any part of the oven with metal foil. This will cause overheating of the oven.
- Turn off the Pro-Smart Oven by pressing the Power Icon before unplugging the unit from the wall socket.
Power-Supply Cords
A short power-supply cord (or detachable power-supply cord) is provided to reduce the risk of becoming entangled in, or tripping over, a longer cord. Longer detachable power-supply cords or extension cords are available and may be used if care is exercised in their use. If a longer detachable power-supply cord or extension cord is used:
- The marked electrical rating of the extension cord should be at least as great as the electrical rating of the appliance.
- The longer cord should be arranged so that it will not drape over any countertop or tabletop where it could be pulled on or tripped over unintentionally.
- The Pro-Smart Oven should be operated on a separate electrical outlet from other operating appliances due to wattage limitations.
- This appliance is of the 3-pin grounded type, so the cord set or extension cord should also be a grounding type 3-wire cord.

To reduce the risk of electric shock, do not perform any servicing other than that which is contained in these instructions.
To disconnect the Pro-Smart Oven, turn it off by pressing the Power Icon and then remove the plug from the wall outlet.
NEVER use the Pro-Smart Oven with loose, damaged, or missing parts.
While cooking, ALWAYS use oven mitts and allow accessories to cool before washing.
Questions or Concerns?
Toll Free: 1-877-689-2838 (Mon-Fri 7:30am-4:30pm CST)
help@nuwavenow.com

Documents / Resources
References
Download manual
Here you can download full pdf version of manual, it may contain additional safety instructions, warranty information, FCC rules, etc.
Download NuWave TODD ENGLISH PRO-SMART 20902/20901/20906/20905 - OVEN Manual
Advertisement


Need help?
Do you have a question about the TODD ENGLISH PRO-SMART 20902 and is the answer not in the manual?
Questions and answers