Advertisement
- 1 REGISTER NOW!
- 2 PARTS & ACCESSORIES
- 3 ASSEMBLY GUIDE
- 4 CONNECTIVITY
- 5 GETTING STARTED
-
6
INSTRUCTIONS
- 6.1 Quick Start
-
6.2
Basic Functions
- 6.2.1 Working with Time and Temperature
- 6.2.2 Using the Cooking Functions
- 6.2.3 Using Menu Presets
- 6.2.4 Reviewing the Steps and Functions
- 6.2.5 Using Preheat
- 6.2.6 Using the Digital Temperature Probe
- 6.2.7 Using the Probe with Stage Cooking
- 6.2.8 Mute/Unmute
- 6.2.9 Setting the Clock
- 6.2.10 Lock
- 6.2.11 Wattage
- 7 CLEANING & MAINTENANCE
- 8 TROUBLESHOOTING GUIDE
- 9 Documents / Resources
REGISTER NOW!
for an additional 12-month warranty!
- Using your smartphone or smart device, scan the QR code located on the back of the Pro Smart Oven.
![]()
- You will be directed to NuWave's product registration page with your Pro Smart Oven's unique serial number automatically entered in the appropriate field.
NOTE: If you do not have a web-enabled smart device, simply visit nuwavenow.com/QR and manually enter in your Pro Smart Oven's serial number. - Fill out the remaining information and complete the optional survey.
- Once you submit your information, you will receive a confirmation email containing your extended warranty details.

*Register your product within 1 year of date of purchase for a free 12-month extension of your limited warranty.

- Open your mobile app store (App Store, Google™ Play).
![www.apple.com]()
![play.google.com]()
- Search for "QR code readers."
![]()
- Simply download the QR code reader to your phone, open it, scan the code and you are ready to go.
NOTE: You may need to open your downloaded QR code reader each time you want to scan a QR code.


PARTS & ACCESSORIES

To order parts, see Replaceable Parts, then contact Customer Service at 877-689-2838 or help@nuwavenow.com, or visit www.nuwavenow.com.
ASSEMBLY GUIDE
BEFORE FIRST USE
- Remove and discard any packaging material from the unit.
- Remove all accessories from their packaging and wash them in warm, soapy water or in the dishwasher, top rack only. NEVER submerge the main unit in water.
Note: While most of the accessories are dishwasher-safe, the Probe is not. Hand washing is, therefore, highly recommended. Frequent dishwasher cleaning may lead to premature wear.

Grill/Griddle
For grilling steaks and roasting vegetables. Flip it to the Griddle side for baking.
Note: The Grill/Griddle must be used with the Grill/Griddle Rack.
Grill/Griddle Rack
½-inch depth is ideal for dehydrating.
Air Fry Basket
1-inch depth is perfect for making crispy chicken, fries, and more.
Wire Rack
Can be used to hold cooking or baking pans, or simply place your food directly on the rack.
Crumb Tray
Catches crumbs and drippings and must remain in the unit at all times while cooking.
Baking and Drip Tray
Ideal for baking, roasting, and as a drip pan when air frying, protecting the bottom heating elements from dripping oils and fats.
Temperature Probe
Eliminates the guesswork of cooking. Consult the temperature guide in the Probe section for more information.


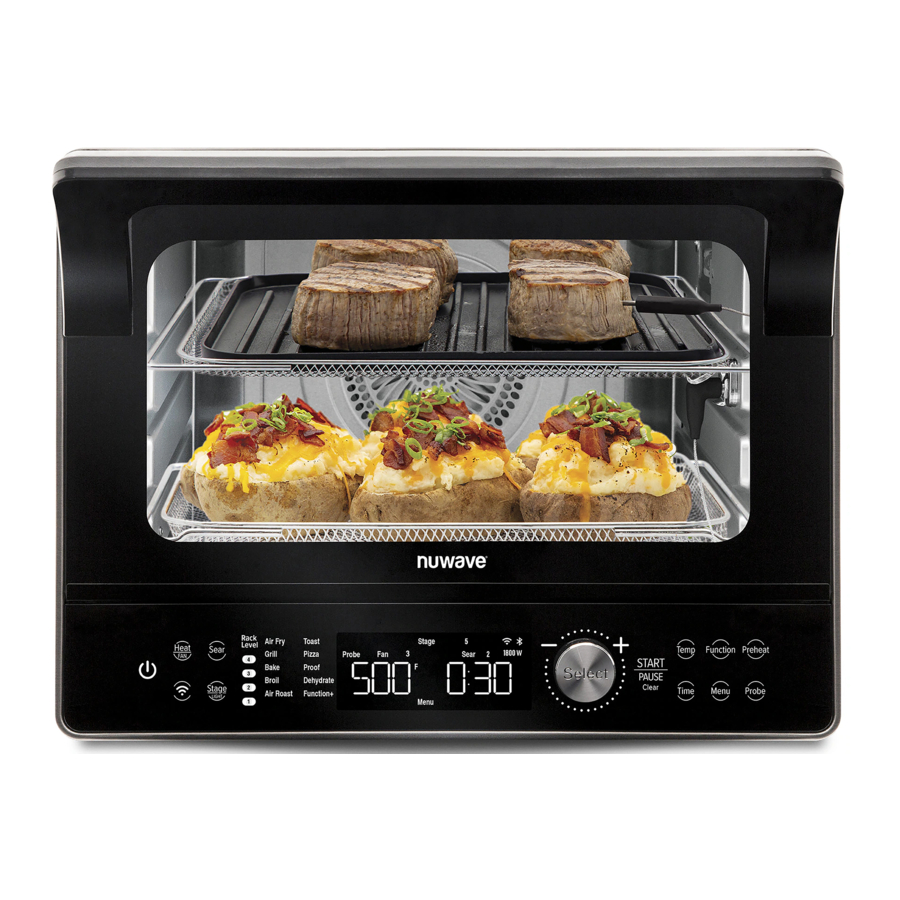
The oven has 4 rack positions where most of your accessories can slide into the unit. When you select a function, the appropriate rack number(s) will illuminate on the control panel. The numbers on the control panel will coincide with those on the interior of the unit.
 |
| ALWAYS use extreme caution when handling accessories when cooking. Use oven mitts and allow accessories to cool before washing. |
CONNECTIVITY
WiFi and Bluetooth
With the NuWave Connect App, you can operate your NuWave Pro Smart Oven with your Smart Device.
Downloading the NuWave Connect App
Using the built-in QR reader in your Camera App:
- Scan the QR code below. It will take you to the App's download page on either the Google Play Store or the Apple AppStore.
![]()
![play.google.com]()
![www.apple.com]()
- Follow the download and installation instructions.

If your phone does not have that capability built-in, simply download a 3rd-Party QR Scanning App before scanning the NuWave QR Codes and you are ready to go.
- Open your mobile app store (App Store, Google Play).
- Search for "QR code readers."
- Simply download the QR code reader to your phone, open it, scan the code, and you are ready to go.
WI-FI Set-Up and Activation
- Download and install the NuWave Connect App.
- Make sure your phone is connected to your home Wi-Fi 2.4GHz network. Open the app and follow the in-app instructions for the verification process. Once verification is complete, begin adding devices. To add a device, tap "+" then select "Pro Smart Oven."
- While the Pro Smart Oven is in standby mode, push and hold WiFi for 1 second. This will activate or deactivate the built-in Wi-Fi.
- The Wi-Fi icon in the screen will indicate the status of the Pro Smart Oven's Wi-Fi connection. Make sure the Pro Smart Oven Wi-Fi is active and connected with your Wi-Fi 2.4GHz network.
- During first-time setup, the Wi-Fi icon will blink rapidly while pairing with the network.
- When the Wi-Fi is connected, the icon will light up and remain lit.
- When the Wi-Fi is disconnected, the icon will be off.
- If the connection process fails, the Wi-Fi light will turn off.
Notes
Some instances may require the user to hold the key button again to return the Wi-Fi to pairing mode even if there was previously a successful connection.
- Whenever the Pro Smart Oven is unplugged, the Wi-Fi will need to be re-paired once it's plugged back in.
- If the Wi-Fi connection is unsuccessful, the Wi-Fi / Bluetooth icons turn off, indicating that the NuWave Pro Smart Oven is not connected to the Wi-Fi.
Bluetooth Connection
The Pro Smart Oven Wi-Fi module also offers back-up Bluetooth connectivity. If your Wi-Fi network goes down, the Pro Smart Oven's Bluetooth signal will automatically pair with your Bluetooth device.
To take advantage of this feature, ensure that your smart device's Bluetooth, Wi-Fi and Mobile Data options are all enabled.
Pairing your device with the Pro Smart Oven via Bluetooth takes up to 5 minutes, but once your device is paired, the NuWave® Connect App will operate normally within the range.
Extending Control to the NuWave Connect App
Controlling the Pro Smart Oven with a smart device is easy and convenient.
- Make sure that the NuWave Connect App is installed on your smart device.
- Make sure the Pro Smart Oven Wi-Fi is active and connected with your Wi-Fi 2.4GHz network.
- Press WIFI. This will extend control of the Pro Smart Oven to the NuWave Connect App.
Notes
You will only have to do this once. After control has been extended, it will remain extended, and to use it, you will only have to bring up the Pro Smart Oven on the NuWave Connect App.
GETTING STARTED
The easy-to-use functionality of the Pro Smart Oven is divided into Basic and Advanced functions, with the former offering the full cooking functionality of the unit and the latter giving you control over fan and heat strength and allowing you to program different cooking stages, features you will primarily use to create your own cooking Presets.
| Button | Function |
 | Turns the Pro Smart Oven on and off. |
| START/ PAUSE & CLEAR | Starts and pauses the cooking process, and allows you to clear any selections. |
| Temp & Time | Allows you to adjust temperature and time before and during the cooking process. |
| Menu | Gives you access to 100 cooking presets and allows you to store an additional 50 of your own. Refer to the 100 Presets in the Quick Start Guide. |
| Function | Choose between 20 cooking options. |
| Probe | Helps to accurately cook your food to your preferred internal temperature. Plugs inside, to the right side. |
| Preheat | Ensures the Pro Smart Oven is at the set cooking temperature when you insert your food, giving you crispier results. |
| Heat/FAN | Control the Pro Smart Oven's heat sources (top, bottom, and/or rear) and fan speeds |
| Sear | Sear your food before and/or after the cooking process. Not required for every cooking process. |
| Use |
| The Power button turns the Pro Smart Oven on and off and stops all cooking functions. |
| Select a cooking function, press START/PAUSE to begin, pause, or resume cooking. While you are on the Setting mode, press and hold START/PAUSE to clear all selections. |
| Press Temp and use the Select dial to adjust the temperature. Press Time and use the Select dial to adjust the time. |
| Press Menu and use the Select dial to choose preset programs (1-100) to cook. Once you have chosen one, the temperature and time can be adjusted. Press START/PAUSE to begin the chosen program. Note: Presets 1-100 can be adjusted, but they will return to the default temperatures and times after cooking has finished. |
| Press Function and scroll through the cooking functions. At "Function+", press the Select dial for functions 10 – 20. Once you've picked a function, press the Select dial and START/PAUSE to begin cooking. |
| The default is 165°F. Plug the Probe into the jack in your Pro Smart Oven. Press and hold Probe for 1 second to set the Probe target internal temperature for your food using the Select dial. Insert the other end of the Probe into your food. Press START/PAUSE to begin cooking. |
| The default is 400°F (default cooking temperature). To begin, press START/PAUSE and adjust the cooking temperature and time. The Pro Smart Oven will preheat at the set cooking temperature. Once the Pro Smart Oven has reached the set temperature, the Pro Smart Oven will beep twice, countdown for 10 seconds, beep once more, and then start cooking automatically. To deactivate automatic preheat, press Menu + Preheat prior to cooking. Repeat to reactivate automatic preheat. |
| Heat: Press Heat/FAN and adjust the rear, top, and/or bottom heating using the Select dial. The odd percentage of Top/Bottom heat defaults to the bottom. Fan: Adjust the fan speed from 0-3. Press and hold Heat/FAN and use the Select dial to adjust. Note: If you are using the rear heater, the fan speed must be 1 or more. |
| The defaults are 450°F for 5 minutes. Press Sear. Then, adjust the Sear temperature and time, if desired, and press START/PAUSE to begin cooking. |
Using the Accessories
| Functions | Grill/ Griddle Grill/ Griddle Rack | Grill/ Griddle Rack | Air Fry Basket | Wire Rack | ||
| Air Fry | ✓ | ✓ | ||||
| Grill | ✓ | |||||
| Bake* | ✓ | ✓ | ||||
| Broil* | ✓ | ✓ | ||||
| Air Roast | ✓ | ✓ | ✓ | |||
| Toast | ✓ | ✓ | ✓ | |||
| Pizza* | ✓ | ✓ | ||||
| Proof | ✓ | |||||
| Dehydrate | ✓ | ✓ | ||||
| Cookie* | ✓ | ✓ | ||||
| Defrost* | ✓ | ✓ | ✓ | |||
| D.I.Y. | ✓ | ✓ | ✓ | ✓ | ||
| Oven Poach* | ✓ | ✓ | ✓ | |||
| Rawtarian* | ✓ | ✓ | ✓ | |||
| Reheat* | ✓ | ✓ | ✓ | |||
| Sanitize* | ✓ | ✓ | ✓ | |||
| Slow Cook* | ✓ | ✓ | ✓ | |||
| Slow Roast* | ✓ | ✓ | ✓ | |||
| Warm* | ✓ | ✓ | ✓ | |||
| Whole Roast* | ✓ | ✓ | ✓ | ✓ | ||
| *Use an oven-safe baking/cooking pan when using the Wire Rack. For best results, use the Grill/Griddle and Grill/Griddle Rack. Flip the Grill/Griddle to the Griddle side. | ||||||
| Helpful Hints | ||||||
| ||||||
| Cooking Temperature | Selectable Cooking Time | |||||
| 50F - 275F | 00:00 - 99:59 | |||||
| 280F - 350F | 00:00 - 24:00 | |||||
| 355F - 400F | 00:00 - 04:00 | |||||
| 405F - 450F | 00:00 - 01:00 | |||||
| 455F - 500F | 00:00 - 00:30 | |||||
Basic Key Functions
| Functions | Buttons |
| Carry-over cooking function | Press Menu + Sear |
| Mute/unmute | Press Sear + STAGE |
| Slow Cook | Press Menu + Probe |
| Mute door | Press and hold Function |
| Clock | Press Preheat + Time |
| Lock | Press Menu + STAGE |
| Target Probe temperature | Press Probe for 1 sec |
| Time format change to min: sec | Press Time for 4 sec |
| Temperature change F/C | Press Temp for 4sec |
| Sear as independent function | Press Sear for 1 sec |
| Bluetooth | Press Wi-Fi for 1 sec |
| Watts | Press Wi-Fi + Light |

*When using Rear heat, the fan can't be turned off.

INSTRUCTIONS

Quick Start
- Plug the power cord into an electrical outlet.
- Press the Power button to turn the Pro Smart Oven on or off. When turned on:
- Each function will flash in turn before the Pro Smart Oven defaults to Air Fry.
- That function's default cooking time and temperature will be displayed.
- If that function has Preheat, then "Preheat" will be lit as well.
- Press and hold Light to turn on the lamp inside the oven and press and hold it again to turn the lamp off.
- Press Temp, then turn the Select dial to adjust the cooking temperature. Press Time and turn the Select dial to adjust the cooking time.
- Temperature, time, and heating source(s) can be adjusted before and during the cooking process.
- Open the oven door and place your food in the Pro Smart Oven.
- While cooking, opening the door will pause the cooking cycle and turn on the oven light.
- Closing the door again will resume the cooking cycle and turn off the oven light.
- If the door remains open for 30 minutes or more, the Pro Smart Oven will turn off.
- Press START/PAUSE. The Pro Smart Oven will begin cooking and the screen will show the cooking temperature and countdown time. ":" will flash.
- Press START/PAUSE again to pause cooking, and again to resume it.
- Press and hold START/PAUSE to clear all settings and selections and return the Pro Smart Oven to its default settings.
- Once the Pro Smart Oven has finished cooking, the screen will show "END" and will beep 3 times.
Basic Functions
With its Cooking Presets and programmed Cooking Functions, the Pro Smart Oven's suite of Basic Functions offer you all you need to carry out nearly every cooking task you might face.
Working with Time and Temperature
You can set the cooking time and temperature before cooking, but you always have the option of adjusting them while you are cooking as well.
To Set the Cooking Temperature and Time Before Cooking
- Press the Power button. The screen will show a cooking function (i.e., "Pizza"), the cooking temperature, the cooking count down time (i.e., "00:15"), "Rear", "Bottom", "Fan", and "Preheat" (if active). The ":" will be lit.
- Press Temp. Turn the Select dial to adjust to the desired cooking temperature.
- Press Time. Turn the Select dial to adjust to the desired cooking time.
- Press START/PAUSE to begin cooking at the set temperature and time.
- When finished, the screen will show "END" and the Pro Smart Oven will beep 3 times.
To Adjust the Cooking Temperature and Time While Cooking
- Press Temp once. Use the Select dial to adjust to the desired cooking temperature.
- Press Time once. Use the Select dial to adjust to the desired cooking time.
- The Pro Smart Oven will continue cooking at the new temperature and time.
- When finished, the screen will show "END" and the Pro Smart Oven will beep 3 times.
Pro Tip
When using your own recipes, especially those written for a conventional oven, cooking times can be different. So, until you know how your recipe will take in the Pro Smart Oven, make sure to check on your food to keep it from burning.
Changing the Temperature Format
The default temperature format is Fahrenheit, but you can change that to Celsius by pressing and holding Temp. The Pro Smart Oven will switch from "F" (Fahrenheit) to "C" (Celsius). To change back, simply press and hold Temp again.
- The temperature figure will change with the change in temperature format.
- The temperature format cannot be switched while cooking.
- The temperature format can only be switched when the temperature is displayed.
- Fahrenheit is the default temperature format. If you switch the format to Celsius, the format will remain Celsius, even if unplugged, until you change it back.
Changing the Time Format
The default time format is hours: minutes (hh: mm). To change that to minutes: seconds (mm: ss:), press and hold Time. The time format will move from hh: mm to mm: ss. Press and hold Time again to switch back.
- The time format cannot be switched while cooking.
- The time format can only be switched when the time is displayed.
- If you switch time formats, the Pro Smart Oven will remain in the new format until you change it back, even if the unit is unplugged.
- The maximum time setting in hh: mm format is 99-hrs.; 59 min.
- The maximum time setting in mm: ss format is 99-min.; 59-sec.
Using the Cooking Functions
The Pro Smart Oven has 20 preprogrammed Cooking Functions to help take the guesswork out of cooking. Air Fry is the default Function, but to access the remaining 19, begin by pressing Function.
- Turn the Select dial or continue to press Function until you reach the Cooking Function you want.
- For "Function+", turn the Select dial to Function+, then press the Select dial (will see #10). Turn the Select dial the function number desired. (10 - 20).
- Once the desired Cooking Function is chosen, press START/PAUSE to start cooking according to the following parameters:
| Cooking Functions | ||||
| #1. Air Fry | ||||
| Defaults | Heat | Fan | Rack Position | |
| Temp 400F Time 15 minutes | Top Bottom Rear | 10% 10% 80% | 3 | 2 or 3 |
| #2. Grill | ||||
| Defaults | Heat | Fan | Rack Position | |
| Temp 450F Time 15 minutes | Top Bottom Rear | 25% 25% 50% | 3 | 3 |
| #3. Bake | ||||
| Defaults | Heat | Fan | Rack Position | |
| Temp 350F Time 25 minutes | Top Bottom Rear | 40% 40% 20% | 1 | 2 |
| #4. Broil | ||||
| Defaults | Heat | Fan | Rack Position | |
| Temp 500F Time 5 minutes | Top Bottom Rear | 80% 0% 20% | 3 | 4 |
| #5. Air Roast | ||||
| Defaults | Heat | Fan | Rack Position | |
| Temp 350F Time 30 minutes | Top Bottom Rear | 30% 30% 40% | 3 | 2 |
| #6. Toast | ||||
| Defaults | Heat | Fan | Rack Position | |
| Temp 425F Time 5 minutes | Top Bottom Rear | 50% 50% 0% | 1 | 3 |
| #7. Pizza | ||||
| Defaults | Heat | Fan | Rack Position | |
| Temp 400F Time 15 minutes | Top Bottom Rear | 0% 70% 30% | 3 | 1 or 2 |
| #8. Proof | ||||
| Defaults | Heat | Fan | Rack Position | |
| Temp 90F Time 30 minutes | Top Bottom Rear | 50% 50% 0% | 0 | 2 or 3 |
| #9. Dehydrate | ||||
| Defaults | Heat | Fan | Rack Position | |
| Temp 100F Time 2 hours | Top Bottom Rear | 50% 50% 0% | 1 | Any |
| #10. Cookie | |||||||||
| Defaults | Heat | Fan | Rack Position | ||||||
| Temp 325F Time 15 minutes | Top Bottom Rear | 40% 40% 20% | 2 | 2 or 3 | |||||
| #11. Defrost | |||||||||
| Defaults | Heat | Fan | Rack Position | ||||||
| Temp 50F Time 30 minutes | Top Bottom Rear | 50% 50% 0% | 3 | Any | |||||
| #12. D.I.Y | |||||||||
| Defaults | Heat | Fan | Rack Position | ||||||
| Temp 350F Time 15 minutes | Top Bottom Rear | 50% 50% 0% | 3 | Any | |||||
| #13. Oven Poach | |||||||||
| Defaults | Heat | Fan | Rack Position | ||||||
| Temp 300F Time 20 minutes | Top Bottom Rear | 50% 50% 0% | 0 | 2 or 3 | |||||
| #14. Rawtarian | |||||||||
| Defaults | Heat | Fan | Rack Position | ||||||
| Temp 115F Time 1 hour | Top Bottom Rear | 50% 50% 0% | 1 | Any | |||||
| #15. Reheat | |||||||||
| Defaults | Heat | Fan | Rack Position | ||||||
| Temp 350F Time 10 minutes | Top Bottom Rear | 50% 50% 0% | 3 | 1 or 2 | |||||
| #16. Sanitize | |||||||||
| Defaults | Heat | Fan | Rack Position | ||||||
| Temp 200F Time 20 minutes | Top Bottom Rear | 50% 50% 0% | 1 | 1 | |||||
| #17. Slow Cook | |||||||||
| Defaults | Heat | Fan | Rack Position | ||||||
| Temp 190F Probe 165F Time 1 hour | Top Bottom Rear | 50% 50% 0% | 3 | 1 or 2 | |||||
| #18. Slow Roast | |||||||||
| Defaults | Heat | Fan | Rack Position | ||||||
| Temp 275F Probe 165F Time 1 hour | Top Bottom Rear | 50% 50% 0% | 3 | 1 | |||||
| #19. Warm | |||||||||
| Defaults | Heat | Fan | Rack Position | ||||||
| Temp 140F Time 1 hour | Top Bottom Rear | 50% 50% 0% | 0 | 1 or 2 | |||||
| #20. Whole Roast | |||||||||
| Defaults | Heat | Fan | Rack Position | ||||||
| Temp 325F Time 1 hour | Top Bottom Rear | 30% 30% 40% | 2 | 1 | |||||
Notes
- To change the default Temp and Time in #12 D.I.Y, press and hold the Select dial for 1 second.
- When using the Toast Function (#6):
- When "Toast" is highlighted, use the Select dial to choose the shade from 1 (lightest) to 10 (darkest) and then press Select to lock in your choice. The default is 5.
- Turn the Select dial again to choose the number of slices of toast from 1 – 6. The default is 2.
- All default temperatures, times, and rack positions are offered as a guide. Adjustments to one or more of them may be needed to reach your desired results.
- The default fan speed is based on the Cooking Function (see table above).
Using Menu Presets
The Menu button allows you to save and recall programmed cooking sequences called Presets. There are 100 Menu Presets (Numbers 1~100) for our most popular recipes that CANNOT be changed, and 50 open memory slots for your own creations.
Accessing Menu Presets
- Press Menu. The screen will show "Menu" and "1".
- Choose the Menu number (1~100) by turning the Select dial. The number will change as the user turns the Select dial up to "100" for the NuWave Menu Presets.
- Once the Menu number is chosen, press START/PAUSE. The Pro Smart Oven will cook according to the selected Preset's programming.
Notes
When a Preset uses stage cooking, all stages in that Preset will show as solid except for the current or selected stage, which will flash.
Programming a Menu Preset
You can program your own Presets into memory slots 101~150.
- Enter the cooking settings using the Preheat, Sear, Temp, and Time functions.
- Press Menu twice. The screen will show "Menu" and "101".
- Choose the Menu number (101~150) by turning the Select dial.
- Once the desired Menu number is chosen, press and hold Menu again to save it.
- Press START/PAUSE and the Pro Smart Oven will begin cooking. The user will be able to recall their new Preset as long as they don't overwrite it with a new one.
Memory Recall
- Press Menu. The screen will show "Menu" and "1".
- The user can choose their Menu number (1~150) by turning the Select dial to the NuWave Preset or user-saved Preset they want.
- Once the Menu number is chosen, press START/PAUSE. The Pro Smart Oven will cook according to the selected Preset's programming.
Notes
While the screen shows "Menu" and a Preset number, press Menu again to switch the number between 1 and 101.
The Review Function
While cooking (":" will flash), you can verify the number and the steps of the current Preset with the Review function. Begin by pressing Menu to display the current Preset number.
Reviewing the Steps and Functions
- Press Menu (and select the recipe number from 1~150 if you are not already cooking).
- Press and hold STAGE or Temp or Time to review the details of the Preset.
- If the Preset has multiple stages or functions, press and hold STAGE until you reach the function and use Time and Temp, and the Select dial to edit the cooking temperature or time.
- If there is only one cooking phase, use Temp or Time to enter Review mode because there are no further cooking stages.
- Once cooking has finished, "END" is displayed and the unit will beep three times. Pressing Menu at this time will display "1".
Modifying a Previously Saved Preset While Cooking:
- Recall the Menu number you wish to edit (see Memory Recall).
- Press START/PAUSE.
- Change the Cooking Temperature and Time
- Press and hold STAGE until the number of the Cooking Function you wish to change shows in the screen. The screen will show the set cooking temperature for the chosen function.
- Turn the Select dial to adjust the cooking temperature or time for the chosen function.
- Press and hold STAGE again to select another function to edit, if needed.
- Turn the Select dial to adjust the cooking temperature or time for that function.
- Continue as above if other functions need to be modified.
- When cooking is finished, the Pro Smart Oven will display "END" and beep three (3) times, and then display "SAVE".
- Press Menu twice, choose the Menu number to which to save the changes, then press and hold Menu. The changed recipe will be saved.
Save an Edited Preset Before Cooking
- Recall the Menu Preset you wish to edit (see Memory Recall).
- Press and hold STAGE until the number of the cooking stage to you wish to change shows in the screen. The screen will show the set cooking temperature for the function chosen.
- Turn the Select dial to adjust the cooking temperature or time for the chosen function.
- Press and hold STAGE again to select another function to edit if needed.
- Turn the Select dial to adjust the cooking temperature or time for that function.
- Continue as above if other stages need to be modified.
- Press Menu twice, then choose the Menu number to save your changes.
- Press and hold Menu to store it. The changed Preset will be saved.
Notes
- If a Preset is edited during cooking, at the end of cooking, the Pro Smart Oven will display "SAVE". The user will then press Menu twice, choose a Menu number, and press and hold Menu again.
- If you choose to save a Preset in a slot that is already taken by another user-saved Preset, the new Preset will override the old one. NuWave Presets 1-100 cannot be overwritten.
Using Preheat
- If the Preheat function does not automatically come on, pressPreheat before cooking.
- Set the cooking temperature and time.
- PressSTART/PAUSE and the Pro Smart Oven will begin preheating to the set cooking temperature.
- "Preheat" will flash while the Pro Smart Oven is preheating.
- When the Pro Smart Oven reaches the set cooking temperature, it will go into a 10-second hold to allow you to put in your food, after which the Pro Smart Oven will begin cooking.
- During the hold, the Pro Smart oven will beep twice, the screen will show a 10-second countdown and "Ready", and then, when the countdown finishes, the Pro Smart Oven will beep once.
- When the Pro Smart Oven has finished cooking, the screen will show "END" and the Pro Smart Oven will beep three (3) times.
Automatic Preheat
The default Preheat setting for the Pro Smart Oven is ON for those functions and Menu Presets that have Preheat, and OFF for those that do not.
- Press Menu + Preheat at the same time to turn off the Automatic Preheat function. The Pro Smart Oven will beep twice.
- Press Menu + Preheat at the same time again to turn on the Automatic Preheat function. The Pro Smart Oven will beep twice.
- If Automatic Preheat is engaged, press Preheat to cancel it.
- If the Pro Smart Oven is turned off and unplugged, it will retain the last Preheat setting used when it is plugged back in and turned on again.
- Pressing Preheat will add or remove Preheat.
Using the Digital Temperature Probe
The Pro Smart Oven's digital Probe lets you cook according to the internal temperature of the food. The default Probe target temperature is 165F with a setting range between of 50F~212F, which is adjustable in 1F increments, or it can be turned off. The Pro Smart Oven will cook until the Probe target temperature is reached, even if the cooking time ends first.
- Press Temp and set the cooking temperature (see Temp/Time).
- Connect the Probe (component) to the Pro Smart Oven. (Inside, right side).
- To read the temperature of the Probe at any time, press Probe once and the screen will show the current Probe temperature, no matter the Cooking Function.
![]()
- To set the Probe target temperature, press and hold Probe. The screen will show "Probe", and "165F". Turn the Select dial to adjust the Probe target temperature.
- Insert the Probe into the food, then push START/PAUSE. The Pro Smart Oven will start to cook to the set Probe target temperature.
- While cooking, the current Probe temperature will be displayed along with "Probe".
- Press Temp and the set oven temperature will be displayed.
- Press and hold Probe, and the screen will show the set target temperature of the Probe. You may then adjust this by using the Select dial.
- While cooking, the current Probe temperature will be displayed along with "Probe".

Carryover Cooking
When the Pro Smart Oven reaches a set temperature (10F default) under the Probe target temperature, it will alert you with 3 sets of short beeps, 2 beeps each. This will happen every time the Probe is in use.
- Press and hold Probe, it will show "165F" and "Probe".
- Set the Probe target temperature.
- After you set the Probe target temperature, press Menu + Sear at the same time. The screen will show "10F", "Carryover" and "Sear". You can then deduct any temperature from 1F to 30F. The main cooking (under stages) will stop at the deducted Probe temperature and will change to Sear 2 and continue to cook until it reaches the original Probe target temperature.
- Once the Probe target temperature is reached during Sear 2, regardless of the set Sear time, it will finish cooking and display "END".
Using the Probe with Stage Cooking
Each stage can have a different Probe target temperature and cooking temperature. Simply set the Probe target temperature for each stage and the Pro Smart Oven will cook each stage until that temperature is achieved and then move on to the next stage. Once the Probe target temperature of the last stage is reached, the Pro Smart Oven will shut-off.
Probe Temperature Guide
| Meats | Temp. | Rare | Med Rare | Med | Med Well | Well |
| Chicken, breast Turkey, breast Duck, breast | 360 | 165 | ||||
| Chicken, whole Turkey, whole Duck, whole | 360 | 165 | ||||
| Chicken, thigh Turkey, thigh Duck, thigh | 360 | 165 | ||||
| Steak, 1-inch thick* | 450 | 120 | 130 | 135 | 145 | 165 |
| Burgers, ½ lb.* | 450 | 120 | 130 | 135 | 145 | 165 |
| Roast Beef (bone-in)* Roast Beef (boneless)* | 350 | 120 | 130 | 135 | 145 | 165 |
| Lamb (bone-in)* Lamb (boneless) * | 350 | 125 | 135 | 145 | 150 | 160 |
| Pork (bone-in)* Pork (boneless)* | 350 | 145 | 150 | 165 | ||
| Salmon, Tuna, Halibut, Swordfish* | 450 | 145 | 150 | 160 | ||
| Fish Steaks, 1-inch thick* | 450 | 145 | 150 | 160 | ||
| Sausage | 450 | 160 | ||||
| Note: Times may vary. Consuming raw or undercooked meats, poultry, or seafood may increase your risk of food borne illness. *To reduce the risk, cook your food to USDA-safe Temperatures. | ||||||
Notes
Avoid touching any bone when inserting the Probe. When air frying, make sure to insert the Probe directly into the center (from the side) of any meat you plan to flip. Avoid inserting the Probe at an angle.

Probe Temperature Errors
| Error | Cause |
| NO PRB |
|
| Prb2 | If the set cooking temperature is lower than the Probe target temperature when the user presses START/PAUSE, it will display a "Prb2" error message, beep three (3) times, and will not start cooking. To avoid an unsafe situation with the Probe shunted outside of the cavity, even though the oven started working with the Probe activated, the oven will shut off if the target cooking temperature is more than 250F and the Probe sensing temperature does not increase more than 5F during first 60min cooking. |
| Prb3 | The Probe has short circuited. Contact Customer Service 1-877-689-2838 or email help@nuwavenow.com |
| Prb4 | If the cooking temperature is less than 250F and the Probe sensing temperature does not increase more than 5F during first 120min cooking, the oven will shut off and display a "Prb4" error notice to the user. |
Mute/Unmute
To mute or unmute the Pro Smart Oven's alert sounds, press Sear + STAGE. To mute or unmute the door alarm sounds, press and hold Function.
Setting the Clock
- Press Preheat + Time. The screen will show "12:00" and flash for 3 seconds while you set the clock. If the clock locks after 3 seconds, press Preheat + Time to restart the process.
- Turn the Select dial to set up the clock. When it reaches "12:00" again, the screen will show "PM".
- The clock may be set as long as the Pro Smart Oven is plugged in, whether it is on or off.
- While cooking, press Preheat + Time to show the clock time.
- Press Select to lock in the new clock time.
- The screen will immediately show the clock at the end of the cooking cycle.
Setting the Clock While Cooking or in Standby Mode
- Press Preheat + Time to display the current time.
- Adjust the clock time by turning the Selectdial.
- To stop the clock display, press Preheat + Time again.
Lock
Lock is used to disable the Pro Smart Oven's keypad, preventing it from responding to most actions until the keypad is unlocked or cooking has finished.
- To activate the keypad lock, press Menu + STAGE. The screen will show "LOC" in the temperature section, indicating that the keypad is now locked.
- While the keypad is locked, no buttons will function except Light, the Power button, and the Menu + STAGE combination (to unlock).
Wattage
To change the Pro Smart Oven's wattage:
- Press and hold STAGE + WiFi.
- Turn the Select dial to the desired wattage.
- Press the Select dial to confirm the new wattage setting.
For more experienced cooks, the Pro Smart Oven's optional Advanced Functions, including Stage cooking, Sear and Slow Cook, may be found in Appendix One.
CLEANING & MAINTENANCE
Cleaning
Before First Use
- Remove all the packaging materials.
- Remove the tape and labels on the appliance.
- Clean the Wire Rack, Grill/Griddle Rack, Grill/Griddle, Air Fry Basket, Crumb Tray, Baking and Drip Pan thoroughly with hot water, a nonabrasive sponge, and mild dish detergent, or in the dishwasher, top rack only.
- Wipe the inside and outside of the Pro Smart Oven with a damp dishcloth or wet cloth and dry thoroughly.
After Each Use
- Allow the Pro Smart Oven to cool completely before cleaning.
- Always unplug the Pro Smart Oven from the electrical outlet prior to cleaning. NEVER clean the Pro Smart Oven while it is plugged in.
- Never use harsh abrasive or corrosive cleaning products, as they may damage the finish or oven surface. Wipe the exterior with a clean, damp cloth and dry thoroughly. NEVER spray a solution directly on the unit, especially the control panel.
- Apply the cleaning agent directly to a cloth towel.
- To clean the interior, use a damp cloth, mild liquid soap, and a clean cloth.
- Never use steel wool pads, etc., on the interior or exterior of the Pro Smart Oven.
- NEVER HANDLE A HOT GRILL/GRIDDLE. Allow the Grill/ Griddle to completely cool before cleaning. Once cooled, wipe it with a clean damp towel then rinse it in a sink with cool water and dry it completely.
![]()
NEVER submerge or rinse a hot Grill/Griddle in water. The Grill/Griddle may warp or break underwater. - When the glass window is completely cool, spray glass cleaner on a clean cloth towel. Clean both the inside and outside of the window. Use a damp cloth to rinse the window then dry it completely with a clean dry towel.
- To remove crumbs, slide out the Crumb Tray and discard the crumbs. Wipe it clean and replace it after each use. Never operate the oven without the Crumb Tray in place.
- To remove baked-on grease, soak the Wire Rack, Grill/Griddle Rack, Grill/Griddle, Air Fry Basket, and/or Crumb Tray, Baking and Drip Pan, in hot, soapy water for a minimum of 10 minutes. Dry thoroughly.


Do not put the Digital Temperature Probe in the dishwasher. Doing so can damage the components. HAND WASH ONLY.
Storage
- Unplug the Pro Smart Oven and let it cool down completely.
- Make sure that all parts are clean and dry.
- Never wrap the cord around the Pro Smart Oven.
Do not immerse the Pro Smart Oven in water or attempt to put it through the dishwasher. The outer surface may be cleaned by wiping it carefully with a damp dishcloth or sponge. Make sure the Pro Smart Oven has cooled completely prior to cleaning.
Replacing the Oven Light Bulb
Allow the interior of the oven to fully cool before replacing the oven light bulb. Failure to do so could result in burns or damage to the glass cover or the light bulb itself.
- Using a Phillips head screwdriver, unscrew the retaining bolt halfway.
![]()
- Using your fingers, manually unscrew it the rest of the way.
- Gently press on the lower corner of the glass cover to swing it open.
![]()
- Pull the bulb straight out from the socket to remove it.


The Pro Smart Oven is engineered with an automatic shut-off feature to prevent overheating during use. If the Pro Smart Oven shuts off to cool itself down, an odor may be detected. Unplug the Pro Smart Oven and wait for it to completely cool down. To prevent the Pro Smart Oven from overheating, do not cook foods at higher temperatures or for longer times than recommended.
TROUBLESHOOTING GUIDE
| The Pro Smart Oven does not work. |
|
| The Pro Smart Oven Door will not close completely. |
|
| The food is fried unevenly. |
| Certain types of ingredients need to be shaken or flipped halfway through the cooking process. |
| Bake vs. Roast vs. Broil |
| Use Bake when cooking items that rise (e.g., cakes and cookies). Use Roast for dense foods that are browned throughout the cooking process. Use Broil to quickly brown or crisp a food item. |
| The Crumb Tray does not fit properly in the Pro Smart Oven |
|
| White smoke is coming out of the Pro Smart Oven. |
|
| The screen is blank. |
|
| The Pro Smart Oven is not heating. |
|
| If the Pro Smart Oven needs to be replaced or returned to the manufacturer, please contact NuWave Customer Service at: 1-877-689-2838 or email help@nuwavenow.com (Mon-Fri 7:30am-4:30pm CST). |
| Error Message: | Solution(s): |
| Er1 | The NTC Temperature Sensor has overheated. Turn the Pro Smart Oven off and allow it to cool. If the Pro Smart Oven is still not working after it cools down, contact Customer Service 1-877689-2838 or email help@nuwavenow.com |
| Err1 | The NTC Temperature Sensor has short circuited. Contact NuWave Customer Service 1-877-689-2838 or email help@nuwavenow.com |
| Err2 | The NTC Temperature Sensor is open. Contact NuWave Customer Service1-877-689-2838 or email help@nuwavenow.com |
| Err8 | A button may be jammed. |
| If the Pro Smart Oven needs to be replaced or returned to the manufacturer, please contact NuWave Customer Service at: 1-877-689-2838 or email help@nuwavenow.com (Mon-Fri 7:30am-4:30pm CST). | |
Questions or Concerns?
Toll Free: 1-877-689-2838 • help@nuwavenow.com
(Mon-Fri 7:30am-4:30pm CST)

Documents / Resources
References
Download manual
Here you can download full pdf version of manual, it may contain additional safety instructions, warranty information, FCC rules, etc.
Advertisement


Need help?
Do you have a question about the 20902 and is the answer not in the manual?
Questions and answers