Vantrue Mirror 3 (M3) - Dash Cam Manual
- User manual (119 pages) ,
- User manual (113 pages)
Advertisement
- 1 What's in the Box?
- 2 Camera Overview
- 3 Installation
-
4
Basic Operation
- 4.1 Turn ON/OFF the camera
- 4.2 Switch the Front, Cabin and Rear camera window display
- 4.3 Low Voltage Protection
- 4.4 Set Date & Time
- 4.5 Auto LCD OFF
- 4.6 Resolution
- 4.7 Loop Recording
- 4.8 Event Recording
- 4.9 Internal & Rear Mirror
- 4.10 Internal & Rear Camera Flip (180°C)
- 4.11 Low-light Night Vision in Parking Mode
- 4.12 Parking Mode
- 4.13 Reversing settings
- 4.14 Time Lapse
- 4.15 GPS
- 4.16 Number Plate
- 4.17 Stamp
- 4.18 Playback Video/Photos on the Camera
- 5 Specifications
- 6 Support
- 7 Documents / Resources
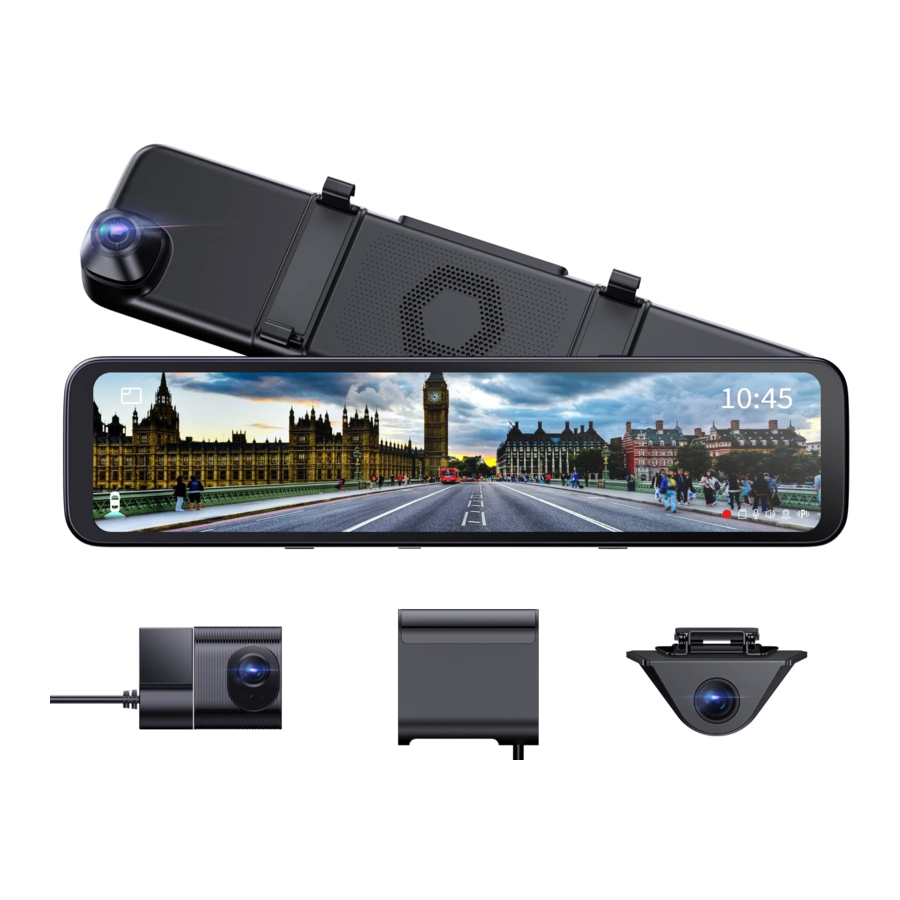
What's in the Box?

- Vantrue M3 Mirror Dash Cam
- Docking Station
- Type-C Power Cable
- Car Charger
- Hardwire Kit
- Backup Camera
- Interior Camera
- Backup Camera Extension Cable
- Rubber Mounting Straps*2 Set
- Rear Camera Bracket *2 Set
- Rear Camera 3M Adhesive Pad*1
- Interior Camera 3M Adhesive Pad*1
- Docking Station 3M Adhesive Pad*1
- User Manual
Camera Overview

| No. | Name | Description |
| 1 | Power Port | Connect to Type C cable or car charger for external power supply; |
| 2 | SD Card Slot | Supports Micro SD Card up to 512GB in FAT32, Class 10; |
| 3 |  Button | Power ON/OFF; long press to turn on/ off the dash cam; |
| 4 |  Button | Short press for screen off; |
| 5 | Screen | 12(11.88) inch LCD Display Screen; |
| 6 | Speaker | Delivers sound during video playback |
| 7 | Front Camera | Front Facing Camera for video recording road Events; |
| 8 | Interior Camera | Camera for in-car video recording; |
| 9 | External Camera | External Camera for video recording rear road events. |
| 10 | Interior Camera interface | Video stream port for streaming interior camera's recording; |
| 11 | Docking station power interface | Type-C USB port for charging the front camera. |
Screen Overview


Installation
Installing a Memory Card
(Recommended: Vantrue U3 hig-speed microSD card)
Please insert a memory card (memory card capacity: 32GB-512GB, card speed: U3/Class10/A2). The dashcam has certain requirements on the card speed of the memory card. For reliable operation, we recommend using a VANTRUE SD card(sold separately).
Memory Card Installation: There is an icon indicating the insertion direction of the memory card. Please push the memory card into the card slot according to the direction indicated by this icon, until a "click" sound is heard in the card slot, indicating that the memory card is inserted properly.

 Reminder:
- Before using the SD card, please format it to FAT32 on the camera.
- We recommend turning on the format reminder setup, and formatting the card regularly. Too many files on the memory card will affect its read and write performance.
All Accessories Installation
The docking station perfectly connected the front, inside, and rear cameras, making the installation of the dash cam more convenient and flexible. The M3 dash cam comes with a car charger and a hardwire kit. If connecting the car charger, the dash cam will power off after the car engine is off; if connecting the hardwire kit, the car will continue to supply power to the dash cam in parking mode.
Car Charger Installation

- Connect the docking station
![]() to the car charger
to the car charger ![]() ;
; - Connect the car charger
![]() with the rear lens extension cable
with the rear lens extension cable ![]() ;
; - Connect the rear lens extension cable
![]() to the rear lens
to the rear lens ![]() ;
; - Connect the docking station
![]() with the M3 main dash cam
with the M3 main dash cam ![]() via the TYPE-C power cable;
via the TYPE-C power cable; - Plug the interior camera
![]() into the docking station headphone jack
into the docking station headphone jack ![]() .
.
 to the car charger
  ;
; with the rear lens extension cable
  ;
; to the rear lens
  ;
; with the M3 main dash cam
  via the TYPE-C power cable;
 into the docking station headphone jack
  .
. Note:
 is the reversing light wire, which is connected to the reversing light in the fuse box;
 is the rear reversing light wire, which is connected to the rear reversing light of the car.
Please connect one of the reversing light wires as needed.
Hardwire Kit Installation (For 24 Hours Parking Mode)
")
- Connect the docking station
![]() to the Hardwire kit
to the Hardwire kit ![]() ;
; - Connect the Hardwire kit
![]() with the rear lens extension cable
with the rear lens extension cable ![]() ;
; - Connect the rear lens extension cable
![]() to the rear lens
to the rear lens ![]() ;
; - The hardware kit
![]() is the same as the installation method of the normal ACC hardwire kit:
is the same as the installation method of the normal ACC hardwire kit:
The black wire is the negative wire, which is connected to the metal of the car;
The red line is the ACC signal line, which is connected to the ACC fuse of the car fuse box;
The yellow wire is the positive wire, which is connected to the constant current fuse of the car fuse box. - Connect the docking station
![]() with the M3 main dash cam
with the M3 main dash cam ![]() via the TYPE-C power cable;
via the TYPE-C power cable; - Plug the interior camera
![]() into the docking station headphone jack
into the docking station headphone jack ![]() .
.
 ;
; Note: Red cable  is the rear reversing light line.
Front Camera Installation
Mount the M3 mirror dash cam over the rearview mirror and use the included rubber ring to fix it.

Docking Station Installation
Take out the docking station, tear off its 3M adhesive protective film, and stick it on the front windshield. After installation, use the TYPE-C cable to connect the mirror dash cam to the dock.

Interior Camera Installation
Take out the interior camera and plug it into the docking station headphone jack, then stick it on the front windshield.

Rearview Camera Installation
There are two ways to install the rear camera, one is installed inside the car, and the other is installed outside the car. In-car installation: Select the installation position on the rear windshield after installing the rear camera mount; then fix the rear camera in the selected position and adjust the lens.

Installation outside the car: Use a trim removal tool to pop out tailgate trim, then runs the cable from the outside of the car into the trunk of your car. Then connect the rear camera's power cable to the extension cable. Finally, find the best location, and fix the camera with a sticker or a screw at the rear end of the car, normally the best place is above the number plate.

Route your rear camera power cable to the front of the car
If you'd like, use a trim removal tool to pop out the headlining panel directly above your windshield. Then, run your cable through the exposure chamber.

Menu Settings
After power ON the camera, press the ![]() button to enter the setup process.
button to enter the setup process.
(If the camera is recording video, press the  button to stop recording before pressing the
 ![]() button.)
button.)
Language: Available languages are English/Français/ Español/Deutsch/Italiano/简体中文/русский/日本語/Polski.
Date & Time: Automatically sets the time by GPS, Set the date and time, the time system (24-hour Format by Default), and the time zone.
Storage: Display Total Memory/Available Memory/Format SD Card.
Format Reminder Setup: Select the reminder options: 15 Days, 1 Month, and Off. The default is off.
Resolution: The M3 camera has 2 resolution modes: Front +Cabin+ Rear recording mode, or Front+Rear recording mode.
Front +Cabin+ Rear Recording: 1440P+1080P+1080P; 1080P+1080P+1080P;
Front+Rear Recording: 1944P+1080P; 1440P+1080P; 1080P+1080P.
Video frame rate of the front camera: Select the video frames. 30FPS/28FPS optional.
Loop Recording: The default setting is 3 min. You can choose the options among 1/3/5 min and OFF. If you select "off", the looping recording is 20 minutes per clip.
Cabin Mirror: The default is ON. If you turn it on, the internal recording screen is displayed in mirror mode.
Internal Rotate Display (180°): The default is Off. If you turn it on, the Internal recording screen will be flipped 180°.
Rear Mirror: The default is ON. If you turn it on, the rear recording screen is displayed in mirror mode.
Rear Rotate Display (180°): The default is Off. If you turn it on, the rear recording screen will be flipped 180°.
Audio Recording: The default is ON. Set recording to on or off.
G-Sensor: You can set the g-sensor values of Forward & Backward, Leftward & Rightward, Upward & Downward of the car. The G-sensor value in each direction can be selected 1/2/3/4/5. The highest sensitivity of G-Sensor is 5.
Battery Low Voltage Protection: When connecting the hardwire kit, the M3 dash cam will automatically identify the current car battery voltage. There are 3 protection voltage thresholds for your choice: 11.8V/12V/12.4V. when the car battery voltage reaches the protection voltage threshold which you choose, it will automatically shut down to protect the car battery.
Low Light Night Vision Parking Mode: The default is Off. When turned on, it can optimize the recording effect of videos in parking mode.
Parking Mode: You can choose the parking mode you need, including Collision Detection/Motion Detection/Low Framerate Mode/OFF.
Exposure: Adjust exposure value for the front lens, +2.0, +1.6,+1.3,+1.0,+0.6,+0.3,+0.0,-0.3,-0.6,-1.0,-1.3,-1.6,-2.0 optional. The default value is +0.0.
Frequency: 50Hz/60Hz available.
Device Sound: Set the volume of the device, such as the startup sound, prompt sound, button sound, and video playback sound. You can select off, low, Medium, or high.
The default value is Medium.
Warning Tone: Turn on or off the operation prompts, such as Format Reminder setup Tone, Video Locked Prompt Tone, Abnormal Video Recording Stopped Prompt Tone, Touch Tone, and ON & Off Tone. Default is ON.
Auto LCD Off: 1Min/3Min/5Min/ OFF optional. Default is OFF.
If it is set to Off, it will keep the screen always on.
LCD Brightness: You can select off, low, Medium, or high. Reversing Setting: Set the Reverse Image, Reverse Assist Lines and Reverse preview Settings.
Reversing Setting: Set the Reverse Image, Reverse Assist Lines and Reverse preview Settings.
Time Lapse: Select the video frames of time lapse. 1FPS/3FPS/ 5FPS/10FPS/OFF optional.
Number Plate: Select the number or letter to be set. After setting, your license plate number can be displayed in the recorded video.
GPS: GPS is enabled by default. GPS ON/OFF settings speed unit settings, and GPS information are all set here.
Stamp: Enable or disable the watermark stamp of the video and photos. The watermark stamp includes VANTRUE label, date and time label, and speed label.
Default Settings: Reset the device back to factory settings.
System Info: Check the Model Number/Firmware Version/ Website/MCU Version.
Basic Operation
Turn ON/OFF the camera
Once connected to the car charger, the camera will auto-power on after you start your car. It will auto off after you turn off the car engine even if it is recording. You can also long-press the Power  Button to turn on/off the camera.
Note:
- Please charge the dash cam with an included car charger or hardwire kit on your car.
- After the car is turned off, if the hardwire kit is connected and the park mode is turned on, the dash cam will automatically enter the park mode, otherwise it will automatically shut down.
Switch the Front, Cabin and Rear camera window display
In 3-way recording mode, there are two ways to switch between the front, cabin, and rear view.
- In the recording interface, click the small window to switch the large screen display of the screen inside or behind the car.

- In the full-screen interface, there will be 4 modes of display. Sliding the screen left and right to switch the front camera preview picture, the cabin camera preview picture, the rear camera preview, and the front+cabin+rear camera preview picture displayed on the same screen.


Low Voltage Protection
The M3 docking station has a power supply identification function, with M3 supporting hardwire kit use, which can identify the car battery voltage. The car mode refers to the protection voltage setting. The protection voltage has 3 gears, namely 11.8V, 12V, and 12.4V. If the protection voltage of 11.8V is set, when the car battery reaches 11.8V, the docking station will automatically cut off the power supply to protect the Car battery.
Note:
The low voltage protection function does not support 24V car batteries for the time being.
Please use the hardwire kit for this function.
Set Date & Time
There are two ways to set the time and date: automatically and manually.
Automatic update: After turning on the GPS, go to the "Time Setting", turn on "Automatically sets the time by GPS", and select your time zone, then the time and date can be automatically corrected. Automatically sets the time by GPS is ON by default.

Manual update: Go to the "Time Setting", turn off the "Automatically sets the time by GPS", and then manually adjust the time and date.

Auto LCD OFF
There are 3 kinds of display modes: 1 Min/3 Min/5 Min, and OFF.
Please go to "Menu Setting" > "Auto LCD OFF", then switch the screen mode. The default is off. If it is set to Off, it will keep the screen always on.
Note:
- Please short press
![]() button for screen off;
button for screen off; - In the parking mode, in order to save power and increase the protection time of the parking mode, the screen will turn off within 3 seconds after the dash cam enters the parking mode.
 button for screen off;
Resolution
By default (Front+ Cabin+ Rear recording mode), both cameras will capture road front and rear and cabin at 1440P+1080P+1080P.
It can be switched to Front+Rear mode with the following steps:
- Go to "Record Setup"> "Resolution" to select Recording Mode.
- Front+Cabin+Rear Mode: 1440P+1080P+1080P;1080P+1080P+1080P;
- Front+Rear Mode: 1944P+1080P; 1440P+1080P; 1080P+1080P.
Note:
- The cabin camera will automatically switch to IR infrared mode at night and in poor light environments.
- The frame rate of the interior and rear lens are both 25FPS.


Loop Recording
After inserting the memory card and connecting the power supply, the M3 dash cam will auto turn on and enter the loop recording.
When recording, the ![]() icon in the middle of the video interface flashes, and the recording time will be recorded according to the loop recording time you set. If you are back to the screensaver screen, you can view the recording status icon in the lower right corner of the screen to learn about the current recording status. (The red icon
icon in the middle of the video interface flashes, and the recording time will be recorded according to the loop recording time you set. If you are back to the screensaver screen, you can view the recording status icon in the lower right corner of the screen to learn about the current recording status. (The red icon ![]() means recording is in progress, the orange
means recording is in progress, the orange ![]() icon means event recording, and white the icon
icon means event recording, and white the icon ![]() means recording has been paused.).
means recording has been paused.).

Note:
After turning off loop recording, emergency recording is invalid, only snapshots can be taken.
After the loop recording is turned off, the duration of each video will be 20 mins, and the recording will stop when the memory card capacity is full.
Event Recording
Event video is triggered by the G-sensor(Gravity Sensor), which can be automatically triggered or manually locked. When the dash cam detects that the current vibration value of the vehicle has reached the preset G-sensor level, the video will be automatically locked, and the recording icon will change from red ![]() to orange
to orange ![]() , the recording time will be until the end of the recording or manually stop, and the event video will be saved in the event video folder. Videos and images in the event video folder will no longer be looping over.
, the recording time will be until the end of the recording or manually stop, and the event video will be saved in the event video folder. Videos and images in the event video folder will no longer be looping over.

Manually lock the video. In the video recording interface, click the ![]() icon and the video will be locked and saved in the event video folder.
icon and the video will be locked and saved in the event video folder.
You can set the G-sensor Sensitivity values of Forward & Backward, Leftward & Rightward, Upward & Downward of the car. The G-sensor value in each direction can be selected 1/2/3/4/5/OFF. The default sensitivity for the three dimensions is 3. The highest sensitivity of G-Sensor is 5. Please go to "Menu Setting" > "G-sensor", then adjust the G-sensor value.
Note:
- The camera will auto-overwrite old Event videos once the Event folder has accumulated 30% of the card capacity.
- Please regularly transfer important videos to your PC or another storage location (e.g. external hard drive).
Internal & Rear Mirror
The interior and rear cameras can be optionally mirrored on or off. The video files are not affected regardless of whether it is turned on or off, just the screen display.
Internal & Rear Camera Flip (180°C)
If your internal and rear camera is mounted upside down, the screen will stand upside down. You can turn on this function to flip the videos. Please go to "Internal Rotate Display(180°)" or "Rear Rotate Display(180°)" on the "Menu Settings" and select "On".
By default, this function is disabled.
Low-light Night Vision in Parking Mode
In order to enhance the safety of parking at night, we make full use of the lens performance combined with low-light night vision technology to improve the night vision effect in parking mode. This function is in open mode by default. It will be triggered only after entering the parking mode and will not affect normal recording.
Note: Low-light Night Vision in Parking Mode is only automatically adjusted for front-lens video footage

Parking Mode
There are 3 modes to choose from in the parking mode of M3: collision detection, low framerate mode, and motion detection. After the parking mode is enabled, you can choose to enable one of the parking modes.
Note:
- To ensure the camera works properly in park mode, please use the hardwire kits or other stable and continuous power supply to power the dash cam.
- The best working environment temperature of M3 is 14-122°F (-10°C to 50°C). We recommend using collision detection within this temperature range, so once the temperature exceeds the normal working temperature range, it will automatically shut down. If the temperature is high, please turn off the camera when parking.
Collision Detection
When the collision detection is turned on, the P icon appears in the center of the screen, and then the dash cam is automatically turned off. When the dash cam is turned off, it will start to record for 1 minute after being shaken, and then turn off the dash cam again.
After the parking mode switch is turned on, the collision detection sensitivity can be selected. There are three levels of low/medium/high respectively. The default collision detection is off.

Note:
The collision detection will be disabled automatically after the normal time-lapse recording is enabled.
Low Framerate mode
When the low framerate mode is selected, the camera will record according to your selection among 1FPS/3FPS/5FPS/10FPS. When the low framerate mode is selected, the camera will record according to your selection among 1FPS/3FPS/5FPS/10FPS. Default is OFF. When the low framerate mode is turned on, the P icon appears in the center of the screen, and then the dash cam is automatically turned off. After 3 seconds, the screen will be closed and start the time-lapse recording.

For example, if you select 1FPS and the current video resolution frame rate is 30FPS, the camera will take one photo every second, and then stitch the photos together into a 1 fps video. With a maximum recording frame rate of 30fps, recording 8 hours of video with Time Lapse 1Sec will generate a time-lapse video lasting just 16 minutes (8x60x60/30/60). This Eco Mode is recommended for storage cards with a smaller capacity.
[Real Recording Time (Sec) = Time Lapse Recording Time (Sec) x Video Frame Rate FPS / Time Lapse Option FPS]
Note:
- After manually turning off the dash cam, it will not be able to enter the low framerate mode.
- After turning on time-lapse, the low frame rate mode will automatically exit.
Motion Detection
There are three levels of motion detection sensitivity: High/Medium /Low and the default is off. Select the recording time of parking, there are 4 hours, 8 hours, 12 hours, 24 hours or unlimited to choose from. Default is unlimited. When the motion Detection is turned on, then the P icon appears in the center of the screen, and the screen will turn off after 3 seconds. M3 comes with a pre-recording function. When the motion detection motion is over, the camera will load the first 5 seconds of motion detection into the motion detection video, and save the motion detection file as 30 seconds.

Note:
- After manually turning off the dash cam, it will not enter the motion detection mode.
- Motion detection will be disabled automatically after the normal time-lapse recording is enabled.
Manual/Auto LCD brightness adjustment: Swipe up and down on the right side of the screen with your finger to adjust the brightness of the screen. Or enter the Menu settings and adjust the screen brightness to high/medium/low mode as needed.
Reversing settings
Under the guidance of the installation video (www.vantrue.net) provided by us, after connecting the rear lens to the reversing light, the reversing assist function will be automatically activated when reversing.

Reverse Image: This function is disabled by default. When your rear camera is installed upside down, the picture will be inverted by 180° and the picture will be in mirror mode. After this mode is enabled, the picture will be in the original image mode.
Reverse Assist Lines: It is on by default. When the rear light is connected to the rear camera, the reverse guideline will be displayed automatically when reversing.
Reverse Preview Settings: According to your car model, adjust up and down the reverse assist line display, click "back" to confirm and save the settings.
The default setting of the reverse image is on, and the reversing aid line is turned on by default (the front and rear direction is to adjust the extension or shortening of the reversing aid line, the size direction is to adjust its width, left and right and up and down are to adjust the direction of the reversing aid line.
Time Lapse
When time-lapse is selected, the camera will record according to your selection of 1FPS/3FPS/5FPS/10FPS. If you set up the 1FPS time-lapse, the camera will take one photo every second, and then stitch the photos together into a 1 fps video. With a maximum recording frame rate of 30fps, recording 8 hours of video with Time Lapse 1Sec will generate a time-lapse video lasting just 16 minutes (=8 x 60 x 60/30/60). This Eco Mode is recommended for storage cards with smaller capacities.

[Normal Recording Time = Time Lapse Recording Time (Sec) x Recording Frame Rate FPS/Time Lapse Option]
Note: When Time Lapse is turned on, all parking modes will be automatically turned off, until it is turned off, the parking mode function can be turned on again.
GPS
After turning on the GPS, a white GPS icon  will be displayed at the bottom right corner of the screen when GPS is searching for signals. Once the GPS signal has been received, the GPS red icon
  will be displayed in the lower right corner of the screen.

To track the Speed, Status, Direction, and GPS Signal Strength, please go to GPS info on the Menu Setting.

You can review recorded videos with GPS info on your PC using the VANTRUE® GPS Viewer (available for download on www.vantrue.net).
Number Plate
You can set your license plate number in the number plate setting, and it is displayed in the watermark of the video.

Stamp
The stamp option will help you to select the stamping that you want to be done on your recorded video. Select the box against each option to activate the specific parameter to be stamped on your recorded video.
The stamp is enabled by default, so the VANTRUE logo tamps/time and date/speed information stamp will be displayed in the video file.
You can also go to "Menu Setting"> "Stamp" to turn on or off these watermark stamps as needed.

Playback Video/Photos on the Camera
After stop recording, press File button  and go to View and Playback videos/Photos on the camera.

The File Browse List video will be displayed as a thumbnail, with folders from top to bottom: normal video folders, emergency video folders, picture folders, and files sorted in chronological order. You can choose to delete multiple files in this interface.


Video Playback
Click on the video file in the list to play it back, and you can choose to lock/delete/previous/fast forward/play/pause/ rewind/next in the playback interface.

Note:
Click the fast forward button once to speed up the playback speed by 2 times; click the rewind button once to speed up the rewind speed by 2 times.
All the locked videos will be stored in event folder.
View Photos
When viewing a photo, you can choose to view the previous or next picture, lock or delete the picture.

Viewing files on a Computer
The M3 dash cam requires a high power supply current and does not support connecting to a computer. If you want to play back files on a computer, you need to use a card reader.

Specifications
The specifications of this product may change without prior notice due to product improvements.
| Model | M3 |
| Chips | Novatek high-performance processor |
| Image Sensor | Sony Sensor |
| G-sensor | Built-in triaxial sensor |
| Screen | 12(11.8) inches IPS Touch Screen |
| Camera Angle | Front: 150° wide viewing angle; Internal: 140° wide viewing angle Rear: 140° wide viewing angle |
| Aperture | Front: F/1. 5 wide aperture Internal: F/2.0 wide aperture Rear: F/2.0 wide aperture |
| Languages | Engish/Français/Español/Deutsch/Italiano/简体中文/русский/ 日本語/Polski |
| Video Resolution | Front+Cabin+Rear mode: Front+ Rear mode: |
| Video File Format | MP4 |
| Image Format | JPEG |
| Audio | Built-in microphone and speaker |
| Memory Storage | External: 32GB-512GB Micro SD Card, U3, Class 10(not included in the package) |
| USB Port | Type C |
| Power Source | Built-in super capacitor |
| Video File Format | MP4 |
| Supply voltage current | DC 5V 3A |
| Working Temperature | -4°F to 158°F(-20°C to 70°C) |
| Storage Temperature | -22°F to 185°F(-30°C to 85°C) |
Support
If you have any questions regarding your product, please do not hesitate to contact us at support@vantrue.net, or drop us a message through the live chat box at www.vantrue.net.
Queries are typically answered within 12-24hours.
Your opinion matters
VANTRUE® is firmly committed to always improving our products, services, and user experience. If you have any thoughts on how we can do even better, we welcome your constructive feedback and suggestions.
Connect with us today at support@vantrue.net.
Documents / Resources
References
Download manual
Here you can download full pdf version of manual, it may contain additional safety instructions, warranty information, FCC rules, etc.
Advertisement


Need help?
Do you have a question about the Mirror 3 and is the answer not in the manual?
Questions and answers