Vantrue Falcon 1 (F1) - Dash Cam Manual
- User manual (111 pages) ,
- User manual (115 pages) ,
- User manual (31 pages)
Advertisement
Warm tips
- Please read this User Manual carefully before using the camera.
- This product is a motorcycle-specific recorder and is limited to connecting to a 12V battery.
- Please turn off the power of the motorcycle before installation, and turn on the power after installation is completed.
- The Wi-Fi name is F1_VANTRUE_XXXX and the initial Wi-Fi password is 12345678.
- It is strictly forbidden to use high-pressure water gun to flush the machine to avoid water in the body.
- This product supports up to 512GB SD card storage. To ensure normal video recording, please use Class 10/U3 and above standard high-speed cards.
- The F1 front and rear cameras are fully sealed and waterproof, but you still need to avoid using solvents such as grease, alcohol and tar cleaner to contact the lens to avoid damaging the waterproof layer.
Note: For normal storage of video files, please format the SD card regularly.
Installation Guide
Inserting a Memory Card
(Recommended: Vantrue U3 high-speed microSD card).
After inserting the SD card for the first time, please press and hold the remote control record button for 10 seconds to start formatting the card.

Note:
After removing the cover of the SD card slot, put the screw in place to avoid losing it.
Installing the Main Unit

Please install the main unit in a location without metal cover, such as under the seat, determine the location and tear off the 3M adhesive to fix it.
Note:
- The Wi-Fi signal transmitting part is on the front of the main unit. Please do not install it facing down when installing the logo side of the main unit or under the metal parts of the motorcycle.

- F1 dash cam main unit needs to be fixed with 3M adhesive (shipped as standard). Please fix the 3M adhesive in the recess of the F1 main body protective case and then paste it to the motorcycle.

- In order to improve the cooling efficiency of F1 mainframe, you can remove the protective case before installation.
- If installed on the curved surface, we recommend using cable ties for fixing.


Installing the Remote Control
You can choose a suitable installation position according to your own usage habits and install the remote control on the handlebars, the front part of the car, the side of the fuel tank, etc.

Note:
- When installing the motorcycle dash camera, you need to face up the button side to avoid affecting the GPS signal reception.
- Please do not use 3M adhesive to cover the speaker hole on the back of the remote control in order to increase the stability of the remote control.

- The side is the microphone receiving hole, please do not put the receiving hole directly in front to avoid serious wind noise.
REMINDER:


Installing the Power Cord
Connect the power cord to the fuse box as follows.
- The red power cable is connected to the positive terminal of the battery.
- The ACC signal wire (yellow wire) is connected to the ACC power fuse of the battery.
- The black ground wire is connected to the negative terminal of the battery or the override position.
- Start the motorcycle power supply and wait for the device to start.
- After confirming that the power supply is properly installed, use the cable ties to organize the storage lines and secure them to the motorcycle.


Note:
- Before installation and wiring, you need to turn off the motorcycle and turn off the motorcycle power to avoid short circuit during the operation.
- For driving safety, please avoid leaving too long power cables exposed. If necessary, please use insulating tape to wrap and fix them.
Installing the Front and Rear camera
The front and rear cameras can be loosened by the hexagonal screw to adjust the camera recording angle, as well as the recording direction.

Note:
- If the front camera is mounted on the handlebar position, you need to fix the front camera to the multifunctional camera holder first, and then fix the holder on the motorcycle handlebar.
- The front/rear cameras comes with 3M adhesive, just stick it in the front/rear of the motorcycle after choosing the right position.
(We recommend mounting the front and rear cameras on the motorcycle body instead of the handlebars to reduce camera shake and improve the stability of the video)

- The line of the camera is a high frequency data line. Please do not bend the cable 180 degrees backwards, as it may cause damage to the cable. We recommend using a circular way to tie the wire fixed.
- Due to different installation positions, the front/rear camera may appear backwards, you can adjust the camera according to the direction of the camera correction line.

- When adjusting the direction of the camera recording, you can use the App real-time preview function to accurately adjust to the appropriate recording effect.


After the camera is installed, you can enter the VANTRUE App real-time preview to correct the camera orientation. After entering the live preview, click on the word [ 田 ] calibration line at the bottom left of the screen to confirm the camera direction.
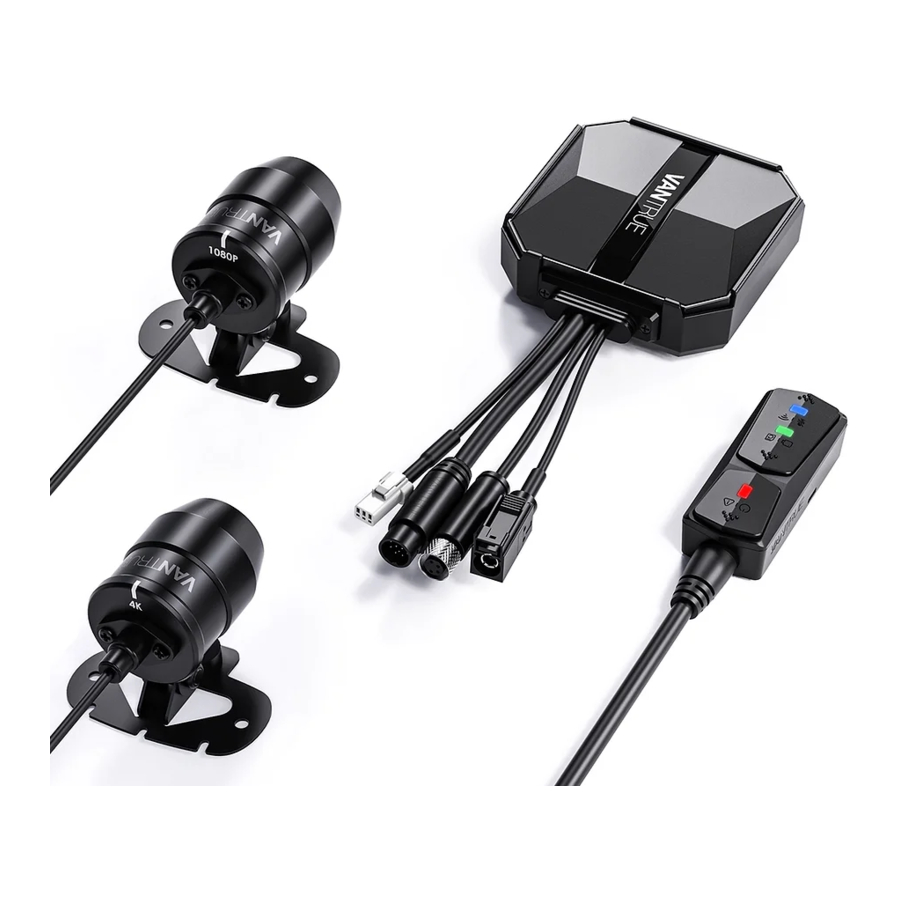
Structure Diagram

- F1 main camera
- 4K front camera
- 1080P Rear Camera
- Remote control
- Power cord
- Rear camera port
- Front camera port
- Connect the remote control
- Connect the power cord
- Fuse
- Red power cable (positive power supply)
- ACC signal wire (yellow wire)
- Black ground wire (power negative)
- Protective housing
Note:
When connecting the front camera cable, until you hear the "click" sound, indicating that the cable buckle has been installed in place. You can use a screwdriver to lift the end of the snap to make the snap easier to snap into the slot.

Please avoid bending the F1 camera cable at a sharp angle, as bending it at a sharp angle can damage its shielding and cause improper signal transmission or interference with other electronic devices.
Basic operation
Remote control button function introduction

- Power/Emergency button
![]()
Long press function: Power off Short press function: Power on; After power on, short press to lock the file, and short press again when locking the file to capture the picture. - Recording button
![]()
L ong press function: After power on, long press for 10 seconds to format SD card.
Short press function: During recording, short press to pause recording; during standby, short press to start recording. - Microphone button
![]()
Long press function: After power on, long press to turn on/off Wi-Fi.
Short press function: Short press to turn on/off the microphone; short press 5 times or more continuously to restore the default factory settings.


LED Indicator

| |
| Status | |
| Steady Light | Normal power supply |
| Blinking Light | Fast flashing, emergency recording |
| OFF | Power off |
| |
| Status | |
| Steady Light | Standby; in emergency recording. |
| Blinking Light | Fast flash: In formatting the card. Slow Flash: In Recording |
| |
| Status | |
| Steady Light | Audio On |
| Off | Audio Off |
| In parking mode, the indicator status is as follows. | |
| Parking Mode Type | Red light + Green light + Blue light: Flashing at the same time, in the recording |
| Collision Detection | Red light + Green light + Blue light: Off at the same time, in standby |
App Operation
App Download
Scan the QR code below to download the latest App from Google Play and App Store. Or you can search "Vantrue" on Google Play and App Store to download it.


First time connection steps.
- Power on the motorcycle dashcam, the F1 will open 5G Wi-Fi by default, and there will be "Wi-Fi on" prompt after power on.
- Open Vantrue App, click "+" to add the device, the App will jump to the cell phone Wi-Fi settings interface, please find the F1_VANTRUE_XXXX name Wi-Fi in the Wi-Fi settings interface, enter the default password 12345678, wait for the Wi-Fi connection success, and then return to App.


Note:
- For Wi-Fi connection operation, please refer to Figure 1~3.
- After the first successful connection, when you turn on F1 again in the future, you can connect automatically by clicking the App. If you turn off the function that Wi-Fi starts when you turn on the motorcycle dashcam, you need to manually turn on Wi-Fi to connect. If you forget the password, you can press the microphone button 5 times or more to restore the factory settings and restore to the initial password 12345678.
App Operation
You can view live preview of driving screen, change settings, play files, view video GPS track, share files, view mileage statistics analysis and other functions through the App.

Note:
- The mileage statistics function is enabled by default. For the GPS mileage information saved in the memory card of the camera, you can view the txt file in the GPS folder in the memory card through the computer, or export pictures or PDF files through the mileage statistics function in the APP.
- Camera calibration line is used to adjust the camera recording direction. When installing the front and rear camera of the car, you can use this function.
App setting menu
| Menu Options | |
| Sync phone time | Sync phone time is turned on by default, you can sync phone time to F1 dashcam. |
| Language | English, French, Spanish, German, Italian, Simplified Chinese, Russian, Japanese, Korean can be set, and the default language is English. |
| Wi-Fi | This function includes Wi-Fi auto-on, Wi-Fi mode, Wi-Fi information. Wi-Fi Auto-On: By default, Wi-Fi is automatically turned on when the dashcam is turned on. Wi-Fi needs to be turned on manually only after you turn it off. Wi-Fi mode: The default is to turn on 5G WiFi, you can switch to 2.4G WiFi Wi-Fi information: check Wi-Fi name, Wi-Fi password and other information. |
| Resolution | There are two resolution modes to choose from, front+back and front resolution. Front + Back: Default resolution is 2160P+1080P(HDR)30fps Front: Default resolution is 3840*2160P 30FPS |
| Video 2-in-1 | Off by default. When turned on, you can integrate the front and rear camera recording video into one segment. |
| Loop Recording | The default is 1 minute, other options can be selected. When the SD card file storage is full, it will overwrite the loops automatically. |
| Voice Prompt | Default is on |
| G-sensor | Lock the sensitivity of the recording, the default level is 3. You can adjust the collision sensitivity level for different directions of the car front and back, left and right, up and down respectively. |
| Exposure | The default is+0.0, you can increase the exposure value or reduce the exposure value as needed |
| Indicator light | Indicator light is on by default |
| WDR | Default is on |
| Rear camera mirroring | The default is on, the car behind the display screen for the mirror image, off the display screen for the original image. |
| License plate number setting | Support license plate setting in Chinese, English and Japanese |
| Tag Stamp | Default is to display date and time tag, make and model tag, license plate tag, speed tag, GPS location tag |
| Time-lapse recording | Default is off, you can choose 1FPS, 5FPS, 10FPS, 15FPS frame rate to start time-lapse recording |
| Parking Mode | The default is off. When turned on, it is collision detection mode. It needs to be connected with ACC function before it can be used. |
| Low-light Night Vision in Parking Mode | The default is on. When turned on, it takes effect when entering parking mode |
| Battery low voltage protection | Battery low voltage protection In this interface, you can check the current voltage of the motorcycle battery, in addition, under this function, you can set low voltage protection |
| Mileage Statistics | Default is on. Users can generate statistical reports in the APP. The reports are saved in the APP in image or PDF format for easy viewing. |
| GPS settings | Open by default, you can change the speed unit and view the GPS signal strength |
| Wi-Fi connection password | Wi-Fi initial password is 12345678, you can change it to other password |
| Formatting | Format SD card |
| Date/time | GPS auto time update is on by default. After turning off, you can manually change the time and date Date format default MM/DD/YY |
| Volume | Adjust the volume level of the speaker at the remote control |
| Beep | Turn on all tones by default, respectively, switch on/off sound, key tone, lock tone, format reminder tone, abnormal stop recording reminder |
| Frequency | 50Hz/60Hz |
| Certificated Info | View all F1 certification information |
| System Information | Check F1 model, software version information, official website |
| Default Information | Restore the default factory settings, after restoring, Wi-Fi password will also be restored to the initial password |
Playback and delete/download files in App

Enter the file browse in App, you can view the daily recording files, play back, delete, download to local save.
Note:
- No data traffic consumption is generated for playback and downloading files within the App.
- You need to download the video to local to view the GPS track information. After the video is downloaded successfully. If the GPS track information is not displayed, please disconnect the Wi-Fi connection and refresh it to display the GPS track information on the map.
App share files
Already downloaded files can be shared to social media by editing within the App.

Note:
Data traffic is required for sharing, so you need to disconnect the Wi-Fi connection with F1. (Required for some Android users)
OTA Upgrade
F1 main camera upgrade supports OTA upgrade in App. There are two types of OTA upgrade pushes:
- After opening the App, an upgrade prompt will pop up.

- In the "About" screen, click OTA update to check for updates.


When the upgrade file is detected in the above 2 ways, click OK, it will enter the upgrade screen, click "Download". Once the download is complete, install the dashcam immediately.
Note:
- If the upgrade fails, please check whether the Wi-Fi connection is normal. During the upgrade, please do not disconnect the Wi-Fi, and make sure the recorder host is powered on properly.
- If the OTA upgrade has been failed, you can use SD card upgrade, remove the SD card, copy the upgrade software into the SD card, then insert the SD card into the host computer, and then power on the upgrade.


Troubleshooting
Tip: The system supports a maximum of 512G SD card storage, in order to ensure normal video, we recommend the use of genuine storage cards. As the recording system keeps reading and writing data, you must use a high-speed card that reaches the standard of Class10 and U3 or above. Also, do not plug and unplug the SD card when the system is on, so as not to cause damage to the SD card.
- The motorcycle does not turn on after starting: Please check if the line connection is normal.
- Press the power on button but the dashcam can't power on: Please check whether the line connection is normal.
- The dashcam can not record/can not take pictures/can not lock the video: Please check whether to insert the SD card or need to format the SD card; SD card format if the problem still exists, please re-insert the SD card or replace the new card to solve.
- The front or rear camera screen is not displayed: Please check whether the camera cable is connected properly.
- Video becomes blurred: Please check if there is dust on the camera. If there is, please wipe the camera.
- No sound in the video: Please check if the microphone is off.
- Many videos are incorrectly locked during normal driving: Please adjust the G-sensor sensitivity. Default is 3. Please adjust to 1.
- When a motorcycle collision occurs the video file is not locked: Please check whether the sensitivity adjustment of G-sensor is above 1st gear. If the crash sensitivity is higher than 1 stop, please further adjust the sensitivity level of the G-sensor higher.
Please also note that if time lapse mode is turned on, the video cannot be locked and only pictures can be taken. - Wi-Fi does not connect properly: Please check whether Wi-Fi is turned on. When Wi-Fi is turned on, the Wi-Fi of your phone will show the F1 Wi-Fi name F1_ VANTRUE_XXXX (initial password is 12345678).
- If there is an abnormal phenomenon such as a dead machine, please restart the power.
- The App shows and recorded video appears to have streaked EMI or purple EMI.
- Please check the motorcycle spark plug type.
Please use R-rated resistive spark plugs. - Check the camera alignment and cable ties for problems. When you run the wires, please run the wires smoothly and do not fold them. Please don't tie the wire too tightly or squeeze it too tightly with the shell when you tie it.
- Please check the motorcycle spark plug type.
Specifications
The specifications of this product may change without prior notice due to product improvements.
| Model | F1 |
| Chips | Novatek high-performance processor |
| Image Sensor | Front Camera: Sony 8MP CMOS Sensor Rear Camera: Sony 2MP CMOS Sensor |
| G-sensor | Built-in Sensor |
| Camera Angle | Front: 160° wide viewing angle; Rear: 145° wide viewing angle |
| Aperture | Front: F/1. 8 wide aperture Rear: F/1. 8 wide aperture |
| Languages | English/Français/Español/Deutsch/Italiano/ 简体中文 /русский/ 日本語 /Polski |
| Video Resolution | Front + Rear recording mode: 2160P+1080P(HDR) 30FPS; 1440P+1080P(HDR) 30FPS; 1080P+1080P(HDR) 30FPS; 720P+720P(HDR)30FPS; 2160P+1080P 30FPS; 1440P+1080P 30FPS; 1080P+1080P 30FPS 720P+720P 30FPS Single front recording mode: 3840x2160P 30FPS 2560x1440P 30FPS 1920x1080P 30FPS 1280x720P 30FPS |
| Video File Format | MP4 |
| Picture Format | JPEG |
| Memory Storage | External: 32GB-512GB Micro SD Card, U3, Class 10(not included in the package) |
| Waterproof | IP67 |
| Power Source | Built-in super capacitor |
| Power Supply | 12V, 2A |
| Wi-Fi | Support |
| GPS | Yes |
| Working Temperature | -4°F to 140°F(-20°C to 60°C) |
| Storage Temperature | -13°F to 158°F(-25°C to 70°C) |
Warranty & Support
Warranty
The VANTRUE F1 Motorcycle Dash Cam comes with a full 12 months warranty. If you register your product on our official site (www.vantrue.net/register), you can extend the warranty to 18 months.
Support new
If you have any questions regarding your product, please do not hesitate to contact us at support@vantrue.net, or drop us a message through the live chat box at www.vantrue.net.
Queries are typically answered within 12-24hours.
Your opinion matters
VANTRUE is firmly committed to always improving our products, services, and user experience. If you have any thoughts on how we can do even better, we welcome your constructive feedback and suggestions. Connect with us today at support@vantrue.net.
Documents / Resources
References
![www.vantrue.net]() http://www.vantrue.net/register
http://www.vantrue.net/register![www.vantrue.net]() Vantrue | Automobile security & dashcam focused
Vantrue | Automobile security & dashcam focused![www.apple.com]() App Store - Apple
App Store - Apple![play.google.com]() Google Play
Google Play
Download manual
Here you can download full pdf version of manual, it may contain additional safety instructions, warranty information, FCC rules, etc.
Advertisement


Need help?
Do you have a question about the Falcon 1 and is the answer not in the manual?
Questions and answers