VANTRUE E2 Manual
- User manual (309 pages) ,
- User manual (175 pages) ,
- User manual (188 pages)
Advertisement
- 1 Packaging
- 2 Diagram
- 3 LED Notification Guide
- 4 Screen Overview
- 5 Installation
-
6
Basic Operation
- 6.1 Menu Settings
-
6.2
Main Functions
- 6.2.1 Loop Recording
- 6.2.2 Event Recording
- 6.2.3 Switching Displaying Between the Front and Rear Camera
- 6.2.4 Enhanced Night Vision for Parking Mode
- 6.2.5 Parking Mode
- 6.2.6 Time Lapse
- 6.2.7 GPS Function
- 6.2.8 Automatic Time via GPS
- 6.2.9 Wireless Remote Control
- 6.2.10 Voice Control
- 6.2.11 Viewing Video/Photos
- 6.2.12 Firmware Updates
- 6.2.13 Operating Temperature Range
- 7 Specifications
- 8 Documents / Resources
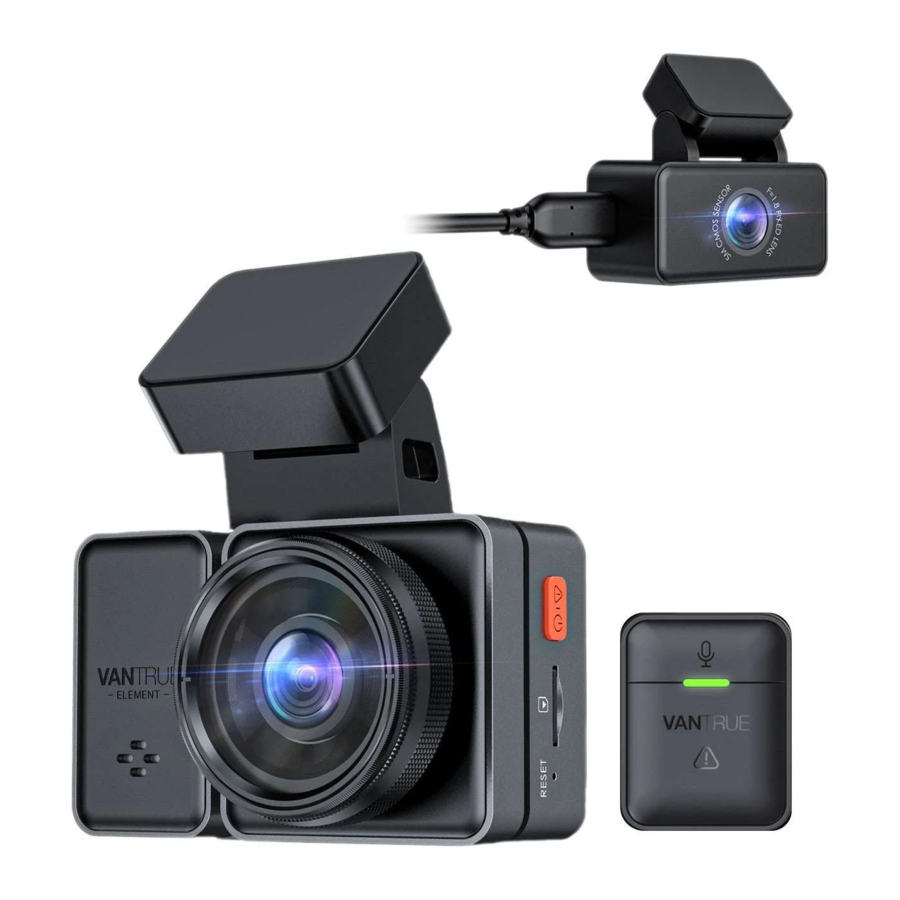
Packaging

Diagram

- Camera Button
![]() : Press and hold during video recording to turn off the display. A short press stops recording and activates standby mode. While in the menu, confirm your selection with a short press. To play or pause a video, press this button.
: Press and hold during video recording to turn off the display. A short press stops recording and activates standby mode. While in the menu, confirm your selection with a short press. To play or pause a video, press this button. - Up Button
![]() : During recording and standby, press shortly to switch the display. In the menu or while browsing files, a short press shows the previous option, and a long press scrolls up. Fast forward videos with a short press in playback mode. Exit Wi-Fi with any key.
: During recording and standby, press shortly to switch the display. In the menu or while browsing files, a short press shows the previous option, and a long press scrolls up. Fast forward videos with a short press in playback mode. Exit Wi-Fi with any key. - Down Button
![]() : Press and hold during recording to quickly switch to parking mode. Press shortly to toggle the microphone on / off. In the menu, scroll through options with a long press and select with a short press. Navigate files with long and short presses. Access the delete menu in playback with a short press. Exit Wi-Fi with any key.
: Press and hold during recording to quickly switch to parking mode. Press shortly to toggle the microphone on / off. In the menu, scroll through options with a long press and select with a short press. Navigate files with long and short presses. Access the delete menu in playback with a short press. Exit Wi-Fi with any key. - Menu Button
![]() : Press shortly during recording to start/stop Wi-Fi. When the device is in standby, navigate the menu or confirm selections. Press and hold to turn Wi-Fi on / off. Exit Wi-Fi with any key.
: Press shortly during recording to start/stop Wi-Fi. When the device is in standby, navigate the menu or confirm selections. Press and hold to turn Wi-Fi on / off. Exit Wi-Fi with any key. - Serial Number: Register your device's warranty using the serial number provided.
- Microphone: Captures audio to accompany your video recordings.
- Speaker: Outputs audio during video playback.
- Front Camera: Records events in front of the vehicle.
- Power Port: Use a Type C cable or car charger to provide power to the device.
- Screen: Features a 2.45" LCD for video display.
- Recording Indicator: A green light signals that the camera is recording.
- Mount Interface: The designated area for attaching the device mount.
- Type C Port for Rear Camera: Connects the rear camera for video and data transfer.
- Power Button
![]() : Locks the current video and captures a photo with a short press. Powers down the device with a long press. In standby mode, captures photos. Exit Wi-Fi with a short press, and power down with a long press.
: Locks the current video and captures a photo with a short press. Powers down the device with a long press. In standby mode, captures photos. Exit Wi-Fi with a short press, and power down with a long press. - SD Card Slot: Accommodates a Micro SD card up to 512 GB in FAT32 format, Class
- Reset Button: Restart the device with a short press.
- Rear Camera: Records what happens behind the vehicle.
- Rear Camera Power Indicator: A green light shows that the rear camera is connected to power.
- Rear Camera Connector: The port for connecting the rear camera cable.
 : Press and hold during video recording to turn off the display. A short press stops recording and activates standby mode. While in the menu, confirm your selection with a short press. To play or pause a video, press this button.
LED Notification Guide
REC Indicator
- A solid green light indicates that the device is either in standby mode or that the recording function is turned off.
- A flashing green light signifies that the camera is actively recording.
![]()

Screen Overview

Installation
Memory Card Setup
(Suggested: Vantrue U3 high-speed microSD card).
Insert a memory card (supported capacity range: 32 GB - 512 GB, speed rating: U3/Class 10/A2) into the dashcam to ensure optimal performance. The dashcam requires specific memory card parameters for stable operation. We suggest using a VANTURE SD card, which is available for purchase separately.

To install the memory card, look for the icon on the dashcam that shows the correct orientation for insertion. Gently slide the memory card into the slot, making sure to align it with the icon's direction. Push it in until you hear a 'click' sound, confirming that the card is securely in place."
Before using a new card, format it by pausing any ongoing recording using the ![]() recording button, then accessing the system settings through the
recording button, then accessing the system settings through the ![]() menu button.
menu button.
Select 'format card' ![]() and confirm to initiate the formatting process. If you encounter a "card error, please format" message upon card insertion, go directly to the menu to start the formatting.
and confirm to initiate the formatting process. If you encounter a "card error, please format" message upon card insertion, go directly to the menu to start the formatting.
Reminders:
- Format the memory card monthly for optimal dash cam performance.
- Never insert or remove the memory card while recording to prevent loss of footage.
- Refrain from using defective or slow-speed cards as they can cause recording interruptions or data loss.
- Always check the emergency video folder for important files before formatting, to avoid accidental deletion of critical recordings.
Attaching the Device
- Line up the mount with the dash cam's mounting area. Push the mount towards the dash cam until you feel it snap into place, indicating it's securely installed.

- Clean the windshield thoroughly using water or alcohol, then dry it with a soft cloth. Apply the electrostatic sticker on the cleaned area of the windshield.


Note: This sticker has two protective layers – first, peel off the top layer, stick it onto the windshield, and then remove the second layer to expose the adhesive side. Then peel the 3M tape from the mount to reveal the adhesive side. Position the mount on the windshield over the electrostatic sticker and press firmly to ensure it is affixed properly.
- Attach one end of the car charger to the cigarette lighter socket and connect the opposite end to the Type C port located on the GPS mount of the front camera. The charger's green indicator light signals that the device is receiving power.


After setting up the main and rear cameras, organize the car charger cable as depicted in the illustration.
- Extract the rear camera cable and establish a connection between the main and rear cameras. Then, plug in the car charger. Once the camera powers on, select and secure an appropriate location for installation.

- Choose a mounting spot on the rear windshield preferably near the center, steering clear of any defogging lines to avoid video interference. Peel off the protective films from the adhesive pad and the lens of the rear camera. Secure the rear camera at the chosen spot, adjust its angle for optimal view, and then connect it to the main front camera using the cable.

- Given the varying window inclinations in different car models, fine-tune the angles of both the main and rear cameras to suit your specific vehicle and recording needs.


Downloading the App
To install the app, scan the QR code corresponding to your mobile device's operating system to initiate the download. If you are using an iOS device, scan the left QR code; for Android devices, scan the right QR code. Alternatively, you can find the app by searching for "Vantrue Cam" in the App Store or Google Play Store. Once located, proceed with the download, and install it onto your smartphone.


Note: Once the camera is linked with your mobile phone via Wi-Fi, it allows for several functionalities without needing an internet connection. These include real-time video preview, adjustments to camera settings, and video playback. Note that GPS tracking and video sharing will require an active internet or a telecom service subscription. To utilize these internet-dependent features, ensure that the camera's Wi-Fi is disconnected.
Establishing Wi-Fi Connection

Activate the Wi-Fi feature on the camera, then go to the Wi-Fi settings on your mobile phone. Look for the camera's Wi-Fi network, which will be named something like 'E2 _VANTRUE_XXXX'. Connect to this network by entering the default Wi-Fi password: '12345678'.
Connecting to the Application

Once you have successfully established a Wi-Fi connection, open the application, and tap the "+" symbol to add your camera model. The app will then sync with your camera, displaying the live feed currently being recorded.
Note:
- Wi-Fi Connection Requirement: Open the application only after connecting to WiFi. If you attempt to open the app without a Wi-Fi connection, it will prompt you to connect first and may redirect you to your Wi-Fi settings. Ensure you're connected to Wi-Fi before proceeding with the app.
- App Permissions Check: If you're already connected to Wi-Fi but the app redirects you to the permission settings upon model selection, please verify that the app has the necessary permissions to access your wireless network.
- Initial Password Caution: The default password provided with your device is for first-time use only. To safeguard against unauthorized access, it's crucial to change this password immediately after the initial login.
- Resetting Forgotten Wi-Fi Password: Should you forget your Wi-Fi password; the device allows you to reset to factory settings. Doing so will also reset the Wi-Fi password back to the default (12345678).
- Android User Connectivity: Android users can connect directly through the app without needing to navigate to the mobile system's Wi-Fi settings.
Using the Application

Once you've accessed the real-time preview in the app, you have several functionalities at your disposal:
Video Preview: Once the app is successfully linked with the camera, navigate to the real-time preview page. To activate full-screen mode, click the full-screen icon or rotate your phone horizontally, and the display will automatically expand. To toggle between front and rear camera views, use the window switch icon. This function is available exclusively on multi-channel dash cams.
Video Playback: Access and watch the video and photo files stored on the SD card directly within the app. Playback initiates when you select a file.
Video Download: Choose the desired video or photo from the SD card browsing interface or video playback section to download. Once downloaded, playing the video from the local file section of the app allows you to view the video's GPS track.
Video Snapshot: Capture and save a still image from the current view in the app's realtime preview mode.
Updating the Application

Launch the "Vantrue Cam" application and ensure your device is connected to Wi-Fi. Navigate to Settings, then select 'About' and 'Detect New Version'. The app will check if you are running the most current version. If an update is available, simply follow the onscreen instructions to complete the app upgrade process.
Basic Operation
Menu Settings
The E2 dash cam offers three functional menus: Record Settings, System Settings, and File Browsing. Customize your dash cam with these settings to suit your needs. To access the menu settings, press the Camera ( ![]() ) Button to pause the recording, then press the Menu (
) Button to pause the recording, then press the Menu ( ![]() ) Button.
) Button.

- Record Setup
- Resolution Settings: The E2 camera offers two recording modes:
- Dual mode (Front + Rear): Resolutions include 1944P+1944P at 24 FPS, and a range of combinations from 1440P+1440P at 30 FPS to 720P+720P at 30 FPS.
- Single mode (Front Camera Only): Options range from 2592 × 1944 at 30 FPS to 1280 × 720 at 30 FPS.
- Loop Recording: The default loop duration is set to 3 minutes. You can select from 1, 3, 5 minutes or choose to turn loop recording off.
- G-Sensor Sensitivity: Customize your G-sensor sensitivity level and configure the trigger directions (Front + Rear/Left + Right/Up + Down). Sensitivity levels range from 1 (lowest) to 5 (highest), with 5 being the most responsive to event triggers.
- Audio Recording: Audio recording is enabled by default. You have the option to turn it off or on as preferred.
- Exposure Compensation: The default setting is +0.0. Adjust this to modify lens exposure.
- Recording Status Indicator: The recording light is typically on. It can be turned off if desired.
- Wide Dynamic Range (WDR): Enabled by default to optimize video quality under various lighting conditions. Toggle this feature on or off as needed.
- Display Orientation: By default, the display is not rotated. You can set the video display to rotate 180 degrees.
- Rear Mirror Display: The rear mirror function is on by default, displaying the rear camera feed in mirror mode.
- Number Plate Watermark: Choose to display your vehicle's number plate in videos. When enabled, the watermark includes the time, date, VANTURE label, license plate number, GPS location, and speed.
- Time Lapse Recording: This feature is turned off by default. You can activate it to record at 1 FPS / 5 FPS / 10 FPS / 15 FPS.
- Enhanced Night Vision in Parking Mode: The default setting is active to improve recordings in parking mode.
- Parking Mode Selection: Customize your parking mode to include Collision Detection, Motion Detection, Low Bitrate Recording, or turn it off entirely.
- GPS Functionality: GPS comes enabled out of the box. Here you can adjust GPS-related settings, view coordinates, and manage other GPS data.
- Resolution Settings: The E2 camera offers two recording modes:
- System Setup
- Language Options: Choose from English, Français, Español, Deutsch, Italiano, 中文, Русский, and Polski.
- Wi-Fi Configuration: Wi-Fi is set to activate automatically. This setting allows you to toggle the Wi-Fi auto-connect feature and access Wi-Fi settings.
- Voice Control Sensitivity: Set to 'Standard' sensitivity by default. Activate voice commands and adjust sensitivity levels for best recognition.
- Voice Command List: Use specific voice commands to operate the camera remotely.
- Memory Card Formatting: Erase all data on the memory card using this function.
- Memory Card Format Reminder: Set reminders to format your memory card every 15 days or 1 month. A prompt will notify you when it's time to format. Note: Changing the reminder resets the reminder schedule.
- Date & Time Configuration: Two methods available: Automatic via GPS or manual setting. GPS updates the date and time according to your time zone.
- Auto LCD Shutdown: Set the screen to turn off after a period of inactivity. Options include 30s, 1 Min, 3 Min, or disabling the feature.
- Device Volume Adjustment: Adjust the device's volume, with levels ranging from 0 (mute) to 5 (maximum).
- Prompt Tones: Five different alert tones are available for various operations, all enabled by default.
- Power Frequency Setting: Select between 50 Hz or 60 Hz to match your region's electrical system frequency.
- System Information and Updates: View your current model, firmware version, and check for updates on the Vanture official website.
- Certifications: Access certification details for the E2 camera.
- Factory Reset: Revert the device to its original factory settings.
- Files Review and manage recorded video and photo files.
Browse through the camera's recorded video and image files:- Event: Files that are automatically saved due to significant movements detected by the G-Sensor or when manually protected. For example:
- Front Camera: 20300128_140633_0008_E_A.MP4
- Rear Camera: 20300128_140633_0008_E_B.MP4
- Normal: These are routinely recorded videos which cover loop recording, parking mode, and time-lapse footage. Their naming formats are:
- Loop Recording:
- Front: 20300128_140633_0008_N_A.MP4
- Rear: 20300128_140633_0008_N_B.MP4
- Parking Mode:
- Front: 20300128_140633_0007_P_A.MP4
- Rear: 20300128_140633_0007_P_B.MP4
- Time-Lapse:
- Front: 20300128_140633_0006_T_A.MP4
- Rear: 20300128_140633_0006_T_B.MP4
- Loop Recording:
- Photo: Snapshot files captured are named as follows:
- Loop Recording Photos:
- Front: 20300128_140633_0005A.JPEG
- Rear: 20300128_140633_0005B.JPEG
- Loop Recording Photos:
- All: This directory consolidates every standard and event-triggered video file.
- Event: Files that are automatically saved due to significant movements detected by the G-Sensor or when manually protected. For example:
Note: File names ending in 'A' are associated with the front camera, whereas 'B' denotes the rear camera recordings.
Main Functions
Loop Recording
When you insert a memory card and power up the E2 dash cam, it automatically starts loop recording. The length of each video clip is determined by your chosen loop recording setting, and clips are saved in the normal video folder. As the folder fills up to 70% of its capacity, the camera will begin overwriting the oldest files first, ensuring continuous recording without manual intervention.

- The loop recording feature's efficiency relies heavily on the memory card's speed. To ensure smooth functionality, it's advisable to format the memory card frequently, preventing issues like file clutter or card wear that can impede the recording process.
- It's important to periodically review the videos captured by the loop recording to ensure that no critical footage is unintentionally overwritten.
- Disabling the loop recording feature will also deactivate the video lock function.
- When loop recording is not active, videos will record in 20-minute segments. The recording process will halt once the memory card reaches full capacity.
Event Recording
The camera's event recording is activated by the G-sensor (Gravity Sensor). This function can operate automatically or can be manually engaged. In certain driving conditions, the camera will automatically secure footage for event recording, or you can choose to lock it for event documentation yourself.

To manually secure the current video, simply press the power (  ) button. If you wish to take photos during this time, the power ( ) button can be pressed multiple times. Subsequently, videos are saved in the event video folder, while photos go to the photo folder. Event videos are also automatically secured when an impact or significant vibration is detected by the dash cam, and these too are stored in the event video folder.
Note that during an event recording, you can take still images by pressing the power ( ) button. Once the recording concludes, the video is saved in the emergency video folder, and any photos taken are stored in the photo folder.

Additional Information
- The likelihood of the automatic event recording being activated is tied to the set sensitivity of the G-sensor. The higher the sensitivity, the more probable it is for the event recording to be triggered.
- Event videos can occupy up to 30% of the memory card's capacity. Once this limit is reached, new recordings may overwrite the oldest event videos. It's advisable to regularly transfer your event videos off the device to prevent data loss.
- The lock recording feature will not engage during loop recording or while time-lapse recording is in progress.
Switching Displaying Between the Front and Rear Camera

To switch the view between the front and rear camera you can simply press the up ( ![]() ) button. There are four modes:
) button. There are four modes:
Enhanced Night Vision for Parking Mode
To improve the safety of nighttime parking, we leverage the camera's advanced lens capabilities along with cutting-edge low-light night vision technology. This enhances visibility in parking mode. The feature is active by default but activates only when you switch to parking mode, ensuring that it does not interfere with regular recording.

Parking Mode
(Inapplicable During Time-lapse Recording)
Parking Mode functions as a surveillance mechanism, offering various monitoring modes to suit different parking scenarios. Upon enabling Parking Mode, recording can be initiated in two ways: either wait for 5 minutes for automatic activation or long-press the down (![]() ) button to start immediately.
) button to start immediately.
Important Considerations:
- To ensure optimal functionality of the camera in parking mode, it is advised to use a hardwiring kit or a reliable and constant power source.
- If the internal temperature of the car reaches 60°C, it is advisable to switch off the camera to prevent any irregular performance due to overheating.
- Time-lapse recording and features specific to parking mode, such as collision detection, motion detection, low bitrate and low framerate recording, can only be used one at a time. Activating one will automatically deactivate the others.
- Videos captured in parking mode (including Collision Detection, Motion Detection, Low Bitrate, and Low Framerate modes) are stored in the standard video folder. To avoid overwriting these files during loop recording, make sure to check and manually save important files to prevent loss.
Collision Detection
When you activate collision detection on the dash cam, a collision icon ( ![]() ) appears on the display, signaling that the camera is in collision detection mode. You have the option to set the sensitivity of this function from 1 to 5 based on your preference and the vehicle's environment.
) appears on the display, signaling that the camera is in collision detection mode. You have the option to set the sensitivity of this function from 1 to 5 based on your preference and the vehicle's environment.

Once collision detection is activated, if the camera does not detect any movement for 5 minutes—part of the camera's quick-start feature—it will engage collision detection mode. A collision icon (  ) will pop up in the center of the screen, and if no further activity is detected, the camera will power down to conserve energy. If the camera is jostled or detects a shock, it will turn back on and record for a minute.

Note: If the camera experiences repeated impacts while in collision detection mode, it will revert to normal recording mode and reset the 5-minute countdown. This feature helps to ensure that the camera does not stay in collision detection mode indefinitely in busy environments.
Motion Detection
Activating motion detection on the dash cam triggers the display of a motion icon (  ) on the screen, indicating that the camera is monitoring for any movement. This mode offers three sensitivity settings: low, medium, and high, which correspond to detection distances of 2 meters, 4 meters, and 6 meters, respectively.

Upon activating motion detection mode, the motion detection icon will appear in the center of the screen. The dash cam will switch to standby mode if no motion is detected within three minutes. During the video recording process, the camera automatically starts recording if it detects movement or vibration. The E2 model features a prerecording capability that ensures footage is captured just before motion detection starts. Once recording triggered by motion detection ends, the camera will save the prerecorded footage to the regular video folder.

Note: The motion detection feature is operational only when the camera is powered on. Turning off the camera will deactivate the motion detection mode.
Low Bitrate Recording
When activated, the low bitrate recording mode is indicated by a 1080P 15 FPS icon (  ) on the lower right of the screen for 1080P selections, or a 720P 15 FPS icon (
  ) for 720P selections.
If the system doesn't detect any movement for five minutes, an icon (  ) will appear in the center of the screen. In this mode, the video resolution defaults to either 1080P 15 FPS or 720P 15 FPS for recording, and the length of the recording will correspond to the previously set loop recording duration. Should the camera detect any vibration or movement, it will exit this standby mode. It will then wait for another five minutes without movement before re-entering the low bitrate recording mode.

Note: The low bitrate recording feature is only functional when the camera is powered on. Turning off the camera will disable low bitrate recording.
Low Framerate Mode
In low framerate mode, the dash cam records at a reduced framerate, which you can set to 1, 5, 10, or 15 frames per second (FPS), depending on your preference. For instance, if the normal recording rate is 30 FPS and you select 1 FPS, the camera will produce one frame of video per second. This mode is efficient for saving storage space on the memory card while maintaining the video's continuity.

The formula to calculate the duration of normal recording time in low framerate mode is: Normal Recording Time = Low Framerate Recording Time (in seconds) × Recording Framerate (FPS). To work with the result, you may need to convert the time into seconds if it's not already.
Please Note:
- For optimal operation of the dash cam in parking mode, it's recommended to utilize hardwire kits or a reliable, uninterrupted power source.
- Low framerate mode operates similarly to time-lapse recording but without the 5minute delay before it starts after activation. Once set, it begins recording immediately.
- A continuous power source is necessary for low framerate mode to function correctly. If the camera is turned off or runs out of power, recording will cease.
Time Lapse
Time-lapse recording is a feature that allows the camera to capture footage at a reduced frame rate. You can choose from options such as 1 frame per second (FPS), 5 FPS, 10 FPS, or 15 FPS. For instance, if you select the 1 FPS option and your camera typically records at 30 FPS, it will now record one frame every second. This method is particularly useful for saving memory card space while still maintaining a time-compressed video record of your trip.

To calculate the actual video duration in time-lapse mode, use the following formula:
Normal Recording Time in Seconds = Time Lapse Recording Time (Sec) × [Normal Framerate FPS / Time Lapse Option FPS]. Remember to convert the time into seconds when calculating.
GPS Function
The GPS feature is a crucial aspect of the dash cam, offering default-enabled geolocation services. The camera captures GPS signals through its mount, allowing it to automatically update the time and date according to your region. It also logs the location of the footage and the vehicle's speed at the time of recording.

Note:
- The GPS should establish a connection within one minute of powering on the device. If it fails to connect, verify that the GPS function is active on the device, the GPS mount is connected correctly, and the environment is conducive to receiving a GPS signal.
- GPS data is recorded concurrently with the video. To access this information, you will need to download the VANTURE Cam App and the VANTURE GPS Player from www.vantrue.net. These tools allow you to view the comprehensive travel data alongside your video playback.
Automatic Time via GPS
The E2 dash cam comes equipped with a GPS-enabled automatic time adjustment feature. By default, this feature is activated and sets the camera's clock based on the GPS location data it receives. You can manually select your time zone—for example, GMT-08:00 for Los Angeles—or connect to the Vantrue Cam app via Wi-Fi to verify and ensure the automatic time setting is correct and active.
Wireless Remote Control
Your camera comes with a wireless remote control for quick access to functions like taking snapshots, recording emergency videos, toggling audio, and more.
Connecting the Remote Control
Initiate the connection by removing the insulating strip from the remote control. The camera will then automatically pair with the remote without the need for manual setup.
A confirmation icon (  ) will display on the screen indicating a successful connection.

Installing the Remote Control
Once paired, select a convenient spot in your vehicle for the remote control. Remove the adhesive backing and attach the remote to your chosen location, ensuring it doesn't interfere with safe driving.

Using the Remote Control
- To toggle audio recording on or off, press the mute button (
![]() ) on the remote.
) on the remote.

- Press the lock button to secure the current video file and to take a snapshot. If you continue to press the lock button (
![]() ) during video playback, you can take additional snapshots.
) during video playback, you can take additional snapshots.

 ) on the remote.

Replacing the Remote Control Battery
When the remote's battery is low, it needs to be replaced with a CR2032 battery. Follow these steps:
- Open the battery compartment by prying it open at the "OPEN" mark.

- Remove the old battery, insert the new one, and reattach the cover.


Note that the remote control does not support recharging; battery replacement (CR2032) is necessary when power is low.
Voice Control
Beyond the remote control, the camera also supports voice commands. It recognizes English, Japanese, Russian, and Chinese. To access a comprehensive list of voice commands, navigate to System Settings > Voice Content. The default voice recognition sensitivity is set to standard, but you can adjust it to low, high, or turn it off according to your needs.

Viewing Video/Photos
- Viewing files on the Camera: To review files directly on your dash cam, start by navigating to "Files" and then select a folder. Once you're in the video folder, you can browse through the files using the Down Button (
![]() ).
).


To delete a file while it's being played back, press the Power Button ( ![]() ), which will bring up the option to remove the file from storage.
), which will bring up the option to remove the file from storage.
- Viewing files on a computer:
- Begin by connecting your dash camera to your computer using the included Type-C USB data cable.

- Once you've established a successful connection, you will notice a USB icon (
![]() ) appearing on the camera's display. This signifies that the camera is ready to transfer data, and you are now able to access and view your video files directly from the camera's storage folder on your computer.
) appearing on the camera's display. This signifies that the camera is ready to transfer data, and you are now able to access and view your video files directly from the camera's storage folder on your computer.
![]()
- Depending on your computer's operating system, the camera may be recognized as a removable drive, or a dedicated folder once connected.
- To manage your files on the computer, simply navigate to the folder where they're stored. You have the option to right-click to open a context menu, which provides further actions such as deleting unwanted files.
- If you prefer, there is also the option to use a USB card reader. This device reads the memory card independently of the dash cam, allowing you to view and transfer your video files directly from the card to your computer.
- Begin by connecting your dash camera to your computer using the included Type-C USB data cable.
- View/Delete on the "Vantrue Cam" App: Once the dash cam is connected to your mobile phone via Wi-Fi, the "Vantrue Cam" app allows you to play back, download, and delete files.
![]()


Note:
- Video playback and downloads to the SD card through the app do not use network data, ensuring that reviewing footage is not only convenient but also economical.
- GPS track data is available for viewing within the app only after the video file has been downloaded and played back locally. Remember to disconnect the dash cam's Wi-Fi connection to ensure the GPS map data displays correctly. If the dash cam remains connected to Wi-Fi, the map data will not load and will show as blank.
Firmware Updates
Your dash cam is equipped with an automatic firmware update feature. When a firmware update file is placed on the Micro-SD card and detected by the system, the update process will commence automatically. After the update is successfully applied, the camera will perform a reboot. To ensure you have access to the latest firmware improvements, you can always visit the official VANTRUE website at www.vantrue.net. Additionally, we recommend registering your product on the VANTRUE website at www.vantrue.net/register, which allows you to receive email notifications whenever a new firmware update becomes available.
Note: It is crucial not to turn off the camera while it is updating, as doing so may result in an unsuccessful update or potentially damage the device. Should the update process be interrupted by an unexpected power outage, reach out to our customer service team immediately for assistance.
Operating Temperature Range
The dash cam is built to function within a specified temperature range, from -20 to 70°C. Operating the camera outside of this temperature spectrum can lead to a decline in performance or potentially cause damage to the unit.
To Prevent Damage:
- When parking in areas with high temperatures for prolonged periods, it's advisable to enable collision detection mode on the camera or refrain from using the camera altogether.
- During severe cold weather conditions, specifically when temperatures drop to 20°C or below, remove the camera from the windshield if it's not in use and store it in the glove compartment.
Specifications
| Model | E2 |
| Processor | Novatek high-performance processor |
| Image Sensor | Sony CMOS Sensor |
| Display | 2.45" IPS Screen |
| Wi-Fi | Built-in 2.4 GHz & 5 GHz |
| Camera Angle | Front: 160° wide viewing angle Rear: 160° wide viewing angle |
| Aperture | Front: F/1.8 wide aperture Rear: F/1.8 wide aperture |
| Languages Supported | English, French (Français), Spanish (Español), German (Deutsch), Italian (Italiano), Chinese (简体中文/繁体中文), Russian (русский), Polish (Polski) |
| Video Resolution Options | In Dual Recording Mode, the camera supports resolutions of 1944P at 24 FPS, 1440P at 30 FPS, a mix of 1440P and 1080P at 30 FPS, and 720P at 30 FPS for both front and rear recordings. For Single Front Recording Mode, resolutions include 2592 × 1944P at 30FPS, 2560 × 1440P at 30FPS, 1920 × 1080P at 30FPS, and 1280 × 720P at 30 FPS. |
| Audio | Built-in microphone and speaker |
| Memory Storage | External; supports 32 GB – 512 GB Micro SD Card, U3 or higher, Class 10 (to be purchased separately) |
| USB | Type-C |
| Power Source | Built-in supercapacitor |
| Video File Format | MP4 |
| Supply Voltage Current | DC / 5 V / 2.4 A |
| Power | 5 W |
| Operating Temperature Range | -20°C to 70°C |
| Storage Temperature Range | -30°C to 85°C |
If you have any questions or comments about the device, please contact the customer line.
www.alza.co.uk/kontakt
+44 (0)203 514 4411
Importer
Alza.cz a.s., Jankovcova 1522/53, Holešovice, 170 00 Praha 7, www.alza.cz
Documents / Resources
References
![www.vantrue.net]() Vantrue | Automobile security & dashcam focused
Vantrue | Automobile security & dashcam focused![www.vantrue.net]() http://www.vantrue.net/register
http://www.vantrue.net/registerAlza | Alza.co.uk
![www.apple.com]() App Store - Apple
App Store - Apple![play.google.com]() Google Play
Google Play
Download manual
Here you can download full pdf version of manual, it may contain additional safety instructions, warranty information, FCC rules, etc.
Advertisement


Need help?
Do you have a question about the E2 and is the answer not in the manual?
Questions and answers