Vantrue OnDash X4S (X4S) - Dash Cam Manual
- User manual (30 pages)
- Also fits for
- X4s
Advertisement
What's in the box?

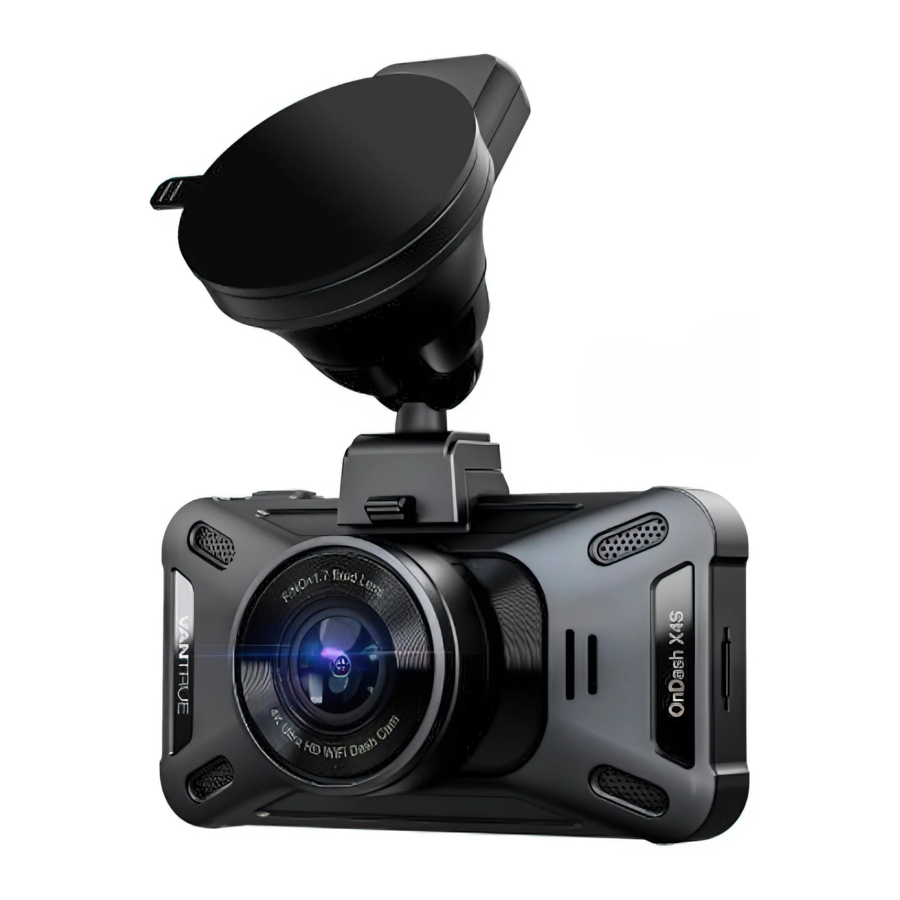
Camera Overview

| NO. | Name | Description |
| 1 |  Button Button | Enter/exit setup menu; Long Press to turn on WIFI. |
| 2 |  Button Button | Move selector up; Microphone on/off; Long press to enter Parking Mode. |
| 3 |  Button Button | Move selector down; Switch the front and rear camera window display. |
| 4 |  Button Button | Confirms the action; Stop/Start the video Recording |
| 5 |  Button Button | Long Press to Power ON/OFF; Short Press to manually lock the currently recording video clip following an emergency or to preserve important videos; Press once while the emergency video is being recorded to take a quick snapshot. |
| 6 | Type-C USB / Rear Cam Port | Type-C USB port for charging or transferring data; Video stream port for streaming rear camera's recording. |
| 7 | Mount Connector | Connects to the Suction Cup Mount. |
| 8 | MicroSD Card Slot | Provides expandable storage (up to 512GB in FAT32, IJ3 or higher). |
| 9 | Reset Button | Press to force reset the device. |
LED Indicator
| Visible Red light [10] | Power Indicator. |
| Blue light visible on the Indicator light [11] | Camera is plugged into supply. |
| Blue light blinks on the Indicator light [11] | Camera is recording. |
Screen Overview

Getting Started
Installing a Memory Card (Recommend Vantrue U3 high-speed micro SD card).
Please use a genuine Micro SD memory card from 160B to 512GB with a speed rating of U3 higher. We recommend using Vantrue Micro SD Card (not including). Please insert the SD card when dash cam is off. Carefully insert the memory card into the camera's card slot until it clicks. To remove the card, power off the camera first, then push the card into the slot until it clicks again. Before using the card, please format it correctly using these steps:

- Press
![]() button to stop the recording then press
button to stop the recording then press ![]() button to enter setup; if the camera is recording video, press
button to enter setup; if the camera is recording video, press ![]() button to stop the recording; if it says 'SD card error, please format SD card here, please press the
button to stop the recording; if it says 'SD card error, please format SD card here, please press the ![]() button and press
button and press ![]() button to access into the menu.
button to access into the menu. - Press the
![]() button to highlight the System Setup option, press
button to highlight the System Setup option, press ![]() button to confirm.
button to confirm. - Press the
![]() button to highlight the format option, press
button to highlight the format option, press ![]() followed by the
followed by the ![]() button to select Format.
button to select Format.
REMINDER:
- The micro SD card should be formatted once a month to maximize the lifetime of the memory card.
- Please do not take the card out when the camera is recording in case the important video files missing.
- Please don't use Sandisk or Transcend SD card on this dash cam.
Installing the camera onto your windshield
- Attach the Suction Mount to the camera's Mount Connector, pushing it in until it clicks.

- Thoroughly clean the windshield using water or alcohol, and wipe clean with a dry cloth.
- Wipe the Suction Mounting Pad clean on the Suction Mount.

- Securely attach the Suction Mount to the windshield, and rotate the locking clamp on the mount 900 upward until it clicks.

- Carefully route the power cable around the windscreen and tuck it under the trim.


- Connect the External Camera(optional) to the Rear Cam Port on the device through the rear camera cable, carefully route the cable and tuck it under the trim.

- With the Type-C USB Cable, connect the supplied Car Charger to the Front Camera Mount Base.

- Insert the Car Charger into your vehicle's cigarette lighter port.

- Start the car.
- The camera will auto power on and start recording.


How to use the APP
The X4S dash cam can be paired with the smartphone with the "Vantrue Cam" APP through the built-in Wi-Fi. You can watch and download the images and video captured during driving easily through the APP and adjust the relevant configuration of the dash cam.
APP Download and Wi-Fi Connection
- Please scan the relevant version QR code below to download the APP and install it.
- Search for "Vantrue Cam" APP in App Store or Google Play Store to find the App and then download and install it on your phone.
![]()
![apps.apple.com]()
![]()
![play.google.com]()


After the mobile phone is connected to the X4S dashcam Wi-Fi, open the "Vantrue Cam" App and click '1+1' on the main page to add the recorder.
For iPhone: In the setting interface, enter "Wireless LAN", select "X4S VAN- TRUE _ XXXX" in the Wi-Fi list, enter the default password "1 2345678" to connect to the recorder Wi-Fi, and then return to the APP.
For Android: Select "X4S VANTRUE XXXX" in the Wi-Fi list, and enter the default password "12345678" for the first time to connect to the recorder Wi-Fi.
APP Operation

Video preview: After the APP is successfully connected to the recorder, it will enter the real-time preview page, click the full-screen button, or the phone is placed horizontally, the real-time picture will automatically switch to the full-screen preview mode. Click the window switch button to switch the front and rear video windows.
Video playback: The video and photo files recorded on the SD card can be viewed in the APP, and the video can be played back after clicking the file.
Video download: You can choose to download videos or pictures in the SD card browse file interface or in the video playback. After downloading the video, it can be played in the App local file, and the GPS track of the video can be viewed.
Video capture: App real-time preview interface can capture the current picture. Please click the snapshot button to take it.
APP Upgrade
Open the "Vantrue Cam" App, connect to the Wi-Fi, and enter "Settings> About> Detect New Version", the App will automatically detect whether the App version is the latest version. If there is a new version of the App, follow the App prompts and upgrade the version.
What should we do if we forget the Wi-Fi password?
The Wi-Fi default password is 12345678. You can reset its password in the APP. If you forget the password, you can default the dash cam setting and restore the password.
Basic Operation
Menu Settings
After power ON the camera, press the button to enter the setup process. (If the camera is recording video, press the  button to stop recording before pressing the button.)

- Record Setup
Press the![]() button to enter the settings, and use the
button to enter the settings, and use the ![]() buttons to navigate the different options.
buttons to navigate the different options. - Resolution: Press the
![]() button to toggle the recording mode and resolution.
button to toggle the recording mode and resolution.
Single Recording Mode: 3840x2160P 30FPS; 2560X1440P 30FPS; 2560X1440P 60FPS; 1920X1080P 30FPS; 1920X1080P 60FPS; 1920X1080P 120FPS; 1280X720P 30FPS.
Dual Recording Mode(Requires optional rear camera):4K+1080P 30FPS; A4K+720P 30FPS; 1440P+1080P 30FPS; 1080P+1080P 30FPS; 1080P+1080P 60FPS; 1440P+1080P(HDR) 30FPS; 1440P+720P(HDR) 30FPS; 1080P+1080P(H- DR) 30FPS; 1080P+720P(HDR) 30FPS;720P+720P(HDR) 30FPS. - Loop Recording: Press
![]() button to change the duration: I /2/3/4/5 min, and OFF.
button to change the duration: I /2/3/4/5 min, and OFF. - G-Sensor Set: You can set the g-sensor values of Forward & Backward, Leftward & Rightward, Upward & Downward of the car. The G-sensor value in each direction can be selected 1/2/3/4/5/Off. The highest sensitivity of G-Sensor is 5. If turned off, the collision sensitivity of the current area is 0.
- Audio Recording: Press
![]() button and
button and![]() button to toggle it OFF/ON.
button to toggle it OFF/ON. - Recording Light: Default is on. Press
![]() and
and ![]() button to toggle it OFF/ON. The blue indicator light will dismiss on recording if turns off.
button to toggle it OFF/ON. The blue indicator light will dismiss on recording if turns off. - Parking Mode: Press
![]() and
and ![]() button to change the options: Collision Detection, Motion Detection, Low Bitrates Recording, OFF.
button to change the options: Collision Detection, Motion Detection, Low Bitrates Recording, OFF.
Collision Detection: Press the![]() and
and ![]() button to select the section: Low, Medium, and High.
button to select the section: Low, Medium, and High.
Motion Detection: Press the![]() and
and ![]() button to select the section: Low, Medium, and High.
button to select the section: Low, Medium, and High.
Low Bitrates Recording: Press the![]() and
and ![]() button to select the section: 1920X1080P 15FPS and 1280X720P I *PS.
button to select the section: 1920X1080P 15FPS and 1280X720P I *PS. - Exposure: Press
![]() and
and ![]() button to select between Front and Rear exposure.
button to select between Front and Rear exposure.
Front: +2.0, +1.6, +1.3, +1.0, +0.6, +0.3, +0.0, -0.3, -0.6, -1.0, -1.3, -1.6, -2.0
Rear: +2.0, +1.6, +1.3, +1.0, +0.6, +0.3, +0.0, -0.3, -0.6, -1.0, -1.3, -1.6, -2.0 - Color: Press
![]() and
and ![]() button to select between Front and Rear Color.
button to select between Front and Rear Color.
Front: Press the![]() and
and ![]() button to select the section: Normal, black and white, sepia.
button to select the section: Normal, black and white, sepia.
Rear: Press the![]() and
and ![]() button to select the section: Normal, black and white, sepia.
button to select the section: Normal, black and white, sepia. - Number Plate: Press
![]() and
and ![]() to set your car license number.
to set your car license number. - Stamp: Press
![]() to toggle it OFF/ON. Stamp shows the date/time, logo, car number, Speed and GPS Location information.
to toggle it OFF/ON. Stamp shows the date/time, logo, car number, Speed and GPS Location information. - Rotate Display: The default is off, press the
![]() and
and ![]() button to choose to rotate the front or rear display, If turned on, the front or rear video screen will be reversed 1800.
button to choose to rotate the front or rear display, If turned on, the front or rear video screen will be reversed 1800. - Time Lapse: Press
![]() followed by
followed by ![]() to set time interval: 1 Sec, 5 Sec, 10 Sec, 15 Sec, Off.
to set time interval: 1 Sec, 5 Sec, 10 Sec, 15 Sec, Off.
- Resolution: Press the
- System Setup
- Language: Press
![]() and
and ![]() button to select between English/Simplified Chinese/ Japanese/Deutsch/Italian/Spanish/ French/ Русский язык/PoIski.
button to select between English/Simplified Chinese/ Japanese/Deutsch/Italian/Spanish/ French/ Русский язык/PoIski. - WiFi: Press
![]() and
and ![]() button to select between 5G and 2.4G.
button to select between 5G and 2.4G. - Format memory Card: Press
![]() , navigate
, navigate ![]() button and select format to format the micro SD card.
button and select format to format the micro SD card. - Format Reminder Setup: Press the and
![]() button to select the reminder options: 15 Days, 1 Month, and Off.
button to select the reminder options: 15 Days, 1 Month, and Off.
Note: If changing the format reminder option, formatting the sd card in advance, or resetting manually, the dash cam will recalculate the time. - Time & Date: Press
![]() and
and ![]() button to set the current date and time.
button to set the current date and time.
Press the![]() button to exit.
button to exit. - AUTO LCD Off: If the setup is 3 min, the dash cam screen will auto turn off after 3 min it start recording. If the setup is off, the screen will not turn off.
Press the![]() button to select the duration in minutes: 30sec, 1Min, 3Min, 5Min or OFF to disable it.
button to select the duration in minutes: 30sec, 1Min, 3Min, 5Min or OFF to disable it. - Device Sound: Press the
![]() button to adjust the device sound.
button to adjust the device sound. - Frequency: Press
![]() to toggle between 50Hz/60Hz.
to toggle between 50Hz/60Hz. - System Info: Press
![]() to check the current model and firmware version and Website.
to check the current model and firmware version and Website. - Default Setting: Press
![]() and
and ![]() Button to select
Button to select ![]() to reset the device back to stock factory settings.
to reset the device back to stock factory settings. - GPS: Press the 0K button to toggle it ON/OFF.
- Speed Unit: Press
![]() and
and ![]() button to select either KM/H or MPH. Press the
button to select either KM/H or MPH. Press the ![]() button to exit and complete the setup.
button to exit and complete the setup.
- Files
Review and delete videos stored in file folders.- Event: Critical event videos detected by G-Sensor activity or manually locked by user.
- Normal: Standard videos recorded.
- Photo: Snapshot file.
- All: All the standard videos and critical event videos were recorded.
Featured Function
Switch the front and rear camera window display
In Dual recording mode, you can switch the front and rear camera window display by pressing the button when recording.

Loop Recording
With a memory card inserted, the camera will (by default) immediately start loop recording video when connected to a power source and powered ON. If the device is not connected to a power source, it will not immediately start on and record. While recording, the record indicator will blink and a blue dot will flash on the lower corner left of the screen. You can stop/start the recording at any time by pressing the button.

By default, the Loop Recording Time is 3 minutes. Please go to "Record Setup"  "Loop Recording" to change it to 1 min, 2 mins, 3 mins, 4mins or 5 mins for your need. The loop recording video file name format is "Year_Date_Time_E.MP4". For example "2021 1228 140633 0001 E A.MP4". The suffix A indicates front cam recorded files, while the suffix B refers to rear cam recorded files. Standard files are stored in the "Video/NormaI" folder. When normal video folder memory reaches 70% of the current memory card's total capacity), the new loop video file automatically overwrites the first loop video file. When Loop Recording is turned off, the camera will record video in 5 minute clips, but will not overwrite old videos when the storage card is full.
Event Recording
Critical event detection is triggered by the G-Sensor (Gravity Sensor) and will auto-detect vehicle impacts and collisions. This will cause the camera to protect the current video clip from being overwritten by locking it and saving the footage in the "Video/Event" folder. The user can also manually lock the current video recording session by pressing the Emergency Button. A key icon will appear at the center of the screen.

You can set the G-sensor Sensitivity values of Forward & Backward, Leftward & Rightward, Upward & Downward of the car. The G-sensor value in each direction can be selected 1/2/3/4/5/OFF. The default sensitivity for the three dimensions is 3. The highest sensitivity of the G-Sensor is 5. Event videos are stored in the "Video/Event" folder, and cannot be automatically overwritten.
Note:
- The camera will auto overwrite old Event videos once the Event folder has accumulated 30% of the card capacity. Please regularly transfer important videos to your PC or another storage location (e.g. external hard drive). To maintain good read/write performance, the micro SD card should be formatted at least once a month.
- If turn off the loop recording or turn on time-lapse recording, the emergency recording will not be triggered.
Parking Mode (Constant Power Supply Needed.)
Parking Mode operates as a sentry function in different situations. To activate Parking Mode, go to 'Record Setup">"Parking Mode", press and select the following options: Collision Detection, Motion Detection, Low Bitrates Recording, OFF. Note:
- In the parking mode, the dash cam cannot use time lapse.
- To ensure the camera is able to function in Parking Mode, please keep it powered with a mobile power bank or hardwire it directly to the car battery. We do not recommend running the camera continuously for too long.
- The X4S working environment temperature is 14ºF-158ºF (-10ºC-60ºC) we recommend using Collision Detection within this temperature range, so once the temp is beyond the normal working temp range, it will auto shut off. If the temperature is high, please take the camera off when you park your car.
- Collision Detection Triggered
When the Collision Detection was turned on, and no movement is detected after 5 minutes of recording, then Collision Detection is activated with a Collision Detection icon at the bottom right corner of the screen, and the camera automatically turn off. Full frame recording will be triggered by the Collision Detection sensor. Once the dash camera detects vehicle impacts or collisions, it will auto turn on and start auto recording, each motion detection recording is 1 min. it will stop recording and auto off again after 5 minutes of inactivity.
The Collision Detection sensitivity is adjustable with 3 settings: Low, Medium, and High. Please go to 'Record Setup" > "Parking Mode"> "Collision Detection" to change it for your need.


- Motion Detection Triggered
When the Motion Detection was turned on, this is represented by a Motion Detection icon at the bottom right corner of the screen. If no movement is detected after 5 minutes of recording, there will be an orange P icon that appears in the center of the screen which means Parking Mode is activated. Once the dash camera detects the movement of the object, it will auto turn on and start auto recording, each motion detection recording is 30 seconds.
The Motion Detection is adjustable with 3 settings: Low, Medium, and High. Please go to "Record Setup" > "Parking Mode"> " Motion Detection" to change it for your need.
Note: In Motion Detection mode, if the dash cam is turned off manually, it will not turn on and record even if it detects any vibration.


- Low Bitrates Recording
When the Low Bitrates Recording has been turned on, this is represented by a Low Bitrates Recording icon at the bottom right corner of the screen. If no movement is detected after 5 minutes of recording, there will be an orange P icon that appears in the center of the screen which means Parking Mode is activated. Once the camera enters Low Bitrates Recording, the dash cam will auto switch to 1080P 15FPS or 720P 15FPS. The camera will exit Low Bitrates Recording if it detects any vibration, and record at the selected resolution.


Note: In Low Bitrates Recording, if the dash cam is turned off manually, it will not turn on and record even if it detects any vibration. To manually activate Parking Mode, press and hold the  button until the P icon appears on the screen.

TIME LAPSE
If TIME LAPSE is selected, the camera will take static photos at the set time interval - either 1FPS/5FPS/1 OFPS/15FPS - to create a video montage. For example, if you set Time Lapse Isec, the camera will take one photo every second, and then stitch the photos together into a 1 fps video. With a maximum recording frame rate of 30fps, recording 8 hours of video with Time Lapse ISec will generate a time lapse video lasting just 16 minutes (=8 x 60 x 60/30/60). This Eco Mode is recommended for storage cards with smaller capacities. [Normal Recording Time = Time Lapse Recording Time (Sec) x Recording Frame Rate FPSx Time Lapse Option] Note: Parking mode will be disabled automatically after the normal time-lapse recording is enabled.

Connecting External GPS Receiver (Optional Accessory)
To use the camera's GPS function, please purchase an external GPS receiver mount. This can be purchased from Amazon.
- Install the External GPS Mount onto the camera instead of the original mount.
- Plug the Type C USB Connector into the GPS Mount to power it.
- Once charged, the camera will power on. Recording will commence if a microSD card has been inserted, just press the Confirm Button to stop recording.
- Press the
![]() button to enter setup, go to 'System Setup'
button to enter setup, go to 'System Setup' ![]() 'GPS " to activate the camera's GPS function.
'GPS " to activate the camera's GPS function. - The GPS receiver will start to search for a GPS signal, the GPS icon will keep flashing on the screen. Once the GPS signal has been received and locked, the icon will stop flashing.


- You can include GPS tracking and vehicle speed on the video footage, go to 'Record Setup"
![]() 'Stamp"
'Stamp" ![]() 'GPS Location Stamp" and "Speed Stamp" to set.
'GPS Location Stamp" and "Speed Stamp" to set. - You can review recorded video using VANTRUEOGPS Viewer (available for download on www.vantrue.net).
Video Playback
Viewing on the dash cam
Press and go to 'Files", press and  button to navigate to
  'Normal" or "Event" or 'AII" file folders to view and playback videos on the camera display. Use the buttons to select the file and press button to playback/pause. During playing back, press to fast forward and press to back to normal playback.

View on a computer
- Connect the camera to your computer using the supplied Type-C USB cable.
- "USB Connecting" will be displayed on the camera screen to transfer data.
- Depending on your computer OS, the device will appear either as a removable drive or a removable volume.
Note: When connected to your computer under "USB Connecting" status, standard camera setup and operations will be disabled.
View on the "Vantrue Cam" APP
Friendly reminder: If want to check more video information, please download Vantrue GPS player from Vantrue official website to watch the video, or view the downloaded video in the APP.
Voice Recording
By default, the voice recording is ON. It can be turned OFF using either of the following methods:
- Go to "Record Setup"
![]() "Audio Recording", press
"Audio Recording", press ![]() button and select OFF;
button and select OFF; - While recording video, press the
![]() button to toggle voice recording OFF/ON.
button to toggle voice recording OFF/ON.

When the voice recording has been turned OFF, the MIC icon at the top of the screen will turn white with a red line across it.


Auto LCD Off
This feature avoids any chance of the screen being a distraction in the vehicle, especially at night when the illumination from the LED screen can be a nuisance or even a hazard to the driver. If you set the Auto LCD Off to 3 minutes, the camera's LCD will light off after 3 minutes but the recording will continue with the blue light blinking on the Indicator light. If you turn off the recording light, the indicator light will stop flashing. You can press any button to light on the screen. If the setup is Auto, screen brightness will decrease to 50% after 3 minutes of normal video recording, but its brightness will be restored by manual operation.

Please go to System Setup to adjust this time to 30 sec, I Min, 3Min, 5 Min, or OFF to disable it so the LCD can always stay on.
Upgrading the Firmware
The system will automatically update if the microSD card contains the firmware upgrade file. The camera will restart once the upgrade has been completed.
Always stay up-to-date
The latest firmware version is always available at the official VANTRUE website (www.vantrue.net). We strongly recommend registering your product (www.vantrue.net/register) to receive a notification email when a new firmware update is available.
Specifications
The specifications of this product may change without prior notice due to product improvements.
| Model | X4S |
| Processor | Front: OmniVision 8M CMOS Sensor Rear: SONY StarVis 2M CMOS Sensor (Optional) |
| WiFi | Built in 2.4G/5G |
| LCD | 3" IPS LCD |
| Lens | Front cam: Fl.7, 1310 (Horizontal), 68.50 (Vertical), 1550 (Diagonal) Rear cam: F2.0, 1310 (Horizontal), 62.50 (Vertical), 1500 (Diagonal) |
| Languages | Chinese)/ Japanese/ Deutsch/ItaIian/Spanish/French/PyccKb, 1Vl 93blK/PoIski |
| Video resolution | Single Recording Mode: 3840x2160P 30FPS/2560X1440P 30FPS/2560X1440P 60FPS/1920X1080P 30FPS/1920X1080P 60FPS/1920X1080P 120FPS/1280X720P 30FPS Dual Recoding Mode(Optional): 4K+1080P SOFPS/4K+720P 30FPS/1440P+1080P 30FPS/1080P+1080P 30FPS/1080P+1080P 60FPS/1440P+1080P(HDR) 30FPS/1440P+720P (HDR) 30FPS/1080P+1080P (HDR) 3OFPS/1080P+720P(HDR) 30FPS/720P+720P(HDR) 30FPS |
| Video File Format | MP4 |
| Image | JPEG format; |
| Audio | Built-in microphone and speaker |
| External memory | Micro SD card (U3 or higher, up to 512GB) |
| Shutter Type | Electronic |
| USB Port | Type-C |
| Battery type | super-capacitor |
| Working voltage | DC 5V 2A |
| Working currency | 800mA(TypicaI value) / DC 5V |
| Working Temperature | 14ºF-158ºF (-10ºC-60ºC) |
| Storage Temperature | -4ºF - 176ºF (-20ºC - 70ºC) |
| Compatible OS | Windows XP/Vista/7/8/10&Mac OS |
Documents / Resources
References
![www.vantrue.net]() Vantrue | Automobile security & dashcam focused
Vantrue | Automobile security & dashcam focused![www.vantrue.net]() http://www.vantrue.net/register
http://www.vantrue.net/register![apps.apple.com]() App Store - Apple
App Store - Apple![play.google.com]() Google Play
Google Play
Download manual
Here you can download full pdf version of manual, it may contain additional safety instructions, warranty information, FCC rules, etc.
Advertisement


Need help?
Do you have a question about the OnDash X4S and is the answer not in the manual?
Questions and answers