Vantrue OnDash N2S (N2S) - Dash Cam Manual
- User manual (31 pages) ,
- User manual (140 pages)
- Also fits for
- N2s
Advertisement
- 1 What's in the box
- 2 Product Overview
- 3 Getting Started
-
4
Basic Operation
- 4.1 Power ON/OFF
- 4.2 Menu Settings
- 4.3 Set Date/Time
- 4.4 Switch Front + Cabin or Front Recording Mode Resolution
- 4.5 Auto LCD OFF
- 4.6 Loop Recording
- 4.7 IR LED light
- 4.8 Event Recording
- 4.9 Audio Recording
- 4.10 Parking Mode
- 4.11 Time Lapse
- 4.12 GPS Function
- 4.13 Viewing Video on the Unit/Computer
- 4.14 Delete Videos
- 4.15 Upgrading the Firmware
- 4.16 Working Temperature
- 5 Specifications
- 6 Warranty & Support
- 7 Documents / Resources
What's in the box

- Dual Car Charger with Built-in Type-C USB Cable (11.4ft)
- Type-C Data Cable (3ft)
- Suction Cup Mount with GPS Module
- VANTRUE N2S Dual Dash Cam
- User Manual
- Quick Start Guide
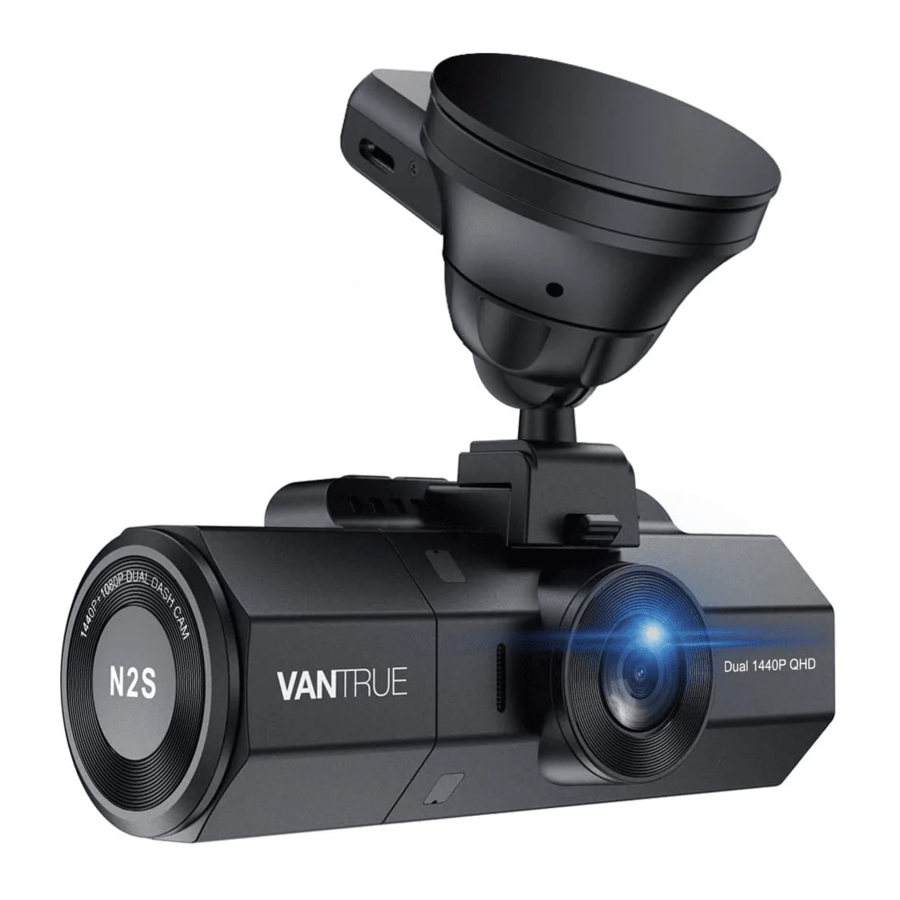
Product Overview

| NO. | Name | Description |
| 1 | Speaker | Delivers sound during video playback. |
| 2 | Mount Connector | Connects to the Suction Cup Mount. |
| 3 | Front Camera Lens | Front Facing Camera for video recording. |
| 4 |  Button Button | Enter/exit setup menu; long press for Power ON/OFF; Return to the previous step in the setup menu. |
| 5 |  Button Button | Microphone ON/OFF; Move selector up; Resume playback speed. |
| 6 |  Button Button | Switch video windows; Move selector down; Fast forward. |
| 7 |  Button Button | Confirms the action; Stop/Start the video recording. |
| 8 |  Button Button | Manually locks the currently recording video clip following emergency or to preserve important videos; Long press to enter Parking Mode; When browsing the file interface, Short press to bring up the Menu. |
| 9 | LCD Screen | 2" TFT Color LCD Display. |
| 10 | IR Light | 4 IR LED Lights enhances night vision. |
| 11 | Rear Camera Lens | Rear facing camera for in-car video recording. |
| 12 | Microphone | Records clear audio with the video footage. |
| 13 | Serial Number | Serial Number for Warranty. |
| 14 | IR Light Sensor | Sense the light changing. |
| 15 | Reset Button | Press to force reset the device. |
| 16 | Micro SD Card Slot | Provides expandable storage (up to 512GB in FAT32, Class 10) |
| 17 | Type-C Port | Type-C Port connects to external device. |
| LED Indicator | ||
| Red light is keeping lighting on the Emergency Button [8] | Camera is plugged into supply. | |
| Red light blinks on the Emergency Button [8] | Camera is recording. | |

Screen overview
Getting Started
Installing a Memory Card
(Recommend VANTRUE Micro SD Card)
Please use a genuine Micro SD memory card from 32GB to 512GB with a speed rating of class 10 or higher. We recommend use Vantrue Micro SD Card (not included). Please insert the SD card when dash cam is off. Carefully insert the memory card into the camera's card slot until it clicks. To remove the card, power off the camera first, then push the card into the slot until it clicks again.
If you are using SD card from other brand, before using the card, please format it correctly using these steps:
- Press
![]() to enter setup; if the camera is recording video, press
to enter setup; if the camera is recording video, press ![]() button to stop the recording; if it says 'please insert SD card' here, please press the button and press
button to stop the recording; if it says 'please insert SD card' here, please press the button and press ![]() button to access into the menu.
button to access into the menu.
- Press the
![]() button to highlight the System Setup option, press
button to highlight the System Setup option, press ![]() button to confirm.
button to confirm.

- Press the
![]() button to highlight the Format option, press
button to highlight the Format option, press ![]() followed by the
followed by the ![]() button to select FORMAT.
button to select FORMAT.
 button to stop the recording; if it says 'please insert SD card' here, please press the button and press
REMINDER:
- Ideally, the microSD card should be formatted once a month to maximize the lifetime of the memory card.
- We recommend VANTRUE Card. Some SD cards may not compatible with our dash cam, such as Sandisk, Transcend, etc.
Installing the unit onto your windshield
- Attach the Suction Mount to the camera's Mount Connector, pushing it in until it clicks.
![]()
- Thoroughly clean the windshield using water or alcohol, and wipe clean with a dry cloth.
- Wipe the Suction Mounting Pad clean on the Suction Mount.
- Securely attach the Suction Mount to the windshield, and rotate the locking clamp on the mount 90° upward until it clicks.
![]()
- Carefully route the power cable around the windshield and tuck it under the trim.

- With the Type C USB Cable, connect the supplied Car Charger to the Camera Mount Base, or connect the supplied Car Charger to the Camera.

- Insert the Car Charger into your vehicle's cigarette lighter port.
![]()
- Start the car.
- The camera will auto power on and start recording.


Basic Operation
Power ON/OFF
Once the car starts on, the camera will automatically turn on and start recording.
When you do not want to use the dash cam, please long press the ![]() button to turn it off, and long press the
button to turn it off, and long press the ![]() button to turn it on again when you want use that.
button to turn it on again when you want use that.
There are two ways to turn OFF the camera:
- Manually
Long press the![]() button to power it OFF.
button to power it OFF.

- Automatically
The camera will power off if the charger cable is disconnected or if the vehicle is turned off.

Menu Settings
After powering ON the camera, press the ![]() button to enter the setup process. (If the camera is recording video, press the
button to enter the setup process. (If the camera is recording video, press the  button to stop recording before pressing the
 ![]() button.)
button.)
Record Setup
Press the ![]() button to enter the settings, and use the
button to enter the settings, and use the  or
or  buttons to navigate the different options.
- Resolution: Press
![]() or
or ![]() button to change the options:
button to change the options:
Front+Cabin:
1440P+1440P 30FPS; 1440P+1080P 30FPS; 1080P+1080P 30FPS; 1080P+720P 30FPS; 720P+1080P 30FPS; 720P+720P 30FPS;
Front:
3840×2160P 30FPS; 2592×1520P 30FPS; 2560×1440P 30FPS; 1920×1080P 30FPS; 1280×720P 30FPS; - Loop Recording: Press
![]() or
or ![]() button to change the duration: 1Min, 3Min, 5Min and Off.
button to change the duration: 1Min, 3Min, 5Min and Off. - IR LEDS: Press
![]() or
or ![]() button to change the options: Auto, On and or Off.
button to change the options: Auto, On and or Off. - G-Sensor: Press
![]() or
or ![]() button to change the sensitivity: 1, 2, 3, 4, 5 and Off.
button to change the sensitivity: 1, 2, 3, 4, 5 and Off. - Audio Recording: Press
![]() or
or ![]() button to change the options: OFF/ON.
button to change the options: OFF/ON. - Parking Mode: Press
![]() or
or ![]() button to change the options: Collision or Detection, Collision + Motion Detection, Motion Detection, Low Bitrates Recording, OFF.
button to change the options: Collision or Detection, Collision + Motion Detection, Motion Detection, Low Bitrates Recording, OFF. - Exposure: Pressing
![]() gives the following options for Front or Cabin: +2.0, +5/3, +4/3, +1.0, +2/3, +1/3, +0.0, -1/3, -2/3, -1.0, -4/3, -5/3, -2.0.
gives the following options for Front or Cabin: +2.0, +5/3, +4/3, +1.0, +2/3, +1/3, +0.0, -1/3, -2/3, -1.0, -4/3, -5/3, -2.0. - WDR: Press
![]() or
or ![]() button to change the options: OFF/ON.
button to change the options: OFF/ON. - Number Plate: Press
![]() or
or ![]() button and
button and ![]() to set your car license or number.
to set your car license or number. - Stamp: Press
![]() or
or ![]() button to change the options: OFF/ON. Stamp or shows the date/time, logo Stamp, Car Number, Speed and GPS Location information.
button to change the options: OFF/ON. Stamp or shows the date/time, logo Stamp, Car Number, Speed and GPS Location information. - Rotate Display: Press
![]() or
or ![]() button to change the options: OFF/ON.
button to change the options: OFF/ON. - Time Lapse: Press
![]() or
or ![]() button to change the options: Off, 1FPS, 5FPS.
button to change the options: Off, 1FPS, 5FPS.
System Setup
- Language: Press
![]() or
or ![]() button to change the duration: English, or Simplified Chinese, Japanese, German, Italian, Spanish, French and Russian.
button to change the duration: English, or Simplified Chinese, Japanese, German, Italian, Spanish, French and Russian. - Format SD Card: Select Format and press
![]() button to format the SD card.
button to format the SD card. - Time & Date: Press
![]() or
or ![]() button and
button and ![]() button to the current or date and time. Press the
button to the current or date and time. Press the ![]() button to exit.
button to exit. - Auto LCD Off: If you choose 3 Min, it will turn off the camera screen 3 minutes after recording commences.
Press![]() or
or ![]() button to change the duration: Auto, 30Sec, 1Min, or 3Min.
button to change the duration: Auto, 30Sec, 1Min, or 3Min. - Device Sound: Press
![]() or
or ![]() button to change the duration: 1, 2, 3, or 4, 5 and OFF.
button to change the duration: 1, 2, 3, or 4, 5 and OFF. - Frequency: Press
![]() or
or ![]() button to change the options: 50Hz/60Hz.
button to change the options: 50Hz/60Hz. - System Info: Press
![]() to check the current firmware version. (System Info)
to check the current firmware version. (System Info) - Default Settings: Press
![]() button select
button select ![]() and to reset the device back to stock factory settings. Press the
and to reset the device back to stock factory settings. Press the ![]() button to exit and complete the setup.
button to exit and complete the setup. - GPS setup: Press
![]() to toggle it ON/OFF.
to toggle it ON/OFF. - Speed Unit: Press
![]() to select either KM/H or MP/H.
to select either KM/H or MP/H.
Files

Review and delete videos stored in the file folders.
- Event: Critical event videos detected by G-Sensor activity or manually locked by user.
- Normal: Standard videos recorded.
- All: All the standard videos, critical event videos recorded.
Set Date/Time
Open the ![]() interface, navigate to "System Setup" > "Time & Date", and press button to set the date/time. Navigate or to select date and time values.
interface, navigate to "System Setup" > "Time & Date", and press button to set the date/time. Navigate or to select date and time values.
Press to confirm and proceed. To finish setup, just press the ![]() button to exit.
button to exit.
NOTE: Date format is MM/DD/YY with the time in 24 hour format.
GPS Automatic Update is on by default. When it is on, GPS positioning will locate the current time and date according to the set time zone. Users can also turn off the GPS auto update function and set the time and date manually.

Note: GPS Automatic Update requires users to select the correct time zone. The time zone of the user can be found by searching the website or locating the time zone on the phone.
Switch Front + Cabin or Front Recording Mode Resolution
The default setting is (Front + Cabin mode) 1440P+1440P 30FPS. You can switch the dual recording resolution with following steps:
- Go to "Record Setup">"Resolution" >"Front+Cabin", Press
![]() button, 1440P+1440P(30FPS); 1440P+1080P(30FPS); 1080P+1080P(30FPS); 1080P+720P(30FPS); 720P+1080P(30FPS); 720P+720P(30FPS);
button, 1440P+1440P(30FPS); 1440P+1080P(30FPS); 1080P+1080P(30FPS); 1080P+720P(30FPS); 720P+1080P(30FPS); 720P+720P(30FPS);


In Front+Cabin mode when driving, you can press to switch display to choose the front/inside camera show bigger on the lcd. It can be switched to front recording following steps:
- Go to "Record Setup">"Resolution" > "Front", press
![]() button, then press
button, then press ![]() or
or ![]() button to change the options 3840x 2160P(30FPS); 2592x1520P(30FPS); 2560x1440P(30FPS); 1920x1080P(30FPS); 1280x 720P(30FPS).
button to change the options 3840x 2160P(30FPS); 2592x1520P(30FPS); 2560x1440P(30FPS); 1920x1080P(30FPS); 1280x 720P(30FPS).


Auto LCD OFF
This feature avoids any chance of the screen being a distraction in the vehicle, especially at night when the illumination from the LED screen can be a nuisance or even a hazard to the driver. If you set the Auto LCD Off to 3 minutes, the camera's LCD will light off after 3 minutes but recording will continue with red light blinks on the ![]() button. If the setup is Auto, the screen will auto shut down when the internal temperature of the camera reaches 115°F.
button. If the setup is Auto, the screen will auto shut down when the internal temperature of the camera reaches 115°F.
You can press any button to light on the screen.

Please go to System Setup to adjust this time to 30 sec, 1Min, 3Min, or Auto to using that.
Loop Recording
With a memory card inserted, the camera will (by default) immediately start loop recording when connected to a power source and powered ON.
While recording, the LED indicator will blink and a red dot will flash on the bottom left of the screen.
You can stop/start the recording at any time by pressing the  button.

By default, the Loop Recording Time is 3 minutes. Please go to "Record Setup" > "Loop Recording" to change it to 1 minutes, 3 minutes or 5 minutes or off. When Loop Recording is turned off, the camera will record video in 20 minute clips, but will not overwrite old videos when the storage card is full.
The loop recording video file name format is "Year_Date_Time_SerialA". For example: "2021_01_01_060101_A", the suffix A indicates front cam recorded files, while the suffix B refers to rear cam recorded files). Standard files are stored in the "Video/Normal" folder. When the microSD card is full, the camera will write over older files.
IR LED light
By default, the IR LED light is auto on.
Please note: If IR lights on, the video footage of the cabin will turn into black and white.


Event Recording
Critical event detection is triggered by the G-Sensor (Gravity Sensor) and will auto-detect vehicle impacts and collisions. This will cause the camera to protect the current video clip from being overwritten by locking it and saving to the "Event" folder.
The vehicle driver can also manually lock the current video recording session by pressing the ![]() Button. A key icon will appear at the center of the screen.
Button. A key icon will appear at the center of the screen.

The G-Sensor sensitivity is adjustable with 5 settings: 1, 2, 3, 4, 5, and off – it is set to 3 by default. The G-Sensor can also be deactivated in "Record Setup">"G-Sensor".
The Collision Detection sensitivity can be adjusted by the following three settings: Low, Medium and High. Please go to "Record Setup" > "Parking Mode"> "Collision Detection" to change as needed.
Event videos are stored in the "Video/Event" folder, and cannot be automatically overwritten.
NOTE: The camera will auto overwrite old Event videos once the Event folder has accumulated 30% of the card capacity. Please regularly transfer important videos to your PC or another storage location (e.g. external hard drive). To maintain good read/write performance, the microSD card should better be formatted once a month.
Audio Recording
By default, the voice recording is ON. It can be turned OFF following either of the methods below:
- Go to "Record Setup" > "Audio Recording", press
![]() button and select OFF;
button and select OFF; - While recording video, press the
![]() button to toggle voice recording OFF/ON.
button to toggle voice recording OFF/ON.

 button to toggle voice recording OFF/ON.
When the voice recording has been turned OFF, the MIC icon on the screen will turn white with a red line across it.

Parking Mode
(Constant Power Supply Needed)
Parking Mode operates as a sentry function under different situations. To activate Parking Mode, go to "Record Setup"> "Parking Mode", press  and select the following options: Collision Detection, Collision Detection + Motion Detection, Motion Detection, Low Bitrates Recording, OFF.

When entering parking mode, there will be a notification appear on the screen, pls press button to confirm.
If you set the Parking Mode OFF, the camera will enter normal recording mode.
Collision Detection Triggered
When the Collision Detection has been turned on, and no The Collision Detection sensitivity can be adjusted by the following three settings:
Low, Medium and High. Please go to "Record Setup" > "Parking Mode"> "Collision Detection" to change as needed.movement is detected after 5 minutes of recording, then Collision Detection is activated with a Collision Detection icon at the bottom right corner of the screen, and the camera automatically to turn off. Full frame recording will be triggered by the Collision Detection sensor. Once it detects vehicle impacts or collision, it will auto turn on and start auto recording; it will stop recording and auto off again after 5 minutes of inactivity.

Collision Detection + Motion Detection Triggered
When the Collision Detection + Motion Detection has been turned on, this is represented by a Collision Detection + Motion Detection icon at the bottom right corner of the screen.

If no movement is detected after 5 minutes of recording, there will be an orange P icon appears in the center of the screen which means Parking Mode is activated. Once the camera detects movement, it will start auto-recording; Once you power off the camera, full frame recording will be triggered by the Collision Detection sensor. Once it detects vehicle impacts or collision, it will auto turn on and start auto recording; it will stop recording after 30 seconds of inactivity.


To manually activate Parking Mode, press and hold the  button until the P icon appears on the centre of screen.
NOTE: In Collision Detection + Motion Detection mode, if the dash cam is turned off manully, it will turn on and record once it detects any vibration.
Motion Detection Triggered
When the Motion Detection has been turned on, this is represented by an Motion Detection icon at the bottom right corner of the screen. If no movement is detected after 5 minutes of recording, there will be an orange P icon appears in the center of the screen which means Parking Mode is activated. Once the camera detects movement, 2 cameras will simultaneously start auto recording; they will stop recording after 30 seconds of inactivity.

NOTE: In Motion Detection mode, if the dash cam is turned off manully, it will not turn on and record even it detects any vibration.
In Parking Mode, the camera will exit Parking Mode if it detects any vibration (Such as opening and closing the door, or moving the car from rest, or other impact vibrations can be triggered), and enter the Normal Video Mode.
In Parking Mode, if you set the Auto LCD OFF to Auto, the camera's LCD will light off after 1 minute but the recording will continue with red light blinks on the Indicator light.
NOTE: Since it is a super capacitor dash cam, to ensure the camera is able to function in Parking Mode, please keep it powered with a power bank or hardwire it directly to the car battery. We do not recommend running the camera continuously for too long time.
Low Bitrates Recording
When the Low Bitrates Recording has been turned on, this is represented by an low Bitrates Recording icon at the bottom right corner of the screen. If no movement is detected after 5 minutes of recording, there will be an orange P icon appears in the center of the screen which means Parking Mode is activated. Once the camera enter Low Bitrates Recording, the dash cam will auto switch to 720P @15fps resolution and keep recording. For example: the single front mode will record video at 720P@15fps, and the dual recording mode will both record video at 720+720P@15fps. The camera will exit Low Bitrates Recording if it detects any vibration, and record at the selected resolution.

- In Low Bitrates Recording, if the dash cam is turned off manually, it will not turn on and record even it detects any vibration.
- In Time Lapse, the dash cam cannot enter the Low Bitrates Recording mode.
Time Lapse
If Time Lapse is selected, the camera will take static photos at the set recording frame rate– either 1FPS, 5FPS, OFF – to create a video montage. For example, if you set Time Lapse 1FPS, the camera will take one photo every second, and then stitch the photos together into a 1 fps video. With a maximum recording frame rate of 5fps, recording 8 hours of video with Time Lapse 1Sec will generate a time lapse video lasting just 16 minutes (8x60x60/30/60). This Eco Mode is recommended for storage cards with smaller capacities.
[Real Recording Time = Time Lapse Video Time Length (Sec) x Video Frame Rate FPS / Time Lapse Option FPS]
When the camera is turned on again, it will record in time lapse recording mode.

GPS Function
- Install the External GPS Mount onto the camera.
- Plug the Type C USB Connector into the GPS Mount to power it.
- Once charged, the camera will power on. Recording will commence if a microSD card has been inserted, just press the
![]() Button to stop recording.
Button to stop recording. - Press the
![]() button to enter setup, go to "System Setup ">"GPS " to activate the camera's GPS function.
button to enter setup, go to "System Setup ">"GPS " to activate the camera's GPS function. - The GPS receiver will start to search for a GPS signal, once the GPS signal has been received, the GPS icon will be displayed on the screen.
![]()
- You can include GPS tracking and vehicle speed on the video footage, go to "Record Setup">"Stamp">"GPS Location Stamp" and "Speed Stamp" to set.
- You can review recorded video using the VANTRUE GPS Viewer (available for download on www.vantrue.net).
 button to enter setup, go to "System Setup ">"GPS " to activate the camera's GPS function.
Viewing Video on the Unit/Computer
Viewing files on camera
Press and go to "Files", press and  or
or  button to navigater to >"Event" or >"Normal" or >"All" file folders to view and playback videos on the camera display. Use the or buttons to select the or file and press button to playback/pause. During playback, and button to fast forward, press button to resume playback speed.
Viewing files on a computer
- Connect the camera to your computer using the supplied USB cable.
- "USB Connecting" and "Power on" will be displayed on the camera screen, please select "Power on" and press
![]() button to transfer data.
button to transfer data. - Depending on your computer OS, the device will appear either as a removable drive or a removable volume.
Delete Videos

Delete Event Files
- Go to Event file, playback the video on the dash cam, single press the
![]() button, select Delete files then press
button, select Delete files then press ![]() button to delete.
button to delete.
Delete Normal Files
- Go to Normal file, playback the video on the dash cam, single press the
![]() button, select Delete files then press
button, select Delete files then press ![]() button to delete.
button to delete.
Upgrading the Firmware
The system will automatically update if the micro SD card contains the firmware upgrade file. The camera will restart once the upgrade has been completed.
Always stay up-to-date
The latest firmware version is always available at the official VANTRUE website (www.vantrue.net). We strongly recom-mend registering your product (www.vantrue.net/register) to receive a notification email when a new firmware update is available.
Working Temperature
The camera is designed to operate in temperatures from 14° to 158°F (-10° to 70°C), temperatures outside this range risk degrading the camera's performance work and causing damage.
To avoid damage
- In hot weather, do not expose the camera directly to the sun when the car is parked.
- In extreme winter conditions, i.e. -4°F (-2°C) or lower, detach the camera from the windshield when not in use, and store in the glove box.
Specifications
The specifications of this product may change without prior notice due to product improvements.
| Model | N2S | |
| Image Sensor | Front: Sony Inside: Sony | |
| Display | 2.0 Inch TFT LCD (4:3) | |
| Lens | Front: 155° wide viewing angle, F/1.4 wide aperture. Rear: 165° wide viewing angle, F/1.8 wide aperture. | |
| Languages | English/Japanese/Deutsch/Italian/Spanish/French/Russian/ 简体中文 (Simplified Chinese) | |
| Video | Front + Cabin Recording 1440P+1440P(30fps); 1440P+1080P(30fps); 1080P+1080P(30fps); 1080P+720P(30fps); 720P+1080P(30fps); 720P+720P(30fps); | Front Recording 3840Px2160P(30FPS ); 2592Px1520P(30fps); 2560Px1440P(30fps); 1920Px1080P(30fps); 1280Px720P(30fps); |
| Image | JPEG format; 5MP/2MP | |
| Audio | Built-in microphone and speaker | |
| Memory Storage | Internal memory: 4MB External: Micro SD Card (32 to 512GB, Class 10) | |
| Shutter Type | Electronic | |
| USB Port | Type-C | |
| Power Source | Supercapacitor | |
| Working Temperature | 14° to 158°F (-10° to 70°C) | |
| Storage Temperature | -4° to 176°F (-20° to 80°C) | |
| Compatible OS | Windows XP/Vista/7/8/10 & Mac OS | |
Warranty & Support
Warranty
The VANTRUE OnDash N2S Dual Dash Cam comes with a full 12 months warranty. If you register your product on our official site(www.vantrue.net/register), you can extend the warranty to 18 months.
Support
If you have any questions regarding your product, please do not hesitate to contact us at support@vantrue.net, or drop us a message through the live chat box at www.vantrue.net. Queries are typically answered within 12-24hours.
Your opinion matters
VANTRUE is firmly committed to always improving our products, services, and user experience. If you have any thoughts on how we can do even better, we welcome your constructive feedback and suggestions. Connect with us today at support@vantrue.net.
Documents / Resources
References
Download manual
Here you can download full pdf version of manual, it may contain additional safety instructions, warranty information, FCC rules, etc.
Advertisement


Need help?
Do you have a question about the OnDash N2S and is the answer not in the manual?
Questions and answers