Vantrue OnDash N1 PRO (N1 PRO) - Dash Cam Manual
- User manual (66 pages) ,
- User manual (25 pages) ,
- User manual (113 pages)
- Also fits for
- N1 pro
Advertisement
- 1 What's in the box
- 2 Product Overview
- 3 Getting started
-
4
Basic Operation
- 4.1 Power on/off the device
- 4.2 Settings in the menu
- 4.3 Date/Time setting
- 4.4 Auto LCD OFF
- 4.5 Loop recording
- 4.6 Event recording
- 4.7 Audio recording
- 4.8 Parking mode
- 4.9 Capture a picture
- 4.10 Connecting external GPS receiver
- 4.11 Viewing video and photos
- 4.12 Delete Videos
- 4.13 Upgrading the firmware
- 4.14 Working temperature
- 5 Specifications
- 6 Warranty & Support
- 7 Documents / Resources
What's in the box

- Car Charger with Built-in with Built-in Type C Cable (11.5ft)
- Suction Cup Mount
- VANTRUE N1 Pro Dash Cam
- Type C Data Cable (3.3ft)
- N1 Pro Dash Cam User Manual
- Quick Guide
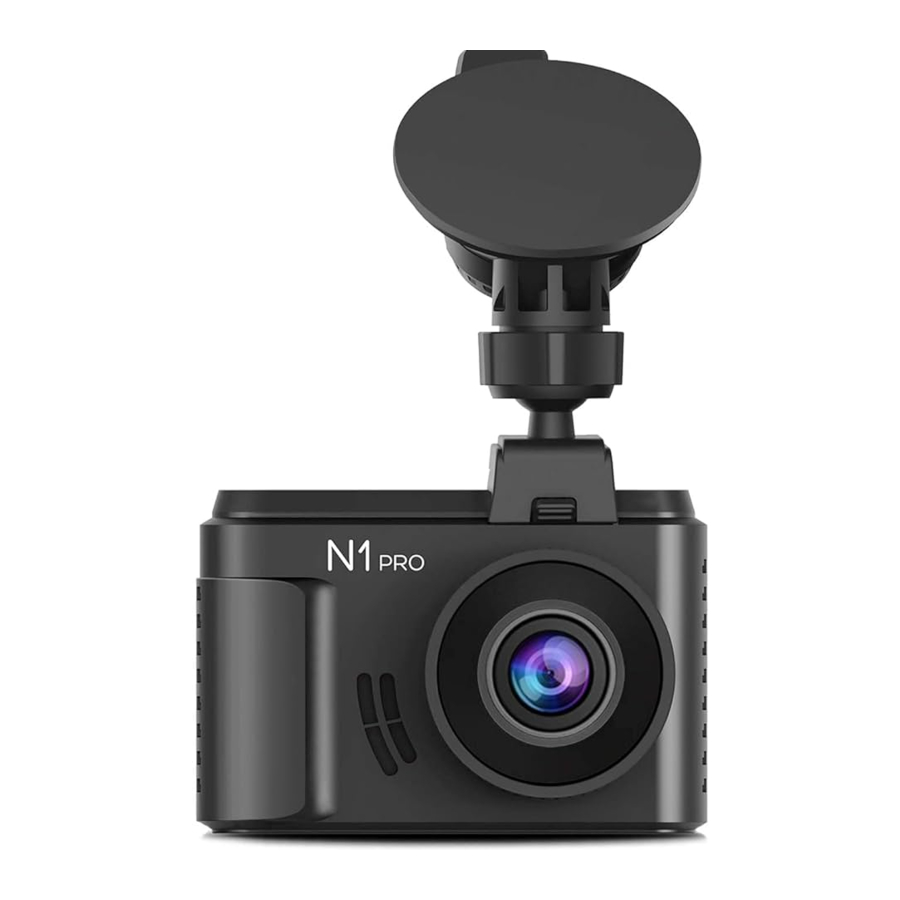
Product Overview

| NO. | Name | Description |
| 1 | Emergency/P Button | One press captures photos when the camera is recording. One press manually locks the current recording video clip when the camera is recording. Long press to enter Parking Mode when the camera is recording. |
| 2 | LED Indicator | Charging LED indicator |
| 3 | LED Indicator | Recording LED indicator |
| 4 | Power/Menu Button | Power ON/OFF when Long press; Enter/exit setup menu when the camera is not recording. Quickly exit the next menu page when the camera is on Menu Interface. |
| 5 | UP Button | Upward selection; Fast forward when playing back videos; Microphone ON/OFF switch. |
| 6 | OK Button | Stops/stars the video recording; Confirms the setup. |
| 7 | Down Button | Downward selection; Slow forward when playing back videos; Turn off/on Screen. |
| 8 | TYPE-C Port | USB port for charging or data transferring. |
| 9 | Memory Card Slot | Location for the micro SD memory card. |
| 10 | Speaker | Delivers sound when playing back videos. |
| 11 | Camera Lens | Front facing F1.8 160° wide camera for video recording. |
| 12 | Reset | Revert to factory settings |
| 13 | Serial Number | Serial Number for Warranty Registration. |
| LED Indicator | ||
| Red LED solid on | Camera is being charged. | |
| Blue LED blinks | Camera is recording videos | |
| Red LED Off | Camera is nearly full charged. | |

Screen overview
Getting started
Before using charge the unit for 2-3 hours
- Charge via your USB charger

- Charge via the car charger


While charging, the LED indicator light is blinking red.
NOTE:
- The device has two ports available for charging - the Micro USB port on the camera and the Type-c port on the suction cup mount.
- When charging via a computer, please use the USB port on the camera with Micro USB Cable. If you use the port on the camera, the device will detect data connecting to the computer and auto switch to "Mass Storage" mode, in which the camera will not be setup or operated.
Installing a Memory Card
Recommend Vantrue microSD Card
Please use a genuine microSD memory card from 16GB to 256GB with a speed rating of class 10 or higher. We recommend using Vantrue microSD Card (need to buy separately). Please insert the SD card when dash cam is off. Carefully insert the memory card into the camera's card slot until it clicks. To remove the card, power off the camera first, then push the card into the slot until it clicks again.
NOTE: When using a 64GB, 128GB or 256GB MicroSD card, please card, please format it to FAT32 on the camera first.

Please insert the card into the camera. If it says 'please insert TF card' or 'error card please format' here, please press the recording button(OK button) and then press the power button to access into the menu, go 'system setup' and choose 'Format SD Card'. Then select the "OK" and wait for 10 seconds. Then the card will be formatted. Then the card will be formatted successfully.
(If you format it on computer, please search online on "How to formata 64GB microSD card to FAT32".
REMINDER:
- The MicroSD card should be formatted every 2 weeks to maximize the lifetime of the memory card.
- Please do not take the card out when the camera is recording in case that the important video files missing.
Installing the unit onto your windshield
- Connect the suction mount to the camera's mounting socket, push it in till it clicks
![]()
- Clean the windshield using water or alcohol, and wipe clean with a lint-free cloth.
- Wipe clean the suction mounting pad on the camera mount.
- Install the suction mount to the windshield, and rotate the locking bar on the mount upward 90 degrees till it clicks, then the camera is mounted on the windshield securely.
![]()
- Line the power cable around the trim of your vehicle.

- Plug the Type-C connect of the cable to the Type-C port on the suction cup mount's locking bar.

- Insert the car charger into your vehicle's cigarette lighter port.

- Start the car, the camera will auto turn on and start recording.


Basic Operation
Power on/off the device
- Manually
Long press the Power button to turn on/off the camera.

- Automatically.
When connecting to car charger, the camera will auto turn on after you start your car and the battery charging starts. It will auto turn off in 5 seconds after you shut off the car.

Settings in the menu

After powering on, one press the power button to enter the setup menus.(lf the camera is recording video, press the OK button to stop the recording and then press the Power button.)
- Record setup
Press OK button to enter the settings, and press UP/DOWN button to select setting items.- Resolution: Default setting is 1920X1080/30FPS (fps: Frames per Second)
Press Down button to select 1280x720/30FPS. - Loop Recording: Default setting is 3 mins per video clip. Press Down button to select among 1 min, 3 mins, 5 mins and OFF.
- G-Sensor: You can choose among 1, 2, 3, 4, 5 and Off. G-sensor is the most sensitive when set to 5.
- Audio Recording: Default setting is ON. Press Down button to select OFF.
- Parking Mode: Default setting is OFF. Press Down and OK button to turn it ON/OFF.
- Exposure: Default setting is 0. Press Down button to select among +2.0, +1.0, +0.0, -1.0, -2.0
- Number plate: Default setting is OFF, Press Down and OK button to set your car number.
- Stamp: Default setting is Date/Time Stamp, Logo Stamp, Number Stamp, Speed Stamp, GPS Location Stamp, Press OK button to turn off/
- Rotate Display: Default setting is OFF. Press OK button to turn it ON/OFF.
- Time Lapse: Default setting is OFF, Press Down Button to select among 1 sec, 5 secs, 10 secs and OFF.
- Power Off Delay: Default setting is ON, the camera will auto end recording and turn off when you shut off the car. Press Down button turn it OFF to disable it.
When the setup finished, press power button to exit.
- Resolution: Default setting is 1920X1080/30FPS (fps: Frames per Second)
- System setup
- Language: Default setting is English. Press OK button to select among Engish/Français/Español/Deutsch/Italiano/ 简体中文 /русский/ 日本語 /Polski.
- Format SD Card: Press OK and Down button, Select OK to format the microSD card.
- Time & Date: Press UP/DOWN and OK button to setup date and time.
When finished, press Power button to exit. - Auto LCD Off: If you choose 3 Min, it will turn off the camera screen 3 minutes after recording commences. If you choose OFF, the LCD 3 minutes after recording commences. If you choose OFF, the LCD screen will always stay on. Press Down button to select among 30 Secs, 1 Min and 3 Mins, or turn it OFF to disable it.
- Device Sound: Default setting is ON. Press OK button to enable or disable it.
- Non-use Auto Power OFF: Default setting is 3 mins, when the camera is on but not in use, it will auto turn off after 3 minutes of inaciivity. To use this function, please turn off the parking mode first. Press Down button to select among 1 min, 2 mins and 3 mins, or turn it OFF to disable it.
- Frequency: Default setting is 60Hz. Press Down button to select 50Hz or 60Hz.
- System info: View the Version of the dash cam.
- Default Setting: Press Down and select OK to set the device back to factory settings.
When the setup finished, press Power button to exit.
- GPS setup
Note: To use the GPS function, you need to purchase an extra GPS mount for the camera.- GPS : Default setting is Off. Press Down button to turn ON/OFF.
- Speed Unit: Default setting is MPH. Press UP button to select KMH or MPH.
When the setup finished, press Power button to exit.
- Files
Check and delete videos/photos in the Normal/Event folder.- Event: Event videos (detected by G-Sensor and manually locked) stored.
- Normal: Normal recording videos and images stored.
- Photo: Images stored.
- All: All Images and video stored.
Date/Time setting

Go to the MENU interface, and "System Setup">"Time& Date", press Down button to set. In the time setup interface, press UP or Down button to select date and time value, press OK to confim and go to next. When the setup is finished, press Power button to exit.
Auto LCD OFF
This feature avoids any chance of the screen being a distraction in the vehicle, especially at night when the illumination from the LCD screen can be a nuisance or even a hazard to the driver. If you choose 3 Min, the camera's LCD will light off after 3 minutes but still recording with blue light blinks. You can press any button to light on the screen.

Please go to System Setup to adjust this time to 30 Secs, 1Min and 3 Mins, or turn it OFF to disable it so the LCD can always stay on. it so the LCD can always stay on.
Loop recording
After installing the memory card, by default, the camera immediately starts loop recording video when it connects to a power source and turn on. If it doesn't connect to a power source, when you press the OK button to turn it on, it will not auto start recording, you should press the OK button to start recording.
While recording, the LED indicator is blinking blue, and a red dot will flash on the top left of the screen. You can stop/start the recording by pressing the OK button.
By default, the loop recording time is 3 mins. Please go to "Record Setup">"Loop Recording" to change to 1 min, 3 mins, or 5 mins for your need. When it turns off, the camera will record video in 20 mins per clip, but WOUId not overwrite the old videos when the card is full.
The loop recording video is named by "YearDate-Time-SeriaI"(for example, "20180101-0010040-001") format and stored in "File"> "Normal" folder. When the microSD card is full, the camera will write over the old files with new recording.

Event recording
The event detection is triggered by G-Sensor (Gravity Sensor), it auto detects possible accident collisions, locks up the current loop recording video clip and saves the footage in the Event folder so it would not be over-written when the card is full.
The G-Sensor sensibility is adjustable, it is Medium by default, but you could adjust to Low or High or turn it Off in "Record Setup"> "G-Sensor".
You could also lock a video footage manually, when the camera is recording, press the Emergency/P Button. A key icon will appear on the top of the screen.
The event video is stored in "Event" folder, and would not be over-written.

Note: The camera will auto overwrite old Event videos once the Event folder has accumulated 30% of the card capacity. Please regularly transfer important videos to your PC or another storage location (e.g. external hard drive). To maintain good read/write performance, the MicroSD card should be formatted every 1-2 weeks.
Audio recording
By default, the audio recording is ON. You could turn it off in two ways:
- Go to "Record Setup">"Audio recording", and press OK and Down button select OFF;
- While the camera is recording videos, press UP button to turn OFF/ON the voice recording.


When the voice recording has been turned off, the mic icon at the right bottom of the screen will turn white with a red line across it.
Parking mode

To use the parking mode, go to "Record Setup">"Parking Monitor" and select ON. Parking mode icon will appear at the left side of the screen.
Triggered by Motion Detection When Charging
After activating the Parking Monitor, the camera will auto switch to parking mode once it detects no movement in front of the camera for 5 minutes while recording. Parking mode icon will turn into orange.
When the dash camera switch into parking mode with power supply, once it detects movement at the front, it will start auto-recording; it will stop recording after 10 seconds of inactivity.
To manually activate Parking Mode, long press the Emergency/P button until the P icon turns into orange.

NOTE: To keep the camera working in parking mode, please keep powering it with an extra power bank or hardwire it to the car battery directly. Don't recommend to keep the camera working all the time for over 10 hours.
Triggered by Collision Detection without External Power Supply

After activating the Parking Monitor, when the camera turns off, it will turn on and end recording after 20 seconds once the camera detects crash in front, and the videos will be locked in the ''Event'' file.
NOTE: Please ensure the battery of the dash cam is fully charged.
Capture a picture
- When the camera is recording videos, press the Emergency/P button to take a photo in 2 million pixels.


Connecting external GPS receiver
(Optional accessory)
To use the camera's GPS function, please purchase an external GPS receiver mount. The external GPS receiver mount could be purchased from Amazon.
- Install the external GPS mount onto the camera instead of the original mount.
- Plug the mini USB connector to the port on the GPS mount, power it.
- Once it gets charged, the camera turns on; if it's has microSD card inserted, it will start recording, press OK button to stop recording first. Press Power button to enter the setup interface, go to "GPS Setup">"GPS" to turn on the GPS function on the camera.
- The GPS receiver starts to search and receive GPS signal, and the GPS icon is gray on the screen. Once it gets GPS signal successfully, the icon will turn orange.

- You could stamp the GPS tracking and speed on the video footage, go to "Record Setup">"Stamp">"Speed Stamp", "GPS Location Stamp" to set.
- You could review the video on VANTRUE GPS Viewer.(available for download on www.vantrue.net.).

Viewing video and photos
Press Power button and go to "Files">"Event","NormaI", "Photo" and "All">"Event" to view and playback videos on the camera. Press UP/DOWN button to select videos and OK button to playback/pause. When playing back, press UP to slow forward the playback, press DOWN to fast forward.
NOTE: Photos are available for viewing on the camera.
View on a computer
- Connect the included TYPE-C USB data cable to the dashcam and the computer.
- "Mass Storage" and "Power On" will be displayed on the camera screen, please navigate to "Mass Storage" and press OK button screen, please navigate to "Mass Storage" and press OK button to transfer data.
- Depending on the computer systems of different users, after the camera is connected to the computer, it will be displayed as a removable drive or a removable folder.
NOTE: When connecting to your computer, the camera cannot be operated or setup. If you want to charge it and operate, please connect it to a USB phone charger or car charger.
Delete Videos

Delete Normal Files
Go to Normal file, choose a video on the dash cam, one press on the dash cam, one press the Emergency/P button, press Down button to select Delete.
Delete Event Files
Go to Event file, choose a video on the dash cam, one press the Emergency/P button, select Protect Files by DOWN button then confirm it with OK Button. Choose 'unlock Current' option, confirm it with OK Button then select Delete Files. Or you can just delete files on PC.
Upgrading the firmware
The system will automatically be updated if the microSD card contains firmware upgrade file. And the camera will restart automatically after the upgrade has been completed.
Make sure your device is always up to date with latest firmware. Please check back frequently at VANTRUE website (www.vantrue.net) for the latest firmware updates. Yoy could register your product on the website (www.vantrue.net/register) so you will get a notice email when there is new firmware update.
Working temperature
The camera's working temperature is from -4°F to 158°F (-20°C to 70°C), temperature out of this range might affect the camera's work and do harm to the device.
In extremely hot weather, please do not expose the camera in the sun when the car is parked outside. When the temperature is around or lower than -4°F (-20°C) in winter, if you don't need to use the camera, please remove it from the windshield and store it in a storage box when the car is parked.
Specifications
The specifications of this product may change without prior notice for product improvements.
| Model | N1 pro |
| Display | 1.5 inch TFT LCD (16:9) |
| Lens | 160 degrees wide viewing angle and full 6 layer glass lens with wide aperture of F/1.8. |
| Sensor | 2M CMOS Sensor |
| Languages | English/ 简体中文 /Español/Français/Italiano / 日本語 /Deutsch/Русский язык |
| Video | H.264 compressed format;.MOV 1920xl 080P /30F, 1280x720P/30F |
| Image | JPEG; 2miIIion pixels |
| Audio | Built-in microphone and speaker |
| Memorizer | Internal memory: 4M External: 8 to 256 GB MicroSD Card of Class 10 or above |
| Shutter | Electronic shutter |
| USB Port | Type-C USB Type-C USB |
| Battery | 130mAh 3.7 V Polymer Li-ion battery |
| Working Temp. | -4 - 158 deg. Fahrenheit, -20-70 deg. Celsius |
| Storage | -4 - 176 deg. Fahrenheit, -20-80 deg. Celsius |
| PC Operation System | Windows XP/Vista/Windows 7/Windows 8/Windows 10/Mac |
Warranty & Support
Warranty
The VANTRUE OnDash N1 Pro Dash Cam comes with 12 months warranty. lf you register your product on our official site (www.vantrue.net/register), you can extend the warranty to 18 months)
Support
If you have any question on your product, please do not hesitate to contact us via Amazon or drop us an email at support@vantrue.net. Any contact will be answered within 24 hours.
Any thoughts?
Got any thoughts on the product? We are always working at our best to improve our product& service quality and user experience. If you have any thoughts on improving the product, please feel free to drop us a message at support@vantrue.net. We are anticipating to hearing and got inspired from you.
Documents / Resources
References
Download manual
Here you can download full pdf version of manual, it may contain additional safety instructions, warranty information, FCC rules, etc.
Advertisement


Need help?
Do you have a question about the OnDash N1 PRO and is the answer not in the manual?
Questions and answers