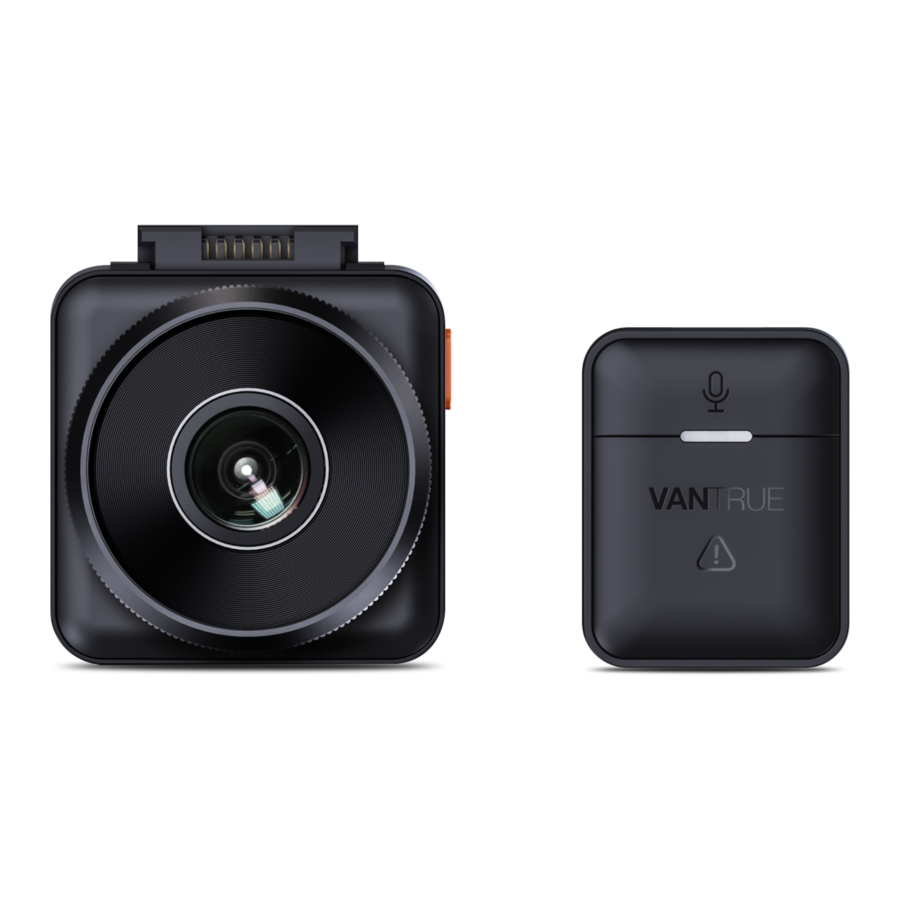
Vantrue Element 1 - Smart Cube Dashcam Manual
- User manual (287 pages) ,
- User manual (160 pages)
Advertisement

What's in the box?
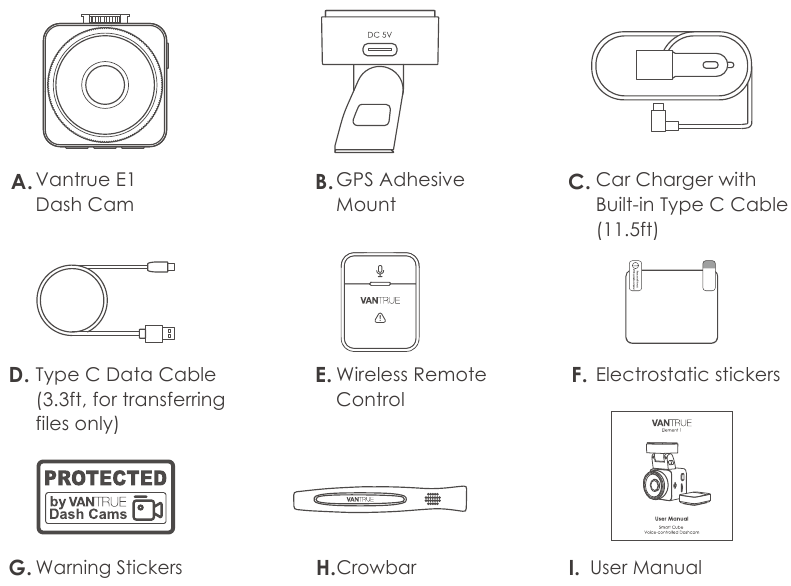
Optional Accessories

Camera Overview
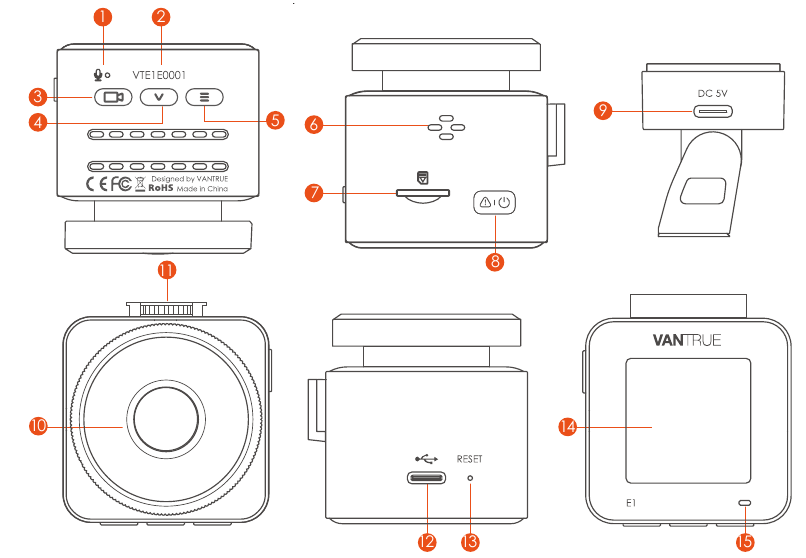
| NO. | Name | Description |
| 1 | Microphone | Records clear audio with the video footage. |
| 2 | Serial Number | Serial number for warranty registration. |
| 3 |  Button Button | During video recording, long press to turn off the screen, short press to stop video recording and enter standby mode; you can confirm the selected option in the menu; when playing back files, you can play/pause files |
| 4 |  Button Button | During video recording and standby, long press to quickly enter parking mode, and short press to turn on/off the microphone; in menu settings, long press to scroll through menu options, and short press to display the next menu option; during file browsing, long press to scroll to display file, short press to display the next file; in playback mode, short press to pop up the delete file menu |
| 5 |  Button Button | During video recording and standby mode, long press to turn on/off WiFi |
| 6 | Speaker | Delivers sound during video playback. |
| 7 | SD Card Slot | Supports Micro SD Card up to 512GB in FAT32, Class 10 |
| 8 |  Button Button | Power ON/OFF; long press to turn on/off the dash cam; short press during recording to enter event recording mode; short press to capture pictures during event recording |
| 9 | Mount Port | Connects to Type C cable or car charger for external power supply |
| 10 | Front Camera | Front facing camera for video recording road Events |
| 11 | Mount Interface | For connecting mounts |
| 12 | Power Port | Connects to Type C cable or car charger for external power supply connects the data cable for data transfer |
| 13 | Reset Button | Short press to restart the camera. |
| 14 | Screen | 1.54" LCD Screen |
| LED Status | Description |
| 15 Steady green light | In standby status |
| 15 Blinking green light | Camera is recording |
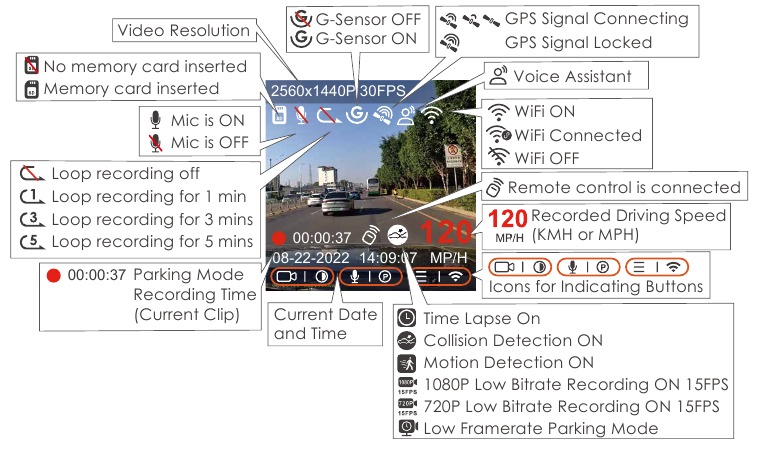
Screen Overview
Installation
Installing a Memory Card (Recommended: Vantrue U3 high-speed micro SD card).
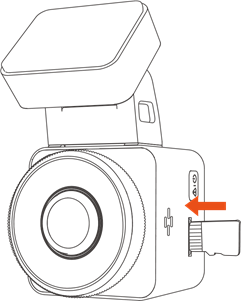
Please insert a memory card (memory card capacity: 32GB-512GB, card speed: U3/Class10/A2). The dashcam has certain requirements on the card speed of the memory card. For reliable operation, we recommend using a VANTRUE SD card(sold separately).
Memory Card Installation: There is an icon indicating the insertion direction of the memory card. Please push the memory card into the card slot according to the direction indicated by this icon, until a "click" sound is heard in the card slot, indicating that the memory card is inserted properly.
Before using this card, please follow the steps below to format it properly: If the camera is recording, please press the ![]() icon to pause the recording, then press the
icon to pause the recording, then press the  icon to enter the menu, then enter "System", select the"
  Format SD Card ", and confirm to format the memory card until it prompts "Formatted successfully."
After inserting the memory card, if the screen prompts "Card error, please format" (please note that the recorder does not record at this time), please directly press the button to enter the  menu and start the formatting process.
REMINDER:
- We recommend formatting the card once a month to ensure normal operation of the dash cam.
- Do not remove or insert the memory card during recording to avoid losing important videos.
- Please do not use bad cards or low-speed cards on the dash cam, as it is easy to stop or lose the recording due to a failure of the memory card.
- Before formatting the memory card, please check the emergency video folder in the SD card to see if there are any videos that need to be saved separately, so as not to delete important videos by mistake.
Installing the camera onto your windshield
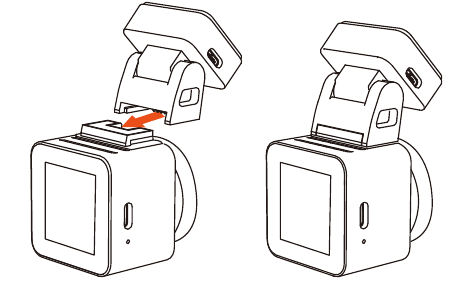
- Align the mount with the dash cam mount interface then push in until the mount is installed
![Vantrue - Element 1 - Installing the camera onto your windshield - Step 1 Installing the camera onto your windshield - Step 1]()
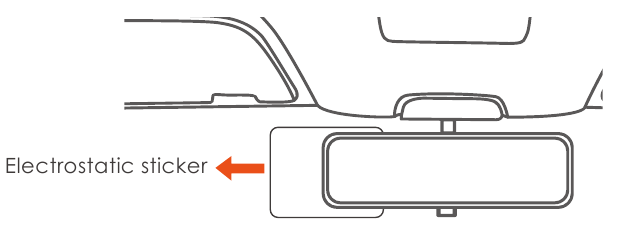
- Thoroughly clean the windshield with water or alcohol, then wipe it with a dry cloth. Stick the electrostatic sticker behind the rear-view mirror, which is the recommended position to prevent blocking your view while driving.
![]()
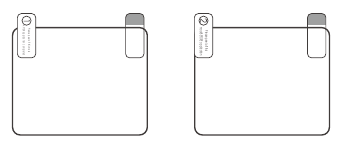
Note: There are two protective films numbered 1 and 2. Please remove the protective film from No. 1, paste the electrostatic sticker on the windshield, and then remove the protective film from No.2.
![Vantrue - Element 1 - Installing the camera onto your windshield - Step 3 Installing the camera onto your windshield - Step 3]()
- Remove the 3M tape from the mount, then fix the mount and camera on the electrostatics stickers.
![Vantrue - Element 1 - Installing the camera onto your windshield - Step 4 Installing the camera onto your windshield - Step 4]()
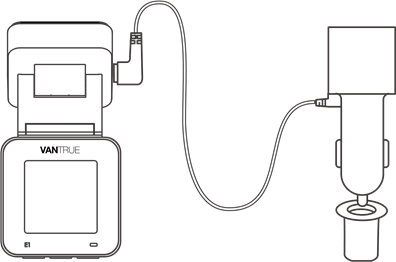
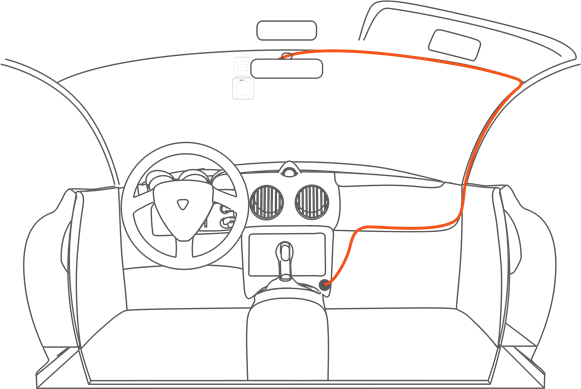
- Connect the car charger to the car cigarette lighter, then insert the USB end of the charger into the Type C USB power port of the camera.
After the car is started, the camera can be powered on immediately.
![Vantrue - Element 1 - Installing the camera onto your windshield - Step 5 Installing the camera onto your windshield - Step 5]()
![Vantrue - Element 1 - Installing the camera onto your windshield - Step 6 Installing the camera onto your windshield - Step 6]()
APP Download
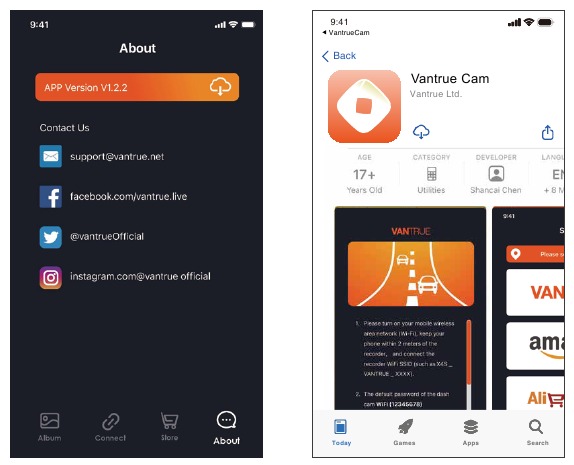
Please scan the QR code of the relevant version below to download the APP and install it.
Search for the "Vantrue Cam" app in App Store or Google Play Store to find the app and then download and install it on your phone.


Note: After this camera is successfully connected to the mobile phone through WiFi, it can realize real-time video preview, change camera settings, download files without Internet connection, and play back videos on the mobile phone. However, the GPS track playback and video sharing functions will depend on the Internet or telecom value-added services (requires you to turn off/disconnect the camera WiFi).
WiFi Connection
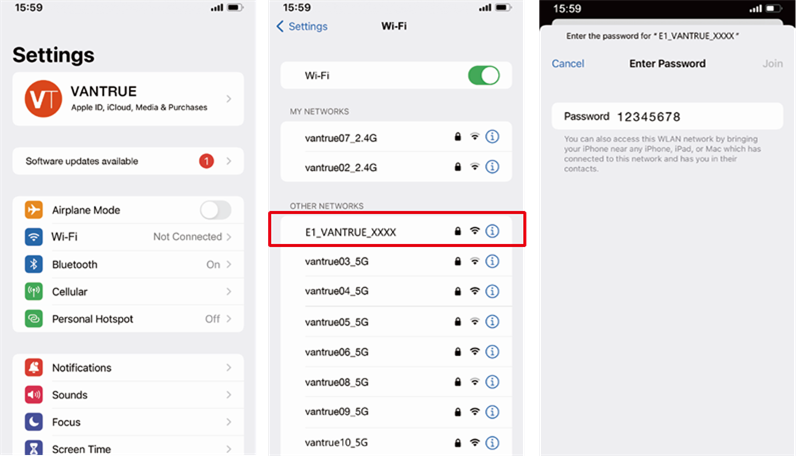
Turn on the WiFi function of the camera, enter the WiFi settings of the mobile phone, then find the WiFi name, such as: E1_VANTRUE_XXXX, and enter the WiFi default password: 12345678 to connect to WiFi.
App Connection
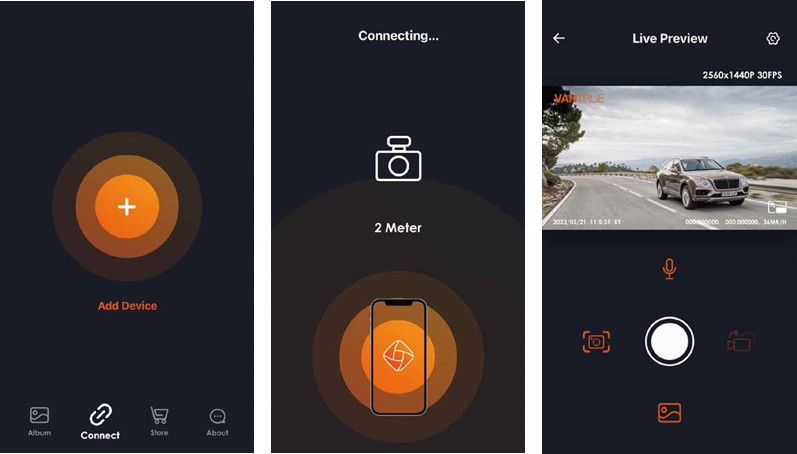
After the WiFi connection is successful, click "+" when opening the app for the first time, add the camera model, then the app will automatically connect to the camera and display the current real-time recording situation of the camera.
Note:
- If you do not connect to WiFi before opening the app, the app will prompt you by saying "Please connect to WiFi first", and will automatically jump to the WiFi settings. Please complete the steps to connect to WiFi first.
- If the WiFi is already connected, but the app jumps to the application permissions after selecting the model, please check whether the wireless network permissions for the app are turned on.
- The initial password for this device is only used for initial login. In order to prevent potential security risks, please be sure to change the initial password after the initial login to prevent others from logging into your device without authorization or other adverse consequences.
- If you forget the WiFi password, you can restore the default setting of the device, and the Wi-Fi password of the device will also be restored to the default password(12345678).
- If the connected WiFi name does not match your dash cam model, the app will prompt you: "Please select the correct model" and automatically jump back to the model selection interface.
- If there is no connection with the mobile phone after the WiFi is turned on, the camera will automatically turn off the WiFi and return to the recording interface after 10 minutes.
App Operation
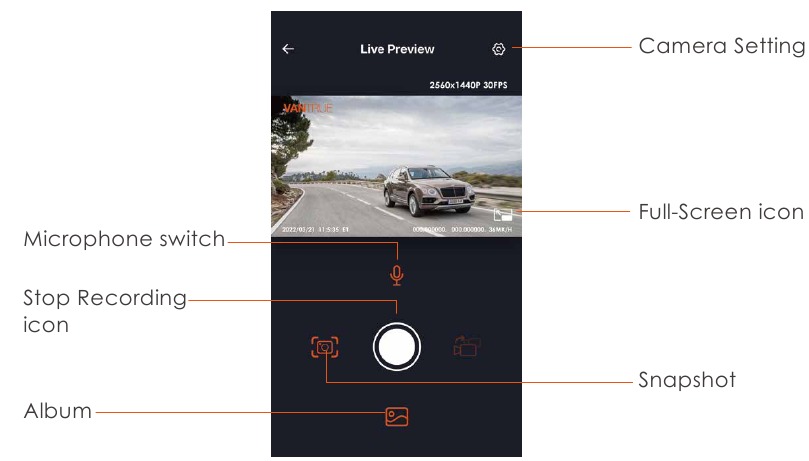
After entering the app's real-time preview, you can perform the following operations:
Video preview: After the app is successfully connected to the camera, enter the real-time preview page, click the full-screen button or place the phone horizontally, and the real-time screen will automatically switch to the full-screen preview mode.
Video playback: The video and photo files recorded on the SD card can be viewed in the app, and the video can be played back after clicking the file.
Video download: You can select the video or picture you want to download in the SD card browsing interface or in the video playback area. After downloading the video, if you play it in the local app interface, you can view the GPS track of the video.
Video snapshot: You can capture the current screen in the real-time preview interface of the app.
App Upgrade
Open the "Vantrue Cam" App, connect to Wi-Fi, and enter Settings > About > Detect New Version. The app will automatically detect whether the its version is the latest version. If there is a new version of the app, follow the prompts and upgrade the version.
Basic Operation
Menu Settings
The E1 dash cam has 3 function menus, which are: record settings, system settings, and file browsing. You can set your dash cam according to your requirements with these function setting.
Press the  button, pause the video first, and then press the
  button to enter the menu settings.

- Record Setup
- Resolution: Press the
![]() Button to switch the resolutions: 2592x1944P 30FPS; 2560x1440P(HDR) 30FPS; 2560x1440P 30FPS; 1920x1080P 60FPS; 1920x1080P(HDR) 30FPS; 1920x1080P 30FPS; 1280x720P(HDR) 30FPS; 1280x720P 30FPS.
Button to switch the resolutions: 2592x1944P 30FPS; 2560x1440P(HDR) 30FPS; 2560x1440P 30FPS; 1920x1080P 60FPS; 1920x1080P(HDR) 30FPS; 1920x1080P 30FPS; 1280x720P(HDR) 30FPS; 1280x720P 30FPS. - Loop Recording: Default setting is 3 min. You can choose among 1/3/5 mins and OFF.
- G-Sensor: Select the level of G-sensor you need, then you can set 3 directions (Front + Back/Left + Right/Up + Down). The G-sensor value in each direction can be selected as 1/2/3/4/5/Off. The higher the sensitivity level, the easier it is to trigger emergency recording. G-sensor is most sensitive when set to 5.
- Audio Recording: The default is ON. Set recording to on or off.
- Exposure: The default value is +0.0. Adjust the exposure of the lens.
- REC Status Light: Default setting is ON. You can choose to turn on/off the recording status light.
- Rotate Display: Default is off. You can choose to flip the video screen up and down(180 Degree).
- Number Plate: Press the
![]() button to select the number or letter to be set. After setting, your license plate number can be displayed in the recorded video.
button to select the number or letter to be set. After setting, your license plate number can be displayed in the recorded video. - Stamp: Enable or disable the watermark stamp on video and photos. The watermark stamp includes date and time label, VANTRUE label, license plate number, GPS location information, and speed label. All enabled by default.
- Time Lapse: The default value is disabled. You can choose to enable 1FPS/5FPS/10FPS/15FPS.
- Parking Mode: You can choose the parking mode you need, including Collision Detection/Motion Detection/Low Bitrate Recording/Low Framerate Mode/OFF.
- GPS Setting: GPS is enabled by default. GPS ON/OFF settings, speed unit settings, and GPS information are all set here.
- Resolution: Press the
- System Setup
- Language: Available languages are Engish/Français/Español/Deutsch/Italiano/简体中文/русский/日本語/Polski.
- Wi-Fi: Once the dashcam is turned on, the Wi-Fi function is activated by default. Wi-fi name and password can be viewed in this device.
- Display Setting: The default setting is Full Screen mode. You can switch it to panorama mode.
- Voice Assistant: The default sensitivity is Standard. Voice commands can be recognized after the option is turned on. You can choose options such as low sensitivity/high sensitivity/standard/off.
- Voice Content: Voice recognition commands. You can use different commands to remote control the camera.
- Format Memory Card: Format all data on the memory card.
- Format Reminder Setup: Select the reminder options: 15 Days, 1 Month, and Off. Default is off.
To prevent you from forgetting to format the memory card regularly, we have added a format reminder time setting. You can choose to be reminded after 15 days or 1 month, When the time is up, you can choose "OK" to format, or choose "Next."
Note: If changing the format reminder option, the timing will restart as soon as the option is changed. - Date & Time: There are two ways to set the time and date:
- GPS automatic update,
- Manual date/time setting. GPS automatic update is enabled by default.
GPS automatically updates the date and time based on your time zone, so you need to select the correct time zone first; you can also choose to turn off GPS automatic update, turn on Manual date/time setting, and manually correct date and time.
The date format and time zone settings can also be set under this menu.
- Auto LCD Off: Set the time to automatically turn off the LCD display after no operation.
If you set the Auto LCD Off to 3 min, the camera's LCD screen will auto light off after 3 min but recording will continue. If the setup is Off, the screen will not turn off. Press the Button to choose the option you want: 30s, 1Min, 3Min and OFF.![]()
- Device Sound: Set the volume of the device. The default volume level is 3, the lowest is 0, and the highest is 5.
- Prompt Tone: According to different situations, the dash cam is set with 5 kinds of prompt tones, which are power-on/off sound, Keys sound, File locked sound, Format sound, abnormal stop recording reminder. All prompt tones are turned on by default.
- Frequency: Different countries have different frequencies. In order to avoid affecting the video, you can choose 50Hz or 60Hz frequency according to different regions.
- System Info: Check the current model, firmware version, and the Vantrue official website.
- Certifications: You can view the certification information of E1 camera.
- Default Setting: Reset the device back to factory settings.
- Files
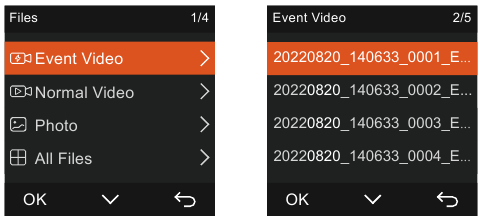
Review the video and photo files recorded by the camera.- Event: Critical event videos detected by G-Sensor activity or manually locked by user.
The file name format is 20300128_140633_0008_E_A.MP4 - Normal: Standard videos recorded. This folder saves loop recording video, parking mode video, and time-lapse video. The file name format of Loop Recording video is 20300128_140633_0008_N_A.MP4; the file name format of Parking Mode video is 20300128_140633_0007_P_A.MP4; the file name format of Time-Lapse video is 20300128_140633_0006_T_A.MP4.
- Photo: Photo files.
- All: All the standard videos and critical event videos recorded.
- Event: Critical event videos detected by G-Sensor activity or manually locked by user.
Main Functions
Loop Recording
After inserting the memory card and connecting the power, the E1 dash cam will auto turn on and enter loop recording. The duration of each recorded video will be saved in the normal video folder according to the loop recording time you set.
When the capacity of the normal video folder reaches 70% of the total, new loop recording files will automatically overwrite original loop recording files. After this function is enabled, the video file will automatically overwrite the loop, so as not to stop recording during the driving process.b
Notice:
- The normal operation of the loop recording function is very dependent on the speed of the memory card, so please format the memory card regularly to avoid problems such as excessive memory card files and card aging that affect normal loop recording.
- Please check the loop recording video regularly to avoid necessary videos being overwritten.
- After loop recording is turned off, the lock video function will no longer work.
- After the loop recording is turned off, the duration of each video will be 20 mins, and the recording will stop when the memory card capacity is full.
Event Recording
Event video is triggered by the G-sensor(Gravity Sensor), which can be automatically triggered or manually locked.
During driving, in case of special circumstances, the camera will automatically lock for event recording or you can manually lock it for event recording.
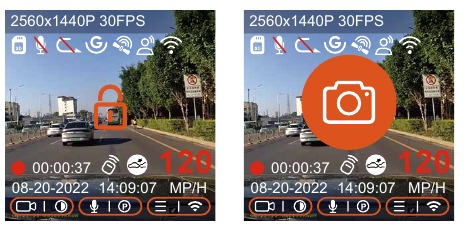
To manually lock the video, just press the button to lock the current video and capture it. During the lock video period, you can press
 the button to capture multiple times. After recording, the video will be automatically saved in the event video folder, and the photo will be saved in the photo folder. Automatic locking event video is triggered when the car is hit/shaken. The dash cam detects the vibration and automatically locks the current video, which is saved in the event video folder. During the locked recording period, you can also press
  the button to take a picture. After the event video recording ends, the video will be saved in the emergency video folder, and the photo will be saved in the photo folder.
Note:
- The sensitivity of the automatic locking video trigger is determined by the sensitivity of the collision. The higher the sensitivity setting, the greater the probability of being triggered.
- The total capacity of the event video file accounts for 30% of the total capacity of the current memory card. When the event video file reaches the upper limit, new event video file will automatically overwrite old event video file. It is recommended to periodically check and save your event video files to avoid loss.
- Lock recording will not trigger in either of the following situations: Loop recording is off or time-lapse recording is on.
Parking Mode(When the parking mode is turned on, the time-lapse video function will not work. These two functions cannot run at the same time)
Parking Mode operates as a sentry function under different situations. You can switch to different parking monitoring modes according to different parking situations.
After parking mode is turned on, there are two ways to record. You can wait for 5 minutes to restart automatically, or long press the ![]() button to begin manually.
button to begin manually.
Note:
- Please use a hardwiring kit or other stable and continuous power supply to power the camera to ensure that the camera works properly in parking mode.
- The E1 operating environment temperature is 14°F to 158°F (-10°C to 70°C). We recommend selecting Collision Detection within this temperature range, as it will automatically turn off once the temperature exceeds the normal operating temperature range. If the temperature outside is high, turn off the camera when parking.
- Time-lapse video recording and parking mode (including collision detection, motion detection, low bit rate recording, and low framerate mode) can only be enabled one at a time. When one is enabled, the other will be automatically disabled.
- All videos in parking mode(Collison Detection, Motion Detection, Low Bitrate Recording, Low Framerate mode) will be saved in the normal folder. In order to prevent the video in parking mode from being overwritten in a loop, please check and save the required files in time to prevent loss.
Collision Detection
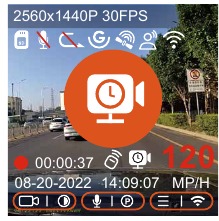
When collision detection is enabled, the ![]() icon will be displayed on the recording interface, indicating that the camera is currently using collision detection mode. Collision detection sensitivity can be adjusted from 1 to 5 levels. You can adjust according to your habits as well as the surroundings of the car.
icon will be displayed on the recording interface, indicating that the camera is currently using collision detection mode. Collision detection sensitivity can be adjusted from 1 to 5 levels. You can adjust according to your habits as well as the surroundings of the car.
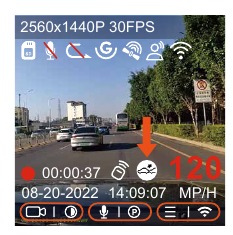
When the Collision Detection is turned on, and no movement is detected after 5 minutes of recording (5-minute entry mechanism for short), then Collision Detection is activated. Collision Detection icon will appear in the middle of the screen and the camera will automatically turn off. When the dash cam is turned off, it will start to record for 1 minute after being shaken, then turn off the dash cam again.
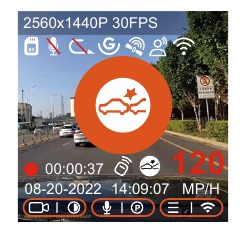
Note:
If the dash cam continues to be hit during collision detection recording, it will exit the collision detection mode and enter normal recording, restarting the 5-minute entry mechanism.
Motion Detection
When the motion detection is turned on, the ![]() icon will be displayed on the recording interface, indicating that the dash cam is currently in motion detection mode. Motion detection has three levels of low/medium/high that can be adjusted, and the corresponding detection ranges for motion detection is 6.6ft/13ft/19.7ft.
icon will be displayed on the recording interface, indicating that the dash cam is currently in motion detection mode. Motion detection has three levels of low/medium/high that can be adjusted, and the corresponding detection ranges for motion detection is 6.6ft/13ft/19.7ft.
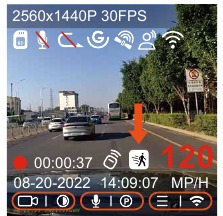
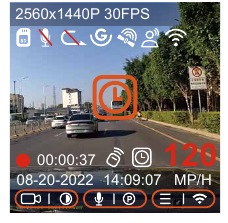
When the motion Detection is turned on, and no movement is detected after 5 minutes of recording, then an orange icon will appear in the center of the screen, and the screen will turn off after 3 minutes.
Video recording process: When the camera detects object movement or car vibration, it will automatically trigger video recording. E1 comes with a pre-recording function. When the motion detection recording is over, the camera will load the pre-recorded video into the motion detection video and save it to the normal folder.
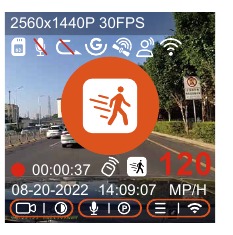
Note:
- Motion detection mode can only be engaged when the camera is turned on. Once the camera is turned off, the motion detection mode will not work.
- The resolution of 1944P and 1440P HDR do not support the pre-recording function, so after enabling motion detection, the resolution will automatically be changed to 1440P for recording.
Low Bitrate Recording
When the low bitrate mode is on, the  icon will be displayed in the lower right corner of the screen if 1080P 15FPS is selected, and the
  icon will be displayed in the lower right corner of the screen if 720P 15FPS is selected.
If no movement is detected after 5 minutes of recording, there will be a  icon that appears in the center of the screen. The resolution of all current video will be automatically switched to 1080P 15FPS or 720P 15FPS for recording, and the recording duration is determined according to the currently set loop recording duration. When the camera vibrates or is moved, it will automatically exit, wait 5 minutes, and enter again.
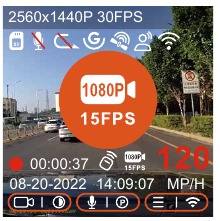
Note:
Low Bitrate recording can only be engaged when the camera is turned on. Once the camera is turned off, Low Bitrate recording will not work.
Low Framerate mode
When the low framerate mode is selected, the camera will record according to your selection among 1FPS/5FPS/10FPS/15FPS.
For example, if you select 1FPS and the current video resolution framerate is 30FPS, the recorder will generate a 30FPS video per second. Low framerate mode can greatly preserve the integrity of the video and save space on the memory card.
[Real Recording Time(Sec)=Low Framerate Video Time Length(Sec) x Video Frame Tate(FPS)/Low Framerate Option (FPS)]
(Time should be converted into seconds)
Note:
- The time unit of the calculation formula is seconds, so the final normal recording time calculated is also in seconds. If you need to convert it into other time units, please check the units and convert.
- The low framerate mode is similar to the time-lapse recording function, but the difference is that there is no 5-minute entry mechanism for time-lapse recording, which will be directly turned on after setting.
- In low framerate mode, the camera also needs a stable power supply. Once the power is off or exhausted, the camera will shut down.
Time Lapse
When time lapse is selected, the camera will record according to your selection among 1FPS/5FPS/10FPS/15FPS.
For example, if you select 1FPS and the current video resolution framerate is 30FPS, the recorder will generate a 30FPS video per second. Low framerate mode can greatly preserve the integrity of the video and save space on the memory card.
The formula for calculating video duration is: [Real Recording Time(Sec)=Time Lapse Video Time Length(Sec) x Video Frame Tate(FPS)/Time Lapse Option (FPS)]
(Time should be converted into seconds)
GPS Function
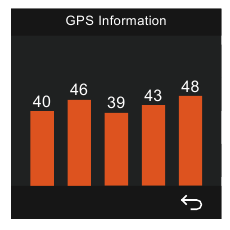
The GPS function is one of the most important functions of the dash cam. GPS is enabled by default, and the camera receives GPS signals through the GPS mount. It can automatically correct the time and date in your area, recording the location where the video was taken and the speed of the car at the time.
Note:
- The GPS connection will be completed within 1 minute after you turn on the device. If the GPS connection is not successful within 1 minute, please check whether the DEVICE has turned on the GPS function, whether the GPS bracket is properly connected, and whether your environment (underground parking lot, densely populated residential area, subway, tunnel, etc.) is affecting the reception of GPS signal.
- GPS information is recorded along with video. To view it, please download and install the VANTRUE Cam App and VANTRUE GPS Player (available for download a twww.vantrue.net).
Automatic Time via GPS
The GPS automatic correction time setting for the E1 dash cam is turned on by default. You can select GMT-08:00 by selecting your time zone, such as Los Angeles. If you do not know the time zone of your location, you can use WiFi to connect to the Vantrue Cam app, and confirm that the automatic time adjustment function in the app is turned on.
Wireless Remote Control
The camera is equipped with a remote control, which can be used to quickly control the camera to snapshot, take emergency video, set recording on/off, and perform other functions.
Remote control connection:
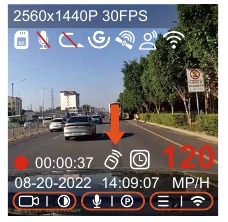
Remove the insulating strip on the remote control and the camera will automatically match the remote control. No manual pairing with the dash cam is required.
When the  icon appears on the screen, it means that the remote control has been successfully matched.
Installation of the remote control:
After the remote control is matched with the camera, please select a suitable location on your car, then tear off the adhesive sticker from the remote control and stick it to your selected location. (Note: The remote control needs to be installed in a position that does not affect safe driving)
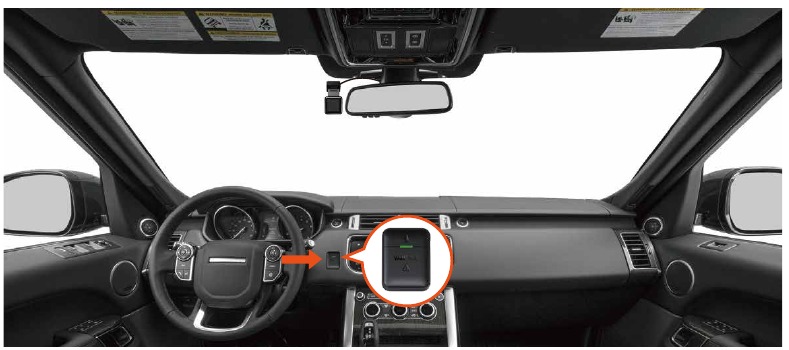
Functions of the remote control:
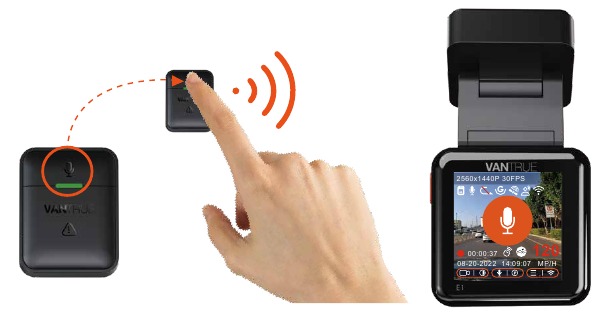
- After the remote control is successfully connected, press
![]() the button to enable or disable audio.
the button to enable or disable audio.
![Vantrue - Element 1 - Functions of the remote control - Step 1 Functions of the remote control - Step 1]()
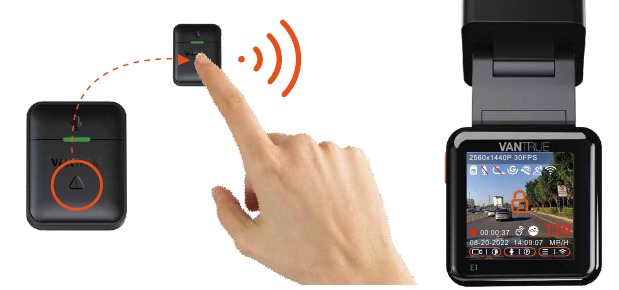
- After the connection is successful, when you short press the
![]() button, the camera will lock the current file and take a video snapshot; continue to short press during the locked video, and continue to capture the photo.
button, the camera will lock the current file and take a video snapshot; continue to short press during the locked video, and continue to capture the photo.
![Vantrue - Element 1 - Functions of the remote control - Step 2 Functions of the remote control - Step 2]()
Replacing the remote control battery:
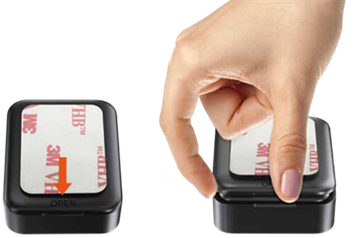
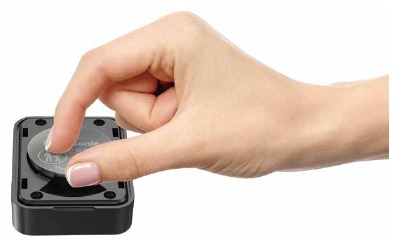
- There is an "OPEN" mark on the bottom of the remote control, please slowly pry open the surrounding gap along the groove position of this mark to open.
![]()
- After opening, gently pry the battery open from the groove in the front of the battery compartment, then take out the old battery, put the new battery in, and cover the back cover of the remote control.
![Vantrue - Element 1 - Replacing the remote control battery - Step 2 Replacing the remote control battery - Step 2]()
Note:
When the power is low, the battery needs to be replaced(The battery model of the remote control is a CR2032 battery). It does not support charging.
Voice Assistant
In addition to controlling the camera with the remote control, you can also control the camera with voice command. Currently supported languages are English, Japanese, Russian and Chinese. For more detailed voice commands, please check System Settings > Voice Content.
The default setting is standard sensitivity. Voice recognition has options such as low sensitivity/standard/high sensitivity/off. You can control the camera with voice commands.
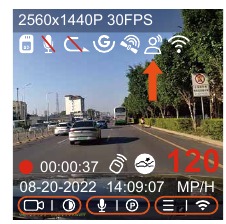
Display Settings
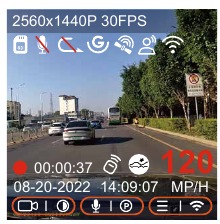
E1 is a small screen camera, so we specially set two screen display modes for you.
The first is full-screen mode. Full-screen mode is full-screen display, with a larger screen ratio, but it will lose some of the left and right viewing angles.
The other is the panorama mode. In this mode, all the content seen by the video camera will be displayed, and the ratio of the video screen display is 4:3.
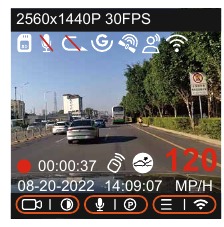
Viewing Video/Photos
- Viewing files on the Camera
After clicking "Files," enter any folder, and after opening the video folder, you can press the![]() button to select the next file, or press the
button to select the next file, or press the ![]() button to delete the file during playback.
button to delete the file during playback.
![]()
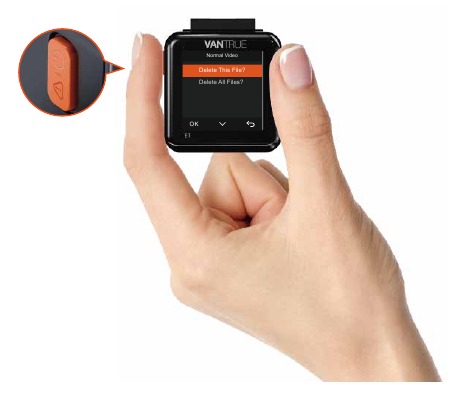
- Delete Videos
Delete the video on the camera. Press the![]() button in the file browsing interface to pop up the delete menu.
button in the file browsing interface to pop up the delete menu.
![Vantrue - Element 1 - Viewing files on the Camera Viewing files on the Camera]()
- Delete Videos
- Viewing files on a Computer
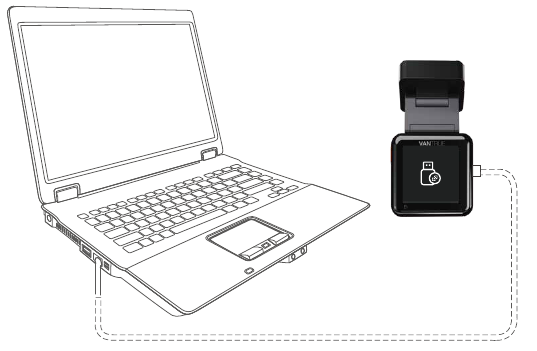
- Connect the included TYPE-C USB data cable to the camera and the computer.
![Vantrue - Element 1 - Viewing files on a Computer Viewing files on a Computer]()
- Connect the included TYPE-C USB data cable to the camera and the computer.
- After the connection is successful, the icon will appear on the
![]() display of the camera to transfer data, and then you can view the video files in the computer folder.
display of the camera to transfer data, and then you can view the video files in the computer folder.
![]()
- Depending on the computer systems of different users, after the camera is connected to the computer, it will be displayed as a removable drive or a removable folder.
- To view files on the computer, you can directly access, right-click to open the menu and delete them.
- You can also use a USB card reader to read the memory card information.
- View on the "Vantrue Cam"App
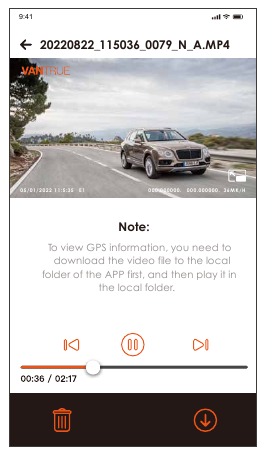
After the camera is successfully connected to the mobile phone through WiFi, it can play back, download and delete files in the mobile app.
![]()
Note:
- For video playback in the app, or for downloads to SD card, there will be no network traffic consumption.
- You can view GPS track information only after the video file is downloaded and played back locally. At the same time, you need to disconnect the WiFi of the dash cam, otherwise the map information will be blank.
Upgrading the Firmware
The system will automatically update with the Micro-SD card firmware upgrade file. The camera will restart once the upgrade has been completed.
The latest firmware version is always available at the official VANTRUE website (www.vantrue.net). We strongly recommend registering your product (www.vantrue.net/register) to receive a notification email when a new firmware update is available.
Working Temperature
The camera is designed to operate in temperatures from -4 to 158°F (-20 to 70°C). Temperatures outside this range risk degrading the camera's performance and causing damage.
To avoid damage
In hot weather, do not expose the camera directly to the sun when the car is parked.
In extreme winter conditions, i.e. -4°F (-20°C) or lower, detach the camera from the windshield when not in use, and store in the glove box.
Specifications
The specifications of this product may change without prior notice due to product improvements.
| Model | E1 |
| Chips | Novatek high-performance processor |
| Image Sensor | Sony CMOS Sensor |
| Screen | 1.54" IPS Screen |
| WiFi | Built-in 2.4G |
| Lens | Front: 160° wide viewing angle; F/1. 8 wide aperture |
| Languages | Engish/ Français/ Español/ Deutsch/ Italiano/ /русский/ / Polski |
| Video Resolution | 2592x1944P 30FPS; 2560x1440P(HDR) 30FPS; 2560x1440P 30FPS; 1920x1080P 60FPS; 1920x1080P(HDR) 30FPS; 1920x1080P 30FPS; 1280x720P(HDR) 30FPS; 1280x720P 30FPS |
| Audio | Built-in microphone and speaker |
| Memory Storage | External: 32GB-512GB Micro SD Card, U3, Class 10(not included in the package) |
| Power Source | Built-in super capacitor |
| Video File Format | MP4 |
| Supply voltage current | DC 5V 2.4A |
| Power | 3.5W |
| Working Temperature | -4°F to 158°F(-20°C to 70°C) |
| Storage Temperature | -22°F to 185°F(-30°C to 85°C) |
| USB Port | Type C |
Support
Support new
If you have any questions regarding your product, please do not hesitate to contact us at support@vantrue.net, or drop us a message through the live chat box at www.vantrue.net.
Queries are typically answered within 12-24hours.
Your opinion matters
VANTRUE® is firmly committed to always improving our products, services, and user experience. If you have any thoughts on how we can do even better, we welcome your constructive feedback and suggestions.
Connect with us today at support@vantrue.net.
Hey, find us here:


www.vantrue.net/contact
Documents / Resources
References
![apps.apple.com]() App Store - Apple
App Store - Apple![play.google.com]() Google Play
Google Play![www.vantrue.net]() Vantrue | Automobile security & dashcam focused
Vantrue | Automobile security & dashcam focused![www.vantrue.net]() http://www.vantrue.net/register
http://www.vantrue.net/register![www.vantrue.net]() VANTRUE: High-end Dash Cam for Your Drive
VANTRUE: High-end Dash Cam for Your Drivehttp://facebook.com/vantrue.live
Download manual
Here you can download full pdf version of manual, it may contain additional safety instructions, warranty information, FCC rules, etc.
Advertisement



 Button to switch the resolutions: 2592x1944P 30FPS; 2560x1440P(HDR) 30FPS; 2560x1440P 30FPS; 1920x1080P 60FPS; 1920x1080P(HDR) 30FPS; 1920x1080P 30FPS; 1280x720P(HDR) 30FPS; 1280x720P 30FPS.
 the button to enable or disable audio.
 button, the camera will lock the current file and take a video snapshot; continue to short press during the locked video, and continue to capture the photo.
 button to select the next file, or press the
 button in the file browsing interface to pop up the delete menu.




Need help?
Do you have a question about the Element 1 and is the answer not in the manual?
Questions and answers