Advertisement
Advertisement

Related Manuals for Vantrue OnDash X3


Summary of Contents for Vantrue OnDash X3
- Page 1 User Manual Dash Cam OnDash X3...
-
Page 2: Table Of Contents
1. What’s in the box? ボックスに何が入っていますか? 2. Camera Overview ドラレコの概要 3. Getting Started 入門 4. Basic Operation 基本操作 5. Specifications 製品仕様 6. Warranty & Support 保証とアフターサービス... -
Page 3: What's In The Box
A. Car charger with built-in 10ft D. 3ft USB data cable USBデーターケーブル (1m) mini USB cable ミニUSBポート付きの車載充電 器(3m) E. X3 dash cam user guide X3 ドラレコ取扱説明書 B. VANTRUE X3 dash cam VANTRUE X3ドライブレコーダ F. Thank you card ー クィックスタートガイド C. Suction cup mount G. Warranty card 吸盤マウント... -
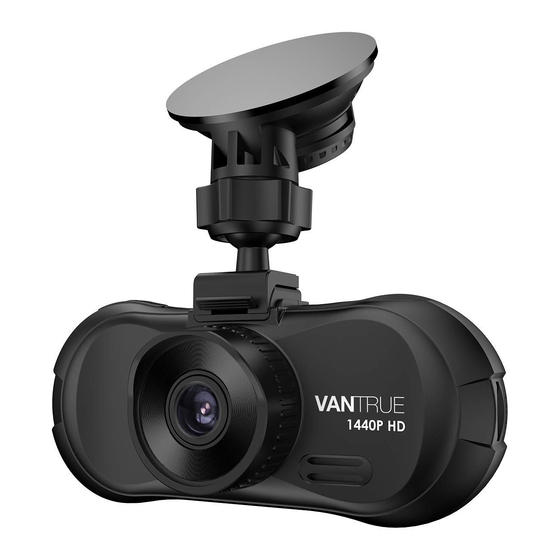
Page 4: Camera Overview
2. Camera Overview Name Description Mini USB Port USB port for charging or data transferring. Camera Button Take photos when preview interface; Captures photos when the camera is recording. Power ON/OFF when Long press; Power Button Delete files during playback mode LED Indicator Charging/Recording LED indicator UP Button... -
Page 5: Getting Started
HDMI Port Connects to HDMI cable. Reset Revert to factory settings Memory Card Slot Location for the microSDmemory card. Camera Lens Front facing F1.8 170°wide camera for video recording. Speaker Delivers sound when playing back videos. LED Indicator Red LED solid on Camera is being charged. - Page 6 USB Charger POWER BANK B. Charge via the car charger. While charging, the LED indicator light is blinking red. Note: 1. The device has two ports available for charging - the USB port on the camera and the USB port on the suction cup mount. 2.
- Page 7 3.2 Installing memory card Please use a genuine microSD memory card of from 16GB to 128GB with a speed rating of class 10 or higher. Insert the memory card to the camera’s card slot, press it until it clicks. To take the card out, turn off the camera first, then push the card into the slot until it clicks out.
- Page 8 2. Clean the windshield using water or alcohol, and wipe clean with a int-free cloth. 3. Wipe clean the suction mounting pad on the camera mount. 4. install the suction mount to the windshield, and rotate the locking bar on the mount upward 90 degrees till it clicks, then the camera is mounted on the windshield securely.
-
Page 9: Basic Operation
6. Plug the mini USB connect of the cable to the USB port on the suction cup mount’s locking bar. 7. Insert the car charger into your vehicle’s cigarette lighter port. vehicle’s cigarette lighter port 8. Start the car, the camera will auto turn on and start recording. 4. - Page 10 B. Automatically When connecting to car charger, the camera will auto turn on after you start your car and the battery charging starts. It will auto turn off in 30 seconds after you shut off the car. 4.2. Settings in the menu After powering on, one press the mode button to enter the setup menus.
- Page 11 - Parking monitor: Default setting is OFF. Press REC and Down button to turn it ON/OFF. - Exposure: Default setting is 0.Press Down button to select among 1,2,0,-1 and -2. - Car number set:Default setting is OFF,Press REC and Down button to set your car number.
- Page 12 When the setup finished, press Power button to exit. C. GPS setup Note: to use the GPS function, you need to purchase an extra GPS mount for the camera. - GPS Setup: Default setting is Off. Press Down button to turn ON/OFF.
- Page 13 4.4 Loop recording After installing the memory card, by default, the camera immediately starts loop recording video when it connects to a power source and turn on. If it doesn’t connect to a power source, when you press the power key to turn it on, it will not auto start recording, you should press the REC button to start recording.
- Page 14 The G-Sensor sensibility is adjustable, it is Medium by default, but you could adjust to Low or High or turn it Off in “Record Setup” > “G-Sensor Set”. You could also lock a video footage manually, when the camera is recording, press the Mode Button. A key icon will appear on the top right of the screen.
- Page 15 When the voice recording has been turned off, the mic icon at the left bottom of the screen will turn white with a red line across it. 4.7 Parking Mode To use the parking mode, go to “Record Setup” > “Parking Monitor” and select ON.
- Page 16 The parking mode will exit once the camera detects itself moved. NOTE: To keep the camera working in parking mode, please keep powering it with an extra power bank or hardwire it to the car battery directly. Don’t recommend to keep the camera working all the time for over 10 hours.
- Page 17 PHOTO:9/500 - While the camera is recording video, press the Camera button to take a snapshot in 16 million pixels. 4.10 Connecting external GPS receiver (Optional accessory) To use the camera’s GPS function, please purchase an external GPS receiver mount. The external GPS receiver mount could be purchased from Amazon.
- Page 18 5. You could stamp the GPS tracking and speed on the video footage, go to “Record Setup” > “Stamp” > “GPS Stamp” to set. 6. You could review the video on VANTRUE GPS Viewer (available for download on www.vantrue.net .). 4.11 Viewing video and photos Press Mode and go to “Files”...
- Page 19 Viewing files on a computer 1. Connect the camera to your computer using the supplied USB cable. 2. “Mass Storage” will be displayed on the camera screen, please navigate to “USB: Mass Storage” and press OK button to transfer data. 3.
- Page 20 b. For iPhone, search “WiFi-CarDV” at App store, download the APP and install it on the phone. 4.13 WiFi connection and APP operation 1) WiFi connection a. Turn on the WiFi on the dash cam following this setup: System Setup > WiFi. Then the WiFi icon and WiFi name “CarDV-FXXX” will appear on the top right of the screen.
- Page 21 3) APP Operation 1. Playback/delete/download the recorded video 2. Snapshot 3. Stop/start recording 4. Landscape preview 5. Microphone On/Off 6. Disconnect with the device 7. Enter the menu setup - 19 -...
- Page 22 Make sure your device is always up to date with latest firmware. Please check back frequently at VANTRUE website (www.vantrue.net) for the latest firmware updates. You could register your product on the website (www.vantrue.net/register) , so you will get a notice email when there is new firmware update.
- Page 23 2. ドラレコの概要 NO. 名称 働き ミニUSBポート 充電やデータを転送します。 カメラボタン ●録画中/録画停止中、写真をキャプチャ します。 ●電源のオン/オフをします; 電源 ボタン ●再生中、ファイルを削除します。 LED インジケーター 充電/録画LED インジケーター アップボタン メニューモード−上向き; 再生中−巻き戻し; アップボタンを長押しで、WIFi機能のオ ン/オフをします; スクリーンのライトのオン/オフをします。 ダウンボタン メニューモード−下向き; 再生中−早送り; マイクのオン/オフをします。 REC ボタン 確認ボタン●録画中、押して録画停止 モード/緊急/駐車モー 録画停止中に押してメニューモードへ; 手動で記録している映像をロックします; ドボタン 録画待機時に、3秒間押し続けて、駐車モ ードに入ります。 - 21 -...
- Page 24 HDMI ポート HDMIケーブルを接続し、外部モニターへ 出力します。 リセットボタン 初期設定に戻ります。 メモリカード挿入口 向きを確認してmicroSDHC カードを挿入 します。 カメラレンズ 広視野角170度大口径F/1.8の光学6G多層 ガラスレンズ スピーカー 動画を再生する場合サウンドを実現します。 LED インジケーター 赤いLEDが点灯 充電中 青色のLEDが点滅 録画中 赤いLEDが消えた カメラはほぼ完全に充電されています。 スクリーンの概要 上書禁止動画撮影時 撮影解像度 鍵マーク点灯します。 WiFi アイコン ループ録画設定時間 1440FHD 000:00:40 露光指数 3 min. 撮影時間 WiFi 名称 CarDV-F09C 0.0 ev タイムラプス撮影 1” モーシ ョン検知 1”...
- Page 25 USBチャージャー モバイルバッテリー b. 車載充電器で充電 充電中、LED インジケーターは赤く点灯しています。 注意: 1. デバイスは二つの充電用USBポートがあります。本体の下部にUSBポートが あり、吸盤マウントの上部にUSBポートがあります。 2. パソコンで充電すれば、マウントにあるUSBポートを使用してください。も しカメラ本体のUSBポートと接続すると、画面で「USB:ストレージ」が表示 されます、「ストレージ」モードに入って、ドラレコを操作出来なく、ただ パソコンでデータを読み取ることができます。 - 23 -...
- Page 26 3.2. メモリーカードの取り付け クラス10以上と16GB以上のmicroSDを使ってください。最大128GBの カードをサポートします。ご使用前に、microSDはフォーマットを行 ってください。メモリーカードのデータが壊れる可能性がありますの で、動作中にメモリーカードを取り出すことをしないでください。 挿入:microSD メモリーカードの端子面と本機の背面が同じ向きになる ようにして、カチッと音がするまでmicroSD メモリーカード挿入口へ 差し込みます。 取出し:microSDメモリーカードを1 回押すと取り出すことができます。 注意: 1. microSDカードは消耗品です。メモリーカードの寿命を延長するた め、2週間を経って、メモリーカードをフォーマットしてくださいね。 2. メモリーカードには書き込み可能回数などの製品寿命があります。使 用状況に応じて定期的に新品に交換するをおすすめします。 3. 事故発生時は記録された録画ファイルが上書きされないように、 必 ず電源を OFF にしてから microSD カードを抜いて保管して下さい。 4. 電源が ON の状態で microSD カードの抜き差しをしないでください。 microSD カード破損の原因となります。 必ず電源 OFF 後ランプが 3 秒以上消灯したこと を確認し miciroSD カードの抜き差しを行ってく ださ い。 3.3 ドライブレコーダーの取り付け 1.ブラケットを本機ブラケットホルダーに、 カチッと音がするまで差 し込んで取り付け てください。 - 24 -...
- Page 27 2. フロントガラスを拭いて事前に決めた位置に軽く押し当て、 マウ ントをロック方向に 90 度まわしてください。 3. 【フロントガラス 上部より 1/5 以内、ルームミラー裏側で視界を 妨げない場所 へ設置して下さい】 4. ワイパーの可動範囲にカメラを取り付けてください - 25 -...
- Page 28 5. シガープラグのUSBケーブルでマウントのUSBポート と接続してく ださい。 6. 車のシガーライターに付属のシガープラグを挿入してください。 車のシガーライターソケ ット 7.エンジンを起動します。 8.ドライブレコーダーは自動にオンをし、自動に録画を開始します。 - 26 -...
- Page 29 4. 基本操作 4.1. 電源のオン/ オフ A. 手動で。 電源ボタンを押し、ドラレコを起動します;電源ボタンを3秒間押し続 いて、ドラレコはオフになります。 b. 自動で。 シガーライターソケットや他の外部電源に接続すると、カメラは自 動的にオンになります。電源が切られた5秒後、本機の電源は自動的 にオフになります。 4.2.メニューの設定 録画中/録画を停止のた【RECボタン】>【モードボタン】を押し、基本 設定画面を開きます。 録画設定 システム設定 GPS設定 ファイル - 27 -...
- Page 30 A. 録画設定 ダウンボタンを押し、録画設定を選択してください、RECボタンを押し、 録画設定を入力して、ダウンボタン/アップボタンで設定項目を選択して ください。 ▶解像度: 解像度の初期設定は2560X1440/30Fです (fps: Frames per Seconds)。 選択可能な設定: 2304x1296/30F、1920x1080/60F、1920x1080/30F、 1280x720/60F、2560x1440P/30F(HDR)、1920x1080/30F(HDR)。 ▶ループ録画設定:初期設定は 3 分です。 一つビデオの録画時間を設定す ることができます。 選択可能な設定:オフ、1 分、3 分、5 分、オフです。 ▶G−センサー設定:G−センサー設定の初期値は標準感度です。状況によ り、適切なレベル(低感度、標準感度、高感度、オフ)を選択してくださ い。録画中、揺れや衝撃を発生した場合、感度に合わ自動的に録画ファイ ルをロックします。 ▶マイク: 初期設定はオンです。オン/オフが選択できます。 ▶駐車モード: 初期設定はオフです。オン/オフが選択できます。 ▶露光指数:初期設定は0です。選択可能な設定:0、-1.0、-2.0、+2.0、+1.0 ▶車両番号設定: 車両番号を設定します。アップ/ダウンボタンを押し、正 確な番号を選択してRECボタンを押してください。設定完成したあと、モ ードボタンを押して退出します。 ▶タイムラプス撮影: 初期設定はオフです。選択可能な設定:1秒、2秒、5秒、 30秒。 ▶スタンプ設定: 初期設定はオンです。全てのスタンプ ( 情報を録画ファ イルに表示 ) が表示しています。画面に日付 / 時間、車両登録番号、ブラ ンドロゴのスタンプを表示したくない場合、スタンプをオフにします。 ▶電源オフ遅延: 初期設定はオンです。オン/オフが選択できます。 設定完成したあと、モードボタンを押して退出します。 B. システム設定 ▶言語選択:言語設定の初期値は英語です。英語、中国語、日本語、ドイ ツ語の4種の言語が選択できます。 ▶フォーマット: microSD メモリーカードのフォーマットを行います。全 てのファイルに保存されたデータはなくなります。 ▶WIFI: 初期設定はオンです。初期のパスワードは12356789です。オン/ オフが選択できます。 ▶時間設定:日付/時間を設定します。画面にスタンプを現わしたい場合、 スタンプ設定に選択してください。(設定方法は4.3に参考してください。) - 28 -...
- Page 31 ▶LCDスクリーンセーバー(LCD表示時間設定): 初期設定は3分です。起動 時の画面表示時間を変更できます。 録画中、設定時間経過後カメラのモ ニターは自動的にオフになります。 選択項目は1分、3分、5分、オフが あります。 ▶ビープ音量: 初期設定はオンです。オン/オフが選択できます。 ▶オートパワーオフ:初期設定は3分です。カメラが動かず3分を経った後、 電源が自動的にオフになるオートパワーオフの時間を調整することできま す。1分、3分、5分オフを選択できます。 ▶光源周波数: 初期設定は50Hzです。光源周波数は50 Hz/60 Hzを選択で きます。 ▶システム情報: ファームウェアのバージョンを確認できます。 ▶初期設定:全ての設定をお買い上げ時の状態に戻します。 設定完成したあと、モードボタンを押して退出します。 C. GPS 設定 注意: GPS を使用する場合: VANTRUE OnDash X3ドライブレコーダー専 用なVANTRUEGPS 受信機を購入してください。 ▶GPS設定: 初期設定はオンです。別売りのGPS 受信機と接続した後、GPS 機能をオフ/オンにしてください。 ▶速度の単位: 初期設定はMP/H です。MP/H、KM/H を選択できます。通 常ではKM/H を選択して下さい。 設定完成したあと、モードボタンを押して退出します。 D. ファイル ノーマル/イベントフォルダのビデオ/画像を確認し、削除します。 ▶ノーマル: 通常の録画ビデオが保存されます。 ▶イベント:イベントビデオ(自動で/手動でロックされたビデオ)が保存さ れます。 ▶画像:通常の画像が保存されます。 4.3.日付/時間の設定 【システム設定】>【時間設定】を選択し、RECタンを押してください。 まず、年を設定してください、アップ/ダウンボタンを押しで、正確な番 号を選択し、RECボタンを押して、次、月を設定してください、RECボタ ンを押し、年、月、日、そして、時間は全部設定した後、モードボタンを 押してください。そうしたら、設定終了しました。 - 29 -...
- Page 32 システム設定 言語 フォーマッ ト 2017 . 05 . 12 16 : 57 LCDスクリーンセーバー 4.4.ループ録画 メモリーカードを差し込んでいた後、電源を入れると、ドラレコは自動 的にオンになり、初期設定によってループ録画を開始します。電源を入 れない場合に、電源ボタンを押し、ドラレコは自動的に録画できません です、ご注意ください。RECボタンを押して、録画を開始します。 録画中、ブルーのLEDライトは点滅しています、上方の赤い点も点滅し ています。RECボタンを押し、録画のオン/オフをします。 2560X1440P30 000:00:40 3 min. CarDV-F09C 0.0 ev 16:47:50 08/05/2017 ループ録画の初期設定は3分です。一つビデオの録画時間を設定するこ とができます。1 分、3分、5分を選択できます。オフを選択する場合 に、一つビデオの録画時間は30分になり、microSD メモリーカードの 容量がなくなると、自動的に古い記録ファイルから順に上書きされま せん。 4.5 イベント録画 ビデオを保存するため、カメラにイベントとノーマルという二つのフ - 30 -...
- Page 33 ォルダを設置します。 緊急時刻にロックされた映像と衝撃を発生した ビデオは自動的にイベントファイルに保存されます。G-Sensor感度の 設定によって、検知できる衝撃の感度は違いがあります。【録画設定】 >【G-センサー設定】を選択して、適切な感度を選択してください。 カメラはオンをする場合に、普通の映像は一般的にノーマルファイル に保存されます。 録画中、揺れや衝撃を発生した場合、感度に合わ自動的に録画ファイ ルをロックします。その際画面の上方にロックのアイコンが現れます。 ロックされた映像は新たなビデオに上書きされません。 2560X1440P30 000:00:40 3 min. CarDV-F09C 0.0 ev 16:47:50 08/05/2017 ロックされた映像はイベントファイルに保存されて、新たなビデオに 上書きされません。 注意:イベントファイルにビデオの容量は総容量の30%以上に達する場 合に、以前のイベントビデオは新たなビデオに上書きされます。定期 的にPCで重要なビデオを保存してください。あるいは、書き込み速度 を守るため、1-2週間ぐらいメモリーカードをフォーマットしてくださ い。 4.6.音声記録 初期設定はオンです。オフの方法は以下のように: ▶ 【録画設定】>【マイク】を選択し、オフを選択してください。 ▶ 録画中、アップボタンを押し、録画音声のオン/オフをします。 - 31 -...
- Page 34 2560X1440P30 000:00:40 3 min. CarDV-F09C 0.0 ev 16:47:50 08/05/2017 音声を閉める時、左下部のマイクアイコンはグレーで、斜め线があり ます。 4.7.駐車モード 駐車モードを使用する前に、駐車監視を開いてください。【録画設定】 >【駐車モード】を押し、オンを選択してください。 駐車モードをオンにします。駐車時、フロントカメラで動きを感知し て録画を開始できます。 自動駐車モード:録画中、5分を連続して、動きを検出していない場合 に、ドラレコは自動的に駐車モードに入ります。スクリーンの右边に 「P」のアイコンが現れます。 2560X1440P30 000:00:40 3 min. CarDV-F09C 0.0 ev 16:47:50 08/05/2017 駐車モードで、駐車中にフロントカメラで動きを感知して記録できま す。駐車中に動きを停止した10秒ぐらい、録画は停止になります。 録画待機時に【モード/駐車モードボタン】を3 秒間長押しで駐車モ ードを開始します。その際画面の右中央に「P」のアイコンが現れま す。駐車中に衝撃や動きがあるまで待機状態になります。 - 32 -...
- Page 35 2560X1440P30 3 min. CarDV-F09C 0.0 ev 16:47:50 08/05/2017 ドラレコ本体は移動される場合に、駐車モードは自動的に退出します。 ★注意: カメラはオンにしているとき、動きの感知ができます。内蔵 しているバッテリーの容量は小さいので短時間しか機能しません。長 時間(10時間以下)使用する場合、外部電源を接続してください。またバ ッテリー消費を少なくする為LCD スクリーンセーバーにて選択時間を なるべく短くすることをお勧めします。 4.8 タイムラプス撮影 タイムラプス撮影にオンを選択してください。 初期設定はオフです。選択可能な設定:1秒、2秒、5秒、30秒。 タイムラプス撮影モード:一定の間隔を開けて画像を撮影し、連続して 再生させることで長時間の映像を短時間で確認できる感覚の微速度撮影 です。天体の動きや草花の成長記録などに適している。 例えば: タイムラプス撮影1秒を選択して、毎秒、ドラレコは一つの写真 を撮ります、ドラレコの録画速度は30fpsです。タイムラプス撮影1秒で 8時間に連続して録画して、最終、全ての画像は16分(=8*60*60/30/60) のビデオに合成されました。 通常録画時間 = タイムラプス撮影時間(Sec) * 録画フレームレートFPS * タイムラプス設定の時間 2560X1440P30 000:00:40 3 min. CarDV-F09C 0.0 ev 1” 16:47:50 08/05/2017 - 33 -...
- Page 36 カメラの電源が切れたとき、カメラは自動的にタイムラプス撮影モード を退出します。カメラの電源を入れ直すと、常時録画を開始します。 4.9 静止画 ▶ 録画中、カメラボタンを押し、写真を撮ることもできます。 ▶ 録画停止中、カメラボタンを押し、写真を撮ることができます。写 真の画素は1600万画素です。 PHOTO:9/500 4.10専用なGPS受信機の取り付け(別売品) VANTRUE OnDash X3ドライブレコーダーはGPS受信機を含んでいない ので、GPS機能を使いたい場合は、AmazonでVANTRUE GPS受信機を購 入してください。 GPS受信機を使用すると、経路と速度の追跡、車両位置を記録できます。 GPS機能を使用するには、以下の手順に操作してください: 1.付属のマウントの代わりに、GPSマウントを取り付けてください。 2.GPSマウントのUSBポートで給電してください。 3.電源を入れると、ドラレコは自動的に録画します、確認ボタンを押し、 録画を停止します。そして、メニューボタンを押し、【GPS設定】> 【GPS設定】を押し、オンを選択してください。 4.GPS受信機をオンになると、GPS信号の捕捉を開始します、最初のGPS アイコンはグレーにしています。GPS信号を受信した後、アイコンは オレンジになります。 - 34 -...
- Page 37 2560X1440P30 000:00:40 3 min. CarDV-F09C 0.0 ev 16:47:50 08/05/2017 2560X1440P30 000:00:40 3 min. CarDV-F09C 0.0 ev 16:47:50 08/05/2017 5. 画面にGPSと速度のスタンプを現わしたい場合、【録画設定】>【ス タンプ】>【GPSスタンプ】、【速度スタンプ】を設定してください。 6.VANTRUE GPS ViewerでGPS情報を含まれているビデオを再生できます。 (VANTRUE GPS Viewerのダウンロードアドレス: (www.vantrue.net) 4.11画像/動画の再生 ドライブレコーダーで表示 本機モニターで再生できます。 メニュー画面で、【ファイル】>【ノーマル】/【イベント】/【画像】 を押し、動画の選択をし、RECボタンを押して再生します。ビデオ再生 している場合に、【RECボタン】を押すと停止になります。 【ダウンボ タン】を押すと早送り、【アップボタン】を押すと巻き戻しになります。 ビデオを選択し【電源ボタン】を押すと、【このファイルを削除する】 を選択することができます。 電源ボタンを押して>ダウンボタンを押して>【全てのファイルを削除】 (全部削除)/【このファイルを削除する】(現在のファイルの削除) を選択してください。 - 35 -...
- Page 38 このファイルを削除する 20170509-165751 MP4 PC で表示 1.カードリーダーなどを使用してパソコンで再生します。ファイルを MOV をサポートするプレーヤー使用すると、ビデオとオーディオファ イルを再生することができます。 2.付属のUSBケーブルでカメラ本体のUSBポートと接続すると、画面で 「USB:ストレージ」が表示されます。「ストレージ」モードに入って、 ドラレコを操作出来なく、ただパソコンでデータを読み取ることがで きます。PC でビデオを再生することができます。 注意:パソコンでドラレコに給電する場合に、マウントのUSBポートと 接続してください。 TV で表示 HDMI ケーブルでHDTV と接続し、動画を見ることができます。HDMI ケーブルが含まれていませんです、自分でHDMIケーブルを用意してく ださい。 1.USB充電器でドラレコに給電してください。 2.ミニHDMIケーブルでドラレコをHDTVと接続してください。 3.テレビをHDMI入力モードに調整します。 4.正常に接続されると、カメラの画面は黒くなり、テレビ画面に投影さ れます。 注意:HDMIモードを使用する時、必ずドラレコに給電してください。 - 36 -...
- Page 39 4.12 APP のダウンロード A. 説明書のカバーでQRコードをスキャンしてAPPをダウンロードし、 スマホにインストールしてください。 B. iPhone端末を利用する場合に、APP store でWiFi-CarDVを検索し て、APPをダウンロードし、スマホにインストールしてください。 4.13WiFi への接続とAPPの基本操作 1) WiFi への接続 a. 【システム設定】>【WiFi】を選択して、オンを選択してください。 画面の右上部にWiFiアイコン(CarDV-FXXX)が表示されます。 b.スマホに【設置】>【WiFi】>【ドライブレコーダーのWiFi名称】>パ スワード【123456789】を入力してください。 c.ドライブレコーダーを接続します。 2) デバイスへの接続 【WiFi-CarDV 】のAPPを開き、画面の中部の【接続】>【一致】をタッ チして、デバイスを接続します。 - 37 -...
- Page 40 一致 一致ではありません キャンセル 3) APPの基本操作 1. ビデオの再生/削除/ダウンロード 2. スナップショット 3. 録画の開始/停止 4. 全画面表示 5. マイクのオン/オフ 6. デバイスへの接続 7. メニュー設定 - 38 -...
- Page 41 4.14 ファームウェアのバージョン メモリーカードの中にファームウェアがあると、システムは自動的に ファームウェアを進級します。そして、バージョンアップが完了された あと、カメラは自動的に再起動します。 定期にお手元のファームウェアのバージョンを検査してくださいね。 弊社のウェブサイトで(www.vantrue.net)最新のファームウェアをダ ウンロードできます。お手数ですが、弊社のウエブサイトで (www.vantrue.net/register)商品を登録してください、ファームウェア を更新する時、こちらはメールでお知らせていただきます。 4.15動作環境温度 ドラレコの動作環境温度範囲は0〜70℃です、動作環境温度範囲を超 える場合に、ドラレコの運行に影響があり、本体の寿命に影響を及ぼ す可能性があります。 暑い日に長い時間でそれを放置しないでください。温度が高すぎると、 本製品が動作を停止し、熱保護を起動します。温度が下がるときにそれ を再起動します。厳冬に温度が32℉(0℃)以下になる場合は、カメラ を使用する必要がない場合は、フロントガラスから取り外して、駐車中 に収納ボックスに保管してください。 - 39 -...
-
Page 42: Specifications
5. Specifications 製品仕様 The specifications of this product may change without prior notice for product improvements. 本製品の仕様及び外観は、改良のため予告なく変更することがあります。予 めご了承ください。 Model 型番 Display 2.7 inch TFT LCD (16:9) 液晶サイズ 2.7 インチTFT LCD (16:9) Lens 170 degrees wide viewing angle and full 6 layer glass lens with wide aperture of F/1.8. -
Page 43: Warranty & Support
ります。18ヶ月の保証期間に延長するため、弊社のウェブサイトで (www.vantrue.net/register)ご注文の商品を登録してください。 Support サポートについて If you have any question on your product, please do not hesitate to contact us via Amazon or drop us an email at support@vantrue.net. Any contact will be answered within 24 hours. 製品に何のご質問・問題がございましたら、いつでもお気軽にアマゾン経 由でお問い合わせいただくか。或いは、support@vantrue.netまでご連絡く ださい。すべてのお問い合わせは、営業日に24時間以内にご返信を差し上 げます。... - Page 44 Got any thoughts on the product? We are always working at our best to improve our product& service quality and user experience. If you have any thoughts on improving the product, please feel free to drop us a message at support@vantrue.net. We are anticipating to hearing and got inspired from you. 製品について何の意見がございますか?いつも私たちの製品とサービスの...
Need help?
Do you have a question about the OnDash X3 and is the answer not in the manual?
Questions and answers