
Related Manuals for Vantrue Falcon 1


Summary of Contents for Vantrue Falcon 1
- Page 1 Falcon 1 English/Deutsch/Français/Polski www.vantrue.net VANTRUE Falcon 1 4K+1080P Dual Dashcam User Guide support@vantrue.net Made in China Model No.: F1 78mmX120mm...
- Page 2 Hey, find us here: www.vantrue.net/contact facebook.com/vantrue.live...
-
Page 3: Table Of Contents
CONTENTS 1.Installation Guide 2.Structure Diagram 3.Basic Operation 4.Troubleshooting 5.Specification 6.After-sales service... - Page 4 Warm tips: Please read this User Manual carefully before using the camera. This product is a motorcycle-specific recorder and is limited to connecting to a 12V battery. Please turn off the power of the motorcycle before installation, and turn on the power after installation is completed.
-
Page 5: Installation Guide
1. Installation Guide 1.1 Inserting a Memory Card (Recommended: Vantrue U3 high-speed microSD card). After inserting the SD card for the first time, please press and hold the remote control record button for 10 seconds to start formatting the card. - Page 6 of the main unit. Please do not install it facing down when installing the logo side of the main unit or under the metal parts of the motorcycle. <2>. F1 dash cam main unit needs to be fixed with 3M adhesive (shipped as standard). Please fix the 3M adhesive in the recess of the F1 main body protective case and then paste it to the motorcy- cle.
- Page 7 1.3 Installing the remote control You can choose a suitable installation position according to your own usage habits and install the remote control on the handlebars, the front part of the car, the side of the fuel tank, etc. Note : <1>.
- Page 8 1.4 Installing the Power Cord Connect the power cord to the fuse box as follows. Step 1: the red power cable is connected to the positive terminal of the battery. Step 2: the ACC signal wire (yellow wire) is connected to the ACC power fuse of the battery. Step 3: The black ground wire is connected to the negative terminal of the battery or the override position.
- Page 9 1.5 Installing the Front and Rear camera The front and rear cameras can be loosened by the hexagonal screw to adjust the lens recording angle, as well as the recording direction. Camera mount holder head cap screws: loosened, you can adjust the camera angle up and down, can be inverted, side-mounted rotation to adjust the direction of the camera recording.
- Page 10 (We recommend mounting the front and rear cameras on the motorcycle body instead of the handlebars to reduce camera shake and improve the stability of the video) <3>. The line of the camera is a high frequency data line. Please do not bend the cable 180 degrees backwards, as it may cause damage to the cable.
-
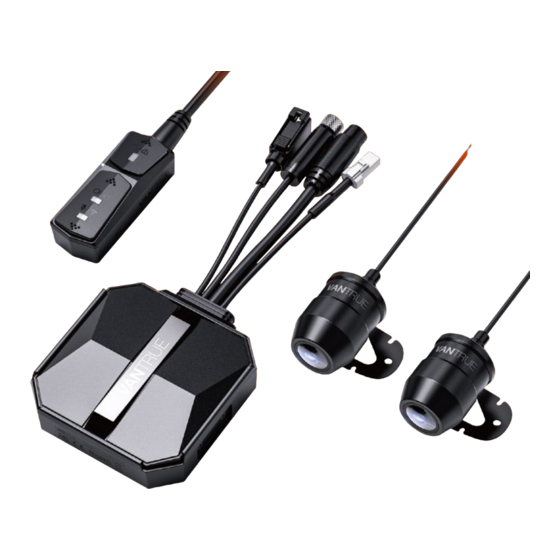
Page 11: Structure Diagram
After the lens is installed, you can enter the VANTRUE App real-time preview to correct the lens orientation. After entering the live preview, click on the word 田 calibration line at the bottom left of the screen to confirm the lens direction. -
Page 12: Basic Operation
11.Red power cable (positive power supply) 12.ACC signal wire (yellow wire) 13.Black ground wire (power negative) 14.Protective housing Note: When connecting the front camera cable, until you hear the "click" sound, indicating that the cable buckle has been installed in place. You can use a screwdriver to lift the end of the snap to make the snap easier to snap into the slot. - Page 13 <3>.Microphone button Long press function: After power on, long press to turn on/off Wi-Fi. Short press function: Short press to turn on/off the microphone; short press 5 times or more continuously to restore the default factory settings. LED Indicator Power Light(Red Light) Status Normal power supply Steady Light...
- Page 14 5G Wi-Fi by default, and there will be "Wi-Fi on" prompt after power on. <2>. Open Vantrue App, click "+" to add the device, the App will jump to the cell phone Wi-Fi settings interface, please find the F1_VAN-...
- Page 15 - 11 -...
- Page 16 Note: 1. For Wi-Fi connection operation, please refer to Figure 1~4. 2. After the first successful connection, when you turn on F1 again in the future, you can connect automatically by clicking the App. If you turn off the function that Wi-Fi starts when you turn on the motorcycle dashcam, you need to manually turn on Wi-Fi to connect.
- Page 17 Note: <1>. The mileage statistics analysis function is based on the recording file in the current F1 SD card, but if the card is formatted, or the recording file does not have GPS information, the mileage statistics analysis will not be possible. <2>.
- Page 18 Front of the car default is the resolution 3840x2160P 30FPS Video 2-in-1 Off by default. When turned on, you can integrate the front and rear camera recording video into one segment. The default is 1 minute, other Loop options can be selected. When Recording the SD card file storage is full, it will overwrite the loops automatically.
- Page 19 Default is off, you can choose Time-lapse 1FPS, 5FPS, 10FPS, 15FPS frame rate recording to start time-lapse recording The default is off. When turned on, Parking it is collision detection mode. It Mode needs to be connected with ACC function before it can be used. Low-light The default is on.
- Page 20 Frequency 50Hz/60Hz Certificated View all F1 certification information Info Restore the default factory settings, System after restoring, Wi-Fi password will information also be restored to the initial password Playback, delete and download files in App Enter the file browse in App, you can view the daily recording files, play back, delete, download to local save.
- Page 21 <2>. You need to download the video to local to view the GPS track information. After the video is downloaded successfully, if the GPS track information is not displayed, please disconnect the Wi-Fi connection and refresh it to display the GPS track information on the map.
- Page 22 OTA Upgrade F1 main camera upgrade supports OTA upgrade in App. There are two types of OTA upgrade pushes: <1>. After opening the App, an upgrade prompt will pop up. - 18 -...
- Page 23 <2>. In the "About" screen, click OTA update to check for updates. When the upgrade file is detected in the above 2 ways, click OK, it will enter the upgrade screen, click "Download". Once the download is complete, install the dashcam immediately. - 19 -...
- Page 24 Note: <1>. If the upgrade fails, please check whether the Wi-Fi connection is normal. During the upgrade, please do not disconnect the Wi-Fi, and make sure the recorder host is powered on properly. <2>. If the OTA upgrade has been failed, you can use SD card upgrade, remove the SD card, copy the upgrade software into the SD card, then insert the SD card into the host computer, and then...
-
Page 25: Troubleshooting
4. Troubleshooting Tip: The system supports a maximum of 512G SD card storage, in order to ensure normal video, we recommend the use of genuine storage cards. As the recording system keeps reading and writing data, you must use a high-speed card that reaches the standard of Class10 and U3 or above. - Page 26 further adjust the sensitivity level of the G-sensor higher. Please also note that if time lapse mode is turned on, the video cannot be locked and only pictures can be taken. <9>. Wi-Fi does not connect properly.: Please check whether Wi-Fi is turned on. When Wi-Fi is turned on, the Wi-Fi of your phone will show the F1 Wi-Fi name F1_ VANTRUE_XXXX (initial password is 12345678).
-
Page 27: Specification
5. Specifications The specifications of this product may change without prior notice due to product improvements. Model Chips Novatek high-performance processor Image Front Camera: Sony 8MP CMOS Sensor Sensor Rear Camera: Sony 2MP CMOS Sensor G-sensor Built-in Sensor Camera Front: 160°wide viewing angle; Angle Rear: 145°... - Page 28 Picture Format JPEG Memory External: 32GB-512GB Micro SD Card, U3, Class 10(not included in Storage the package) IP67 Waterproof Power Source Built-in super capacitor Power Supply 12V, 2A Support Wi-Fi Working -4°F to 140°F(-20°C to 60°C) Temperature Storage -13°F to 158°F(-25°C to 70°C) Temperature - 24 -...
-
Page 29: After-Sales Service
Support new If you have any questions regarding your product, please do not hesitate to contact us at support@vantrue.net, or drop us a message through the live chat box at www.vantrue.net. Queries are typically answered within 12-24hours. Your opinion matters VANTRUE is firmly committed to always improving ®... - Page 30 FCC Warnning: This equipment has been tested and found to comply with the limits for a Class B digital device, pursuant to part 15 of the FCC Rules. These limits are designed to provide reasonable protection againstharmful interference in a residential installation. This equipment generates, uses and can radiateradio frequency energy and, if not installed and used in accordance with the instructions, maycause harmful interference to radio communications.
- Page 31 ISED Statement ‐ English: This device complies with Industry Canada license‐exempt RSS standard(s). Operation is subject to the following two conditions: (1) This device may not cause interference, a nd (2) This device must accept any interference, including interference that may cause undesired operation of the device.
Need help?
Do you have a question about the Falcon 1 and is the answer not in the manual?
Questions and answers