Clenergy PV-ezRack SolarTerrace Eco Installation Manual
Hide thumbs
Also See for PV-ezRack SolarTerrace Eco:
- Installation manual (16 pages) ,
- Installation manual (18 pages)
Advertisement
Advertisement
Table of Contents

Related Manuals for Clenergy PV-ezRack SolarTerrace Eco


Summary of Contents for Clenergy PV-ezRack SolarTerrace Eco
- Page 1 SolarTerrace Eco Installation Guide NO.: PZ046-IM04-10 Last Updated - Apr. 2023...
- Page 2 Please pay attention to safety when installing the Please use Clenergy’s accessories and your installation • tools. (Clenergy will be not liable to other accessories product, and construct it according to local laws and that replace Clenergy’s ones); regulations. You can confirm the latest installation Recycle according to local related laws;...
-
Page 3: Tools And Components
Installation Guide / SolarTerrace Eco Tools and Components Tools 6mm inside Electric tool 5m tape Marking pen Torque spanner hexagonal spanner String Socket spanner Total Station or Pile Driver Equivalent device Note: The tools in the figure are only used for installation of rack system (not included in supply scope). Please consult system installation personnel about installation of electronic parts. -
Page 4: Installation Precautions
Safe Torques Please refer to safe torques defined in this guide as shown in below figure. In case power tools are required, Clenergy recommends the use of low speed only. High speed and impact drivers increase the risk of bolt galling (deadlock) If deadlock occurs and you need to cut fasteners please make sure that there is no load on the fastener before you cut it. - Page 5 - Please apply Zin-rich paint on the surface of ground screws if necessary. And Clenergy will not be liable to the scratches and peeling on the coating surface of ground screws that caused by improperly unloading and piling in the construction site.
-
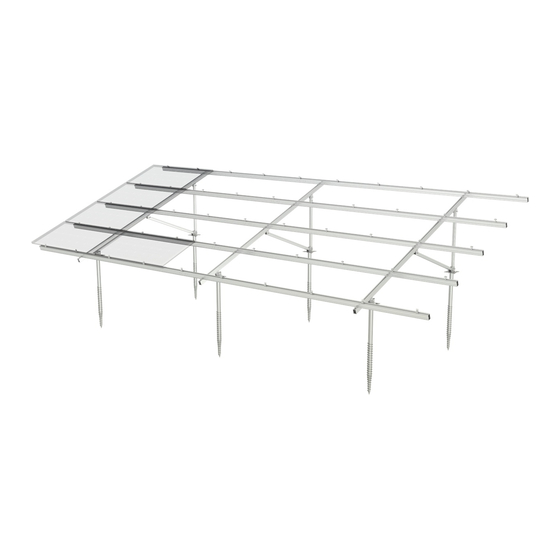
Page 6: System Overview
Installation Guide / SolarTerrace Eco System Overview Composition 1) End Clamp with W Module 2) Module Inter Clamp II 3) TW Rail 4) Splice for TW Rail 5) Support 6) Angle AL 7) Connector for Rectangular Tube 8) Hexagonal Bolt MXX*XX (with nut and washer) 9) Ground Screw - Installation Instructions - Code-Compliant Planning and Installation Guide V 2.0 - Complying with AS/NZS1170.2-2021... - Page 7 Installation Guide / SolarTerrace Eco Installation Planning 1) PV Module Orientation:Portrait 2) Rail Length per table:L2 according to engineering drawings 3) Distance between the two adjacent supports:L1 according to engineering drawings 4) Distance between two legs:L3 according to engineering drawings 5) Distance between two tables:L4 according to engineering drawings - Installation Instructions - Code-Compliant Planning and Installation Guide V 2.0 - Complying with AS/NZS1170.2-2021...
-
Page 8: Installation Instructions
Installation Guide / SolarTerrace Eco Installation Instructions Ground Screw Installation Before the installation, please prepare necessary installation tools & products, and ensure that hydraulic pile driver can work normally in installation site. Read the relevant engineering materials; get the project layout information such as piling depth, column span, etc. - Page 9 Installation Guide / SolarTerrace Eco Pre-assembled Support Installation Before installing Pre-assembled Support, check the ground screws are on the same level and are all aligned. Figure 3 Before installation, it looks as shown Figure3. Unfold the Rectangular Tubes as shown in Figure 4. Figure 4 Unlock the M12*85 Bolts from the Slot U-Shape Joint.
- Page 10 Installation Guide / SolarTerrace Eco Put the unfolded Pre-assembled Support on flange plates of Ground Screws and lock the L-anchor Plates with flange plates with M12 bolts. The up-down adjustable range of ±20mm Front/Rear leg is ±20mm. The north-south adjustable range ±20mm of Front/Rear leg is ±30mm.
- Page 11 Installation Guide / SolarTerrace Eco According to your plan, place TW Rail on the girder, make the lower part of Rail press against pre-assembled Rail Clamp II as shown in Figure 10. Note: if the project doesn’t have pre-assembled Rail Clamp II, please fix Rail Clamp II on each side of Rail on site.
- Page 12 Installation Guide / SolarTerrace Eco Note: The quantity, position and tilt direction need to comply with the requirement on engineer drawings. Recommend torque: M 8 bolt 18~20N.m Figure 13 Tilt the Inter Clamps with W-module into the channel of the Rail as shown in Figure 14.
- Page 13 Installation Guide / SolarTerrace Eco Fix the rest of PV-Module according to the sequence: from low to up, from left to right. Make the side faces of PV-Module tightly against Clamps as shown in Figure 18. Any adjacent side face of PV-Module keep the distance of 20mm, as shown in Figure 16.
- Page 14 Clenergy 1/10 Duerdin St Phone: +61 3 9239 8088 Clayton VIC 2168 Email: sales@clenergy.com.au Australia Web: www.clenergy.com.au @ClenergyGlobal / @ClenergyClub / ClenergyAUS @Clenergy @ClenergyClub @Clenergy_global @Clenergy A Clenergy Technologies Company...
Need help?
Do you have a question about the PV-ezRack SolarTerrace Eco and is the answer not in the manual?
Questions and answers