
Related Manuals for Clenergy PV-ezRACK SolarRoof Tilt Legs


Summary of Contents for Clenergy PV-ezRACK SolarRoof Tilt Legs
- Page 1 SolarRoof Penetrative Tilt Mounting with Elite Rail Code-Compliant Planning and Installation Guide V 1.0 (New Zealand) Complying with AS/NZS 1170.2-2021 Last Updated - Mar. 2024...
-
Page 2: Table Of Contents
Installation Guide / SolarRoof Penetrative Tilt Mounting with Elite Rail Introduction The installer is solely responsible for: The Clenergy PVezRack® SolarRoof Tilt Legs has been developed as a universal PV-mounting system for roof-mounting on pitched and flat roofs. The use of •... -
Page 3: Planning
Installation Guide / SolarRoof Penetrative Tilt Mounting with Elite Rail Planning Determine the wind region of your installation site Wind regions map below shows 4 different wind regions in New Zealand: NZ1, NZ2, NZ3 and NZ4. The lee (effect) multiplier (M1ee) shall be evaluated for New Zealand sites in the lee zones below. In wind regions of NZ1 and NZ2 with M1ee over 500 m above sea level, the interface spacing reduction is applied. - Page 4 “Examples” in certificate to understand how to use maximum spacing in Sub-alpine Regions. If your installation site is in Alpine regions, please contact Clenergy to obtain a project specific engineering certificate to support your installation.
- Page 5 Installation Guide / SolarRoof Penetrative Tilt Mounting with Elite Rail New Zealand – Approximate Locations of Alpine and Sub-alpine Regions - Planning - Code-Compliant Planning and Installation Guide V 1.0 (New Zealand) - Complying with AS/NZS 1170.2-2021 -...
- Page 6 Please refer “SNZ TS 3404:2018 Durability requirements for steel structures and components” or consult local construction business to verify corrosivity category of installation site. If your installation site is not in the corrosion zones C1, C2 and C3, please contact Clenergy to obtain a project specific engineering certificate to support your installation.
- Page 7 Installation Guide / SolarRoof Penetrative Tilt Mounting with Elite Rail Determine Roof slope and Tilt Leg Angle The PVezRack® SolarRoof Tilt Legs system is suitable for rails running perpendicular to the roof slope (including standard and reverse tilt), and slope up to 10° for rails running parallel to the roof slope. Determine the Installation Area of Roof There are 4 different roof zones for tilt leg installation: Internal Zone, Intermediate Zone, Edge Zone and Corner Zone.
- Page 8 1. The panels are clamped within one quarter of panel length; 2. Rear leg adjustable range: ER-TL-10/15: 260-375 mm; ER-TL-15/30: 390-635 mm; ER-TL-30/60: 675-1205 mm; 3. If the info. is different from the table and diagram, it could have different results. Please contact the Clenergy to confirm its applicability.
- Page 9 Installation Guide / SolarRoof Penetrative Tilt Mounting with Elite Rail - Planning - Code-Compliant Planning and Installation Guide V 1.0 (New Zealand) - Complying with AS/NZS 1170.2-2021 -...
- Page 10 Installation Guide / SolarRoof Penetrative Tilt Mounting with Elite Rail - Planning - Code-Compliant Planning and Installation Guide V 1.0 (New Zealand) - Complying with AS/NZS 1170.2-2021 -...
- Page 11 Installation Guide / SolarRoof Penetrative Tilt Mounting with Elite Rail - Planning - Code-Compliant Planning and Installation Guide V 1.0 (New Zealand) - Complying with AS/NZS 1170.2-2021 -...
- Page 12 Installation Guide / SolarRoof Penetrative Tilt Mounting with Elite Rail (10) - Planning - Code-Compliant Planning and Installation Guide V 1.0 (New Zealand) - Complying with AS/NZS 1170.2-2021 -...
- Page 13 Installation Guide / SolarRoof Penetrative Tilt Mounting with Elite Rail (11) (12) - Planning - Code-Compliant Planning and Installation Guide V 1.0 (New Zealand) - Complying with AS/NZS 1170.2-2021 -...
- Page 14 Installation Guide / SolarRoof Penetrative Tilt Mounting with Elite Rail (13) (14) - Planning - Code-Compliant Planning and Installation Guide V 1.0 (New Zealand) - Complying with AS/NZS 1170.2-2021 -...
- Page 15 Installation Guide / SolarRoof Penetrative Tilt Mounting with Elite Rail (15) - Planning - Code-Compliant Planning and Installation Guide V 1.0 (New Zealand) - Complying with AS/NZS 1170.2-2021 -...
-
Page 16: Tools & Components
Installation Guide / SolarRoof Penetrative Tilt Mounting with Elite Rail Tools and Components Tools Screw Driver Torque Spanner Socket Wrench M8 5m Tape String & Marker Pen (maximum torque≥34N·m) Components ER-TL-10/15 ER-TL-15/30 ER-EC-ST ER-IC-ST C-U/30/46 C-U/30/46-G ER-TL-30/60 End Clamp Inter Clamp Universal Clamp Universal Clamp Adjustable Tilt legs,... -
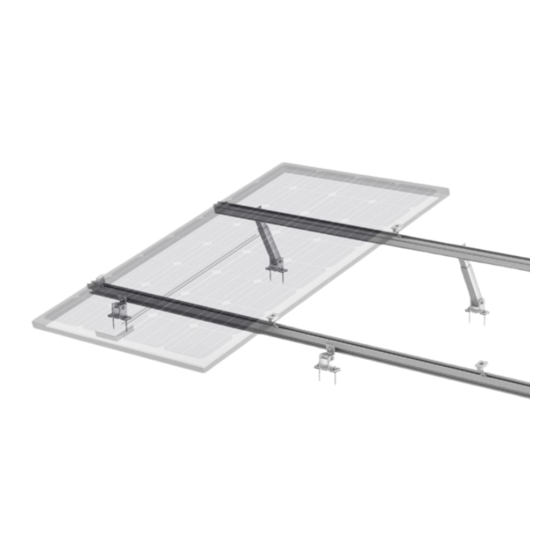
Page 17: System Overview
Installation Guide / SolarRoof Penetrative Tilt Mounting with Elite Rail System Overview Overview of PVezRack® SolarRoof Tile Interface 1. End Clamp 2. Inter Clamp 3. Elite Rail 4. Tile interface Tin Interface 1. End Clamp 2. Inter Clamp 3. Elite Rail 4. - Page 18 Installation Guide / SolarRoof Penetrative Tilt Mounting with Elite Rail Adjustable Tilt Legs ② ① ⑤ ③ ④ ⑥ 1. End Clamp 2. Inter Clamp 3. Grounding Clip 4. Elite Rail 5. Grounding Lug 6. Adjustable Tilt Legs Adjustable Tilt Legs with L-feet ②...
- Page 19 Safe Torques Please refer to safe torques defined in this guide as shown in the figure below. If power tools are required, Clenergy recommends the use of low speed only. High speed and impact drivers increase the risk of bolt galling (deadlock). If deadlock occurs and you need to cut fasteners, please make sure that there is no load on the fastener before you cut it.
- Page 20 Installation Guide / SolarRoof Penetrative Tilt Mounting with Elite Rail 2) Adjustable Tilt Legs with L-feet Note: Grounding Z Module, External Teeth Lock Washers, Spring washer and corrugated shim (with pins) on the diagram above are to create the electrical continuity between rail and rear leg tubes. 3) Fixed Tilt Legs Note: Grounding Z Module,External Teeth Lock Washer and Spring washer on the diagram above are to create the...
-
Page 21: Installation Instruction
Installation Guide / SolarRoof Penetrative Tilt Mounting with Elite Rail Installation Instructions Front & Rear Leg Installation Front Leg Installation According to the installation plan, determine the mounting position and direction of the front legs. Either two screws or single screw (Buildex 14-11 x 70 Hex Head Zips screw) is required depending on the installation spacing requirement. See two screws and single screw options in Figures 1 and 2. - Page 22 Installation Guide / SolarRoof Penetrative Tilt Mounting with Elite Rail Rear Leg Installation According to the installation plan, after confirming the length L of the Rear Leg, fasten two M8*12 bolts as shown in Figure 4. Recommended torque for M8*12 bolts is 18~20 N·m Figure 4 According to the installation plan, either two screws or single screw (Buildex 14-11 x 70 Hex Head Zips screw) is used to install rear leg.
- Page 23 Installation Guide / SolarRoof Penetrative Tilt Mounting with Elite Rail Install the remaining Front and Rear Legs in Figure 10. NOTE: WHEN USING TIN INTERFACES FOR INSTALLATION WORKS, SCREWS NOT EXPOSED TO FREQUENT RAIN SHOULD BE WASHED DOWN WITH FRESH WATER AT LEAST EVERY 6 MONTHS TO MEET THE WARRANTY CONDITIONS OF BUILDEX SCREWS.
- Page 24 Installation Guide / SolarRoof Penetrative Tilt Mounting with Elite Rail PV Module Installation 1) Please refer PVezRack® Grounding System for PV modules clamps and grounding lugs installations. 2) The installers must ensure panel clamps are installed flush mounted to the panel frame and apply correct torque value of clamp fastener as shown in section "Safe Torques (P17)".
-
Page 25: Certification
Installation Guide / SolarRoof Penetrative Tilt Mounting with Elite Rail Certification PV Array Frame Engineering Certification PV-ezRack SolarRoof Tilt Mount Penetrative Fixing System with ELITE Rail in New Zealand For: Clenergy Australia Suite 1, 10 Duerdin St Clayton, VIC 3168 Job No.: 13924 Date: 08/11/2023 1 of 23 - Certification - Code-Compliant Planning and Installation Guide V 1.0 (New Zealand) - Complying with AS/NZS 1170.2-2021 -... - Page 26 Pty Ltd accepts no liability or responsibility whatsoever for or in respect of any use of or reliance upon this report by any third party. 13924(RE13708)-02-CER-Clenergy PV-ezRack Tilt Mount Penetrative System with Elite Rail in New Zealand 2 of 23...
- Page 27 Zealand. The design check has been based on the information and test reports provided by Clenergy Australia. This certificate is only valid for Clenergy PV-ezRack SolarRoof. The roof structure or the building structure and PV panels shall be assessed separately and accordingly.
- Page 28 ● The spacing shown in the interface tables shall be adjusted based on the assessment and requirement of the roof structures. ● If any of the above conditions cannot be met, the structural engineer must be notified immediately. 13924(RE13708)-02-CER-Clenergy PV-ezRack Tilt Mount Penetrative System with Elite Rail in New Zealand 4 of 23...
- Page 29 Yours faithfully, Gamcorp Pty Ltd Jianzeng Geng Technical Director FIEAust CPEng NER 3108316 NT Registration: 239858ES QLD Registration: 18455 VIC Registration: PE0002539 TAS Registration: CC7263 13924(RE13708)-02-CER-Clenergy PV-ezRack Tilt Mount Penetrative System with Elite Rail in New Zealand 5 of 23...
- Page 30 Tilt Array Frame System Spacing Table According to AS/NZS 1170.2-2021 with ELITE Rails – Tin Roof (Pierced Fix Roof) within New Zealand Terrain Category 2 & 3 For: CLENERGY AUSTRALIA 1/10 Duerdin St Clayton, VIC 3168 Job Number: 13924 (ELITE Rails & Tilt)
- Page 31 37 Butler St, Richmond VIC 3121 Tel: 03 9543 2211 Job No: 13924 Client: CLENERGY AUSTRALIA Project: Tilt Array Frame System Spacing Table with ELITE Rails – Tin Roof (Pierced Fix Roof) Address: within New Zealand Wind Terrain Category: Terrain Category 2 &...
- Page 32 Client: CLENERGY AUSTRALIA Job: 13924 Project: Tilt Array Frame System Spacing Table Date: Nov-23 with ELITE Rails – Tin Roof (Pierced Fix Roof) Designed: JD Address: within New Zealand Checked: JG Tilt Array Frame System Spacing Table for Tin Roof (mm)
- Page 33 Client: CLENERGY AUSTRALIA Job: 13924 Project: Tilt Array Frame System Spacing Table Date: Nov-23 with ELITE Rails – Tin Roof (Pierced Fix Roof) Designed: JD Address: within New Zealand Checked: JG Tilt Array Frame System Spacing Table for Tin Roof (mm)
- Page 34 Client: CLENERGY AUSTRALIA Job: 13924 Project: Tilt Array Frame System Spacing Table Date: Nov-23 with ELITE Rails – Tin Roof (Pierced Fix Roof) Designed: JD Address: within New Zealand Checked: JG General Notes Note 1 Following components are satisfied to use according to AS/NZS 1170.2:2021...
- Page 35 Client: CLENERGY AUSTRALIA Job: 13924 Project: Tilt Array Frame System Spacing Table Date: Nov-23 with ELITE Rails – Tin Roof (Pierced Fix Roof) Designed: JD Address: within New Zealand Checked: JG Note 10 Wind direction multiplier (Md), Shielding multiplier (Ms) and Hill shape multiplier (Mh) are taken as 1.0.
- Page 36 Client: CLENERGY AUSTRALIA Job: 13924 Project: Tilt Array Frame System Spacing Table Date: Nov-23 with ELITE Rails – Tin Roof (Pierced Fix Roof) Designed: JD Address: within New Zealand Checked: JG Note 25 Interface spacing to be reduced as follows for sites in wind regions NZ1 & NZ2 with Mlee over 500m above sea level:...
- Page 37 Client: CLENERGY AUSTRALIA Job: 13924 Project: Tilt Array Frame System Spacing Table Date: Nov-23 with ELITE Rails – Tin Roof (Pierced Fix Roof) Designed: JD Address: within New Zealand Checked: JG Note 27 Refer table 3 and Figure 2 of NZS 4219:2009 for zone factor (Z). Performance factor (Cp) is taken as 0.85 and Component risk factor (Rc) coefficient (Ce) is taken as 1.0 and High coefficient (...
- Page 38 Perpendicular installation (rails to purlins) for roofs with roof pitch greater than 10 degrees is not covered by this certification. Note 32 Installation of solar array to be done in accordance with the relevant Clenergy PV installation manual. Contact Clenergy if you are unable to comply with any of the above installation specifications.
- Page 39 Client: CLENERGY AUSTRALIA Job: 13924 Project: Tilt Array Frame System Spacing Table Date: Nov-23 with ELITE Rails – Tin Roof (Pierced Fix Roof) Designed: JD Address: within New Zealand Checked: JG Examples Example 1 Tin Roof factor Wind Region Final factor...
- Page 40 Appendix 1. Refer Figure 3.1(B) of AS/NZS 1170.2:2021 for the wind region 16 of 23...
- Page 41 2. Refer Table 4.4 and Figure 4.6 of AS/NZS 1170.2:2021 for the location of New Zealand Lee zone 17 of 23...
- Page 42 18 of 23...
- Page 43 3. Refer section 2.3 and Figure 2.2 of AS/NZS 1170.3:2003 for Sub-alpine zone the location of New Zealand Lee zone NEW ZEALAND Alpine and sub-alpine regions are defined as follows: N1 (southern portion of North Island of New Zealand, see Figure 2.2): Sub-alpine between 400 m and 1200 m.
- Page 44 NOTE: This map is approximate only and altitude above mean sea level shall be used to determine snow region. For sub-alpine regions in the South Island (N2, N3, N4 and N5) the regions coincide with the 1988 county boundaries. Where an alpine region exists between sub-alpine regions, the alpine region separates the 2 sub-alpine regions (which extend downwards from 1200 m altitude).
- Page 45 4. Refer table 3 and Figure 2 of NZS 4219:2009 for zone factor (Z) Table 3 – Zone factors for New Zealand locations (north to south) Location Location Kaitaia 0.13 Taupo 0.28 Paihia/Russell 0.13 Taumarunui 0.21 Kaikohe 0.13 Turangi 0.27 Whangarei 0.13 Gisborne...
- Page 46 Table 3 – Zone factors for New Zealand locations (north to south) (continued) Location Location Porirua 0.40 Christchurch 0.22 Wellington CBD 0.40 Geraldine 0.19 (north of Basin Ashburton 0.20 Reserve) Fairlie 0.24 Wellington 0.40 Temuka 0.17 Hutt Valley – south 0.40 Timaru 0.15...
- Page 47 figure 2 – Zone factor, Z 23 of 23...
- Page 48 Gamcorp Pty Ltd Clenegy PV-ezRack SolarRoof Flush and Tilt Roof Mount systems with ER-R-ECO & ER-R-ELT Penetrative fixing refer Certification Letter 13708-01 & 13924-01 for Flush Mount system & 13708-02 &13924-02 for Tilt Mount system refer Certification Letter 13708-01 & 13924-01 for Flush Mount system & 13708-02 &13924-02 for Tilt Mount system CMEngNZ 2003796 08/11/2023...
-
Page 50: Certificate User Guideline
Installation Guide / SolarRoof Penetrative Tilt Mounting with Elite Rail Certificate User Guideline - Certificate User Guideline - Code-Compliant Planning and Installation Guide V 1.0 (New Zealand) - Complying with AS/NZS 1170.2-2021 -... - Page 51 12. If building is located within alpine regions (Note 26) or hills and escarpments areas (Hill shape multiplier Mh is more than 1.0 according to AS1170.2 2021) or panel width is bigger than 1200mm, a site-specific certification is needed.
- Page 52 Clenergy 1/10 Duerdin St Phone: +61 3 9239 8088 Clayton VIC 2168 Email: sales@clenergy.com.au Australia Web: www.clenergy.com.au @ClenergyGlobal / @ClenergyClub / ClenergyAUS @Clenergy @ClenergyClub @Clenergy_global @Clenergy A Clenergy Technologies Company...
Need help?
Do you have a question about the PV-ezRACK SolarRoof Tilt Legs and is the answer not in the manual?
Questions and answers