Advertisement
Quick Links
Advertisement

Related Manuals for Clenergy PVezRack Ascent


Summary of Contents for Clenergy PVezRack Ascent
- Page 1 Ascent Installation Guide V1.1 Last Updated - Oct. 2023...
- Page 2 Installation Manual, which you can do by contacting • The upper and lower limit of the torque of the Clenergy via www.clenergy.com or contacting your locking screws must be checked regularly at local distributor. least once a year.
- Page 3 Installation Guide / Ascent Tools & Components Tools Marker pen Screw Driver Torque Socket Wrench (M6/M8) (13mm) Allen Key 6mm Tape String Drive Bit (M8 Hexagon Socket Screw) (6mm,10mm) Components IC-M SEB-AC/120 MB-AC/EW EC-M Inter Clamp Start and End Base L120 Main Base, East- west End Clamp WD-AC...
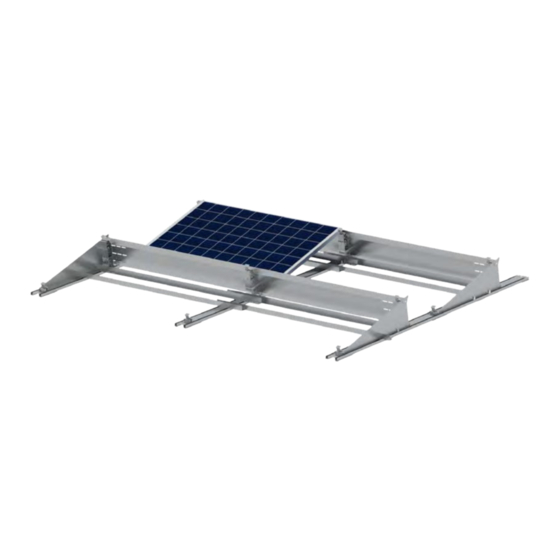
- Page 4 Installation Guide / Ascent System Overview Overview of PVezRack® Ascent system ❷ ❽ ❻ ❼ ❿ ❶ ❾ ❶ ❸ End Clamp ❷ Inter Clamp ❹ ❸ Start and End Base L120 ❹ ❺ Main Base L1500, South-north ❺ Front Leg ❻...
- Page 5 Safe Torques Please refer to safe torques defined in this guide as shown below. If power tools are required, Clenergy recommends the use of low speed only. High speed and impact drivers increase the risk of bolt galling (deadlock). If deadlock occurs and you need to cut fasteners, please make sure that there is no load on the fastener before you cut it.
- Page 6 Installation Guide / Ascent Installation Guide / Ascent Installation Instruction Base Installation Mark the position of the Bases according to your plan. ❸ X= module length+ 20 mm-135 mm Lay out the components, such as Start and End Base ❹ ❺...
- Page 7 Installation Guide / Ascent Installation Guide / Ascent Rear Leg Installation ❻ ❻ Mark the position of the Bases according to your plan. ❻ ❹ Install the Rear Leg to the Main Base using the method shown in the right figure. ❻...
- Page 8 Installation Guide / Ascent Wings Installation Guide / Ascent Rear Leg Extension Installation (For 15°system) ❿ ❻ Install the Rear Leg Extension to the Rear Leg ❿ using the method shown in the right figure. And then fix the M6*10 bolt with the torque of 5 N·m ❻...
- Page 9 Installation Guide / Ascent Wings Installation Guide / Ascent Placing the Ballast Ballast per rail section. Place the ballast centrally on Main Base. Ballast on double brace. Place the ballast centrally on Angle AL when necessary. Then fasten the nut with a torque of 10 N·m. - Placing the Ballast - Installation Guide_PVezRack®...
- Page 10 Installation Guide / Ascent PV Modules Installation Place the PV modules on the Front and Rear Leg. Leave a 20mm gap between PV modules for Inter Clamp. Incline the Inter and End clamp to fit the top channel of Front and Rear Leg. Press the Clamp down to securely fit into top channel until you hear a clicking sound.
- Page 11 Installation Guide / Ascent Wings Installation Guide / Ascent Wind Deflector Installation Place back Wind Deflectors from left to right on the Main Base. Adjacent Wind Deflector are overlapping. Align the first and last back Wind Deflector with the edge of the Rear Leg. Screw the back Wind Deflector tight with ST6*32 screw.
- Page 12 Installation Guide / Ascent Side Wind Deflector Installation Place Side Wind Deflector on the Main Base. Note: Please pay attention to the direction . Screw the Side Wind Deflector tight with ST6*32 screw. - Installation Instruction - Code-Compliant Planning and Installation Guide V1.0 - Complying with AS/NZS1170.2-2011 AMDT 2-2016...
- Page 13 Installation Guide / Ascent Grounding System Installation Hexagon screw Installation After the installation of Front Leg and Base, fasten Hexagon screws with the holes of front leg. Note: It is required to install two Hexagon screws per Front Leg. Grounding Clip Installation Before module and clamps installation, it is important to arrange how to position grounding clips to achieve earthing continuity between...
- Page 14 Installation Guide / Ascent Grounding Lug Installation It is required to install one Grounding Lug per row of base. The recommended fasten torque of the bolt M6*14 is 5~6 N·m. Fix the Grounding lug on the end of base. Make sure the inner face of side opening of Grounding lug is closely attach to the base as shown in right figure.
- Page 15 Clenergy Deutschland Gmbh Willy-Brandt-Straße 23, Phone: +49 (0) 40 3562 389 00 20457 Hamburg, Germany Email: sales@clenergy.com Web: www.clenergy.com @ClenergyGlobal / @ClenergyClub / @ClenergyAUS / @ClenergyThailand @Clenergy_global @Clenergy @Clenergy @ClenergyClub A Clenergy Technologies CompanyCo...
Need help?
Do you have a question about the PVezRack Ascent and is the answer not in the manual?
Questions and answers