Advertisement
Available languages
Available languages
Quick Links
Advertisement

Subscribe to Our Youtube Channel
Related Manuals for TERMOFOL TF-TRW-02


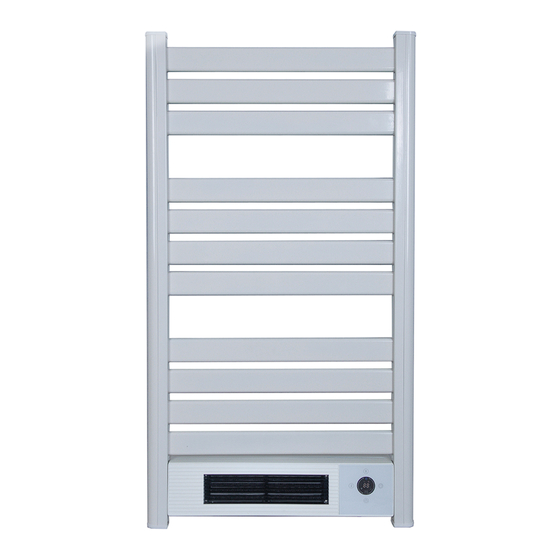
Summary of Contents for TERMOFOL TF-TRW-02
- Page 1 TF-TRW-02 INTELIGENTNY GRZEJNIK ŁAZIENKOWY Instrukcja instalacji i obsługi Installation and user manual Uwaga: Przed rozpoczęciem instalacji przeczytaj instrukcję! Note: Please read the instructions before starting the installation!
-
Page 2: Opis Symboli
Przed rozpoczęciem wszelkich prac instalacyjnych należy dokładnie przeczytać instrukcję montażu i obsługi i zachować ją do późniejszego wykorzystania. Zastosowanie się do wytycznych zawartych w instrukcji użyt- kowania oraz przestrzeganie zasad w niej zawartych zapewni bezpieczną pracę urządzenia. OPIS SYMBOLI Produkt zgodny z dyrektywami europejskimi Symbol przekreślonego kosza na kółkach oznacza, że urządzenie powinno być... -
Page 3: Informacje Dotyczące Bezpieczeństwa
UWAGA: Zachowaj niniejszą instrukcję obsługi na przyszłość. Jeśli sprzeda- jesz lub przekazujesz ten produkt, upewnij się, że niniejsza instrukcja jest dołączona do tego produktu. Informacje dotyczące bezpieczeństwa • Upewnij się, że napięcie sieciowe odpowiada napięciu podanemu na tabliczce znamionowej urzą- dzenia oraz że gniazdko ścienne jest uziemione. - Page 4 To urządzenie może być używane przez dzieci w wieku 8 lat i starsze oraz osoby o ograniczonych zdolnościach fizycznych, sensorycznych lub umysłowych, jeśli znajdują się pod nadzorem lub zostały poinstruowane na temat korzystania z urządzenia w bezpieczny sposób i rozumieją zagrożenia wyni- kające z jego obsługi.
- Page 5 Instalacja: • Za pomocą wiertarki wykonaj 4 otwory o średnicy 8 mm. • Wrowadź 4 kołki w otwory. • Za pomocą wkrętów ST4x40 zamocuj zewnętrzne elementy mocujące do ściany. • Za pomocą 4 śrub ST4.0x20 zamocuj 4 wewnętrzne elementy mocujące i 4 przednie elementy mocujące do urządzenia.
- Page 6 Śruba M5x14 mocowanie wewnętrzne Przednia osłona Przedni uchwyt uchwytu mocowanie zewnętrzne Śruba ST4.0x20 Mocowanie na ścianie Mocowanie na urządzeniu Użytkowanie grzejnika •Umieść grzejnik na płaskiej, stabilnej powierzchni. • Podłącz do dowolnego źródła prądu zmiennego 220-240 V, 50 Hz, a następnie włącz przełącznik z boku, aż...
-
Page 7: Pilot Zdalnego Sterowania
1. Wyświetlacz 2. Temperatura 3. Wybór trybu 4. Timer 5. Włącznik Przycisk zasilania (wł./wył.) Gdy produkt jest włączony, naciśnij przycisk ON/OFF, dioda LED wyświetli temperaturę pokojową. Tryb nagrzewania Naciśnij przycisk , urządzenie zacznie się nagrzewać. Temperatura Naciśnij przycisk temperatury , by ustawić temperaturę w zakresie od 5 °C do 40 °C. Temperatura we- wnętrzna jest wyświetlana przy każdym uruchomieniu urządzenia. - Page 8 • Mycie grzejnika z użyciem dużej ilości wody oraz umieszczanie w wodzie jest zabronione! • Przechowuj nieużywany grzejnik w suchym, wentylowanym pomieszczeniu. Unikaj miejsc o wysokiej wilgotności i takich w których urządzenie może być narażone na uszkodzenia mechaniczne. Model TF-TRW-02 Napięcie 220-240V Częstotliwość...
- Page 9 Rys. 2 Rys. 3 Rys. 4 7. Po pomyślnym podłączeniu urządzenia dotknij „urządzenia” w aplikacji u dołu. Nazwa urządzenie pojawi się na liście (na obrazku 5). Dotknij go, aby wejść do panelu sterowania inteligentnego grzejnika. Uwagi: Gdy urządzenie jest w trybie online, z przodu ikony urządzenia pojawi się zielona kropka; Gdy urzą- dzenie jest w trybie offline, kropka będzie szara;...
-
Page 10: Karta Gwarancyjna
8. „Mój profil” to miejsce, w którym użytkownicy mogą zarządzać danymi osobowymi. Kluczowe informacje są takie – patrz rysunek 6: a. Dane osobowe: w tym nazwa konta i numer telefonu komórkowego b.Informacje o udostępnionych urządzeniach c. Centrum wiadomości d. Wejście do przesyłania opinii e.FAQ f. - Page 11 TF-TRW-02 SMART HEATER BATHROOM Installation and user manual Note: Please read the instructions before starting the installation!
-
Page 12: Symbols Description
Before commencing any installation work, carefully read the installation and operating instructions and keep them for future reference. Adherence to the guidelines contained in the user manual and compliance with the rules contained therein will ensure safe operation of the device. SYMBOLS DESCRIPTION The product complies with European directives The symbol of the crossed-out wheeled bin means that the device... -
Page 13: Safety Information
NOTE: Keep this manual for future reference. If you are selling or trans- ferring this product, make sure this manual is included with the product. Safety information • Make sure that the mains voltage corresponds to the voltage indicated on the rating plate of the device and that the wall socket is grounded. - Page 14 This appliance can be used by children aged 8 years and over and persons with reduced physical, sen- sory or mental capabilities if they have been given supervision or instruction concerning use of the ap- pliance in a safe way and understand the hazards involved. Children should not play with the device. CAUTION: Some parts of the heater can get very hot and cause burns.
-
Page 15: Installation
Installation: • Using a drill, make 4 holes with a diameter of 8 mm. • Insert 4 pins into the holes. • Use ST4x40 screws to fix the external fasteners to the wall. • Use 4 screws ST4.0x20 to fix the 4 internal fasteners and 4 front device fasteners. - Page 16 M5x14 screw internal fixing Front handle Front handle cover external fixation Screw ST4.0x20 Fixing on the wall Mounting on the device Use of the heater • Place the heater on a flat, stable surface. • Connect to any AC 220-240V, 50Hz power source, then turn on the switch on the side until you hear a beep.
-
Page 17: Power Button (On/Off)
1. Display 2. Temperature 3. Mode selection 4. Timer 5. Switch Power Button (On/Off) When the product is turned on, press the ON/OFF but- ton, the LED will display the room temperature. Heating mode Press the button, the device will start to heat up. Temperature Press the temperature button to set the temperature from 5 °C to 40 °C. - Page 18 • Washing the radiator with a large amount of water and placing it in water is prohibited! • Store the heater when not in use in a dry, ventilated room. Avoid places with high humidity and places where the device may be exposed to mechanical damage. Model TF-TRW-02 Tension 220-240V Frequency...
- Page 19 Fig. 2 Fig. 3 Fig. 4 7. Once your device is successfully connected, tap „device” in the app at the bottom. The name of the device will appear in the list (in the picture 5). Touch it to enter the smart heater control panel. Notes: When the device is online, a green dot will appear in front of the device icon;...
-
Page 20: Warranty Card
8. „My profile” is a place where users can manage personal data. The key information is this - see Figure 6: a. Personal data: including account name and mobile number b. Information about shared devices c. Message Center d. Feedback input e.FAQ f.
Need help?
Do you have a question about the TF-TRW-02 and is the answer not in the manual?
Questions and answers