Advertisement
LCC-USB-DVI
FCC/CE Statement
FCC Statement:
This equipment has been tested and found to comply with the regulations for a Class A digital device, pursuant to Part 15
of the FCC Rules. These limits are designed to provide reasonable protection against harmful interference when the
equipment is operated in a commercial environment. This equipment generates, uses, and can radiate radio frequency
energy and, if not installed and used in accordance with this Quick Installation Guide, may cause harmful interference to
radio communications. Operation of this equipment in a residential area is likely to cause harmful interference in which
case, the user will be required to correct the interference at his/her own expense.
CE Statement:
This is a Class A product in a domestic environment, this product may cause radio interference, in which case the user may
be required to take adequate measures.
*This specification is subject to possible change without prior notice. Copyright © 2024 Raritan Inc. All Rights
Reserved.P/N: QSG-LCCUSBDVI-1l-v1.0.0 ● 255-62-0010-00 RoHS.
Introduction
Thank you for purchasing the 2-port Local Console Controller LCC-USB-DVI. With our highly reliable and quality product,
users can enjoy countless benefits from using it.
LCC-USB-DVI is a 2-port Local Console Controller with 10 User-preset OSD Image Banks. Users can upload a maximum of 10
user-configurable On-Screen Display (OSD) images either remotely over the network from virtual media or locally from a
USB flash drive, using any of its two USB (UPGRADE) ports at console 2. The priority of the console 2 (C2) port is defined as
higher than that of the console 1 (C1) port. The unit is operable under two modes (C2 Active-only Mode and C1/C2 Sharing
LCC-USB-DVI Quick Setup Guide
LCC-USB-DVI_v1.0.0_A1
page
1
Advertisement
Table of Contents

Related Manuals for LEGRAND Raritan LCC-USB-DVI


Summary of Contents for LEGRAND Raritan LCC-USB-DVI
- Page 1 LCC-USB-DVI FCC/CE Statement FCC Statement: This equipment has been tested and found to comply with the regulations for a Class A digital device, pursuant to Part 15 of the FCC Rules. These limits are designed to provide reasonable protection against harmful interference when the equipment is operated in a commercial environment.
-
Page 2: Package Contents
Mode). In C2 Active-only Mode, the C1 K/M access is blocked. C2 user can select a preferred OSD image from the OSD image banks to be displayed on C1 monitor. In C1/C2 Sharing Mode, both C1 and C2 can access the connected PC, which is also the default operation mode. -
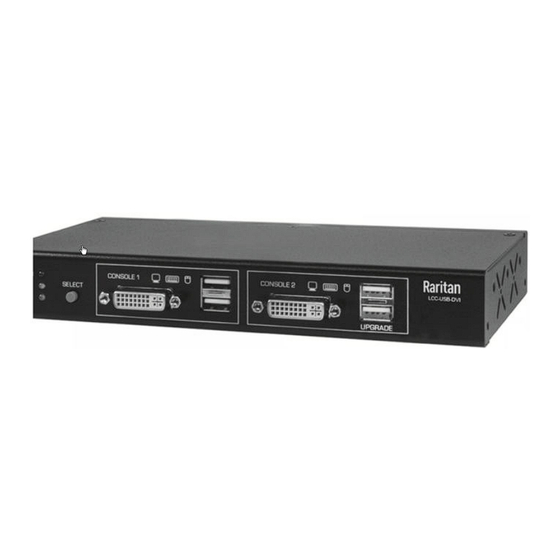
Page 3: Front And Rear Panel Overview
Console LED indicators vs. Operation Modes Front and Rear Panel Overview Front Panel Front Panel Marking (Console 1 / Console 2) Power LED Indicator Console 1 (C1) / Console 2 (C2) Active LED Indicator Emergency button to toggle* off/on Console 2 K/M access *press and hold 3 seconds DVI-I (Digital/Analog) output (to C1 monitor) C1 Keyboard/Mouse... -
Page 4: Installation
Rear Panel Marking (PC) Grounding terminal 5V DC Power Jack USB Type-B Socket (connected to PC via an USB A-to-B cable) DVI-D digital video input (connected to PC DVI-D output). Control Port (for External Push Button) Pin 1(White-orange)/2(Orange): for connecting the External Push Button;... -
Page 5: Operation Mode Introduction
2. Now you can enjoy using the LCC-USB-DVI unit. Operations You may operate this Local Console Controller as below. Front-Panel SELECT Button Operation The front-panel SELECT button allows you to toggle 3 seconds to off/on the Console 2 K/M access both in two operation modes (Mode 0: C2 Active-only Mode / Mode 1: C1/C2 Sharing Mode). - Page 6 1 user at the local site can emergently press the external Access Control Button connected to the IOIO connector of the LCC-USB-DVI unit, to temporarily disable Console 2's PC access. After the emergent condition is cleared, the Console 1 user can again press the Access Control Button, going back to its previous Console 1/2 Sharing Mode or Console 2 Active-only Mode.
- Page 7 Load an OSD Select a preferred image stored in an OSD Image Bank to be Image from 10 displayed on Console 1 monitor in C2 Active-only Mode. OSD Image Banks There are 10 available OSD Image Banks to store 24-bit 960x540 to display on C1 bitmap image files (*.bmp) uploaded from any USB port of the monitor in C2...
-
Page 8: Specifications
Specifications Model. LCC-USB-DVI PC Connector DVI-D Female 1 x USB Type-B Female Console Connector 2 x DVI-I 24+5 pin Female (Console 1/2:Analog + Digital) 4x USB Type A Female (Console 1/2:Keyboard/Mouse; Console 2: additionally Firmware Upgrading / OSD Image Uploading) 1 x RJ45 (External I/O) Console Selection 1 x Tact Switch... -
Page 9: Technical Tips
1024 x 768 800 x 600 640 x 480 OSD Display OSD Image Size Resolutions* Format 1920 x 1080 960 x 540 | bmp 1600 x 1200 800 x 600 | bmp 1280 x 1024 640 x 512 | bmp 1024 x 768 512 x 384 | bmp 800 x 600... - Page 10 page LCC-USB-DVI Quick Setup Guide LCC-USB-DVI_v1.0.0_A1...
- Page 11 4. To update the content of the 10 built-in OSD Image Banks, please prepare a FAT32/ exFAT-formatted USB flash drive (*NTFS format is not supported). Next, copy the prepared files to its root directory with the following naming convention, such as image1. bmp, image2.bmp, ..., and image10.bmp. Insert this flash drive into any of the two USB (UPGRADE) ports at the console 2 of the LCC-USB-DVI unit.
- Page 12 page LCC-USB-DVI Quick Setup Guide LCC-USB-DVI_v1.0.0_A1...
Need help?
Do you have a question about the Raritan LCC-USB-DVI and is the answer not in the manual?
Questions and answers