Precor P31 Operator's Manual
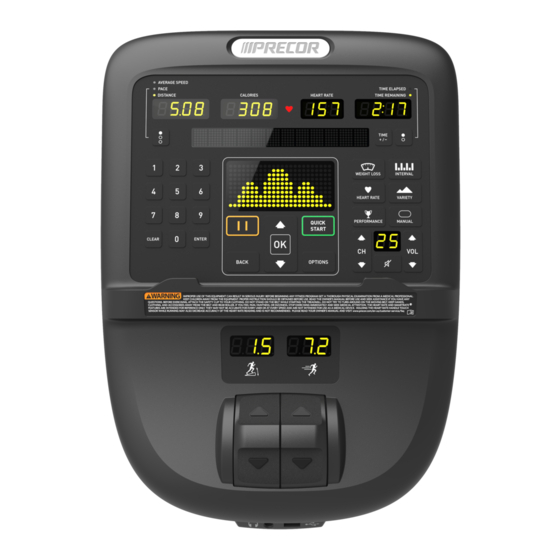
Console
Hide thumbs
Also See for P31:
- Setting up (9 pages) ,
- Installation manual (2 pages) ,
- Getting started manual (2 pages)
Table of Contents
Advertisement
Quick Links
Advertisement
Table of Contents

Related Manuals for Precor P31


Summary of Contents for Precor P31
- Page 1 ENGLISH P31 Console Operator's Guide...
-
Page 3: Table Of Contents
Table of Contents Get Started ..............................4 Get to know the P31 console ......................... 4 Activate the Console ..........................4 Set Up the Console ..........................5 Set Club Parameters ..........................6 Safety Code (Treadmill only) ......................6 Select Language (All Equipment) ....................6 Select Units (All Equipment) ...................... -
Page 4: Get Started
If the user does not maintain the minimum rate of motion, a shutdown process begins. An optional AC power adapter provides sustained power to the equipment. To purchase the power adapter, contact Precor Customer Support. -
Page 5: Set Up The Console
Within the console, configure settings that benefit your users and facility. NOTE The information provided in this section is intended for system administrators and Precor service technicians. DO NOT share it with exercisers or non-administrative staff. To view the Club Parameters: 1. -
Page 6: Set Club Parameters
Set Club Parameters Use this information to customize the equipment for your setting. Safety Code (Treadmill only) Value Range: Enabled or Disabled Default: Disabled When the equipment is shipped from the factory, the safety code feature is disabled. An enabled safety code requires users to enter the code 1 2 3 4 to use the equipment. -
Page 7: Set Metrics Default
Set Metrics Default Value Range: Off or On Default value: Off This setting sets the console defaults for the following workout parameters: • Metric Defaults on or off • Average Speed • Target HR • Percent Complete • Cal/minute • Average HR •... -
Page 8: Auto Stop Configuration (Treadmill Only)
Auto Stop Configuration (Treadmill only) Value Range: On and Off Default Value: On Precor strongly recommends that you leave this setting ON. This ensures that the treadmill will stop if it does not detect a user. Set Custom Workouts 1 and 2... -
Page 9: Set Resistance Range (Bike Only)
Set Resistance Range (Bike only) Value Range: High, Medium, or Low Default: High You can set a low, medium, or high base resistance on the recumbent or upright bikes. There are 25 levels of resistance within each base setting, but the base setting affects the overall resistance range. The following ranges are available: High: Provides full resistance range. -
Page 10: Information Settings
Information Settings Information settings provide access to an error log, software and equipment serial numbers, and usage information. To view information settings: 1. Press Pause. 2. Enter the password: 6 5. The settings appear. 3. Scroll through the information settings. Information settings Product Value... -
Page 11: Error Log
Displays message, Belts change required in place of the standard banner text. AMT only No workout can be started. Contact a Precor-certified service technician. 17-20, 25, 85-88 Turn the equipment off and on. Repeat twice. If the message still appears, Treadmill only contact a Precor-certified service technician. -
Page 12: User Id Entry With Csafe Equipment
User ID Entry with CSAFE Equipment This equipment is fully compatible with CSAFE protocols. When the equipment is connected to a CSAFE device that requires a user ID, the user is prompted to press ENTER and begin an identification process. The user ID is displayed as 00000 (five zeros) and indicates the starting point. -
Page 13: Configure The Audio Receiver
Configure the Audio Receiver Use the automatic programming feature first to acquire the facility's available channels. Manual program (P) mode may be used to add or subtract the channels after reviewing the automatic scan results. NOTE You must run the automatic programming process before you can manually program the receiver. Automatic Programming of the Receiver IMPORTANT Transmitters must not share the same channel. -
Page 14: Manual Programming The Receiver
Manual Programming the Receiver IMPORTANT You must run the automatic programming procedure before you run manual programming. After the automatic scan of the selected frequency mode has been completed once, use this feature to add or delete channels. When you enter manual programming, the receiver displays the actual channel numbers it has found and these may be different than those displayed during normal operation. -
Page 15: Troubleshoot The Receiver
Troubleshoot the Receiver Below are troubleshooting steps for some common issues. However, receivers rarely experience issues once the wireless system is installed. For more equipment information and troubleshooting, visit us at www.precor.com. Problem Receiver What to do Not Charging • Verify that the console is On. - Page 16 P31 Console Operator's Guide P/N 305260-101, ENU © 2019 Precor Incorporated 1 January 2019...
Need help?
Do you have a question about the P31 and is the answer not in the manual?
Questions and answers