Table of Contents
Advertisement
Quick Links
Advertisement
Table of Contents

Subscribe to Our Youtube Channel
Related Manuals for ISHIDA DACS-H Series


Summary of Contents for ISHIDA DACS-H Series
- Page 1 DAC-160-E SANITARYTYPE CHECKWEIGHER DACS-H OPERATION MANUAL • Do not carry out installation, operation, service, or maintenance until thoroughly understanding the contents of this manual. • Keep this manual available at all times for installation, operation, service, and maintenance.
- Page 2 You can help improve this manual by calling attention to errors and by recommending improvements. Please convey your comments to the nearest Ishida Company regional representative. Thank you! Copyright © 2002 by Ishida Co.,Ltd. All Rights Reserved. No part of this manual may be reproduced in any form, by photocopy or any other means,...
- Page 3 2. The copyright for the material in this document is held by Ishida Company Ltd. Accordingly, any disclosure to third parties or unauthorized copying of the diagrams or technical information contained herein is not permitted.
-
Page 4: Warranty Conditions
The details of the warranty are defined in the warranty certificate. 2. Ishida assumes no responsibility for loss, injury or damage which are the result of unauthorized or unforeseen operational procedures. 3. The warranty period is indicated in the warranty certificate. - Page 5 MANUAL OBJECTIVES AND STRUCTURE MANUAL OBJECTIVES AND STRUCTURE This manual is designed to provide users with information on operation, maintenance and inspection procedures of the Ishida sanitarytype checkweigher. The following information is contained in this manual. 1. SAFETY AND SANITARY Be sure to read and understand all information related to safety contained in this manual before attempting to operate, inspect or service this equipment.
- Page 6 MANUAL OBJECTIVES AND STRUCTURE 8. ADDITIONAL FUNCTIONS Describes the Installation Engineer level procedures not normally used during daily production. 9. PERIODIC MAINTENANCE Describes the maintenance and inspection procedures required to keep the weighing function in optimum condition. 10.TROUBLESHOOTING This chapter describes the causes and countermeasures for machine malfunctions. INDEX...
-
Page 7: Table Of Contents
DACS-H OPERATION MANUAL Table of Contents GENERAL TABLE OF CONTENTS 1 SAFETY AND SANITARY Summary ........... 1-1 Warning Indications: Types and Definitions . - Page 8 DACS-H OPERATION MANUAL 5 NORMAL OPERATIONS & FUNCTIONS Summary ........... 5-1 Data Entry .
- Page 9 DACS-H OPERATION MANUAL 6 PRODUCTION Summary ........... 6-1 Emergency Stop &...
- Page 10 DACS-H OPERATION MANUAL 8.4.2.10Over Weight Output Signal ........8-15 8.4.2.11Under Weight Output Signal .
- Page 11 DACS-H OPERATION MANUAL 9.5.8 Replacement of Counter-belt Side Bearing (and Oil Seal) for Conveyor Driven Roller ............. 9-20 9.5.9 Replacing Battery for Memory Backup .
- Page 12 DACS-H OPERATION MANUAL...
- Page 13 1 SAFETY AND SANITARY Summary ........1-1 Warning Indications: Types and Definitions .
- Page 14 <MEMO>...
-
Page 15: Safety And Sanitary
If there are any unclear points or questions concerning the information contained in this manual, please contact Ishida installation personnel or your nearest Ishida representative before proceeding. -
Page 16: Warning Indications: Types And Definitions
1 SAFETY AND SANITARY DACS-H OPERATION MANUAL 1.2 Warning Indications: Types and Definitions The warning instructions contained in this manual, as well the indications on the labels attached to the machine, are ranked into three categories according to the level of hazard involved. It is important that these indications be fully understood and complied with. -
Page 17: General Precautions To Be Observed
DACS-H OPERATION MANUAL 1 SAFETY AND SANITARY 1.3 General Precautions to be Observed This section describes the general safety and sanitary precautions which must be observed when handling this equipment. • All electrical work for the installation site must be performed by licensed electrical contractors. •... - Page 18 1 SAFETY AND SANITARY DACS-H OPERATION MANUAL • When performing maintenance and inspection works at a height such as on a wrapping machine or bench, use a sturdy ladder or foothold to avoid a hazardous fall. • Do not connect other equipment to the power outlet used for this equipment. This may cause a fire.
-
Page 19: Special Safety Precautions
Do not place in a location subject to dust, vibration, direct sunlight or extreme heat. Insure that there is no moving metal objects in the vicinity of the machine other than Ishida equipment. - Page 20 1 SAFETY AND SANITARY DACS-H OPERATION MANUAL • For areas to which no specific cleaning method is defined, clean them wiping with a dry cloth. Otherwise, damage or malfunction may result. Weighing fresh meet or cut vegetables with this equipment under improper conditions may result in hygienic hazards.
-
Page 21: Warning Labels
DACS-H OPERATION MANUAL 1 SAFETY AND SANITARY 1.5 Warning Labels Warning labels which indicate points requiring particular caution are attached to the weigher at certain locations. Please take sufficient time to familiarize yourself thoroughly with the meanings and positions of these labels. 1.5.1 Warning Label Handling •... -
Page 22: Drive Power Shutdown And Indication
1 SAFETY AND SANITARY DACS-H OPERATION MANUAL 1.6 Drive Power Shutdown and Indication Before performing maintenance or inspection, electrical power should be shutdown to ensure the safety of personnel. The following methods are recommended to prevent other workers from starting the power supply during maintenance or inspection work. -
Page 23: Introduction
2 INTRODUCTION Summary ........2-1 Terminology....... . 2-2 Model Specifications . - Page 24 <MEMO>...
- Page 25 DACS-H OPERATION MANUAL 2 INTRODUCTION 2 INTRODUCTION 2.1 Summary This chapter describes the special terminology used in this manual, installation specifications, configurations, and operation outlines.
-
Page 26: Terminology
2 INTRODUCTION DACS-H OPERATION MANUAL 2.2 Terminology Some of the special terms used in this manual are explained below. Table 2-1 Terminology Term Definition Product The article which is being checkweighed. Packer The upstream equipment feeds product to the checkweigher. Span Adjustment After zero adjustment is performed, a standard span counterweight is weighed and the measured value is stored in memory as a reference point for weighing. -
Page 27: Main Components
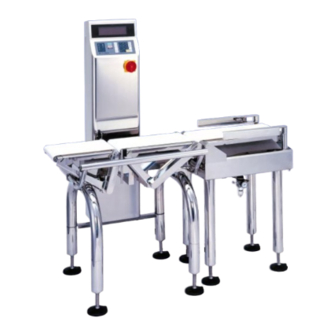
DACS-H OPERATION MANUAL 2 INTRODUCTION 2.4 Main Components The name of each part and the function are described below: SIGNAL TOWER PRINTER (OPTION) (OPTION) DISPLAY PANEL OPERATION PANEL WIND COVER (OPTION) REJECTOR DEVICE PHOTO SWITCH POWER SWITCH INFEED CONVEYOR WEIGH CONVEYOR Figure 2-1 External View Table 2-3 Explanation of Components Unit... - Page 28 2 INTRODUCTION DACS-H OPERATION MANUAL Table 2-3 Explanation of Components (Continued) Unit Functional Description Operation Panel Used to set weighing parameters and operate the checkweigher. Display Panel Displays operational status, weigh settings, etc. Printer (option) Prints out weigh statistics, etc. Signal Tower (option) Displays operational status.
-
Page 29: Operation Outline
DACS-H OPERATION MANUAL 2 INTRODUCTION 2.5 Operation Outline This section describes a chain of operations from the time product is infed to the infeed conveyor, to the time it is weighed and discharged. REJECTOR DEVICE PHOTO SWITCH INFEED CONVEYOR WEIGH CONVEYOR Figure 2-2 Operation Outline 1. - Page 30 2 INTRODUCTION DACS-H OPERATION MANUAL...
-
Page 31: Installation
3 INSTALLATION Summary ........3-1 Verification and Preparation of Installation Site . . 3-2 3.2.1 Verification of Installation Site . - Page 32 <MEMO>...
- Page 33 This chapter provides information on the correct methods of installing the weigher. • Before attempting to shift this equipment, contact the distributor where the equipment was purchased or an Ishida Service representative. Unstable equipment may result in inaccurate weighing. For this reason, make sure the equipment is securely fastened.
-
Page 34: Verification And Preparation Of Installation Site
3 INSTALLATION DACS-H OPERATION MANUAL 3.2 Verification and Preparation of Installation Site 3.2.1 Verification of Installation Site The weigher installation site should conform to the following conditions: • Indoors • Ambient temperature range: 0-35°C • Ambient humidity: 35-85% (no condensation) •... -
Page 35: Power Source Connection
Use a power outlet that conforms to the specified voltage. Be sure to connect a ground wire to the outlet for Class 3 grounding. An Ishida service engineer connects the power cable from the checkweigher. 3.2.3 Air Supply Air Supply Regulate the supply pressure to this equipment to 0.4MPa-0.5Mpa (gauge) using the... -
Page 36: Installation Procedure
3 INSTALLATION DACS-H OPERATION MANUAL 3.2.4 Installation Procedure a. Equipment size The equipment size is shown below. Install the equipment in consideration of the size combined with an interlocked machine, environmental condition and the following. The equipment size is for reference only. Check the actual machine. WORK SPACE WORK SPACE 345-545 mm... - Page 37 DACS-H OPERATION MANUAL 3 INSTALLATION b. Security of working area (1) Space necessary to accommodate the outside dimensions of checker (including the working area) (2) Space to collect the rejected product at rejects (including the working area) (3) Height of belt surface c.
- Page 38 3 INSTALLATION DACS-H OPERATION MANUAL...
-
Page 39: Operation Panel
4 OPERATION PANEL Summary ........4-1 Operation Panel......4-2 Key Functions . - Page 40 <MEMO>...
- Page 41 DACS-H OPERATION MANUAL 4 OPERATION PANEL 4 OPERATION PANEL 4.1 Summary This chapter describes the components and functions of the operation panel unit. • Be sure to read this chapter carefully before attempting operation. • For information on operation procedures please refer to "6 PRODUCTION".
- Page 42 4 OPERATION PANEL DACS-H OPERATION MANUAL 4.2 Operation Panel Figure 4-1 Operation Panel...
-
Page 43: Key Functions
DACS-H OPERATION MANUAL 4 OPERATION PANEL 4.3 Key Functions Operation panel key functions are described in the table below. Table 4-1 Key and Functions Name Function When checkweigher is in pause status, starts operation. [START] key When checkweigher is in operation, stops operation and the machine becomes stand by state. - Page 44 4 OPERATION PANEL DACS-H OPERATION MANUAL...
- Page 45 5 NORMAL OPERATIONS & FUNCTIONS Summary ........5-1 Data Entry .
- Page 46 5.6.2.6 Batch: Total Count ..... . . 5-34 5.6.2.7 Auto Lots Total Time ..... 5-35 5.6.2.8 Log Setting .
-
Page 47: Normal Operations & Functions
DACS-H OPERATION MANUAL 5 NORMAL OPERATIONS & FUNCTIONS 5 NORMAL OPERATIONS & FUNCTIONS 5.1 Summary This chapter describes procedures for setting parameters and functions for daily operation. • Please refer to "6 PRODUCTION" for more information on daily production procedures. •... -
Page 48: Data Entry
5 NORMAL OPERATIONS & FUNCTIONS DACS-H OPERATION MANUAL 5.2 Data Entry Numeric data, alphanumeric characters and symbols are entered via the operation panel. To enter data, proceed as described below. 5.2.1 Data Entry Procedure Follow the procedures below for input of numeric figures with the operation panel. 1. -
Page 49: Operational Levels
DACS-H OPERATION MANUAL 5 NORMAL OPERATIONS & FUNCTIONS 5.3 Operational Levels Weigher Operation is divided into three access levels: the Operator Level, Site Engineer Level and Installation Engineer Level. Table 5-1 shows how these levels are distinguished. A password is necessary to enter the Site Engineer and Installation Engineer Levels. "5.4 Access Level Change"... -
Page 50: Operator Level
5 NORMAL OPERATIONS & FUNCTIONS DACS-H OPERATION MANUAL • *These functions are available when optional printer is installed. ZERO PRESET (Call Up the Preset Number) SET UP ACCESS LEVEL CHANGE PAUSE/BAR GRAPH DISPLAY WEIGHT VALUE ZOOM TOTAL COUNT ZOOM ACTUAL SPEED ZOOM INFO HISTOGRAM DISPLAY OPERATOR LEVEL... - Page 51 DACS-H OPERATION MANUAL 5 NORMAL OPERATIONS & FUNCTIONS Table 5-2 Operator Level Functional Configuration Display Function Zero Zero Adjustment Executes zero adjustment. Refer to "5.5.1 Zero Adjustment". Set up Preset (Call Up the Preset Sets preset No. Number) Refer to "5.5.2 Preset Setting (Call-out of Preset Number)". Access Level Change For changing access level.
- Page 52 5 NORMAL OPERATIONS & FUNCTIONS DACS-H OPERATION MANUAL Table 5-2 Operator Level Functional Configuration (Continued) Display Function Print Current Batch Total Prints out the total for the current batch. Refer to "5.5.5.2 Printer". Current Log Total Prints out the total for the current product item. Current log shows data from the time the current preset was selected or the last Clear All Totals was executed.
- Page 53 DACS-H OPERATION MANUAL 5 NORMAL OPERATIONS & FUNCTIONS • *1, *2 and *3 in Figure 5-2 Site Engineer Level Functional Configuration and Figure 5-3 Site Engineer Level Functional Configuration are effective only when the following options are provided. *1: Functions interlocked with metal detector *2: Printer (option) functions *3: Functions when interlocked with air rejector/arm rejector (do not function when interlocked with Colocon rejector)
- Page 54 5 NORMAL OPERATIONS & FUNCTIONS DACS-H OPERATION MANUAL From the previous page [a] LOG SETTING Power On/Off Start/Stop LOG FILE OUTPUT Preset No. Change CLEAR BATCH OPERATOR TOTALS Error Has Occurred LEVEL CLEAR ALL TOTALS STATISTICS Error Release &PRINT LOG CLEAR SETTING Metal Detected *1 SITE...
- Page 55 DACS-H OPERATION MANUAL 5 NORMAL OPERATIONS & FUNCTIONS Table 5-3 Site Engineer Level Additional Functions Display Function Set up Preset Reference Weight Sets reference weight. Refer to "5.6.1.1 Reference Weight". Upper Limit The maximum weight which will be judged as a proper pack. Entered as the amount of difference above the Reference Weight value.
- Page 56 5 NORMAL OPERATIONS & FUNCTIONS DACS-H OPERATION MANUAL Table 5-3 Site Engineer Level Additional Functions (Continued) Display Function Set up Preset Preset Tare Used to check net weight of product by tare subtraction. Refer to "5.6.1.10 Preset Tare". Dynamic Calibration Used to set the compensation weight if there is a discrepancy between weight values.
- Page 57 DACS-H OPERATION MANUAL 5 NORMAL OPERATIONS & FUNCTIONS Table 5-3 Site Engineer Level Additional Functions (Continued) Display Function Set up Statistics & Log Setting This sets whether the log data for the various operation of checkerweigher Print Setting is recorded or not. Refer to "5.6.2.8 Log Setting".
-
Page 58: Access Level Change
5 NORMAL OPERATIONS & FUNCTIONS DACS-H OPERATION MANUAL 5.4 Access Level Change After the pre-production procedure (refer to "6.4 Pre-Production Procedure") is completed, the RCU starts up in the operator level mode. A password is required to change from the Operator level to the Site Engineer level. (No password is necessary to return to the Operator level). -
Page 59: Changing To The Site Engineer Level
DACS-H OPERATION MANUAL 5 NORMAL OPERATIONS & FUNCTIONS 5.4.2 Changing to the Site Engineer Level To access the Site Engineer level from another level, follow the procedure shown below. The Site Engineer level password is required to execute this procedure. <From the Operator Level>... - Page 60 5 NORMAL OPERATIONS & FUNCTIONS DACS-H OPERATION MANUAL 4. Enter the Site Engineer Level password. The Level 1 Setup Menu appears. Figure 5-11 Access Level Change Menu 5-14...
-
Page 61: Operator Level Functions
DACS-H OPERATION MANUAL 5 NORMAL OPERATIONS & FUNCTIONS 5.5 Operator Level Functions This section contains instructions for operating the Operator Level (Level 0) functions used for daily production. 5.5.1 Zero Adjustment Zero adjustment sets the initial zero point of the load cell (weigh unit) mechanism without product. Zero adjustment is performed at the beginning of the day and during product changeover, when span adjustment is performed and when a Zero error occurs to ensure checkweighing precision. -
Page 62: Preset Setting (Call-Out Of Preset Number)
5 NORMAL OPERATIONS & FUNCTIONS DACS-H OPERATION MANUAL 5.5.2 Preset Setting (Call-out of Preset Number) Preset parameters (presets) which have been entered previously in the Site Engineer level can be called up in the Operator level. (Refer to "5.6.1 Preset Setting".) Follow the procedure outlined below to call up a preset. -
Page 63: Data Displays
DACS-H OPERATION MANUAL 5 NORMAL OPERATIONS & FUNCTIONS 5.5.4 Data Displays This item is used to change the display in the Production Standby Menu. Weight Value Zoom, Total Count Zoom, Actual Speed Zoom, Histogram Display, X-Bar Chart Display, Last 27 Weight Data Display, Log Display and Bar Graph Display can be viewed in the Operator mode during production. -
Page 64: Print
5 NORMAL OPERATIONS & FUNCTIONS DACS-H OPERATION MANUAL 5.5.5 Print Print is a function to clear or print the total data with a printer (option). When the printer option is not installed, the print key is used only to Clear Batch Totals, Clear All Totals and Log Clear. -
Page 65: Printer
DACS-H OPERATION MANUAL 5 NORMAL OPERATIONS & FUNCTIONS 5.5.5.2 Printer When an optional printer is installed, in addition to Clear Batch Totals, Clear All Totals and Log Clear, Current Batch Total, Current Log Total, All Lot Totals, Pack Weight Log, Preset Description, Paper Pass, Log Print and End Print Job are available. -
Page 66: Print Sample
5 NORMAL OPERATIONS & FUNCTIONS DACS-H OPERATION MANUAL 5.5.5.3 Print Sample The format of the DACS-H All Lot Totals, Pack Weights Logs and Log Data printouts are shown below. Number of packs in each zone is 97.5 represented by the 98.0 histogram-type graph. - Page 67 DACS-H OPERATION MANUAL 5 NORMAL OPERATIONS & FUNCTIONS 101.0 99.4 99.2 100.1 OVER, UNDER 98.7 101.4 WEIGHT DATA 100.5 99.4 99.7 100.5 99.0 99.4 100.4 98.7 100.5 100.6 100.4 101.6 99.6 99.7 99.5 99.5 1997-JAN-11 10:43 START PACK WEIGHT LOG Figure 5-30 Pack Weight Log Sample Operation POWER ON...
-
Page 68: Site Engineer Level Functions
5 NORMAL OPERATIONS & FUNCTIONS DACS-H OPERATION MANUAL 5.6 Site Engineer Level Functions This section explains the procedures for operating the Site Engineer Level functions. 5.6.1 Preset Setting The preset setting function is used to set the required weighing parameters prior to starting production. One set of the following 12 preset parameters is registered for each product: 12 items of Reference Weight, Upper Limit, Lower Limit, Product Length, Product Name, Product Code, Timing Setting, Over Weight Accept, Metal Detection, Preset Tare, Dynamic Calibration, and... -
Page 69: Upper Limit
DACS-H OPERATION MANUAL 5 NORMAL OPERATIONS & FUNCTIONS 4. Press [SELECT ITEM] key The Preset Menu appears. Figure 5-33 Preset Number Menu 5. Enter the Reference Weight value with numeric keys. The entered Reference Weight is displayed. Reference Weight setting is complete. Figure 5-34 Preset Menu 5.6.1.2 Upper Limit... -
Page 70: Product Length
5 NORMAL OPERATIONS & FUNCTIONS DACS-H OPERATION MANUAL 1. Display the Preset Menu. 2. Press [ENTER] key to scroll the cursor to "Lower Limit -". 3. Enter the Lower Limit value with numeric Figure 5-36 Preset Menu keys. The entered Lower Limit value is displayed. Lower Limit setting is complete. -
Page 71: Product Code
DACS-H OPERATION MANUAL 5 NORMAL OPERATIONS & FUNCTIONS 4. Press or [ENTER] key to align cursor with desired characters or numbers. 5. Press [SELECT ITEM] key The characters are registered. 6. After all characters are registered, press Figure 5-39 Product Name Menu [EXIT] key The registered name appears on the Preset Menu. -
Page 72: Timing Setting
5 NORMAL OPERATIONS & FUNCTIONS DACS-H OPERATION MANUAL 5.6.1.7 Timing Setting The Timing Setting Menu is used to adjust operational timing for checkweigher components to achieve a smooth flow of product across the conveyors. There are 12 setting items in this menu. For descriptions of the timing setting parameters refer to "Table 5-3 Site Engineer Level Additional Functions"... -
Page 73: Over Weight Accept
DACS-H OPERATION MANUAL 5 NORMAL OPERATIONS & FUNCTIONS 5.6.1.8 Over Weight Accept This item is set to ON when overweight packs are to be judged as proper weight. When Over Weight Accept is enabled, overweight items are included in the totals for allowable packs. Over Weight Accept is set as shown below. -
Page 74: Preset Tare
5 NORMAL OPERATIONS & FUNCTIONS DACS-H OPERATION MANUAL 5.6.1.10 Preset Tare This item is used to check net weight of product by tare (weight of the container, package etc.) subtraction. This item will not be displayed on the Preset Menu if the Tare Subtraction item is set to OFF in the System Configuration Menu of the Installation Engineer level. - Page 75 DACS-H OPERATION MANUAL 5 NORMAL OPERATIONS & FUNCTIONS 4. Place product on the weigh conveyor. 5. Press [ENTER] key Press [EXIT] key to stop the Dynamic Calibration. Figure 5-54 Dynamic Calibration Standby Menu The Dynamic Calibration Menu (1) appears. When static weighing calculation is completed, the Dynamic Calibration Menu (2) appears.
-
Page 76: Statistics And Print Setting
5 NORMAL OPERATIONS & FUNCTIONS DACS-H OPERATION MANUAL • If the weight is outside a range of ±10% tolerance from the reference weight in static weight calculation as well as dynamic calibration, the display to the right will appear and dynamic calibration will be stopped. -
Page 77: Total Items
DACS-H OPERATION MANUAL 5 NORMAL OPERATIONS & FUNCTIONS 5.6.2.1 Total Items This item is used to set which items need statistical data output. Follow the procedure shown below to operate Total Items. 1. Display the Preset Menu. 2. Press [ENTER] key to scroll the cursor to "Statistics &... -
Page 78: Auto Printout
5 NORMAL OPERATIONS & FUNCTIONS DACS-H OPERATION MANUAL Clear All Lots Totals 8:00 Operation Start 8:00 Time: (For Batch Column Auto Printout of Batch Analysis) 8:00~9:00 Batch Analysis 9:00 Run Preset #3 Batch Column Auto Printout 9:00~10:00 Batch Analysis 10:00 Auto Printout Batch Column Operation Stop Time:... -
Page 79: Batch Analysis
DACS-H OPERATION MANUAL 5 NORMAL OPERATIONS & FUNCTIONS 1. Display the Statistics & Print Setting Menu. 2. Press [ENTER] key to scroll the cursor to Auto Printout. 3. Press [SELECT ITEM] key Figure 5-65 The Statistics & Print Setting Menu The Auto Printout Menu appears. -
Page 80: Batch: Total Time
5 NORMAL OPERATIONS & FUNCTIONS DACS-H OPERATION MANUAL 1. Display the Statistics & Print Setting Menu. 2. Press [ENTER] key to scroll the cursor to "Batch Column Auto Printout". 3. Press [SELECT ITEM] key Figure 5-69 Statistics & Print Setting Menu The Batch Column Auto Printout Menu appears. -
Page 81: Auto Lots Total Time
DACS-H OPERATION MANUAL 5 NORMAL OPERATIONS & FUNCTIONS 5.6.2.7 Auto Lots Total Time This item is only in effect when the optional printer is installed. When this item is set, all lot totals are automatically printed out at the scheduled time. When printing is completed, Clear All Totals is performed. -
Page 82: Log Setting
5 NORMAL OPERATIONS & FUNCTIONS DACS-H OPERATION MANUAL 5.6.2.8 Log Setting Log Setting sets whether the log data for various operations of checkweigher is recorded or not. Follow the procedure below for the setting. 1. Display the Statistics & Print Setting Menu. 2. -
Page 83: Log File Out
DACS-H OPERATION MANUAL 5 NORMAL OPERATIONS & FUNCTIONS Log Data Full: when the number of stored log data reaches to 300; i.e., when the 300th data is recorded. Operation Start: when the conveyor starts by pressing [ENTER] key key in the Operation Confirm Menu. - Page 84 5 NORMAL OPERATIONS & FUNCTIONS DACS-H OPERATION MANUAL 1. Perform zero adjustment. (Refer to "5.5.1 Zero Adjustment".) 2. Remove the wind cover. 3. Place a span weight on the center of the weigh conveyor. Figure 5-82 Weigh Conveyor 4. Display the Level 1 Setup Menu. 5.
-
Page 85: Operation Confirm
DACS-H OPERATION MANUAL 5 NORMAL OPERATIONS & FUNCTIONS 5.6.4 Operation Confirm Operation confirm is used to check if such functions as metal detection, weight judgment, or reject are correctly operated, by conveying a sample product. The reject status and the weight for the convey result are displayed, where the reject device can be driven depending on the reject result (excluded from the count). - Page 86 5 NORMAL OPERATIONS & FUNCTIONS DACS-H OPERATION MANUAL 5-40...
-
Page 87: Production
6 PRODUCTION Summary ........6-1 Emergency Stop & Restart....6-2 Outline of Production Sequence . - Page 88 <MEMO>...
- Page 89 DACS-H OPERATION MANUAL 6 PRODUCTION 6 PRODUCTION 6.1 Summary This chapter provides an emergency stop procedures, outline of operations, pre-operation preparation, operation and the end production sequence.
-
Page 90: Emergency Stop & Restart
6 PRODUCTION DACS-H OPERATION MANUAL 6.2 Emergency Stop & Restart Emergency Stop and restart procedures are described below. • Do not power off the checkweigher during production except when emergency stop is required. <Emergency Stop> 1. Turn off the main power switch. The weigher will stop production. -
Page 91: Outline Of Production Sequence
DACS-H OPERATION MANUAL 6 PRODUCTION 6.3 Outline of Production Sequence An outline of production operation is shown below. Refer to "6.4 Pre-Production Procedure" for details of pre-production procedures. Pre-startup Inspection [Refer to "9.2.1 Pre-Startup Inspection"] Pre-production [Refer to "6.4 Pre-Production Procedure"] If preset has been set beforehand For new preset Preset No. -
Page 92: Pre-Production Procedure
6 PRODUCTION DACS-H OPERATION MANUAL 6.4 Pre-Production Procedure Before starting production, perform the following procedure. Weighing operations can begin when this procedure is completed. • Before performing the pre-production. Check the checklist described in "9.2.1 Pre-Startup Inspection". • Power should be turned on 30 minutes prior to production start to stabilize the weighing mechanism circuitry. -
Page 93: Checkweigher Production
DACS-H OPERATION MANUAL 6 PRODUCTION 6.5 Checkweigher Production 6.5.1 Preset For a new product, set the weighing parameter of the product. (Refer to "5.6.1 Preset Setting".) When a preset number is registered for the product, follow the procedure shown below to select preset 1. -
Page 94: Production Start And Stop
6 PRODUCTION DACS-H OPERATION MANUAL 6.5.2 Production Start and Stop • During operation or immediately after stop of the equipment, do not touch the moving parts. The oil seal to protect the bearing is very hot due to frictional heat. Note that, however temperature rise of the oil seal is not abnormal. - Page 95 DACS-H OPERATION MANUAL 6 PRODUCTION <When Weight Is Incorrectly Displayed> When an incorrect weight is displayed when production starts, proceed as follows. STOP KEY 1. Press [STOP] key START KEY The START lamp goes out. Production stops. 2. Remove the product from the weigh conveyor. 3.
-
Page 96: End Production
6 PRODUCTION DACS-H OPERATION MANUAL 6.6 End Production When weighing operations are complete for the day, end production by the following procedure. 1. Turn off the main power switch. The RCU display goes blank. MAIN POWER SWITCH Figure 6-11 Main Power Switch (Front View of Equipment) - Page 97 7 CLEANUP PROCEDURES Summary ........7-1 Before Washing and Sterilizing ....7-3 Methods of Washing and Sterilizing .
- Page 98 <MEMO>...
-
Page 99: Cleanup Procedures
DACS-H OPERATION MANUAL 7 CLEANUP PROCEDURES 7 CLEANUP PROCEDURES 7.1 Summary This chapter describes procedures for cleaning weigher components. An appropriate cleaning method should be adopted according to contamination level. When the operation screen of the remote control unit is stained, lightly wipe with a soft cloth containing neutral detergent. - Page 100 7 CLEANUP PROCEDURES DACS-H OPERATION MANUAL Waterproof Performance and Precautions for Cleaning This machine is designed to satisfy the waterproof test standard equivalent to IP-66 (JIS C0920). IP66 is characterized by: 1. Equipment must be of dustproof structure for human body and solid debris. 2.
-
Page 101: Before Washing And Sterilizing
DACS-H OPERATION MANUAL 7 CLEANUP PROCEDURES 7.2 Before Washing and Sterilizing The equipment allows only the components contacting products to be removed for washing or sterilizing. This checkweigher has removable and unremovable units or components. To clean and sterilize the removal components, be sure to dismount them from the equipment. -
Page 102: Methods Of Washing And Sterilizing
• The washing and sterilizing methods should vary depending on product characteristics, process of production, or status of microorganism development. For more information, consult the distributor where the weigher was purchased or your Ishida customer service representative. • After washing or sterilizing, drain water from the units and components and dry them completely. - Page 103 DACS-H OPERATION MANUAL 7 CLEANUP PROCEDURES Table 7-2 Washing and Sterilizing Methods Units or component Washing method Sterilizing method <Removable Units> CR specification <Washing by Brushing or Wiping> <Sterilizing by spraying or wiping> (IP66) •Infeed Conveyor Unit 1.Brushing 1.Spraying Brush the surface of the unit or Spray bactericide on the unit or •Weigh Conveyor Unit component with a brush moistened...
- Page 104 7 CLEANUP PROCEDURES DACS-H OPERATION MANUAL Table 7-2 Washing and Sterilizing Methods (Continued) Units or component Washing method Sterilizing method <Unremovable Units> CR specification <Washing by Brushing or Wiping> <Sterilizing by spraying or wiping> (IP66) •Remote Control Unit 1.Brushing 1.Spraying Brush the surface of the unit or Spray bactericide on the unit or •Printer Unit (Option)
-
Page 105: Key Points For Cleaning
DACS-H OPERATION MANUAL 7 CLEANUP PROCEDURES 7.4 Key Points for Cleaning The following parts are likely to be contaminated. Clean them with most cautiousness according to "Table 7-2 Washing and Sterilizing Methods". (1) Conveyor CONVEYOR (2) Belt BELT (3) Arm type rejector (Arm) -
Page 106: Washing And Sterilizing Procedures For Each Unit And Component
7 CLEANUP PROCEDURES DACS-H OPERATION MANUAL 7.5 Washing and Sterilizing Procedures for Each Unit and Component 7.5.1 Infeed and Weigh Conveyor Unit The conveyor is mounted by the spring force. When mounting or removing the conveyor, take extreme caution to the following: •... - Page 107 DACS-H OPERATION MANUAL 7 CLEANUP PROCEDURES 1. Lift the part of the weigh or infeed conveyor and take off the shaft from the hook. 2. Then, Lift the discharged side of the weigh or infeed conveyor and take off the shaft from the CONVEYOR hook, too.
-
Page 108: Wind Cover
7 CLEANUP PROCEDURES DACS-H OPERATION MANUAL 7.5.2 Wind Cover • When cleaning the wind cover, do not drop or apply excessive pressure. Doing so may damage the wind cover. 1. Raise and remove the wind cover. 2. Wash, sterilize and dry the unit according to WIND COVER the specification. -
Page 109: Removing Of Rejector Device Arm
DACS-H OPERATION MANUAL 7 CLEANUP PROCEDURES 7.5.3 Removing of Rejector Device Arm Follow the below procedures for washing and sterilizing. 1. Release the binding inside the rejector device arm. NOTCH 2. Pull the arm strongly toward you and remove it from the rejector conveyor main unit. -
Page 110: Remote Control Unit & Printer Unit (Option)
7 CLEANUP PROCEDURES DACS-H OPERATION MANUAL 7.5.4 Remote Control Unit & Printer Unit (Option) • Do not clean the operation panel of the remote control unit by rubbing it strongly or using adhesive tape. • Do not clean the operation panel of the remote control unit with thinner, benzene, or other organic solvents. -
Page 111: Main Unit, Foot Unit, Drive Unit, Bumper And The Other Units
DACS-H OPERATION MANUAL 7 CLEANUP PROCEDURES 7.5.5 Main Unit, Foot Unit, Drive Unit, Bumper and the Other Units • The weigh/drive unit is connected to the weigh sensor. Do not apply excessive load to them. 1. Dry the each unit after washing and sterilizing. (Follow "Table 7-6 Washing &... - Page 112 7 CLEANUP PROCEDURES DACS-H OPERATION MANUAL 7-14...
-
Page 113: Additional Functions
8 ADDITIONAL FUNCTIONS Summary ........8-1 Installation Engineer Level Functional ..8-2 Changing to the Installation Engineer Level . - Page 114 8.4.5.2 Time Setting ......8-29 8.4.6 Password Setting......8-30 8.4.6.1 Site Engineer Level (Level 1) Password Setting 8-30 8.4.6.2...
- Page 115 DACS-H OPERATION MANUAL 8 ADDITIONAL FUNCTIONS 8 ADDITIONAL FUNCTIONS 8.1 Summary This chapter describes the Installation Engineer Level procedures not normally used during daily production. This procedure is used mainly by Ishida Service representatives to calibrate the checkweigher.
-
Page 116: Installation Engineer Level Functional
8 ADDITIONAL FUNCTIONS DACS-H OPERATION MANUAL 8.2 Installation Engineer Level Functional In addition to the functions included in the Operator and Site Engineer levels, the Installation Engineer levels includes the following items. • *1 These functions are available when a metal detector is connected. •... - Page 117 DACS-H OPERATION MANUAL 8 ADDITIONAL FUNCTIONS Figure 8-1 Installation Engineer Level Functional Configuration (1)
- Page 118 8 ADDITIONAL FUNCTIONS DACS-H OPERATION MANUAL Level 1&2 Passwords Setting Figure 8-2 Installation Engineer Level Functional Configuration (2)
- Page 119 DACS-H OPERATION MANUAL 8 ADDITIONAL FUNCTIONS Table 8-1 Installation Engineer Level Additional Functions Display Function Statistics and Setting Span Adjustment Prints span adjustment records (for equipment with printers) Print Print Refer to "8.4.1.1 Span Adjustment Print". Reject Setting Proper Wt. Rej. Dir. Sets the reject direction for proper weight items.
- Page 120 8 ADDITIONAL FUNCTIONS DACS-H OPERATION MANUAL Table 8-1 Installation Engineer Level Additional Functions (Continued) Display Function Reject Setting Double Item Signal Sets signal to be output each time a double item error occurs. Refer to "8.4.2.16 Double Item Output Signal". Output Signal 1 ON Time Defines length of time Output Signal 1 is output.
- Page 121 DACS-H OPERATION MANUAL 8 ADDITIONAL FUNCTIONS Table 8-1 Installation Engineer Level Additional Functions (Continued) Display Function System Dynamic Calibration Set to ON when Dynamic Calibration is used. Configuration Refer to "8.4.3.6 Dynamic Calibration". Preset Number Memorize Defines whether the Preset No. is to be memorized. Refer to "8.4.3.7 Preset Number Memorize".
-
Page 122: Changing To The Installation Engineer Level
8 ADDITIONAL FUNCTIONS DACS-H OPERATION MANUAL 8.3 Changing to the Installation Engineer Level A password is required to access the Installation Engineer Level from the Operator or Site Engineer Levels. To enter this level follow the procedure shown below. 1. In the Production Standby Menu, press [SET UP] key The Setup Menu appears. -
Page 123: Installation Engineer Level Functions
DACS-H OPERATION MANUAL 8 ADDITIONAL FUNCTIONS 8.4 Installation Engineer Level Functions This section contains instructions for operating the Installation Engineer Level (Level 2) functions. 8.4.1 Statistics & Print setting In the Installation Engineer Level, "Span Adjustment Print" function is added to the Statistics & Print Setting Menu. -
Page 124: Proper Weight Reject Direction
8 ADDITIONAL FUNCTIONS DACS-H OPERATION MANUAL 8.4.2.1 Proper Weight Reject Direction This item defines which direction proper packs are diverted. Follow this procedure to set parameter. 1. Display the Level 2 Setup Menu. 2. Press [ENTER] key to scroll the cursor to "Reject Setting". -
Page 125: Under Weight Reject
DACS-H OPERATION MANUAL 8 ADDITIONAL FUNCTIONS 4. To set "Left" as the reject direction, Press [0]. To set "Center" as the reject direction, Press [1]. To set "Right" as the reject direction, Press [2]. To set "Stop" as the reject direction, Press [3]. The setting for this parameter will appear on Figure 8-13 Over Wt. -
Page 126: Metal Detect Reject Direction
8 ADDITIONAL FUNCTIONS DACS-H OPERATION MANUAL 8.4.2.4 Metal Detect Reject Direction This item defines which direction packs with metal detected in them are diverted. Follow this procedure to set parameter. 1. Display the Reject Setting Menu. 2. Press [ENTER] key to scroll the cursor to "Metal Detect Rej. -
Page 127: External 2 Reject Direction
DACS-H OPERATION MANUAL 8 ADDITIONAL FUNCTIONS 8.4.2.6 External 2 Reject Direction This item defines which direction packs are diverted when there is external signal input from External unit 1. When external input signals are not used, this item is left unset. Follow this procedure to set parameter. -
Page 128: Double Item Reject Direction
8 ADDITIONAL FUNCTIONS DACS-H OPERATION MANUAL 8.4.2.8 Double Item Reject Direction This item defines which direction packs are diverted when double item error occurs. Follow this procedure to set parameter. 1. Display the Reject Setting Menu. 2. Press [ENTER] key to scroll the cursor to "Ext.2 Rej. -
Page 129: Over Weight Output Signal
DACS-H OPERATION MANUAL 8 ADDITIONAL FUNCTIONS 4. Set the output signal with numeric keys. An asterisk (*) will appear below the set item. 5. If this item is reset, the asterisk will disappear. (Setting cleared) Figure 8-27 Roper Weight Signal Menu 6. -
Page 130: Metal Detection Output Signal
8 ADDITIONAL FUNCTIONS DACS-H OPERATION MANUAL 1. Display the Reject Setting Menu. 2. Press [ENTER] key to scroll the cursor to "Under Weight Signal". 3. Press [SELECT ITEM] key Figure 8-30 Reject Setting Menu The Under Weight Signal Menu appears. 4. -
Page 131: External 1 Output Signal
DACS-H OPERATION MANUAL 8 ADDITIONAL FUNCTIONS 8.4.2.13 External 1 Output Signal This item sets the signal to output when product is diverted to the predetermined direction by the external input signal 1. This setting is required only when the external input signal 1 is used. Follow this procedure to set the signal parameter. -
Page 132: Zero Error Output Signal
8 ADDITIONAL FUNCTIONS DACS-H OPERATION MANUAL 4. Set the output signal with numeric keys. An asterisk (*) will appear below the set item. 5. If this item is reset, the asterisk will disappear. (Setting cleared) Figure 8-37 Ext.2 Output Signal Menu 6. -
Page 133: Double Item Output Signal
DACS-H OPERATION MANUAL 8 ADDITIONAL FUNCTIONS 8.4.2.16 Double Item Output Signal This item sets the signal to output when an item is rejected due to double item error occurrence. Follow this procedure to set the signal parameter. 1. Display the Reject Setting Menu. 2. -
Page 134: Output Signal 2 On Time
8 ADDITIONAL FUNCTIONS DACS-H OPERATION MANUAL 8.4.2.18 Output Signal 2 ON Time This item defines the length of time Output Signal 2 is output. The setting range is 0 to 29999ms. If 30000ms is set, signal will be output continuously. Follow this procedure to set the parameter. -
Page 135: Reject Buzzer On Time
DACS-H OPERATION MANUAL 8 ADDITIONAL FUNCTIONS 8.4.2.21 Reject Buzzer ON Time This item defines the length of time the reject buzzer sounds. The setting range is 0 to 29999ms. If 30000ms is set, buzzer will sound continuously. Follow this procedure to set the parameter. 1. -
Page 136: Continuous N/G Output Signal
8 ADDITIONAL FUNCTIONS DACS-H OPERATION MANUAL 8.4.2.23 Continuous N/G Output Signal This item sets whether to automatically send or not send output signals when a predetermined number of rejected items (underweight, overweight, metal detected) have occurred in succession. The number of rejected items is set in the preset Menu of Continuous N/G Count. -
Page 137: System Configuration Setting
DACS-H OPERATION MANUAL 8 ADDITIONAL FUNCTIONS 8.4.3 System Configuration Setting This Menu specifies the system-related configurations such as option unit presence and type of rejector in use. (Refer to "Table 8-1 Installation Engineer Level Additional Functions".) 8.4.3.1 Weight Display This item sets weight display during production. Set this parameter as described below. -
Page 138: Metal Detection
8 ADDITIONAL FUNCTIONS DACS-H OPERATION MANUAL 8.4.3.2 Metal Detection This item sets whether an independent, integrated,or no metal detector is connected. Follow the procedure shown below to operate Medal Detection. 1. Display the System Configuration Menu. 2. Press [ENTER] key to scroll the cursor to "Metal Detection". -
Page 139: Reject Device
DACS-H OPERATION MANUAL 8 ADDITIONAL FUNCTIONS 8.4.3.4 Reject Device When a rejector is operated with the checkweigher, this item is used to set the type of device to be used. When no rejector is to operate, this parameter is set to Air. Setting is performed as described below. -
Page 140: Dynamic Calibration
8 ADDITIONAL FUNCTIONS DACS-H OPERATION MANUAL 8.4.3.6 Dynamic Calibration This parameter is set to ON when Dynamic Calibration is to be used. Setting is performed as described below. 1. Display the System Configuration Menu. 2. Press [ENTER] key to scroll the cursor to "Dynamic Calibration". -
Page 141: Gap Control
DACS-H OPERATION MANUAL 8 ADDITIONAL FUNCTIONS 8.4.3.8 Gap Control This parameter is set to ON to activate the Gap Control function. Setting is performed as described below. 1. Display the System Configuration Menu. 2. Press [ENTER] key to scroll the cursor to "Gap Control". -
Page 142: Date And Time Setting
8 ADDITIONAL FUNCTIONS DACS-H OPERATION MANUAL 5. Enter the destination preset number with numeric keys. The Preset Copy in Progress Menu appears. Figure 8-70 Preset Copy Confirmation Menu The preset copy is complete and the Setup Menu returns. Figure 8-71 Preset Copy in Progress Menu 8.4.5 Date and Time Setting This item is used to set current date and time. -
Page 143: Time Setting
DACS-H OPERATION MANUAL 8 ADDITIONAL FUNCTIONS 8.4.5.2 Time Setting Set this parameter as described below. 1. Display the Level 2 Setup Menu. 2. Press [ENTER] key to scroll the cursor to "Date/Time Setting". Figure 8-75 Setup Menu (Level 2) 3. Press [SELECT ITEM] key The Date/Time Setting Menu appears. -
Page 144: Password Setting
8 ADDITIONAL FUNCTIONS DACS-H OPERATION MANUAL 8.4.6 Password Setting The passwords to access Levels 1 and 2 are set via this item. The default setting at time of shipment is [1] for Level 1, and [2] for Level 2. • Be sure to administer assignment of passwords so that personnel can access only the levels required for their duties. -
Page 145: Installation Engineer Level (Level 2) Password Setting
DACS-H OPERATION MANUAL 8 ADDITIONAL FUNCTIONS 5. Enter the new password (Up to 12 characters) with numeric keys. The new password is registered and the Level 1&2 Passwords Setting Menu returns. Figure 8-80 Level 1 Password Setting Menu 6. Press [EXIT] key The Setup Menu appears. - Page 146 8 ADDITIONAL FUNCTIONS DACS-H OPERATION MANUAL 8-32...
- Page 147 9 PERIODIC MAINTENANCE Summary ........9-1 Daily Inspection......9-2 9.2.1 Pre-Startup Inspection .
- Page 148 <MEMO>...
-
Page 149: Periodic Maintenance
DACS-H OPERATION MANUAL 9 PERIODIC MAINTENANCE 9 PERIODIC MAINTENANCE 9.1 Summary This chapter explains the maintenance and inspection procedures required to maintain the checkweigher in optimum operating condition. • Before cleaning the equipment, always turn OFF the power switch, lock the power switch with a key and the worker should keep that key with him. -
Page 150: Daily Inspection
9 PERIODIC MAINTENANCE DACS-H OPERATION MANUAL 9.2 Daily Inspection 9.2.1 Pre-Startup Inspection Before starting production, perform the inspection procedure described below. Table 9-1 Pre-startup Inspection Checklist Inspection Item Inspection Points Countermeasures •Check that no tools or fixtures unnecessary for production •Remove any unnecessary Equipment and area around equipment... - Page 151 DACS-H OPERATION MANUAL 9 PERIODIC MAINTENANCE 2. Press[ZERO] key ZERO KEY Verify that the indication value is 0.0 [g]. (in case of Model DACS-H-012) Figure 9-2 Operation Panel Figure 9-3 Production Standby Menu 3. Place the span adjusting weight on the weigh conveyor.
-
Page 152: Photoelectric Sensor
9 PERIODIC MAINTENANCE DACS-H OPERATION MANUAL 4. Place the product on the weigh conveyor. WEIGH CONVEYOR Verify that the product has a correct weight. PRODUCT Figure 9-6 Weigh Conveyor 5. Operate the equipment. (Refer to "6 PRODUCTION".) Verify that the belt runs smoothly without meandering. -
Page 153: Inspection During Production
Inspection Item Inspection Points Measure Belt condition Check that there is no damage, deterioration, meandering in Consult an Ishida Service the weigh and infeed conveyor belts. Representative to change the conveyor belt, the weigh and infeed conveyor belts. Refer to "9.5.2 Tension and Meandering (Snaking) Adjustments of Infeed &... -
Page 154: Periodic Replacement Parts
9 PERIODIC MAINTENANCE DACS-H OPERATION MANUAL 9.4 Periodic Replacement Parts The periodic replacement parts are shown in "Table 9-4 Periodic Replacement Parts List". These parts are consumables. After a certain period, their performance rapidly decreases and the probability of breakage increases. Periodically inspect and immediately replace them if any problem is found. The periodic exchange period varies depending on the working condition. -
Page 155: Maintenance And Inspection Procedures
DACS-H OPERATION MANUAL 9 PERIODIC MAINTENANCE 9.5 Maintenance and Inspection Procedures • Before cleaning the equipment, always turn OFF the power switch, lock the power switch with a key and the worker should keep that key with him. Otherwise, other workers may operate the equipment resulting in injury. 9.5.1 Printer Paper Replacement When the printer paper is depleted, the message appears on the RCU display indicating "Printer no paper". - Page 156 9 PERIODIC MAINTENANCE DACS-H OPERATION MANUAL 2. Lift the lever. The printer head shifts to the raised position. LEVER CLIPS 3. Press open the roll holder clips and remove the empty roll core. 4. Load a new roll, making sure that it is properly inserted as shown to the right.
-
Page 157: Tension And Meandering (Snaking) Adjustments Of Infeed & Weigh Conveyors
DACS-H OPERATION MANUAL 9 PERIODIC MAINTENANCE 9. Press the lever down. The printer head returns to the lowered LEVER position. Figure 9-11 Printer Internal View 10. Close the printer cover. BINDING 11. Fix the binding. 12. Advance the paper. Refer to "5.5.5.2 Printer". Printer paper replacement is complete. - Page 158 9 PERIODIC MAINTENANCE DACS-H OPERATION MANUAL 1. To adjust the weigh conveyor, remove the wind cover. LOCK NUT 2. Adjust the length of spring to 36mm with the tension adjustment bolt. HEXAGONAL WRENCH TENSION ADJUSTMENT 36 mm BOLT Figure 9-13 Conveyor Plan View START KEY 3.
-
Page 159: Fuse Replacement
DACS-H OPERATION MANUAL 9 PERIODIC MAINTENANCE 9.5.3 Fuse Replacement The fuses used in this equipment are as follows. When a fuse blows, replace it with a correct type of fuse. φ5 × 20 250V 3.15A Replace fuses according to the procedure shown below. •... - Page 160 9 PERIODIC MAINTENANCE DACS-H OPERATION MANUAL 2. Rotate the fuse holder to the left, then remove the blown fuse. 3. Attach a new fuse. (LED lights.) 4. Reattach the fuse holder. FUSE 5. Attach the cover. HOLDER The fuse replacement procedure is complete. Figure 9-17 Equipment Internal View 9-12...
-
Page 161: Replacement Of Roller Timing Belt
DACS-H OPERATION MANUAL 9 PERIODIC MAINTENANCE 9.5.4 Replacement of Roller Timing Belt Replace the roller timing belt in the following procedure: <Objects to be prepared> Timing belt Tool kit When the belt cover is removed, it is recommended to replace the gasket. 1. -
Page 162: Replacement Of Roller Bearing (And Oil Seal)
9 PERIODIC MAINTENANCE DACS-H OPERATION MANUAL 9.5.5 Replacement of Roller Bearing (and Oil Seal) Replace the roller bearing (and oil seal) in the following procedure: <Objects to be prepared> Bearing (×2) Oil seal (×1) Grease Tool kit Round bar Vice •... - Page 163 DACS-H OPERATION MANUAL 9 PERIODIC MAINTENANCE 3. Remove the oil seal from inside the bracket. Figure 9-21 Removing the Oil Seal 4. Fix the bracket as shown in the figure and drive out the bearing with a plastic hammer and a round bar.
-
Page 164: Replacement Of Driven Roller Bearing (And Oil Seal) For Conveyor
9 PERIODIC MAINTENANCE DACS-H OPERATION MANUAL BEARING BEARING COUPLING OIL SEAL PULLY TOLERANCE WAVE WASHER RING TIMING BELT <BRACKET CONVEYOR> Figure 9-24 Roller Mounting 9.5.6 Replacement of Driven Roller Bearing (and Oil Seal) for Conveyor For replacement of driven roller bearing (and oil seal) for conveyor, follow the procedures below: <Objects to be prepared>... - Page 165 DACS-H OPERATION MANUAL 9 PERIODIC MAINTENANCE 1. Remove the springs fixing the driven roller at both ends. 2. Loosen the set screw with a hexagon wrench (turn clockwise) to release the spring force. SPRING • When mounting the driven roller, adjust to tighten the set screw so that the spring length should be 36mm.
-
Page 166: Replacement Of Belt-Side Bearing (And Oil Seal) For Conveyor Driven Roller
9 PERIODIC MAINTENANCE DACS-H OPERATION MANUAL 9.5.7 Replacement of Belt-side Bearing (and Oil Seal) for Conveyor Driven Roller For replacement of belt-side bearing (and oil seal) for conveyor driven roller, follow the procedures below: <Objects to be prepared> Bearing (×1) Oil seal (×2) Tool kit Round bar... - Page 167 DACS-H OPERATION MANUAL 9 PERIODIC MAINTENANCE 3. Insert a screwdriver into the shaft hole to take 2 oil seals out of the bearing. 4. Drive out the bearing with a round bar. 5. Mount the bearing and oil seal in the reverse order of the above procedure.
-
Page 168: Replacement Of Counter-Belt Side Bearing (And Oil Seal) For Conveyor Driven Roller
9 PERIODIC MAINTENANCE DACS-H OPERATION MANUAL 9.5.8 Replacement of Counter-belt Side Bearing (and Oil Seal) for Conveyor Driven Roller For replacement of counter-belt side bearing (and oil seal) for conveyor driven roller, follow the procedures below: <Objects to be prepared> Bearing (×1) Oil seal (×2) Tool kit... -
Page 169: Replacing Battery For Memory Backup
The end of battery life might be shorter than five years. • Contact your nearest Ishida representative or the Ishida Service Center for replacing battery for memory backup. <Memory Backup Battery Voltage Check Function>... - Page 170 Battery voltage is low due to inactivity over an extended period of time. •In this case, recharge the battery for over 8 hours. End of the battery life has been reached. •Contact your nearest Ishida representative or the Ishida Service Center for replacing battery for memory backup. To determine the cause, either , for display of the "Low Battery"...
-
Page 171: Troubleshooting
10 TROUBLESHOOTING 10.1 Summary ....... . . 10-1 10.2 Error Message Handling..... 10-2 10.3 Equipment Malfunction . - Page 172 <MEMO>...
- Page 173 DACS-H OPERATION MANUAL 10 TROUBLESHOOTING 10 TROUBLESHOOTING 10.1 Summary This chapter describes how to determine the causes of equipment malfunction and to restore proper function. If the suggested measures in this chapter cannot find the causes of abnormality/fault or solution or the equipment does not restore proper conditions, contact the distributor from which you purchased or our Customer Service Window.
-
Page 174: Error Message Handling
10 TROUBLESHOOTING DACS-H OPERATION MANUAL 10.2 Error Message Handling When an error occurs, the message will appear on the display screen of the RCU. If the message is displayed, follow this procedure. 1. Press [EXIT] key 2. Take corrective actions, referring to "Table 10-1 Error Displays". 3. - Page 175 DACS-H OPERATION MANUAL 10 TROUBLESHOOTING Table 10-1 Error Displays (Continued) Error Message Causes Countermeasures Left Rejector Error Product or other object is caught Check the rejector and remove any against the left rejector arm. obstructions. [Occurs when the left rejector Rejector setting is incorrect.
-
Page 176: Equipment Malfunction
Status Probable Causes Countermeasures When the power switch is turned on, Defective board in RCU or wiring Contact an Ishida Service representative. no initial display appears. disconnection. The initial display appears, but no Defective board in the body or wiring other displays can be called up. -
Page 177: Corrective Action When Weight Check Is Inoperative
DACS-H OPERATION MANUAL 10 TROUBLESHOOTING 10.4 Corrective Action when Weight Check is Inoperative When zero adjustment or span adjustment cannot be made due to failure of load cell or weighing mechanism, the belt conveyor can be driven in the following procedure. (No weight check is available.) •... - Page 178 10 TROUBLESHOOTING DACS-H OPERATION MANUAL 2. Remove the cover at the rear of the equipment. COVER Figure 10-2 Removing the Cover at the Rear of Equipment 3. Remove the connector connected to the motor driver. CONNECTOR Figure 10-3 Removing the Connector 4.
-
Page 179: Disposition For Reject Conveyor
DACS-H OPERATION MANUAL 10 TROUBLESHOOTING 6. Adjust the control switch for speed using a screwdriver. VOLUME 7. Mount the cover at the rear of the equipment. SCREW DRIVER Figure 10-5 Adjustment of Control Switch 10.4.2 Disposition for Reject Conveyor 1. Turn OFF the power of the body. MAIN POWER SWITCH Figure 10-6 Front View of Equipment... - Page 180 10 TROUBLESHOOTING DACS-H OPERATION MANUAL 3. Change over the switches of P-5515 as follows: SW1=FREE, SW2=SELF • At the same time as power ON, conveyor starts moving. 4. Turn ON the power of the equipment. Figure 10-8 Board 5. Adjust the speed with VR1 control switch. 6.
-
Page 181: Belt Speed Calculation
DACS-H OPERATION MANUAL 10 TROUBLESHOOTING 10.5 Belt Speed Calculation 1. Put a mark on the conveyor and measure the time required for optionally set revolutions using a stop watch. 2. Calculate the belt speed using the following formula: Belt speed: (Revolutions×Belt length [mm]÷Time [minute])×60÷1000 [m/min.] Belt length: Conveyor length×2... - Page 182 10 TROUBLESHOOTING DACS-H OPERATION MANUAL 10-10...
- Page 183 DACS-H OPERATION MANUAL INDEX INDEX Date Setting 8-28 Decimal point key 4-3 Access Level Change 5-12 Display Panel 2-4 ADDITIONAL FUNCTIONS 8-1 Disposition for Reject Conveyor 10-7 Air Supply 3-3 Double Item Error 10-3 Auto Lots Total Time 5-35 Double Item Output Signal 8-19 Auto Printout 5-32 Double Item Reject Direction 8-14 Drive Power Shutdown and Indication 1-8...
- Page 184 INDEX DACS-H OPERATION MANUAL Installation Engineer Level Functions 8-9 Operator Level 5-3 Installation Procedure 3-4 Operator Level Functions 5-15 INTRODUCTION 2-1 Outline of Production Sequence 6-3 Output Signal 1 ON Time 8-19 Output Signal 2 ON Time 8-20 Output Signal 3 ON Time 8-20 Output Signal 4 ON Time 8-20 key 4-3 OVER LAMP 4-3...
- Page 185 DACS-H OPERATION MANUAL INDEX Proper Weight Reject Direction 8-10 Total Items 5-31 TROUBLESHOOTING 10-1 Reference Weight 5-22 Reject Buzzer ON Time 8-21 Under (weight) 2-2 Reject Conveyor Error 10-3 UNDER LAMP 4-3 Reject Device 8-6, 8-25 Under Weight Output Signal 8-15 Rejector Device (option) 2-3 Under Weight Reject 8-11 Rejector Direction Setting 8-9...
- Page 186 INDEX DACS-H OPERATION MANUAL...
- Page 187 44 SANNO-CHO, SHOGOIN, SAKYO-KU, KYOTO, 606-8392 JAPAN PHONE: (075)771-4141 FACSIMILE: (075)751-1634 TELEX: 05422065 SCALES J...
Need help?
Do you have a question about the DACS-H Series and is the answer not in the manual?
Questions and answers