Hoover UH70015 Owner's Manual
Platinum series cyclonic bagless upright
Hide thumbs
Also See for UH70015:
- Brochure (4 pages) ,
- Owner's manual (47 pages) ,
- Owner's manual (33 pages)

Related Manuals for Hoover UH70015


Summary of Contents for Hoover UH70015
- Page 1 ™ CYCLONIC BAGLESS UPRIGHT OWNER’S MANUAL OPERATING AND SERVICING INSTRUCTIONS Please read these instructions carefully before using your vacuum.
-
Page 2: Table Of Contents
TABLE OF CONTENTS Sa fe ty In s tr ucti on s ......3 7. T ROU BLE SHO OTING G UIDE ..17 1. -
Page 3: Sa Fe Ty In S Tr Ucti On S
THIS CLEANER IS INTENDED FOR HOUSEHOLD USE. IMPORTANT SAFETY INSTRUCTIONS When using an electrical appliance, basic precautions should always be followed, including the following: • READ ALL INSTRUCTIONS BEFORE USING THIS APPLIANCE. • WARNING: THIS PRODUCT CONTAINS CHEMICALS KNOWN TO THE STATE OF CALIFORNIA TO CAUSE CANCER, BIRTH DEFECTS OR REPRODUCTIVE HARM. - Page 4 WARNING: To reduce the risk of electric shock, this appliance has a polarized plug (one blade is wider than the other). This plug will fit in a polarized outlet only one way. If the plug does not fit fully in the outlet, reverse the plug. If it still does not fit, contact a qualified electrician to install the proper outlet.
-
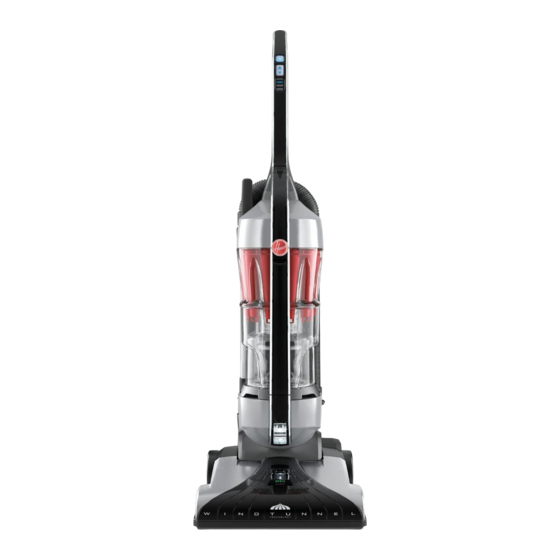
Page 5: Features
1. FEATURES Handle Grip Power Button Floor Selector Button Floor Selector Indicator Light Dirt Cup Release Button Stretch Hose Wand Handle Primary Filter Access Button (Filter located above dirt cup) Carrying Handle Dusting/Upholstery Tool Dirt Cup Crevice Tool Handle Release Pedal Headlight Embedded DirtFINDER™... -
Page 6: Carton Contents
2. CARTON CONTENTS Remove all parts from carton and identify each item shown. Make sure all parts are located before disposing of packing. Upper Handle Cleaner Body Bagged Screws (2) Dusting/Upholstery Tool Crevice Tool Turbine Hand Tool (Available on some models only) -
Page 7: Vacuum Controls
3. VACUUM CONTROLS Po we r Button Push to turn cleaner on and off. F lo or Se lector Push the floor selector button to raise and lower the nozzle to clean bare floors and various carpet pile heights. For maximum cleaning performance, the following In dica tor Li ght carpet height settings are recommended: FLOOR SELECTION... -
Page 8: How To Assemble
4. HOW TO ASSEMBLE Attach Ha ndl e Slide upper handle down into cleaner body. Insert the (2) screws provided into the handle where indicated in the figure. Tighten with screwdriver. Too l Stora ge A. Dusting/Upholstery Tool storage. B. Crevice Tool storage. C o rd Sto rag e Wrap the cord in a clockwise direction around the two cord hooks (C). -
Page 9: How To Operate
5. HOW TO OPERATE Carrying Handle H a n d l e R el ea s e H a n d l e Pos i ti ons Pe d a l The cleaner can be Step on handle release The handle of your cleaner has three positions; moved by using the pedal to lower handle. -
Page 10: Select Proper Tools
5. HOW TO OPERATE S ele ct Prope r Tool s A t tach To o ls Dusting/Upholstery Tool may be used on table Crevice Tool may be Turbine Hand Tool* Disconnect cleaner tops, books, lighting fixtures, and blinds. used in tight spaces, used from electrical outlet. -
Page 11: Stair Cleaning
5. HOW TO OPERATE S t a ir Cle an in g Use the wand and the Dusting/Upholstery Tool for stair cleaning. Clean from bottom to top. CAUTION: To avoid personal injury or unneces- sary wear to carpet, and to prevent the cleaner from falling, always place cleaner at bottom of stairs. -
Page 12: General Maintenance
6. GENERAL MAINTENANCE DIRT CUP W he n to E m pty Empty the dirt cup before the dirt reaches the fill line (A). Place the cleaner in the upright position before removing the dirt cup. How to Em pty Disconnect cleaner from electrical outlet. -
Page 13: Cleaning Filters
Allow filter to dry completely before replacing. May take up to 24 hours. Replace filter, tab side out. Replace dirt cup as described in Fig 6.4. W h a t to B uy When purchasing a new Primary filter, ask for HOOVER part No. 43615096. -
Page 14: Umbrella Filter
6. GENERAL MAINTENANCE CLEANING FILTERS 6.11 6.10 6.12 Umbrella Tube Wh e n to Cle an Check Umbrella tube on a monthly basis and clean when it is wrapped with debris. How to C lea n Disconnect cleaner from electrical outlet. Do not use cleaner without dirt cup or filters in place. -
Page 15: Hepa Filter
Replace filter and lid. Turn knob on top of lid to the locked position. Replace dirt cup as described in Fig 5.4. W h a t to B uy When purchasing a new HEPA filter cartridge, ask for HOOVER part No. 38765035. -
Page 16: Brushroll
What to Buy To assure cleaning effectiveness, use only Hoover ® Brushroll part #48414156. It is important that you use only genuine HOOVER ® parts to assure your cleaner operates at peak performance. To order bags please visit www.hoover.com. HOOVER products ®... -
Page 17: T Rou Ble Sho Oting G Uide
Dealer or visit our website at www.hoover.com. Costs of any transportation to and from any place of repair are to be paid by the owner. The service parts used in this unit are easily replaced and readily available from an authorized HOOVER ®... -
Page 18: Service
• call 1-800-944-9200 for an automated referral of authorized service outlet locations (U.S. only). Do not send your cleaner to Hoover, Inc., in Glenwillow for service, this will only result in delay. If further assistance is needed, contact the Exclusive Hoover Platinum Collection™... -
Page 19: Warranty
, owner’s acts or omissions, use outside the country in which the product was initially purchased and resales of the product by ® the original owner. This warranty does not cover pick up, delivery, transportation or house calls. However, if you mail your product to a Hoover ®... - Page 20 Español ™ A S P I R A D O R A V E R T I C A L S I N B O L S A CYCLONIC MANUAL DEL USUARIO INSTRUCCIONES DE FUNCIONAMIENTO Y MANTENIMIENTO Lea atentamente estas instrucciones antes de usar su aspiradora.
- Page 21 ÍNDICE I n strucci o ne s de s eg ur i d a d .... E3 7. GU ÍA D E S O L UC I ÓN DE PRO BLE MAS ......E17 1.
-
Page 22: I N Strucci O Ne S De S Eg Ur I D A D
ESTA ASPIRADORA PARA ALFOMBRAS ESTÁ DISEÑADA PARA USO DOMÉSTICO. INSTRUCCIONES DE SEGURIDAD IMPORTANTES GUARDE ESTAS INSTRUCCIONES Cuando use un aparato eléctrico, siempre siga las precauciones básicas, que incluyen las siguientes: • LEA TODAS LAS INSTRUCCIONES ANTES DE USAR ESTE APARATO. •... - Page 23 • No lo desenchufe tirando del cordón. Para desenchufarlo, • No haga funcionar la aspiradora descalzo ni cuando use sanda- sujete el enchufe, no el cordón. lias o calzado que dejen al descubierto los dedos de los pies. • Nunca manipule el enchufe ni el aparato con las manos húmedas. GUARDE ESTAS INSTRUCCIONES •...
-
Page 24: Funciones
1. FUNCIONES Empuñadura del mango Botón de encender/apagar Botón selector de superficies Luz indicadora Botón para soltar el depósito para polvo Manguera extensible Empuñadura del tubo Botón de acceso al filtro primario (El filtro se encuentra encima del contenedor para polvo) Asa de transporte Accesorio para polvo/tapizados Depósito para polvo... -
Page 25: Contenido De La Caja
2. CONTENIDO DE LA CAJA Retire todas las piezas de la caja e identifique cada artículo que se muestra. Asegúrese de ubicar todas las piezas antes de eliminar el embalaje. Parte superior del mango Cuerpo de la aspiradora Tornillo guardado en una bolsa (2) Accesorio para polvo/tapizados Accesorio para hendiduras Accesorio de mano turboaccionado... - Page 26 3. PANEL DE CONTROL B o t ó n d e e n ce nd i do Presiónelo para encender y apagar la aspiradora. Se lector d e s up e r fi c i e s Selector de Empuje el botón del selector de superficies para elevar y bajar la boquilla a fin de limpiar superficies suelos sin moqueta y moquetas de distintos...
-
Page 27: E Nsa Mb L A J E
4. ENSAMBLAJE DE LA ASPIRADORA C o loca ció n De l Ma n go Deslice la parte superior del mango hacia abajo en el cuerpo de la limpiadora. Introduzca los (2) tornillos provistos en el mango en el lugar indicado en la figura. Apriete con el destornillador. -
Page 28: Funcionamiento
5. FUNCIONAMIENTO Asa de transporte Ped a l p a ra Pos i c ion es d el man go s o l t a r e l m a n g o El mango de su aspiradora tiene tres posiciones: posible mover Pise el pedal para bajar... -
Page 29: Selección De Los Accesorios Apropiados
5. FUNCIONAMIENTO S ele cció n d e l os a c c e s o ri o s a p ro p ia d os Con exión de lo s a cce sori o s El accesorio para polvo/tapizados se usa en las El accesorio para hen- El accesorio de mano Desconecte la aspi-... -
Page 30: Limpieza De Escaleras
5. FUNCIONAMIENTO Li m p ieza de es ca l e r a s Use el tubo y el accesorio para polvo/tapizados para limpiar las escaleras. Limpie de abajo hacia arriba. PRECAUCIÓN: Para evitar lesiones personales o el desgaste innecesario de la moqueta, y evitar que la aspiradora se caiga, colóquela siempre al pie de la escalera. -
Page 31: Mantenimiento General
6. MANTENIMIENTO GENERAL DEPÓSITO PARA POLVO Cuándo va ciarlo Vacíe el contenedor para polvo antes de que la suciedad llegue a la línea de llenado (A). Coloque la aspiradora en posición vertical antes de retirar el contenedor para polvo. C ó mo va ciar l o Desconecte la aspiradora de la toma de cor- riente eléctrica. -
Page 32: Limpieza De Filtros
Vuelva a colocar el filtro, con el lado de la lengüeta hacia afuera. Vuelva a colocar el contenedor para polvo, como se describe en la Fig. 6.4 Q u é co mp rar Si compra un nuevo cartucho de Filtro primario, solicite la pieza n°43615096 de HOOVER . - Page 33 6. MANTENIMIENTO GENERAL LIMPIEZA DE FILTROS 6.11 6.10 6.12 Tubo sombrilla C u á n do limp ia r lo Verifique mensualmente el filtro del tubo y límpielo cuando esté cubierto de residuos. C ó mo limpi a rl o Desconecte la aspiradora de la toma de cor- riente eléctrica.
- Page 34 Vuelva a colocar el contenedor para polvo, como se describe en la Fig. 5.4 Q u é c o m p r a r Si compra un nuevo cartucho de filtro HEPA, solicite la pieza n° 38765035 de HOOVER .
-
Page 35: Rodillo De Cepillos
Vuelva a colocar la placa inferior y los tornillos. Q u é c o m p r a r Para asegurar una limpieza eficaz, utilice únicamente cepillo de rodillos de Hoover, núm. de pieza 48414156. Es importante que utilice únicamente piezas de Hoover ®... -
Page 36: Guía De Solución De Problemas
Lleve la aspiradora a un centro de servicio. Para encontrar el centro más cercano, visite nuestro sitio Web Necesita mantenimiento. en www.hoover.com o llame al 1-877-697-5866. De lunes a viernes de 8 a.m. a 5 p.m., hora del Este. CUALQUIER OTRO MANTENIMIENTO DEBE SER REALIZADO POR UN REPRESENTANTE DE MANTENIMIENTO AUTORIZADO. -
Page 37: Servicio
Para obtener el servicio aprobado HOOVER y piezas genuinas HOOVER ® ® localice el Centro de ventas y servicio de Hoover o el Concesionario autorizado de servicio de garantía de Hoover (depósito) más cercano: • Consultando la sección “Service” (Servicio) de Hoover ®... -
Page 38: Garantía
EE. UU. y en Canadá. CÓMO HACER UN RECLAMO EN VIRTUD DE LA GARANTÍA Si este producto no se ajusta a las condiciones garantizadas, lleve o envíe el producto a un Centro de ventas y de servicio de Hoover ®... - Page 39 ™ www.hoover.com ©2008 Healthy Gain Investments, Ltd. All rights reserved #56511C81-R1 12/08...
Need help?
Do you have a question about the UH70015 and is the answer not in the manual?
Questions and answers