
Related Manuals for Advantech M5800 Series


Summary of Contents for Advantech M5800 Series
- Page 1 All manuals and user guides at all-guides.com A-LNC Milling Machine Series Operation Manual Version: V01.00.003(4408230007) Leading Numerical Controller Advantech-LNC Technology Co., Ltd.
-
Page 2: Table Of Contents
Contents Table of Contents _Toc448762604 CNC operations ..................... 1 Type of operation device ........................1 1.1.1 M5800 series ..........................1 1.1.2 M6800 series ..........................8 Screen and function instructions......................13 Monitoring group (MONITOR) ......................15 1.3.1 Monitoring ..........................15 1.3.2... - Page 3 Network settings and connections ..................124 1.8.7 System update ........................127 1.8.8 System data backup - export ....................131 1.8.9 System data backup - import ....................135 1.8.10 Preview function ........................139 1.8.11 Editing and using manufacturer macros ................. 145 Advantech-LNC Technology Co., Ltd.
- Page 4 1.8.18 OnLine Help ......................... 174 1.8.19 Switching multiple paths ...................... 174 Control panel operations ................176 Operating panel ..........................176 2.1.1 M5800 series ........................176 2.1.2 M6800 series ........................176 LED signal light (LED SIGNAL) ......................177 Axis selection (AXIS SELECTION) ......................178 Mode selection (MODE SELECTION) ....................
- Page 5 All manuals and user guides at all-guides.com...
-
Page 6: Cnc Operations
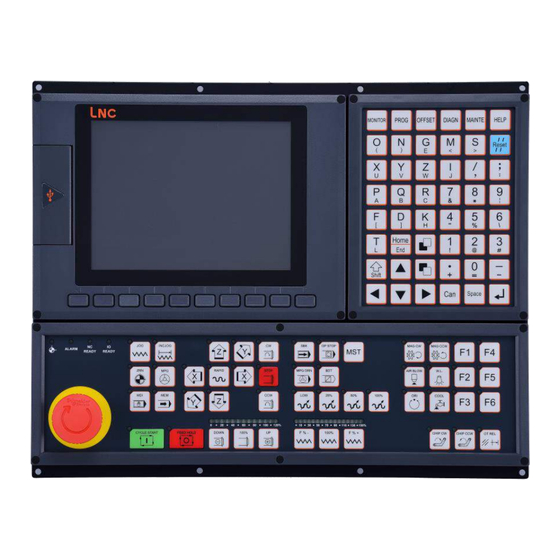
M5800 series Keys shown on the LCD liquid crystal display: Function keys: There are 10 horizontal keys right below the LCD. They allow users to select functions which are shown in the lower part of the screen. Advantech-LNC Technology Co., Ltd. -
Page 7: Function Keys
All manuals and user guides at all-guides.com Milling Machine Series CNC operations Function keys LCD liquid crystal display Advantech-LNC Technology Co., Ltd. - Page 8 Program All screens related to program information (in coordination with 1. group Editing mode, 2. Memory mode, 3. Manual mode). Compensation Sets the tool offset. group Diagnosis Shows real time information from the diagnosis screen. group Advantech-LNC Technology Co., Ltd.
- Page 9 All manuals and user guides at all-guides.com Milling Machine Series CNC operations Function group Name Description Maintenance System related settings. group Advantech-LNC Technology Co., Ltd.
- Page 10 1. Default values of system rest status. 2. Cancel alert after the abnormal situation has been cleared. System Reset Reset 3. Cancel the machining process after cycle start. reset 4. Return the cursor to highlight the program header in editing mode. Advantech-LNC Technology Co., Ltd.
- Page 11 Please note: Character shift can only be done by simultaneously Shift pressing the SHIFT key and the text symbol key. Row header Return the cursor for highlighted row to the character position at row Home position header during program editing. Advantech-LNC Technology Co., Ltd.
- Page 12 Return the cursor to the last character position of the selected row End of row during program editing. position Please note: it must be used in combination with SHIFT key. Cancel Cancels the unwanted character at previous position. character Advantech-LNC Technology Co., Ltd.
-
Page 13: M6800 Series
M6800 series Keys shown on the LCD liquid crystal display: Function keys: There are 12 horizontal keys right below the LCD. They allow users to select functions which are shown in the lower part of the screen. Advantech-LNC Technology Co., Ltd. - Page 14 All manuals and user guides at all-guides.com Milling Machine Series CNC operations Function keys LCD liquid crystal display Advantech-LNC Technology Co., Ltd.
- Page 15 All screens related to program information (in coordination with 1. group Editing mode, 2. Memory mode, 3. Manual mode). Compensation Sets the tool offset. group Diagnosis Shows real time information from the diagnosis screen. group Maintenance System related settings. group Advantech-LNC Technology Co., Ltd.
- Page 16 Go to previous 1. Field on the screen for navigating to the previous page. ( PgUp ) page Go to next 1. Field on the screen for navigating to the next page. page ( PgDn ) Advantech-LNC Technology Co., Ltd.
- Page 17 1. Return the cursor for highlighted row to the character position at position row header during program editing. End of row 1. Return the cursor to the last character position of the selected row position during program editing. Advantech-LNC Technology Co., Ltd.
-
Page 18: Screen And Function Instructions
】represents function keys in the lower part of screen, and < > represents keys on the MDI panel. Layout of the display screen: Note: Different models are equipped with different numbers of function keys in the lower part of screen. Advantech-LNC Technology Co., Ltd. - Page 19 Note: this area is to be used for corresponding keys on the screen. If there are keys listed in this manual but they cannot be seen on the controller, it means that current user does not have the proper permission level. 12: Error messages. Note: Alerts and warnings. Advantech-LNC Technology Co., Ltd.
-
Page 20: Monitoring Group (Monitor)
Description of various fields: Users can inspect the current machining program's filename on the monitoring page as shown in the figure below. Advantech-LNC Technology Co., Ltd. - Page 21 (ZRN), manual (MDI), incremental (INC), hand wheel (MPG), automatic (MEM). Users can view whether the current status is ready or other (not ready, machine paused, section stopped) on the monitoring page as shown in the figure below. Advantech-LNC Technology Co., Ltd.
- Page 22 For example: When there is insufficient air pressure, insufficient lubricant, or program error, this item will flash to notify users of the current status of machine malfunction. Users can view the current function group on the monitoring page as shown in the figure below. Advantech-LNC Technology Co., Ltd.
- Page 23 % status, number of current machining pieces, maximum number of machining pieces, time for single machining, accumulated total machining time, spindle tool number, and standby tool number as shown in the figure below. Advantech-LNC Technology Co., Ltd.
- Page 24 This is the soft key activation section where activated soft keys are shown; the background color is yellow when activated. Advantech-LNC Technology Co., Ltd.
- Page 25 CNC operations When the number of axis in use is greater than 6, <PgUp> and <PgDn> keys on the MDI panel can be used for additional inspections along axial directions as shown in the figure below. Advantech-LNC Technology Co., Ltd.
-
Page 26: Coordinate Switching
Milling Machine Series CNC operations 1.3.2 Coordinate switching (Note: This function key is not available in the M5800 series) Description of the coordinate switching function: Users can use the 【Coordinate switching】 key for switching program coordinates, relative coordinates, machine coordinates, and the amount of moves remaining in the main coordinate viewing section. - Page 27 CNC operations B. Relative coordinates Relative coordinates show the distance from any user defined point to the current position, so users can zero the relative coordinates at any time or directly enter a non-zero value. Advantech-LNC Technology Co., Ltd.
- Page 28 Machine coordinates show the relative distance between the current tool position and machine reference point. D. Amount of moves remaining Amount of moves remaining refers to the remaining movement amount before the coordinate point reaches the destination position according to a command issued by the program. Advantech-LNC Technology Co., Ltd.
-
Page 29: Variables
@5000 to @5999 are global variables with shared paths which can be edited by users. @6000 to @6999 are global variables with shared paths to be used by the system. Users can edit a macro or a program to change the numerical values. Advantech-LNC Technology Co., Ltd. - Page 30 All manuals and user guides at all-guides.com Milling Machine Series CNC operations Advantech-LNC Technology Co., Ltd.
-
Page 31: Machining Settings
Users can record the quantity of workpieces to be machined and time required for workpiece machining to have better control over machining time. Using machining settings: Users can used the <POS> key on the MDI panel to switch to monitoring group before pressing the 【Machining settings】 key to enter. Advantech-LNC Technology Co., Ltd. - Page 32 Clear the number of workpieces: Press the 【Clear the number of workpieces】 key and select Yes to clear the number of workpieces which have already been machined and reset its value to 0. Advantech-LNC Technology Co., Ltd.
- Page 33 Set max value: Enter a numerical value in the input area and press the 【Set max value】 key to set the maximum number of workpieces to be machined. When this number has been reached, an alert will be issued to notify the user. Advantech-LNC Technology Co., Ltd.
-
Page 34: Machining Data
When G group shows G00, it means coordinate movement by the program will be based on the current G00 status without an existing G00 or G01 command; if the G01 command has been issued by the program, G00 will be replaced by G01 in G group's G-CODE. Advantech-LNC Technology Co., Ltd. -
Page 35: Relative Coordinates
1/2 of its numerical value or 0 as needed. Advantech-LNC Technology Co., Ltd. -
Page 36: Wear
Milling Machine Series CNC operations 1.3.7 Wear (Note: This function key is not available in the M5800 series) Description of the wear function: Users can view tool wear information on the monitoring page. Instructions for using the wear function: ... -
Page 37: Mdi
【MDI】 key to enter. Users can key in a single action command or simpler program commands on the MDI's editing page, then press the <Input> key to switch to the next line to continue entering commands. Advantech-LNC Technology Co., Ltd. -
Page 38: Figures
It is for users to view the current machining program's path on the monitoring page. Instructions on how to use figures: Users can use the <POS> key on the MDI panel to switch to monitoring group, then press the 【Figures】 key to show the current machining program's path. Advantech-LNC Technology Co., Ltd. -
Page 39: Load
It allows users to view load data along each axial direction during machining on the monitoring page. Instructions for using load: Users can use the <POS> key on the MDI panel to switch to monitoring group before pressing the 【Load】 key to show the current load for each axial direction. Advantech-LNC Technology Co., Ltd. -
Page 40: Program Restart
Users can use the <POS> key on the MDI panel to switch to monitoring group, then press the 【Program restart】 key to enter the program restart page. The program restart function is only available under automatic (MEM) mode. Advantech-LNC Technology Co., Ltd. - Page 41 2. Enter the program line number you wish to find, and then press Confirm to start searching for that specific line number. 3. After the designated line number is found, a confirmation message window will appear as shown in the figure below. Advantech-LNC Technology Co., Ltd.
- Page 42 Press Confirm to start the tool and continue with machining. Search by line break: 1. Press the 【Line break search】 key to start searching for the line number of previous program line break recorded by NC. Advantech-LNC Technology Co., Ltd.
- Page 43 2. Enter the numerical value of the program T code you wish to find, then press Confirm to start searching for the T code. 3. After the designated T code is found, a confirmation message window will pop up indicating the target has been found. Advantech-LNC Technology Co., Ltd.
-
Page 44: Program Group (Prog)
【Open new file】 key for the window requesting a new filename to appear. After entering a new filename and selecting Confirm, the open new file operation is completed, or users can select Cancel to return to the previous page. Advantech-LNC Technology Co., Ltd. - Page 45 Open existing file: Users can use the <PROG> key on the MDI panel to switch to editing group before pressing the 【Open existing file】 key to enter the file list. Move the cursor to the filename to be opened and select Confirm, the selected file will be opened. Advantech-LNC Technology Co., Ltd.
- Page 46 All manuals and user guides at all-guides.com Milling Machine Series CNC operations Saving a file: After editing is completed, users can press 【Save file】 key to save the file. Advantech-LNC Technology Co., Ltd.
-
Page 47: Preview
【Undo】: restoring to the preview figure before the zoom operation. 【Plot settings】: setting the viewing angle and range of display during path drawing. For detailed instructions, please refer to section 1.8 for instructions on Preview Function description Advantech-LNC Technology Co., Ltd. -
Page 48: Supplementary Commands
Supplementary commands Description of supplementary commands: During program editing, users can press the 【Supplementary commands】 key to browse the introduction and description of the command at cursor position inside the machining program currently being edited. Advantech-LNC Technology Co., Ltd. -
Page 49: Program Editing
【Undo】: Restore to previous editing status. 【Redo】: This function is for returning to the action prior to undo. For detailed instructions, please refer to section 1.8 for instructions on how to Open and Edit a File Advantech-LNC Technology Co., Ltd. -
Page 50: File Management
USB device or import machining programs from a USB device. Instructions on file management: Users can use the <PROG> key on the MDI panel to switch to editing group, then press the 【File management】 key to access the file management page. Advantech-LNC Technology Co., Ltd. - Page 51 Rename: After moving the cursor to the filename to be renamed, a window requesting a new filename will appear after pressing the 【Rename】 key. A new filename should be entered followed by selecting Confirm to complete renaming the file, or users can select Cancel to return. Advantech-LNC Technology Co., Ltd.
- Page 52 【Copy】 key. A new filename for the copied file should be entered, select Confirm to complete the file copy operation or select Cancel to return. Import\Export: Export machining programs inside the controller to a USB device, or importing machining programs from a USB device to the controller. Advantech-LNC Technology Co., Ltd.
- Page 53 【Transfer】: proceed with file import/export. 【Cancel transfer】: cancel file transfer of the file to be imported/exported. For detailed instructions, please refer to section 1.8 for instructions on File Backup - Import and File Backup - Export Advantech-LNC Technology Co., Ltd.
-
Page 54: Manufacturer Macros
【Paste】: Paste the cut or copied content. 【Delete row】: Delete the row highlighted by the cursor, and delete the contents in the selected area. 【Cut】: Cut the contents of a selected area. 【Undo】: Restore to previous editing status. Advantech-LNC Technology Co., Ltd. - Page 55 Rename: After using cursor to select the filename to be renamed, a window prompting the input of a new file name will be shown by pressing the 【Rename】 key. New file name should be entered before selecting Confirm, or users can select Cancel to return. Advantech-LNC Technology Co., Ltd.
- Page 56 Delete: After using the cursor to select the file to be deleted, a confirmation message will be shown by pressing the 【Delete】 key. If this action is confirmed, users should select Confirm to continue or Cancel to return. Advantech-LNC Technology Co., Ltd.
- Page 57 USB device can be imported to the controller. Press the 【Import\Export】 key to access this function and then select "Import from USB" or "Export to USB". Key function descriptions: 【Select】: select one single macro program file to be imported/exported. Advantech-LNC Technology Co., Ltd.
- Page 58 【Cancel select all】: cancel all selected files. 【Transfer】: import/export the macro files. 【Cancel transfer】: cancel the import/export of macro files. For detailed instructions, please refer to section 1.8 for instructions on File Backup - Import and File Backup - Export Advantech-LNC Technology Co., Ltd.
-
Page 59: Plot Settings
6: Drawing the program path by using XYZ planes (3D) approach. Reserved boundaries: Set the preserved boundary values of the path display screen. Setting method 0: Manual. 1: Preview result – full stroke. 2: Preview result – cutting stroke. Advantech-LNC Technology Co., Ltd. - Page 60 All manuals and user guides at all-guides.com Milling Machine Series CNC operations Figure grid lines 0: No. 1: Yes. For detailed instructions, please refer to section 1.8 for instructions on Preview Function description Advantech-LNC Technology Co., Ltd.
-
Page 61: Compensation Group (Offset)
After entering the coordinate system, the cursor should be moved to the coordinate system to be set up such as G54 to G59, G54P1 to G54P100. The controller provides three options for users to quickly set up coordinate values in accordance with the properties of the workpiece. Advantech-LNC Technology Co., Ltd. - Page 62 【Set Y1】 should be pressed after contacting Y1, 【Set Y2】 should be pressed after contacting Y2, and the controller will automatically derive the center of a rectangular workpiece. 2. Center of a circle It is for users to set up the center point of a circular shaped workpiece. Advantech-LNC Technology Co., Ltd.
- Page 63 P3, and then the controller will automatically derive the center of a circular workpiece based on the positions of these three points. 3. Instruction input (Set all, set X, set Y, set Z, ...) It is for users to set up workpiece coordinates (non-square, non-circular). Advantech-LNC Technology Co., Ltd.
- Page 64 Confirm for the cursor to move to that coordinate system. It can facilitate search convenience, but the sub-coordinate system can only be used by G54. Advantech-LNC Technology Co., Ltd.
- Page 65 All manuals and user guides at all-guides.com Milling Machine Series CNC operations For detailed instructions, please refer to section 1.8 for instructions on Coordinate System Settings Advantech-LNC Technology Co., Ltd.
-
Page 66: Tool Management
<Input> key to enter the numerical value into the controller. (This is an absolute setting) It can be used in coordination with the【Guided input】 key for changing settings. Advantech-LNC Technology Co., Ltd. - Page 67 Use arrow keys to move the cursor to X-wear, Y-wear, Z-wear, and wear radius for the tool number you wish to set up, enter a set value into the input area and press the <Input> key to enter the numerical value into the controller. (This is an incremental setting) Advantech-LNC Technology Co., Ltd.
- Page 68 Milling Machine Series CNC operations 3. Clear relative It is for users to clear the relative coordinates of all axial directions or one single axial direction into 1/2 the numerical value or 0, when necessary. Advantech-LNC Technology Co., Ltd.
-
Page 69: Tool Service Life
When the numerical value of "Maximum service life" minus the numerical value of "Current service life" is equal to or less than the numerical value of "Remaining service life reminder", the "Tool status" field will become "Approaching", and the system will issue an alarm. Advantech-LNC Technology Co., Ltd. -
Page 70: Wear Management
The "Initially measured tool length coordinate" field: When the "Tool Z axis wear status" is set as a "New tool", the numerical value measured when the M50 command is executed for the first time will be filled into that field. Advantech-LNC Technology Co., Ltd. -
Page 71: Tool Registration
"Standby tool number": displays the tool number currently in standby mode. "Standby tool pocket": sets and displays the tool pocket number currently in standby mode. Key function descriptions: 【Arrange tool】: this function key can be used to re-arrange the tool number sequence. Advantech-LNC Technology Co., Ltd. -
Page 72: Automatic Tool Alignment
"Whether to use a reference point": when 0 is selected (not using a reference point), the tool alignment procedure will be carried out based on current X/Y coordinates; when 1 is selected (a reference point is used), Z axis will return to the machine reference point, then it will Advantech-LNC Technology Co., Ltd. - Page 73 "Tool alignment starting point Z": sets the machine coordinate for starting tool alignment on the Z axis. Press【Z axis guide】 for guided input after moving the cursor to this field. Advantech-LNC Technology Co., Ltd.
- Page 74 "Return to Z's safety point after tool alignment": sets the machine coordinate of the point to return to after completing tool alignment on the A axis. Press 【Z axis guide】 for guided input after moving the cursor to this field. Advantech-LNC Technology Co., Ltd.
- Page 75 Instructions for using automatic tool alignment: Users can use the <OFFSET> key on the MDI panel to switch to compensation group before pressing the 【Automatic tool alignment】 key to access the automatic tool alignment page. Advantech-LNC Technology Co., Ltd.
- Page 76 【Z axis guide】: this function key is for setting the current machine coordinate of the Z axis. For detailed instructions, please refer to section 1.8 for instructions on how to use Automatic Tool Alignment Advantech-LNC Technology Co., Ltd.
-
Page 77: Diagnosis Group (Dgnos)
Instructions for alerts/warnings: Alert page: After using the <DGNOS> key on the MDI panel to switch to diagnosis group, the 【Alert】 key or the <ALARM> key on the MDI panel can be pressed to access this page. Advantech-LNC Technology Co., Ltd. - Page 78 All manuals and user guides at all-guides.com Milling Machine Series CNC operations Warning page: After using the <DGNOS> key on the MDI panel to switch to diagnosis group, the 【Warning】 key can be pressed to access this page. Advantech-LNC Technology Co., Ltd.
-
Page 79: Ladder Diagram
Press the 【First line】 key to return the cursor to the file header position. After a new ladder diagram file is imported, the 【Reload】 key on the human machine interface should be pressed to update the diagram. Advantech-LNC Technology Co., Ltd. -
Page 80: Iocsa
Press the 【 I 】 key, 【 O 】 key, 【 C 】 key, 【 S 】 key, 【 A 】 key, 【 IO 】 key, 【 CS 】 key, 【IOCSA】 key, and then press the 【Find】 key to enter the number to be found in the input section, press Confirm to switch to the position screen corresponding to that number. Advantech-LNC Technology Co., Ltd. -
Page 81: Timer/Counter
After using the <DGNOS> key on the MDI panel to switch to diagnosis group, the 【Timer/counter】 key can be pressed to access the timer/counter page. Viewers can change views by using the arrow keys on the MDI panel, or use the <PgUp> and <PgDn> keys for quickly switching pages. Advantech-LNC Technology Co., Ltd. -
Page 82: System Information
Instructions for using system information: After using the <DGNOS> key on the MDI panel to switch to diagnosis group, the 【System information】 key can be pressed to access the system information page. Advantech-LNC Technology Co., Ltd. -
Page 83: Alert History
After using the <DGNOS> key on the MDI panel to switch to diagnosis group, the 【alert history】 key can be pressed to access the alert history page. Users can change views by using the arrow keys on the MDI panel, or use the <PgUp> and <PgDn> keys for quickly switching pages. Advantech-LNC Technology Co., Ltd. -
Page 84: Operation History
After using the <DGNOS> key on the MDI panel to switch to diagnosis group, the 【Operation history】 key can be pressed to access the operation history page. Users can change views by using the arrow keys on the MDI panel, or use the <PgUp> and <PgDn> keys for quickly switching pages. Advantech-LNC Technology Co., Ltd. -
Page 85: R Value
R value page. After entering the R value number you wish to find in the input section, press the 【Find】 key and the cursor will be moved to the position corresponding to that number. Advantech-LNC Technology Co., Ltd. -
Page 86: Waveform Monitoring
After using the <DGNOS> key on the MDI panel to switch to diagnosis group, the 【 > 】 key can be pressed, followed by pressing the 【Waveform monitoring】 key to access the waveform monitoring page. For detailed instructions, please refer to section 1.8 for instructions on the Waveform Monitoring Function Advantech-LNC Technology Co., Ltd. -
Page 87: Maintenance Group (Mainte)
【Find】 key to quickly search and move the cursor to the position of that number. Advantech-LNC Technology Co., Ltd. -
Page 88: Language Settings
After using the <MAINTE> key on the MDI panel to switch to maintenance group, the 【Language setting】 key can be pressed to access the language setting page. After moving the cursor to the language to be replaced, press the <Input> key to change to the selected language. Advantech-LNC Technology Co., Ltd. -
Page 89: Network Settings
When setting the IP address, make sure that the first three regional addresses of the PC and controller are identical. For detailed instructions, please refer to section 1.8 for instructions on configuring Network Settings and Connections Advantech-LNC Technology Co., Ltd. -
Page 90: Changing Identity
<Input> key can be pressed to change the current permission level. Users can check the current permission field or the upper right corner of the screen to see if the change was made successfully. Advantech-LNC Technology Co., Ltd. -
Page 91: Hardware Contact
【Update now】: update signal status. 【Find】: enter the parameter number you wish to find in the input area, then press the 【Find】 key to quickly search and move the cursor to the position of that number. Advantech-LNC Technology Co., Ltd. -
Page 92: Parameters
The 【 > 】 key can be pressed before pressing the 【Reset all to default】 to restore all parameters to their default values. For detailed instructions, please refer to section 1.8 for instructions on changing Parameter Settings Advantech-LNC Technology Co., Ltd. -
Page 93: Backup
After using the <MAINTE> key on the MDI panel to switch to maintenance group, the 【Backup】 key can be pressed to access the backup page. 【Import from USB】: import data from a USB device to controller. 【Export to USB】: export system data from controller to a USB device. Advantech-LNC Technology Co., Ltd. - Page 94 【Transfer】: proceed with file import/export. 【Cancel transfer】: cancel file transfer of the file to be imported/exported. For detailed instructions, please refer to section 1.8 for instructions on System Data Backup-Import and System Data Backup-Export Advantech-LNC Technology Co., Ltd.
-
Page 95: System Update
The system will be automatically restart after update, and system update will be completed. For detailed instructions, please refer to section 1.8 for instructions on how to perform a System Update Advantech-LNC Technology Co., Ltd. -
Page 96: Tuning Functions
Arrow keys on the MDI panel can be used to move the cursor to the corresponding field, and a numerical value can be entered into the input area before pressing the <Input> key to complete the setting. Advantech-LNC Technology Co., Ltd. - Page 97 【Guided input】: sets the value of estimated measurement into the offset field. 【Rigid tapping program】: set parameters related to rigid tapping test program. 【Start recording】: start executing rigid tapping program and making a drawing. Advantech-LNC Technology Co., Ltd.
- Page 98 "Number of gear teeth on the motor side", the corresponding axial setting keys such as 【Set X】 , 【Set Y】 , and 【Set Z】 keys can be pressed to modify the current C\DMR values of the numerator and denominator. 2. Spindle setting Advantech-LNC Technology Co., Ltd.
-
Page 99: Period Of Use
Description of the period of use function: This function allows machine factory/distributor to track and limit a customer's use of the controller, which can be used for handling periodic payments and removing the lock on payment by installments. Advantech-LNC Technology Co., Ltd. - Page 100 Instructions on usage period: After using the <MAINTE> key on the MDI panel to switch to maintenance group, the 【Service life】 key can be pressed to access the service life page. Advantech-LNC Technology Co., Ltd.
-
Page 101: Page Permissions
【Page permission】 key. After moving the cursor to the item number you wish to change, the permission code should be entered in the input field before pressing the <Input> key to complete the change. Advantech-LNC Technology Co., Ltd. -
Page 102: Change Password
After using the <MAINTE> key on the MDI panel to switch to maintenance group, pressing the 【 > 】 key to access the change password page via the 【Change password】 key. The password should be entered into the input area, press the <Input> key and confirm the password to complete the procedure. Advantech-LNC Technology Co., Ltd. -
Page 103: Date And Time
After using the <MAINTE> key on the MDI panel to switch to maintenance group, the 【 > 】 key can be pressed to access the date and time page via the 【Date and time】 key. Advantech-LNC Technology Co., Ltd. -
Page 104: Version Information
Instructions for accessing version information: After using the <MAINTE> key on the MDI panel to switch to maintenance group, the 【 > 】 key can be pressed to access the version information page via the 【Version information】 key. Advantech-LNC Technology Co., Ltd. -
Page 105: Project Settings
1: Monitoring group 2: Program group 3: compensation group 4: Diagnosis group 5: Maintenance group) 3. Hide group key menu: It is for setting whether users can return to the group key menu level by pressing the return key. (0 to 1, 0: No 1: Yes) Advantech-LNC Technology Co., Ltd. -
Page 106: Usage Instructions
For opening a new file, the 【Open new file】 key can be pressed to show a dialog window for entering a new file name, and then select Confirm to enter the editing screen (as shown in the figure below). By selecting Cancel, the dialog window for entering a new file name will be closed. Advantech-LNC Technology Co., Ltd. - Page 107 【Edit】 key can be pressed in coordination with supplementary editing function key. The <Input> key can be pressed during the editing process to start a new line. After editing is completed, the 【Save】 key can be pressed to save your progress. Advantech-LNC Technology Co., Ltd.
- Page 108 【Open existing file】 key to access the file list page. After using arrow keys on the MDI panel to select the file to be modified, select Confirm to enter the file editing page to make changes. Advantech-LNC Technology Co., Ltd.
- Page 109 For direct modification of a certain line within the program, the 【Row position】 key can be pressed to show a row position window, and then a line number can be entered before selecting Confirm for the cursor to move to the single block of that line. Advantech-LNC Technology Co., Ltd.
- Page 110 For finding any characters/strings in the program, the 【Find】 key can be pressed to display a search window for entering the characters/string you wish to find, then <PgDn> or <PgUp> keys can be used for upward or downward searching; or select Cancel to close this search window. Advantech-LNC Technology Co., Ltd.
- Page 111 For example, if X100. is to be replaced by X125., selecting Replace will only replace that particular X100. with X125., and selecting Replace all will replace all X100. in the program with X125. The text replacement window can be closed by selecting Cancel. Advantech-LNC Technology Co., Ltd.
- Page 112 For deleting an entire line of command in the program, the cursor should be moved to the line number to be deleted before pressing the 【Delete row】 key, a confirmation window will appear, simply select [Yes] to complete the process. Advantech-LNC Technology Co., Ltd.
- Page 113 For selecting the range of command in the program, the 【Selection mode】 key can be pressed while using arrow keys on the MDI panel to select the desired range. Press the 【Selection mode】 key again in order to use 【Cut】 or 【Copy】 to copy the selected range. Advantech-LNC Technology Co., Ltd.
-
Page 114: Execute Machining
OP panel should be pressed to execute the reference point return procedure. Press the <PROG> key, followed by pressing the 【Open existing file】 key to enter the file list page as shown in the figure below. Advantech-LNC Technology Co., Ltd. - Page 115 Press the <MEM> key after the reference point return procedure is completed in order to switch the system to memory mode (as shown in the figure below), and then press the <Reset> key to return the cursor to the starting row of the program. Advantech-LNC Technology Co., Ltd.
-
Page 116: Using The Mdi Function
【MDI】 key on the controller human machine page should be pressed to confirm that the status mode is MDI before editing. During editing, the <Input> key can be pressed to start editing a new line; the 【Sign-in】 key should be pressed after editing is completed. Advantech-LNC Technology Co., Ltd. - Page 117 All manuals and user guides at all-guides.com Milling Machine Series CNC operations Press the program start 〔CYCLE START〕 button to execute this function. Advantech-LNC Technology Co., Ltd.
-
Page 118: Program Restart
After the target has been found, a confirmation window will appear on the human machine page (as shown in figure below) with the system under the state of section stop. Press the Confirm key to complete this process. Advantech-LNC Technology Co., Ltd. - Page 119 And then press the program start 〔CYCLE START〕 button for the tool to be moved to the coordinate position of that program block and stopped 20 mm above the workpiece before a confirmation window appears. Press the Confirm key start the tool and continue with the machining process. Advantech-LNC Technology Co., Ltd.
- Page 120 All manuals and user guides at all-guides.com Milling Machine Series CNC operations Advantech-LNC Technology Co., Ltd.
-
Page 121: Automatic Tool Alignment
(1 to 100) in the input area and pressing the <Input> key. Set "Measurement speed": Move the cursor to "Measurement speed", enter a numerical value in the input field and then press the <Input> key. Advantech-LNC Technology Co., Ltd. - Page 122 For the single tool/multiple workpieces method, the tool length of automatic tool alignment will be saved into the 00 coordinate system, and the gap value between the tool alignment instrument and workpiece surface should be saved into the designated work coordinate system in accordance with Z axis gap settings. The operation is described below: Advantech-LNC Technology Co., Ltd.
- Page 123 【Z axis guide】 for guided input. (With the protective mechanism, when the tool alignment instrument has malfunctioned, the Z axis will not be moved further downward) Set the numerical value for the "Return to safety point Z after tool alignment" field. Advantech-LNC Technology Co., Ltd.
- Page 124 Z axis gap settings. The operation is described below: Advantech-LNC Technology Co., Ltd.
- Page 125 2 mm (not too much) lower than the normal position of the tool alignment instrument and stop right here. The cursor should be moved to the "Z axis lowest machine Advantech-LNC Technology Co., Ltd.
- Page 126 The system will conduct the automatic tool alignment procedure after automatically changing tools at T2. The system will then fill in the tool length compensation value into the Z length offset of tool length offset number 2 corresponding Advantech-LNC Technology Co., Ltd.
- Page 127 (from 54 to 59) in the input area and press the <Input> key. If the extended coordinate system G54 is required, a numerical value (from 101 to 200) should be entered in the input area before pressing the <Input> key. Advantech-LNC Technology Co., Ltd.
- Page 128 Move the tool to a proper height (higher than the tool alignment instrument) and press the 【Start tool alignment】 key to execute the automatic tool alignment procedure. The system will fill in the designated coordinate system with the tool length compensation value after completing automatic tool alignment. Advantech-LNC Technology Co., Ltd.
-
Page 129: Network Settings And Connections
After pressing and moving the cursor to the corresponding field, and entering the IP address in the input area, the <Input> key should be pressed to show the entered numbers at the cursor's position. Advantech-LNC Technology Co., Ltd. - Page 130 Enter 1 in this input field and press the <Input> key to set it as "Open". Open ReconFTP_user as shown in the figure below. Enter the IP address and password before pressing to connect as shown in the figure below. Advantech-LNC Technology Co., Ltd.
- Page 131 All manuals and user guides at all-guides.com Milling Machine Series CNC operations If the connection needs to be interrupted, press again. Advantech-LNC Technology Co., Ltd.
-
Page 132: System Update
"Not ready" state before system update can be executed. After pressing the <MAINTE> key on the controller's MDI panel, the 【System update】 key on the controller's human machine page can be pressed to enter the system update page. Advantech-LNC Technology Co., Ltd. - Page 133 After inserting a USB device with update files, the 【Confirm】 key on the controller's human machine page can be pressed for the directory selection window to appear. ► key on the MDI panel can be used to open a subdirectory. Advantech-LNC Technology Co., Ltd.
- Page 134 <Input> key can be pressed before selecting Confirm to enter the "Confirm upgrade version" stage. The 【Confirm】 key can be pressed to enter the "Copy file" stage (as shown in the figure below). Advantech-LNC Technology Co., Ltd.
- Page 135 After the file copy operation is 100% complete, it will enter the "Reboot" stage (as shown in the figure below). After pressing the 【Confirm】 key, wait for the controller to reboot automatically and complete the system update process. Advantech-LNC Technology Co., Ltd.
-
Page 136: System Data Backup - Export
"Not ready" status before the backup function can be executed. After inserting a USB device and pressing the <MAINTE> key on the controller's MDI panel, the 【Backup】 key on the controller's human machine page can be pressed to enter the system data backup page. Advantech-LNC Technology Co., Ltd. - Page 137 All manuals and user guides at all-guides.com Milling Machine Series CNC operations Press the 【Export to USB】 key as shown in the figure below. Advantech-LNC Technology Co., Ltd.
- Page 138 In addition, the 【Select all】 key on the controller's human machine page can be pressed to directly backup all files. After pressing the 【Transfer】 key on the controller's human machine page, a window for directory selection will appear (as shown in the figure below). Advantech-LNC Technology Co., Ltd.
- Page 139 Milling Machine Series CNC operations ► ▲ ▼ Use the key to open a subdirectory, and then use keys to select the folder to be exported. Press the <Input> key and select Confirm to start the transfer. Advantech-LNC Technology Co., Ltd.
-
Page 140: System Data Backup - Import
"Not ready" status before the backup function can be executed. After pressing the <MAINTE> key on the controller's MDI panel, the 【Backup】 key on the controller's human machine page can be pressed to enter the backup page. Advantech-LNC Technology Co., Ltd. - Page 141 All manuals and user guides at all-guides.com Milling Machine Series CNC operations Press the 【Import from USB】 key as shown in the figure below. At this moment, a window for directory selection will appear. Advantech-LNC Technology Co., Ltd.
- Page 142 Milling Machine Series CNC operations ► ▲ ▼ Use the key to open a subdirectory, and then use keys to select a folder for saving the imported file. Press the <Input> key and select Confirm. Advantech-LNC Technology Co., Ltd.
- Page 143 (as shown in the figure below), and users can select Yes or Yes to all to overwrite the existing file. If the wrong folder was selected, a "file type error" will be shown in the message prompt area. Advantech-LNC Technology Co., Ltd.
-
Page 144: Preview Function
While under the ready status, the <PROG> key on the MDI panel can be pressed to switch the controller's human machine page to the program editing page, and the 【Preview】 key on the human machine page can be pressed to enter the preview page as shown in the figure below. Advantech-LNC Technology Co., Ltd. - Page 145 Arrow keys on the MDI panel can be used to move this frame, and <PgUp> and <PgDn> keys on the MDI panel can be used to determine the size of the area you wish to select. Advantech-LNC Technology Co., Ltd.
- Page 146 After selecting the area to be magnified, press the 【Zoom】 key again and the selected area enclosed inside the white frame will be magnified as shown in the figure below. The 【Restore】 key on human machine page can be pressed to cancel magnification. Advantech-LNC Technology Co., Ltd.
- Page 147 CNC operations By pressing the 【Zoom】 key again on the human machine page, a certain area of the currently magnified path drawing can be selected to be magnified once again as shown in the figure below. Advantech-LNC Technology Co., Ltd.
- Page 148 "Drawing plane" field (as shown in the figure above); a value should be entered in the input area before pressing the <Input> key to complete the setting. (0: XY, 1: YZ, 2: ZX, 3: YX, 4: ZY, 5: XZ, 6: XYZ) Advantech-LNC Technology Co., Ltd.
- Page 149 "Minimum value in range" fields, and the maximum and minimum values of the of X, Y, and Z axis ranges can also be set up. If grid lines are required for viewing the figure, it can be set up in the "Figure grid lines" field. (0: No, 1: Yes) Advantech-LNC Technology Co., Ltd.
-
Page 150: Editing And Using Manufacturer Macros
L5. After pressing the <PROG> key on the controller's MDI panel to switch the controller's human machine page to the program editing page, press the 【Manufacturer macro】 key to enter the manufacturer macro page. Advantech-LNC Technology Co., Ltd. - Page 151 By selecting Cancel, the dialog window for entering a new file name will be closed. Naming regulations Type of filename Examples of filename types Description maker_macro_g□□ maker_macro_g35 G code calls a manufacturer macro M code calls a manufacturer maker_macro_m□□ maker_macro_m35 macro Advantech-LNC Technology Co., Ltd.
- Page 152 If the name of a new macro file is MAKER_MACRO_G123, it can be called by a program command containing the command G123. When the program is executed to G123, contents of the MAKER_MACRO_G123 program will be executed. Advantech-LNC Technology Co., Ltd.
-
Page 153: Tool Offset Settings
Use arrow keys on the MDI panel to select the tool number requiring an offset, and enter the tool radius in the input area followed by pressing the <Input> key to enter the compensation value to the radius field of that tool number. Advantech-LNC Technology Co., Ltd. - Page 154 【Guided Z】 to set the machine coordinate of the Z axis into Z's length field of that tool number to complete the tool offset setting. (If the Z axis field of the coordinate system has been set, the value must be subtracted during input to avoid repeating the offset) Advantech-LNC Technology Co., Ltd.
-
Page 155: Coordinate System Settings
G54, the value of 0 should be entered into the "Extended coordinate system" field before selecting Confirm. If another extended coordinate system is to be selected, its corresponding number should be entered into the "Extended coordinate system" field before selecting Confirm. Advantech-LNC Technology Co., Ltd. - Page 156 If the workpiece is rectangular in shape and the program's reference point is the center point of the workpiece, the 【Rectangle】 key on the human machine page can be pressed to enter the rectangle center settings page. Advantech-LNC Technology Co., Ltd.
- Page 157 P2, and P3 on the human machine page) of the workpiece's edge, and the 【Set P1】 key, 【Set P2】 key, and 【Set P3】 key on the human machine page should be used to set the center coordinates of X and Y axis. Advantech-LNC Technology Co., Ltd.
-
Page 158: Parameter Settings
Different parameters need to be set up in accordance with different user levels. By pressing the <MAINTE> key on the MDI panel, the controller provides two parameter setting functions to set "user parameters" and "system parameters". Advantech-LNC Technology Co., Ltd. - Page 159 If a known parameter needs to be found, its parameter number can be entered into the input area before pressing the 【Find】 key on the human machine page, the cursor will move directly to the parameter corresponding to this number as shown in the figure below. Advantech-LNC Technology Co., Ltd.
- Page 160 CNC operations If a parameter is to be set as a default value, the 【Initialization】 key can be pressed for a confirmation message window to appear, select Confirm to set the parameter as a default value. Advantech-LNC Technology Co., Ltd.
- Page 161 R in front of the parameter number, it means that the parameter will take ⊙ effect by pressing the <RESET> key after setting is complete; if there is a in front of the parameter number, it means that the parameter will take effect after system reboot. Advantech-LNC Technology Co., Ltd.
- Page 162 All manuals and user guides at all-guides.com Milling Machine Series CNC operations Advantech-LNC Technology Co., Ltd.
-
Page 163: File Backup - Import
1.8.15 File backup - import To import or export a file, the <PROG> key on the controller's MDI panel can be pressed, then press the 【File management】 key to enter the import/export page via the 【Import\export】 key. Advantech-LNC Technology Co., Ltd. - Page 164 The 【Import from USB】 key on the human machine page can be pressed to import files from a USB device as shown in the figure below. At this time, a directory selection window will appear as shown in the figure below. Advantech-LNC Technology Co., Ltd.
- Page 165 MDI panel to open the subdirectory as shown in the figure below. Arrow keys on the MDI panel should be used to select the folder of file to be imported, then select Confirm to enter the file selection page. Advantech-LNC Technology Co., Ltd.
- Page 166 In addition, the 【Select all】 key can be pressed to select all files. Transfer will start after pressing the 【Transfer】 key. The "Transfer completed" message will be displayed in the message prompt area after the process is completed as shown in the figure below. Advantech-LNC Technology Co., Ltd.
- Page 167 All manuals and user guides at all-guides.com Milling Machine Series CNC operations The importing method of manufacturer macros is the same as the method described above. Advantech-LNC Technology Co., Ltd.
-
Page 168: File Backup - Export
【Import\export】 key. The 【Export to USB】 key on the human machine page can be pressed to export files to a USB device as shown in the figure below. Advantech-LNC Technology Co., Ltd. - Page 169 In addition, the 【Select all】 key can be pressed to directly export all files. After pressing the 【Transfer】 key on the human machine page, a window for directory selection will appear. Advantech-LNC Technology Co., Ltd.
- Page 170 All manuals and user guides at all-guides.com Milling Machine Series CNC operations ► Press the key to open the subdirectory as shown in the figure below. Advantech-LNC Technology Co., Ltd.
- Page 171 After the transfer is completed, the "Transfer completed" message will be displayed in the message prompt area. The exporting method of manufacturer macros are the same as the method described above. Advantech-LNC Technology Co., Ltd.
-
Page 172: Waveform Monitoring Function
Press the <DGNOS> key on the controller's MDI panel to enter diagnosis group, press the 【 > 】 key followed by 【Waveform monitoring】 to enter the waveform monitoring page from the human machine page as shown in the figure below. Advantech-LNC Technology Co., Ltd. - Page 173 "Type" field, and the "Hide" field can be used to hide the channel. When setting changes are complete, the 【Option】 key can be pressed again to close the setting window. Specifications of the type field: Advantech-LNC Technology Co., Ltd.
- Page 174 Press the 【Start】 key to monitor the waveform; press the 【Stop】 key to stop at the current screen; press the 【Clear】 key to clear the waveform. To hide the waveform of channel 2, the 【Display/hide】 key can be pressed to access channel selection. Advantech-LNC Technology Co., Ltd.
- Page 175 All manuals and user guides at all-guides.com Milling Machine Series CNC operations Press the 【Channel 2】 key on the page to hide the waveform of channel 2. Advantech-LNC Technology Co., Ltd.
- Page 176 Press the 【Move right horizontally】 key to move all waveforms to the right. To undo the zooming action, press the 【 】 key on the page followed by pressing the 【Undo zoom】 key on the human machine page. Advantech-LNC Technology Co., Ltd.
- Page 177 All manuals and user guides at all-guides.com Milling Machine Series CNC operations To zoom in/out vertically on the waveform, the 【Vertical zoom】 key on the human machine page can be pressed to access the vertical function keys. Advantech-LNC Technology Co., Ltd.
- Page 178 Press the 【Move down vertically】 key to move the entire waveform downward. To undo the zooming action, press the 【 】 key on the page followed by pressing the 【Undo zoom】 key on the human machine page. Advantech-LNC Technology Co., Ltd.
-
Page 179: Online Help
Pressing the <Input> key on the human machine page to close Online Help. 1.8.19 Switching multiple paths (Note: This function key is not available in the M5800 series) When the multiple path function is activated, an additional path field will be shown on the status bar; press the <PATH>... - Page 180 All manuals and user guides at all-guides.com Milling Machine Series CNC operations Advantech-LNC Technology Co., Ltd.
-
Page 181: Control Panel Operations
Operating panel 2.1.1 M5800 series 2.1.2 M6800 series Based on function, it can be divided into the first operating panel and the second operating panel: The first operating panel Advantech-LNC Technology Co., Ltd. -
Page 182: Led Signal Light (Led Signal)
The light will come on automatically when an alert is issued by the controller. The light will come on automatically after the power is turned on. The light will come on automatically the I/O axis card has successfully performed a self-hardware circuit test. Advantech-LNC Technology Co., Ltd. -
Page 183: Axis Selection (Axis Selection)
By pressing +X once under the reference point return (ZRN) mode, the X axis will automatically return to the reference point along the positive direction. The same operating method can be applied to movement along other axes. Advantech-LNC Technology Co., Ltd. -
Page 184: Mode Selection (Mode Selection)
HOME in order to remind users that the HOME operations have been completed by the machine. For each machine restart, reference point return should be implemented before executing other machining programs in order to ensure the correctness Advantech-LNC Technology Co., Ltd. - Page 185 +X, +Y, -Z, -4 (7). Incremental jog mode (INC JOG) Under this mode, operators can select the direction for axial movement, and the amount of each movement is set via user parameter numbers 8130 to 8134. Advantech-LNC Technology Co., Ltd.
- Page 186 All manuals and user guides at all-guides.com Milling Machine Series Control panel operations Incremental jog (INC JOG) mode Moving along each axial direction such as +X, +Y, -Z, -4 Advantech-LNC Technology Co., Ltd.
-
Page 187: Spindle Operation & Spindle Speed Adjustment
The controller can be used in coordination with frequently used supplementary function keys to facilitate operation, such as the over travel release or PLC's self-defined key function; functions of various keys are described below: 1. MPG DRN (hand wheel mode) Advantech-LNC Technology Co., Ltd. - Page 188 When the single block execution switch is ON, program operation will be based on executing single blocks without continuous action, and the operation of each block must be executed by pressing the program start 〔CYCLE START〕 key. Advantech-LNC Technology Co., Ltd.
- Page 189 This is the switch for controlling machine lock, which will be activated by pressing this key, and it will be turned off by pressing this key again. During program execution, the controller will continue with program execution, but the servo axis will stop issuing movement commands; so the servo axis is actually stopped. 7. ORI (spindle orientation) Advantech-LNC Technology Co., Ltd.
- Page 190 9. AIR BLOW (blowing air) This is the switch for controlling the blow of air. Air blow can be started by pressing this key, and it can be turned off by pressing this key again. Advantech-LNC Technology Co., Ltd.
- Page 191 After pressing this key, the power will be automatically disconnected after the program is executed to the M30 command. 12. W.L (work light) This is the switch for controlling the work light. The work light can be turned on by pressing this key, and it can be turned off by pressing this key again. Advantech-LNC Technology Co., Ltd.
- Page 192 15. CHIP CW (chip former clockwise rotation) This is the switch for controlling the clockwise rotation of the chip former. The chip former will be activated by pressing this key, and it will be turned off by pressing this key again. Advantech-LNC Technology Co., Ltd.
- Page 193 (and the indicator light will go off). 17. F1 - F8 (additional function options) …… This function key is open for definition and used by the tool machine manufacturer. 18. OT REL (over-travel limit release) Advantech-LNC Technology Co., Ltd.
-
Page 194: Emergency Stop (Emg-Stop)
Please note: As soon as the emergency stop is pressed, reference point return must be performed after each clear, yet the absolute reference point is not affected by this limitation. Advantech-LNC Technology Co., Ltd. -
Page 195: Program Start (Cycle Start) & Program Pause (Feed Hold)
Press this key to pause program execution. During the pause period, the FEED HOLD indicator will be turned on. Miscellaneous function (M), spindle function (S), and tool function (T) will maintain their current status. Press the program start key again to resume program execution. Advantech-LNC Technology Co., Ltd. -
Page 196: Feed Rate Adjustment
Users can lock program edit mode via the program protection lock. A locked program can only be opened by file explorer; it cannot be modified. 0: Release the program protection lock 1: Activate the program protection lock Advantech-LNC Technology Co., Ltd. -
Page 197: Seven-Segment Display Of Tool Number
When users press the power on key, the CNC controller will be turned on. On the contrary, when the power off key is pressed, the CNC controller will delay its shut down after the servo is completely discharged. Advantech-LNC Technology Co., Ltd.
Need help?
Do you have a question about the M5800 Series and is the answer not in the manual?
Questions and answers