Table of Contents
Advertisement
Quick Links
EN
Owner's/Operator's Manual
Sauna
heater
installation,
instructions,
troubleshooting,
guarantee.
IMPORTANT! This manual must be left with owner,
manager, or operator of Sauna after it is used by
electrician!
MODEL
HSPE60U1M
6.0 kW
HSPE80U1M
8.0 kW
Harvia US Inc.
3567 Jefferson St. N,
Lewisburg, WV 24901
+1 304-497-3991
08122023 B
Harvia Spirit
wiring,
operating
maintenance
240 V
240 V
FR
Manuel de l'utilisateur/opérateur
Instructions
and
d'utilisation, dépannage, entretien et garantie du
poêle de sauna.
IMPORTANT ! Ce manuel doit être remis au
propriétaire, au gérant ou à l'opérateur du sauna
après avoir été utilisé par l'électricien !
d'installation,
de
câblage
et
Y05-1238
Advertisement
Table of Contents

Related Manuals for Harvia Spirit HSPE60U1M


Summary of Contents for Harvia Spirit HSPE60U1M
- Page 1 à l’opérateur du sauna electrician! après avoir été utilisé par l’électricien ! MODEL HSPE60U1M 6.0 kW 240 V HSPE80U1M 8.0 kW 240 V Harvia US Inc. 3567 Jefferson St. N, Lewisburg, WV 24901 +1 304-497-3991 Y05-1238 08122023 B...
-
Page 2: Important Safety Instructions
IMPORTANT SAFETY INSTRUCTIONS DANGER: Indicates a hazardous situation that, if not avoided, will result in death or serious injury. WARNING: Indicates a hazardous situation that, if not avoided, could result in death or serious injury. CAUTION: Indicates a hazardous situation that, if not avoided, could result in minor or moderate injury. NOTICE: Indicates information considered important, but not hazard-related. - Page 3 • Keep all occupants away from the heater and when it is hot. The stones and outer surface of the heater may burn your skin. • Do not throw excessive amounts of water on the stones. The evaporating water is boiling hot and could cause burns.
-
Page 4: Table Of Contents
CONTENTS TABLE DES MATIÉRS These instructions for installation and use are intended Les présentes instructions d'installation et d'utilisation for the owner or the person in charge of the sauna, sont destinées au propriétaire ou à la personne en charge as well as for the electrician in charge of the electrical du sauna, ainsi qu'à... -
Page 5: Warnings And Notes
WARNINGS AND NOTES READ THE WARNINGS AND MANUAL CAREFULLY BEFORE USING THE PRODUCT! WARNINGS • The sauna heater is designed for the heating of a sauna room to bathing temperature. It is not to be used for any other purpose! The control unit is meant for controlling the functions of a sauna and a sauna heater. - Page 6 • No such objects or devices should be placed inside the heater rock space or near the heater that could change the amount or direction of the air flowing through the heater, thus causing the resistance temperature to rise too high, which may set the wall surfaces on fire! •...
-
Page 7: Technical Data
75 / 1900 Approved Embedding flange HSP1 HSP1 Accessories Safety railing HSP3M HSP3M Harvia Xenio CX30-U1-U3 Harvia Xenio CX30-U1-U3 Suitable Harvia Xenio CX45-U1-U3 Harvia Xenio CX45-U1-U3 Control units Harvia Xenio CX30-U1-U3-XW Harvia Xenio CX30-U1-U3-XW Harvia Xenio CX45-U1-U3-XW Harvia Xenio CX45-U1-U3-XW... -
Page 8: Instructions For Installation
INSTRUCTIONS FOR INSTALLATION Before installation See WARNINGS AND NOTES! Before installing the heater, study the instructions for installation. Check the following points: • The heater volume should be suitable for the sauna room volume. See the minimum and maximum volumes for each heater output >... - Page 9 min. inch / mm 3.2" 35.5" 80 mm 900 mm 3.2" 3.2" 80 mm 80 mm 3.2" 80 mm 4"- 12" 100-300 mm 21.5" 16.3" 545 mm 414 mm 2. Safety distances...
-
Page 10: Installing The Heater
Installing the Heater min. inch / mm 4.6" 116 mm 2.3" 7.8" 59 mm 197 mm 4"- 11.8" 100-300 mm 4.6" 116 mm 3. Installing the heater... - Page 11 4.2 x 32 4. Installing the heater...
-
Page 12: Placing Of Sauna Stones
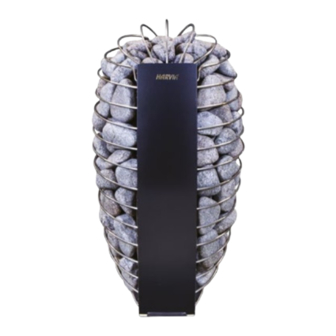
Placing of sauna stones The placing of sauna stones has a major effect on the heater’s safety and steam-creation properties. See Images > 5. Piling of the Sauna Stones, > 6. Safety function Important information about sauna stones: • 50 kg is a suitable amount. The amount of stones varies, depending on the type of stone. •... - Page 13 Ø 5–10 cm ~ 50 kg M4 x 6 Ø 5–10 cm ~ 60 kg NOTE! Do not lift or bend. 5. Piling of the Sauna Stones...
-
Page 14: Heater Fence
TEST Heater ON Heater OFF NOTE! Make sure that the heater stones do not block the downward movement of the safety device. Before using the heater test the safety function by pressing the back of the safety device. You will hear a soft 'click' sound when the safety function is activated. 6. - Page 15 (mm/inch) 4" 100 mm Temperature sensor 125 ºC / 257 ºF (Delivered as part of the heater package) 7. Installation of the Sensor 8. Electrical Connections...
-
Page 16: Electrical Connections
Electrical connections The heater may only be connected to the electrical network in accordance with the current regulations by an authorised, professional electrician. • > Image 8. Electrical Connections • The wiring diagrams are included in the control unit’s installation instruction. •... -
Page 17: Replacing The Heating Elements
Replacing the Heating Elements 9. Replacing the Heating Elements... -
Page 18: Sauna Room
SAUNA ROOM See WARNINGS AND NOTES! See TECHNICAL DATA! Insulation and Wall Materials of the Sauna Room In an electrically heated sauna, all the massive wall surfaces which store plenty of heat (such as bricks, glass blocks, plaster etc.), must be sufficiently insulated in order to keep the heater output at a reasonably low level. -
Page 19: Heater Output
Blackening of the Sauna Walls It is perfectly normal for the wooden surfaces of the sauna room to blacken in time. The blackening may be accelerated by: • sunlight • heat from the heater • protective agents on the walls (protective agents have a poor heat resistance level) •... -
Page 20: Sauna Room Hygiene
Sauna Room Hygiene Good hygienic standards of the sauna room will make bathing a pleasant experience. • The use of sauna seat towels is recommended to prevent sweat from flowing onto the platforms. The towels should be washed after each use. Separate towels should be provided for guests. •... -
Page 21: Operating Instructions
OPERATING INSTRUCTIONS See WARNINGS AND NOTES! See TECHNICAL DATA! Heating of the Sauna When operating the heater for the first time, both the heater and the stones emit smell. To remove the smell, the sauna room needs to be efficiently ventilated. If the heater output is suitable for the sauna room, it will take about an hour for a properly insulated sauna to reach the required bathing temperature. -
Page 22: Instructions For Bathing
Instructions for Bathing See WARNINGS AND NOTES! • Begin by washing yourself. • Stay in the sauna for as long as you feel comfortable. • Forget all your troubles and relax. • According to established sauna conventions, you must not disturb other bathers by speaking in a loud voice. •... -
Page 23: Maintenance Instructions
Maintenance Instructions 1. Use only clean water on sauna stones. Do not use spa or pool water as it will destroy your heater. 2. Clean water should always be used in sauna buckets and water should be dumped out after every use. Scour buckets and dippers occasionally when film collects from usage.
Need help?
Do you have a question about the Spirit HSPE60U1M and is the answer not in the manual?
Questions and answers