
Subscribe to Our Youtube Channel
Related Manuals for GPX PJ603


Summary of Contents for GPX PJ603
- Page 1 Projector with Bluetooth User’s Guide for Model PJ603 v3051-01 For the most up-to-date version of this User’s Guide, go to www.gpx.com...
-
Page 2: Information & Safety Instructions
Information & Safety Instructions Important Safety Instructions • Increase the separation between the equipment and receiver. • Read these Instructions. • Connect the equipment into an outlet on a • Keep these Instructions. circuit different from that to which the receiver is •... - Page 3 • When powering off the projector, allow the cooling markings. cycle to finish before handling or disconnecting the • No user serviceable parts inside, do not attempt power supply. to open the unit or perform any repair. Doing so Do not use the projector if it has been damaged. may cause damage or injury, and will void your Damage could be (but not limited to): warranty.
-
Page 4: Table Of Contents
Table of Contents Information & Safety Instructions Table of Contents Overview Includes - 5 Projector Features & Inputs - 6 Controls - 7 Projector Setup Power - 8 Angle Adjustment - 8 Image Adjustment - 8 Connecting Your Projector HDMI - 9 Audio/Video Input - 10 MicroSD &... -
Page 5: Overview
Overview Includes • Remote control: requires 2 AAA batteries (included) • HDMI cable • 3.5mm to RCA audio/video cable • AC/DC power adapter • Lens cover • Cleaning cloth • Storage bag • User's Guide... -
Page 6: Projector
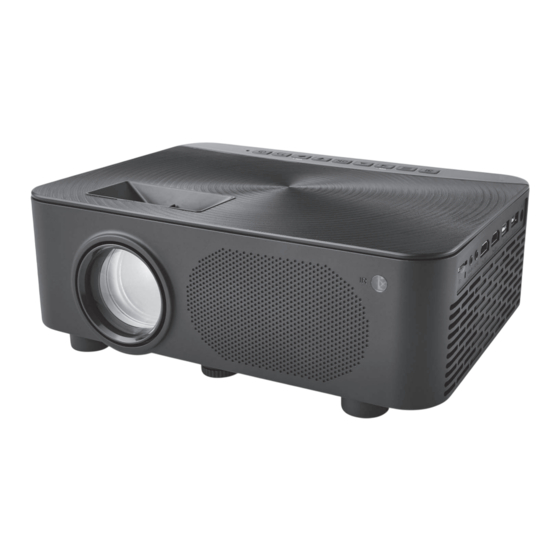
Projector Features & Inputs... -
Page 7: Controls
1. Lens Cap ( please remove the lens cap while 9. Speakers use projector) 10. Projector stand 2. Projector Lens 11. Micro SD Card Port 3. Remote sensor 12. 3.5mm Audio Output 4. Focus Adjustment 13. 3.5mm AV Input 5. Keystone Adjustment 14. -
Page 8: Projector Setup
Projector Setup Power Plug the AC/DC power adapter (included) into a standard wall outlet and the DC power input on the side of the unit. After connecting power, please allow approximately 5 seconds to pass before powering the unit ON. Angle Adjustment Angle the Projector as close to the center of the screen as possibble. -
Page 9: Connecting Your Projector
Connecting Your Projector HDMI HDMI offers superior sound and picture quality, and is the easiest way to play media from a computer, Blu-Ray player, or other device with an HDMI output. Requires an HDMI cable (included) and a device with an HDMI output. 1. -
Page 10: Audio/Video Input
Audio/Video Input Requires a 3.5mm to RCA audio/video cable (included). 1. Connect the 3.5mm to RCA audio/video cable to the AV input on the unit. 2. Connect the 3.5mm to RCA audio/video cable to the RCA stereo audio outputs and composite video output on the media player. -
Page 11: Microsd & Usb Flash Drive Devices
MicroSD & USB flash drive Devices Supports MicroSD cards and USB flash up to 128GB (Supports Mpeg1, Mpeg2, Mpeg4, mp3, Jpeg file formats). 1. Load a USB flash into the USB Port or Load a MicroSD card into the MicroSD Card Slot. 2. -
Page 12: External Audio
External Audio This unit has a built-in speaker. However, you can also connect external speakers for more sound options. Headphone Jack/Audio Out Requires a 3.5 mm to RCA audio/video cable (included) or 3.5mm audio cable (not included). Note: External speakers must have their own power supply. 1. -
Page 13: Remote
Remote Functions Power Zoom Press to power ON. Press to zoom display image Press twice to go into standby in or out. mode. (When powered ON, HDMI connection: Just Scan, press to enter shut down menu. Zoom2, Zoom1, 16:9, 4:3, Auto Press again to power OFF or &... -
Page 14: Projector Placement
FRONT TABLE Projector Placement For best results, place the projector in a dark room or other dimly lit area. Use the unit with a dedicated projector screen for best picture resolution. A variety of screens and screen sizes can be used. If placing the projector behind the viewing screen (unit in front of/projecting toward viewers), a special screen will be required (not included). -
Page 15: Menu Options
Menu Options Change projector settings by pressing the Menu button and selecting the Setup icon. Note: Not all settings are user adjustable. Picture Menu 1. Picture Mode Select Standard, Dynamic, Mild, or User (custom). Set Picture Mode to "User" to select Contrast, Brightness, Color or Sharpness and adjust digit level 0-100. -
Page 16: Sound Menu
Sound Menu 1. Sound Mode Select Standard, Movie, Music, Sports or User. Set Sound Mode to "User" to select Treble and Bass digit and adjust digit level 0-100.. 2. Balance Adjust the audio balance level -50 to +50. -
Page 17: Options Menu
Options Menu 1. OSD Language Select language. 2. Flip Choose which direction you want to project (Front Table, Front Ceiling, Rear Table or Rear Ceiling). 3. Aspect Ratio Activate in below input: AV input: select 4:3, 16:9, Full, Zoom1, Zoom2 or Panorama. HDMI input: select 4:3, 16:9, Full Zoom1, Zoom2 or Panorama or Just Scan. -
Page 18: Troubleshooting
Troubleshooting Problem Solution USB Drive not recognized/won’t play • This unit supports up to 128GB, please make sure that the USB drive or MicroSD card you are using is 128GB or less. • Please make sure that the file you are trying to play is smaller than 4GB. -
Page 19: Features
Features Features • HDMI input supports 480p, 720p, 1080i, 1080p (30 fps) • AV input supports 480p • Native Resolution: 1280x 720 • Aspect Ratio: 16:9, 4:3 • LED lamp • I/O: 2 x HDMI, VGA PC, 2x USB, Micro SD card, AV in, 3.5mm audio output •... -
Page 20: Customer Support
To download this User’s Guide in English, Spanish, and French, or to get answers to frequently asked questions, visit the support section at: www.gpx.com Para descargar este Manual del Usuario en inglés, español y francés, o para obtener respuestas a preguntas frecuentes, visite la sección de apoyo en: www.gpx.com...
Need help?
Do you have a question about the PJ603 and is the answer not in the manual?
Questions and answers