
Related Manuals for GPX PJ300


Summary of Contents for GPX PJ300
- Page 1 Mini Projector with Blutooth User’s Guide for Model PJ300 v2577-01 For the most up-to-date version of this User’s Guide, go to www.gpx.com...
- Page 2 Safety Instructions & Warnings Important Safety Instructions Battery Warnings • Read these Instructions. • WARNING: Do not ingest battery, Chemical Burn Hazard. • Keep these Instructions. • If the remote control supplied with this product contains a coin/button cell battery and the coin/button cell battery is •...
- Page 3 • If the air vents become clogged or dirty, use a vacuum or air WARNING: To reduce the risk of electric CAUTION compressor and nozzle to clean. Do not use canned air, as the RISK OF ELECTRIC SHOCK shock, do not remove cover (or back). No DO NOT OPEN gas may leave a residue inside the enclosure.
-
Page 4: Table Of Contents
Table of Contents Overview Features - 5 Includes - 5 Projector Features & Inputs - 6 Controls - 7 Remote Functions - 8 Batteries - 8 Menu Options Picture Menu - 9 Sound Menu - 10 Options Menu - 11 Projector Setup Power - 12 Projector Placement - 12... -
Page 5: Features
Overview Features Includes • Supports 480p, 720p, 1080i, 1080p • Remote control: requires 2 AAA batteries • Native Resolution: 800 x 480 (not included) • Aspect Ratio: 16:9, 4:3 LB • 3.5mm to 3 x RCA audio/video cable • LED bulb •... -
Page 6: Projector
Projector Features & Inputs... -
Page 7: Controls
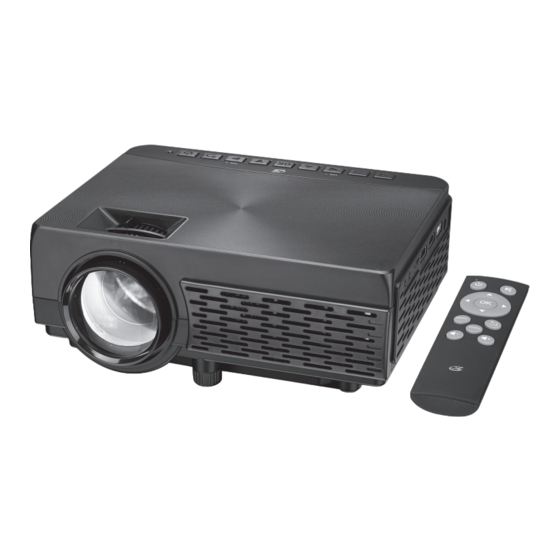
1. Projector Lens 8. Height Adjustment Peg 2. Focus Adjustment 9. Micro SD Card Port 3. Keystone Adjustment 10. HDMI Input 1 & 2 4. Controls & Power Indicators 11. USB Port 5. VGA/PC Input 12. 3.5mm Audio Output 6. Remote sensor (duplicated on the 13. -
Page 8: Remote
Remote Functions Power Mute Press to power ON/OFF. Press to mute volume. Arrows/OK Return Press to navigate and confirm selections in Press to return to a previous page or Settings and other menus. setting in the on-screen menus. Menu Vol + / Vol − Press to access projector Settings. -
Page 9: Menu Options
Menu Options Change projector settings by pressing the Menu button and selecting the Setup icon. Note: Not all settings are user adjustable. Picture Menu 1. Picture Mode Select Vivid, User (custom), Soft, or Standard. 2. Contrast, Brightness, etc. Set Picture Mode to "User" to adjust these settings. 3. -
Page 10: Sound Menu
Sound Menu 1. Sound Mode Select Music, Movie, User (custom), Sports, or Standard. 2. Treble & Bass Set Sound Mode to "User" to adjust these settings. 3. Balance Adjust the audio balance. 4. Bluetooth Speaker ON/OFF Turn Bluetooth capability ON/OFF. -
Page 11: Options Menu
Options Menu 1. OSD Language Select English, French, or Spanish for the On Screen Display. 2. Restore Factory Default Reset the projector and restore all of the default settings. 3. Rotate Flip and mirror the screen image. 4. OSD Duration Set how long the menu will be displayed after you stop using the menu. -
Page 12: Projector Setup
Projector Setup Power Plug the AC/DC power adapter (included) into a standard wall outlet and the DC power input on the side of the unit. After connecting power, please allow approximately 5 seconds to pass before powering the unit ON. Projector Placement For best results, place the projector in a dark room or other dimly lit area. -
Page 13: Viewing Options
FRONT TABLE Viewing Options The projector can be used to project onto a wall or screen, mounted from the ceiling or on a table. When projecting from the rear position, a special screen will be needed (not included) to display the image. FRONT CEILING "... -
Page 14: Ceiling Mount
Ceiling Mount To mount the projector from the ceiling, you will need mounting hardware recommended by a professional. Mounting hardware and instructions are not included. Before mounting, be sure the ceiling structure can support the weight of the projector and the mount itself. It is recommended to have this unit mounted by a professional. -
Page 15: Angle Adjustment
Angle Adjustment Use the Angle Adjustment Knob to fine tune the projector's height. Image Adjustment 1. Focus Adjustment Increase or reduce to image size to sharpen image. 1. Keystone Adjustment Adjust image corners to reduce image distortion. -
Page 16: Connecting Your Projector
Connecting Your Projector HDMI HDMI offers superior sound and picture quality, and is the easiest way to play media from a computer, Blu-Ray player, or other device with an HDMI output. Requires an HDMI cable (not included) and a device with an HDMI output. 1. -
Page 17: Audio/Video Input
Audio/Video Input Requires a 3.5mm to RCA audio/video cable (included). 1. Connect the 3.5mm to RCA audio/video cable to the AV input on the unit. 2. Connect the 3.5mm to RCA audio/video cable to the RCA stereo audio outputs and composite video output on the media player. -
Page 18: Microsd & Usb Storage Devices
MicroSD & USB Storage Devices Supports MicroSD cards and USB drives up to 32GB. Supports AVI, MOV file formats. 1. Load a USB drive into the USB Port. 2. Set the Source to Media Player, then use the Arrow buttons to select "C:Drive" or "D:Drive" (C:Drive is the SD card, D:Drive is the USB). -
Page 19: External Audio
External Audio The PJ300 has a built-in speaker. However, you can also connect external speakers for more sound options. Bluetooth - Pairing to Wireless Speakers or a Sound Bar NOTE: Bluetooth is OFF by default when the projector first powers ON. Bluetooth can be turned ON or OFF from the OPTIONS Menu. -
Page 20: Customer Support
To download this User’s Guide in English, Spanish, and French, or to get answers to frequently asked questions, visit the support section at: www.gpx.com Para descargar este Manual del Usuario en inglés, español y francés, o para obtener respuestas a preguntas frecuentes, visite la sección de apoyo en: www.gpx.com...
Need help?
Do you have a question about the PJ300 and is the answer not in the manual?
Questions and answers