Table of Contents
Advertisement
Quick Links
Advertisement
Table of Contents

Subscribe to Our Youtube Channel
Related Manuals for Electrolux EOP600


Summary of Contents for Electrolux EOP600
- Page 1 EOP600 Oven User Manual...
-
Page 2: Table Of Contents
12. ENERGY EFFICIENCY.................. 32 WE’RE THINKING OF YOU Thank you for purchasing an Electrolux appliance. You’ve chosen a product that brings with it decades of professional experience and innovation. Ingenious and stylish, it has been designed with you in mind. So whenever you use it, you can be safe in the knowledge that you’ll get great results every time. -
Page 3: Children And Vulnerable People Safety
ENGLISH responsible if an incorrect installation and use causes injuries and damages. Always keep the instructions with the appliance for future reference. 1.1 Children and vulnerable people safety This appliance can be used by children aged from 8 • years and above and persons with reduced physical, sensory or mental capabilities or lack of experience and knowledge if they have been given supervision or instruction concerning use of the appliance in a safe... -
Page 4: Safety Instructions
If the supply cord is damaged, it must be replaced by • the manufacturer, its Authorised Service Centre or similarly qualified persons in order to avoid a hazard. - Page 5 ENGLISH fuses removed from the holder), earth – do not put ovenware or other leakage trips and contactors. objects in the appliance directly • The electrical installation must have on the bottom. an isolation device which lets you – do not put aluminium foil directly disconnect the appliance from the on the bottom of the appliance.
-
Page 6: Pyrolytic Cleaning
• Clean regularly the appliance to appliance location during and prevent the deterioration of the after the Pyrolytic cleaning and surface material. first use maximum temperature • Remaining fat or food in the appliance operation to a well ventilated can cause fire. -
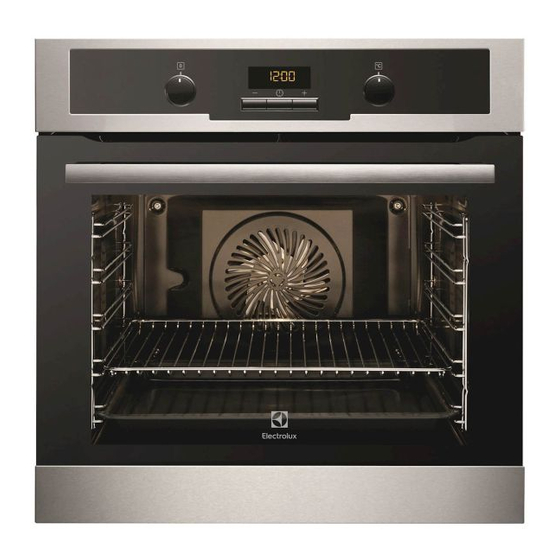
Page 7: Product Description
ENGLISH 3. PRODUCT DESCRIPTION 3.1 General overview Control panel Knob for the oven functions Power lamp / symbol / indicator Electronic programmer Knob for the temperature Power lamp / symbol / indicator Socket for the core temperature sensor Heating element Lamp Shelf support, removable Shelf positions... -
Page 8: Before First Use
4. BEFORE FIRST USE 2. Press to confirm. This is WARNING! necessary only when you set the Refer to Safety chapters. time for the first time. Later the new time will be saved automatically after 4.1 Initial Cleaning 5 seconds. -
Page 9: Oven Functions
ENGLISH 3. To deactivate the appliance turn the knobs for the oven functions and temperature to the off position. 5.3 Oven functions Oven function Application Off position The appliance is off. Light To activate the lamp without a cooking function. True Fan Cook‐... -
Page 10: Heat-Up Indicator
5.5 Buttons Button Function Description MINUS To set the time. CLOCK To set a clock function. PLUS To set the time. 5.6 Heat-up indicator one. The bars show that the oven temperature increases or decreases. When you activate an oven function, the... -
Page 11: Using The Accessories
ENGLISH "00:00" and flash in the display. If you press when you set Press any button or open the oven the hours for DURATION door to stop the acoustic signal. , the appliance goes to If you set the MINUTE setting of the END MINDER when the function. -
Page 12: Inserting The Accessories
Every time you put the core temperature sensor in the socket, you need to set the core temperature time again. You cannot select the duration and end time. When the appliance calculates the provisional duration time for the first... -
Page 13: Additional Functions
ENGLISH Wire shelf and the deep pan together: Push the deep pan between the guide bars of the shelf support and the wire shelf on the guide bars above. Deep pan: Push the deep pan between the guide bars of the shelf support. •... -
Page 14: Residual Heat Indicator
If the Pyrolysis function not change any settings. operates, the door is locked comes on in the Temperature (°C) Switch-off time display. Loc comes on in the display 30 - 115 12.5... -
Page 15: Tips On Baking
ENGLISH at first. If this occurs, do not change When you cook frozen food, the trays in the temperature setting. The the oven can twist during baking. When differences equalize during the baking the trays become cold again, the procedure. distortions are gone. - Page 16 Food Function Temperature Time (min) Shelf position (°C) Madeira cake / True Fan 140 - 160 70 - 90 Fruit cakes Cooking Fatless sponge True Fan 140 - 150 35 - 50 cake / Fatless Cooking sponge cake Fatless sponge...
- Page 17 ENGLISH Food Function Temperature Time (min) Shelf position (°C) Swiss roll Top / Bottom 10 - 20 180 - 200 Heat Cake with True Fan Cook‐ 150 - 160 20 - 40 crumble top‐ ping (dry) Buttered al‐ Top / Bottom 20 - 30 190 - 210 mond cake /...
-
Page 18: Bakes And Gratins
Food Function Temperature Time (min) Shelf position (°C) Biscuits made True Fan Cook‐ 150 - 160 15 - 20 with sponge mixture Pastries made True Fan Cook‐ 80 - 100 120 - 150 with egg white / Meringues Macaroons True Fan Cook‐... -
Page 19: Multilevel Baking
ENGLISH Food Function Temperature Time (min) Shelf position (°C) Fish bakes Top / Bottom 180 - 200 30 - 60 Heat Stuffed vegeta‐ True Fan Cook‐ 160 - 170 30 - 60 bles 1) Preheat the oven. 9.6 Multilevel Baking Use the function True Fan Cooking. -
Page 20: Pizza Setting
Food Temperature Time (min) Shelf position (°C) 2 positions 3 positions Small cakes / 23 - 40 1 / 4 Small cakes (20 per tray) 1) Preheat the oven. 9.7 Pizza Setting Food Temperature (°C) Time (min) Shelf position... -
Page 21: Roasting Tables
ENGLISH • To prevent the meat juices or fat from roasting. This gives better roasting burning onto the pan, put some liquid results. into the deep pan. • You can deactivate the appliance • If necessary, turn the roast (after 1/2 - approximately 10 minutes before the 2/3 of the cooking time). - Page 22 Lamb Food Quantity Function Tempera‐ Time (min) Shelf posi‐ (kg) ture (°C) tion Shelf posi‐ tion Leg of 1 - 1.5 Turbo Grill‐ 150 - 170 100 - 120 lamb / Roast lamb Saddle of 1 - 1.5 Turbo Grill‐...
-
Page 23: Frozen Foods
ENGLISH Fish (steamed) Food Quantity Function Tempera‐ Time (min) Shelf posi‐ (kg) ture (°C) tion Whole fish 1 - 1.5 Top / Bottom 210 - 220 40 - 60 Heat 9.10 Grilling • Grill only flat pieces of meat or fish. •... - Page 24 Food Temperature (°C) Time (min) Shelf position Pizza, frozen 200 - 220 15 - 25 Pizza American, 190 - 210 20 - 25 frozen Pizza, chilled 210 - 230 13 - 25 Pizza Snacks, fro‐ 180 - 200 15 - 30...
-
Page 25: Preserving - Bottom Heat
ENGLISH Food Quantity Defrosting Further de‐ Comments time (min) frosting time (min) Chicken 1 kg 100 - 140 20 - 30 Put the chicken on an upturned saucer in a big plate. Turn half‐ way through. Meat 1 kg 100 - 140 20 - 30 Turn halfway through. -
Page 26: Drying - True Fan Cooking
Vegetables Food Temperature (°C) Cooking time until Continue to cook simmering (min) at 100 °C (min) 160 - 170 50 - 60 5 - 10 Carrots Cucumbers 160 - 170 50 - 60 Mixed pickles 160 - 170 50 - 60... -
Page 27: Care And Cleaning
ENGLISH Food Food core temperature (°C) Rib / Fillet steak: medium 60 - 65 Rib / Fillet steak: well done 70 - 75 Pork Food Food core temperature (°C) Shoulder / Ham / Neck joint of pork 80 - 82 Chop (saddle) / Smoked pork loin 75 - 80 Meatloaf... -
Page 28: Notes On Cleaning
10.1 Notes on cleaning Install the shelf supports in the opposite sequence. • Clean the front of the appliance with a soft cloth with warm water and a 10.3 Pyrolysis cleaning agent. • To clean metal surfaces, use a usual CAUTION! cleaning agent. -
Page 29: Removing And Installing The Door
ENGLISH 7. Pull the door trim to the front to The cleaning reminder remove it. goes out: 8. Hold the door glass panels on their • after the end of the top edge one by one and pull them Pyrolysis function. up out of the guide. -
Page 30: Troubleshooting
11. TROUBLESHOOTING WARNING! Refer to Safety chapters. 11.1 What to do if... Problem Possible cause Remedy You cannot activate or op‐ The oven is not connected Check if the oven is cor‐ erate the oven. to an electrical supply or it rectly connected to the is connected incorrectly. -
Page 31: Service Data
ENGLISH Problem Possible cause Remedy The display shows "C2". You want to start the Pyrol‐ Remove the core tempera‐ ysis or the Defrost function, ture sensor plug from the but you did not remove the socket. core temperature sensor plug from the socket. The display shows "C3". -
Page 32: Energy Efficiency
12. ENERGY EFFICIENCY 12.1 Product Fiche and information according to EU 65-66/2014 Supplier's name Electrolux EOP600W Model identification EOP600X Energy Efficiency Index 103.5 Energy efficiency class Energy consumption with a standard load, con‐ 0.99 kWh/cycle ventional mode Energy consumption with a standard load, fan- 0.88 kWh/cycle... -
Page 33: Environment Concerns
ENGLISH 13. ENVIRONMENT CONCERNS Recycle the materials with the symbol marked with the symbol with the household waste. Return the product to . Put the packaging in applicable your local recycling facility or contact containers to recycle it. Help protect the your municipal office. - Page 34 www.electrolux.com...
- Page 35 ENGLISH...
- Page 36 www.electrolux.com/shop...
Need help?
Do you have a question about the EOP600 and is the answer not in the manual?
Questions and answers