Table of Contents
Advertisement
Quick Links
Advertisement
Table of Contents

Subscribe to Our Youtube Channel
Related Manuals for Mooer OCEAN MACHINE II


Summary of Contents for Mooer OCEAN MACHINE II
- Page 1 OCEAN MACHINE II Premium Dual Delay, Reverb and Looper Pedal Owner’s Manual...
-
Page 2: Table Of Contents
CONTENT PRECAUTIONS ............................1 FEATURES ..............................2 TOP PANEL ............................... 2 BACK PANEL ............................. 4 CONNECTION SCENARIOS ........................4 Mono setup ............................4 Mono input and stereo output setup ....................5 Stereo input and stereo output setup ....................5 FX LOOP setup ............................. 6 EFFECT TYPES............................ - Page 3 Patch Detail screen ........................16 Tap Tempo ............................. 17 Storing presets ..........................17 LOOPER ..............................17 Operation ............................18 Looper positioning ..........................18 SETTINGS MENU ............................ 19 F4 Pairing ............................19 Bypass & Trail ............................ 20 Exp..............................20 Calibrate ............................21 IN &...
-
Page 4: Precautions
Please do not modify the unit without authorization. Should repairs be required, please contact the MOOER support team for more information. Storage and usage locations To avoid deformation, discoloration or other serious damage, do not expose this device to any of the following conditions: ... -
Page 5: Features
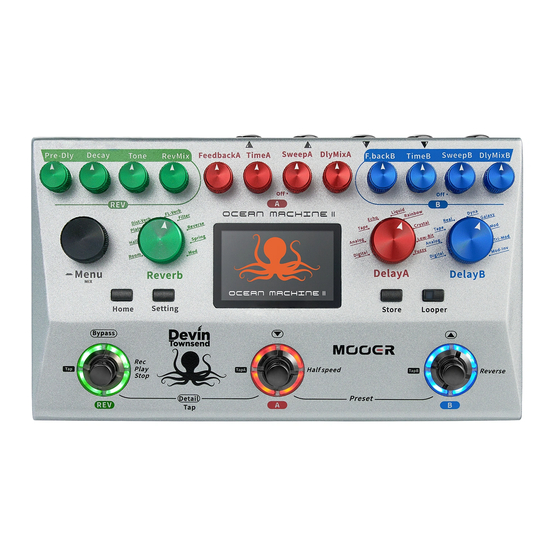
Supports external parameter control via expression pedal Upgraded MIDI control with clock sync, allowing the pedal to sync with other MIDI devices Supports external control with MOOER F4 wireless footswitch controller USB-C port for firmware updates TOP PANEL 1. - Page 6 counterclockwise (11-7 o'clock) high pass filter (20 kHz ~ 3 kHz) 5. RevMix: Rotate to adjust the dry/wet ratio of the reverb effect. 6. FeedbackA: Rotate to adjust the feedback value of the DelayA module (repeats). 7. TimeA: Rotate to adjust the delay time of the DelayA module. 8.
-
Page 7: Back Panel
BACK PANEL 1. EXP: 1/4" stereo audio jack, connection to external expression pedal (please use a TRS cable for the connection) 2. LEFT INPUT: 1/4" mono audio jack, input for the left channel 3. RIGHT INPUT: 1/4" mono audio jack, input for the right channel 4. -
Page 8: Mono Input And Stereo Output Setup
Mono input and stereo output setup Guitar connects to the LEFT/MONO input jack LEFT/MONO output jack connects to the INPUT of the amplifier RIGHT output jack connects to the INPUT of another amplifier Stereo input and stereo output setup Guitar connects to the INPUT of a stereo pedal LEFT output jack of the stereo pedal connects to the LEFT/MONO input jack RIGHT output jack of the stereo pedal connects to the RIGHT input jack LEFT/MONO output jack connects to the INPUT of the amplifier... -
Page 9: Fx Loop Setup
FX LOOP setup Guitar connects to the INPUT of the amplifier LEFT/MONO input jack connects to the SEND of the amplifier LEFT/MONO output jack connects to the RETURN of the amplifier EFFECT TYPES Reverb Room: Small room reverb with a short decay Hall: Large spacious reverb with a long decay Plate: Based on a traditional mechanical plate reverb Ds-Verb*: Distorted reverb... -
Page 10: Delayb
Menu knob. (See section Menu ) OPERATION Plug your guitar into the INPUT of the Ocean Machine II and use audio cables to connect to your amplifier. (See section CONNECTION SCENARIOS). Connect the power adapter (9 VDC, 500 mA, center negative) to the DC IN jack. -
Page 11: Modes
4. right output level Modes The Ocean Machine II features two main operation modes for using the delay and reverb effects in different ways (Play Mode and Patch Mode) plus a Looper Mode. The Patch Mode features different interfaces: the Preset Selection screen and the Patch Detail screen. -
Page 12: Play Mode
Play Mode In this mode the Ocean Machine II operates like a traditional effects pedal. You can use the Rev, A and B footswitches as if the effects were individual pedals. The footswitch LED indicate whether the respective effect is ON or OFF. -
Page 13: Freeze Feedback
Freeze Feedback Holding down any of the footswitches while its respective effect is turned on will put the effect into a state of infinite feedback until the footswitch is released. This can result in oscillating feedback in some cases. The feedback will decay again as soon as the footswitch is released. Note: If you want to use Freeze Feedback in Patch Mode, press the REV and A footswitches simultaneously to switch to Patch Detail screen. -
Page 14: Menu Control
When the main interface (Play or Patch Mode) is displayed and no module is selected (highlighted), rotate the Menu knob to adjust the master output effect mix of the Ocean Machine II (ratio of the effect signal / dry signal), with 100 being the maximum effect volume and 0 being completely dry sound output. -
Page 15: Pingpong Effect
The top row in the display shows the selected effect type. The section below shows the parameters for this type. In Play Mode, the indicated parameters correspond to the physical settings of the knobs. The main parameters can only be adjusted by rotating the corresponding knobs. The parameter values are indicated as dials and digital readouts (in percent). -
Page 16: Tempo Subdivisions
In Patch mode, first step on the REV and A footswitches simultaneously to open the Patch Detail screen, then use the steps above to set the PingPong effect. Tempo subdivisions For DelayA or DelayB, tempo subdivisions will be applied to the tap tempo that was entered for each individual delay or to the Master Tap Tempo entered with the help of the Reverb footswitch. -
Page 17: Storing Settings As Preset
Note: Previously saved settings in the selected slot will be overridden. Patch Mode In this mode, the Ocean Machine II recalls saved presets. The OMII features 8 banks with 3 presets each, for a total of 24 presets. All main effect parameter values correspond to the values saved in the preset, not to the values indicated on the respective physical knobs. -
Page 18: Footswitch Functions
Footswitch functions REV (Bypass) in Preset Selection screen: - activates the pedal, footswitch LED for effects that are active in the selected preset are lit A and B LED rings blink to indicate the respective tempo the preset number in the display is shown in blue - or switches the pedal to global bypass, ... -
Page 19: Preset Selection Screen
Patch Detail screen (Effect type / OFF). The On/Off status of each individual effect is stored separately for each preset. Press A + B footswitches simultaneously to switch to Play Mode. Preset Selection screen DelayB Time DelayA Time Reverb type Preset number (blue, if effects are active, DelayB type... -
Page 20: Tap Tempo
Note: Previously saved settings in the selected slot will be overridden. LOOPER The Ocean Machine II pedal features a Looper with up to 120 seconds of recording time, overdubbing, independent level control, full featured half speed + reverse effects and no limit to the number of recorded tracks. -
Page 21: Operation
Operation Menu knob Rotate Menu to adjust the Looper playback volume level. This is independent from the master mix. REC / PLAY / DUB / STOP / CLEAR (REV footswitch) With an empty track: Tap once for Record, tap again for Play, tap again for Dub… ... -
Page 22: Settings Menu
Ocean Machine II supports the MOOER F4 wireless footswitch for external control options. Use this setting to pair your Ocean Machine II with an optional wireless MOOER F4 series footswitch. Turn the F4 wireless footswitch on and long press the A + C footswitches on the F4 simultaneously to put it into pairing mode. -
Page 23: Bypass & Trail
Footswitch A: Master Tap Tempo, the LED flashes to indicate the selected tempo Footswitch B: Tap Tempo for Delay A, the LED flashes to indicate the selected BPM value Footswitch C: Tap Tempo for Delay B, the LED flashes to indicate the selected BPM value Footswitch D: Switches all modules into bypass, only the dry signal is put out (works in Play and Patch modes). -
Page 24: Calibrate
Rotate the Menu knob to select which parameter you want the expression pedal to control. This will be a global setting and cannot be changed per preset. Press the Menu knob to confirm your selection. The selected Parameter will be highlighted in red. -
Page 25: Merge
Global EQ The Ocean Machine II is equipped with a Global EQ section which will affect both your dry guitar signal and the sound of the effects. This can be switched on or off. The Global EQ can be used for quick adjustments to accommodate the sound conditions at the venue. -
Page 26: Midi
(See section Calibrate in the Settings menu) WIRELESS FOOTSWITCH The Ocean Machine II supports a wireless footswitch of the MOOER F4 series (to be purchased separately). Please consult the manual for the F4 footswitch for battery specs and charging requirements. -
Page 27: Midi Tables
If the Effects are active on the OMII, the LED on the wireless footswitch will blink to indicate their respective tempo. MIDI TABLES The Ocean Machine II can receive MIDI signals but cannot generate its own MIDI commands. Incoming MIDI commands can be routed through the OMII to the MIDI TRU port and forwarded to other devices. -
Page 28: Firmware Update
0-127 FIRMWARE UPDATE From time to time, MOOER will release new firmware updates for your Ocean Machine II which will include new features or bug fixes based on user feedback. The current firmware version of the OMII is shown in the Reset screen. (See Reset in the Settings menu) Note: A firmware update will reset all settings and stored presets to factory settings! You will need a USB Type C to USB Type A cable to complete the firmware update. -
Page 29: Specifications
Caution: Do not disconnect the USB cable or the power supply on your pedal while an update is in progress. This could cause unexpected errors. SPECIFICATIONS Input: 6.35 mm (1/4") TS audio interface, impedance 1 MΩ Output: 6.35 mm (1/4") TS audio interface, impedance 100 Ω External expression pedal: TRS device, impedance 10 kΩ...
Need help?
Do you have a question about the OCEAN MACHINE II and is the answer not in the manual?
Questions and answers