Table of Contents
Advertisement
Quick Links
We warrant that the product will be free from defects in materials and
workmanship for a period of 1 years from the date of purchase of the product
by the original purchaser from our company. This warranty only applies to the
original purchaser and is not transferable to a third party.
If the product proves defective during the warranty period, we will either
repair the defective product without charge for parts and labour, or will provide
a replacement in exchange for the defective product. Parts, modules, and
replacement products used by our company for warranty work may be new or
reconditioned like new. All replaced parts, modules and products become the
property of our company.
In order to obtain service under this warranty, the customer must notify our
company of the defect before the expiration of the warranty period. Customer
shall be responsible for packaging and shipping the defective product to the
designated service centre, a copy of the customers proof of purchase is also
required.
This warranty shall not apply to any defect, failure or damage caused by
improper use or improper or inadequate maintenance and care.
We shall not be obligated to furnish service under this warranty a) to repair
damage resulting from attempts by personnel other than our company
representatives to install, repair or service the product; b) to repair damage
resulting from improper use or connection to incompatible equipment; c) to
repair any damage or malfunction caused by the use of not our supplies; or d)
to service a product that has been modified or integrated with other products
when the effect of such modification or integration increases the time or
difficulty of servicing the product.
Please contact the nearest Sales and Service Offices for services.
Excepting the after-sales services provided in this summary or the
applicable warranty statements, we will not offer any guarantee for
maintenance declared or hinted, including but not limited to the implied
guarantee for marketability and special-purpose acceptability. We should
not take any responsibilities for any indirect, special, or consequent
damages.
※:The illustrations, interface, icons and characters in the user manual may be slightly
different from the actual product. Please refer to the actual product.
General Warranty
Advertisement
Table of Contents

Related Manuals for Owon CMS101


Summary of Contents for Owon CMS101
- Page 1 General Warranty We warrant that the product will be free from defects in materials and workmanship for a period of 1 years from the date of purchase of the product by the original purchaser from our company. This warranty only applies to the original purchaser and is not transferable to a third party.
-
Page 2: Table Of Contents
Table of Contents 1.Safety Information ................1 General Safety Requirements ....................1 Measurement Category ......................3 Safety Terms and Symbols .....................3 2.Quick Start ..................5 General Inspection ........................5 Install the Battery ........................5 Power on/off ..........................6 Selecting the Range ........................ 6 Instrument Panel ........................ -
Page 3: Safety Information
1.Safety Information 1.Safety Information (Be sure to read the safety information before using this product.) General Safety Requirements Before any operations, please read the following safety precautions to avoid any possible bodily injury and prevent this product or any other products connected from damage. In order to avoid any contingent danger, this product is only used within the range specified. - Page 4 1.Safety Information Do not operate in an explosive atmosphere. Keep product surfaces clean and dry. Do not apply more than the rated voltage (as marked on the digital clamp meter) between terminals, or between terminal and earth ground. ...
-
Page 5: Measurement Category
1.Safety Information Measurement Category The digital clamp meter has a safety rating of 1000 V,CAT III and 600V,CAT Measurement category definition Measurement CAT I applies to measurements performed on circuits not directly connected to the AC mains. Examples are measurements on circuits not derived from the AC mains and specially protected (internal) mains- derived circuits. -
Page 6: Safety Symbols
1.Safety Information Warning: It indicates an injury or hazard may be accessible potentially. Caution: It indicates a potential damage to the instrument or other property might occur. Safety Symbols Symbols on the Product. The following symbol may appear on the product: Direct current (DC) Fuse Caution, risk of danger (refer to this... -
Page 7: Quick Start
2.Quick Start 2.Quick Start General Inspection After you get a new digital clamp meter, make a check on the instrument according to the following steps: 1. Check whether there is any damage caused by transportation. If it is found that the packaging carton or the foamed plastic protection cushion has suffered serious damage, do not throw it away first till the complete device and its accessories succeed in the electrical and mechanical property tests. -
Page 8: Power On/Off
2.Quick Start battery type. Use the following procedure to install the battery: (1) Power off, remove test leads and any connectors from the input terminals. (2) Loosen the screws with a suitable Phillips screwdriver and remove the battery cover. (3) Observe the battery polarity indicated inside the battery compartment, Insert the battery. -
Page 9: Instrument Panel
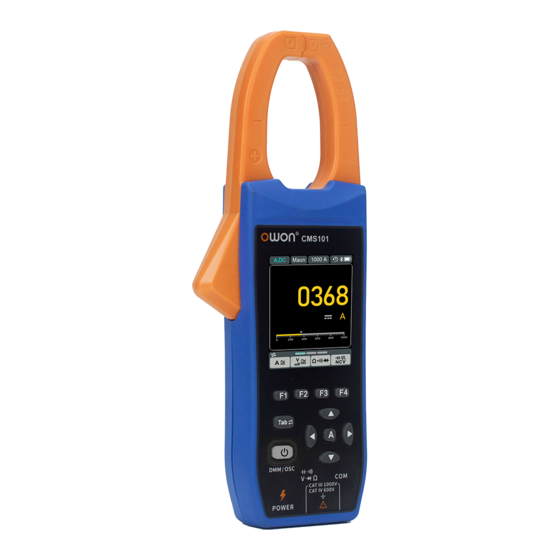
2.Quick Start Instrument Panel Front Panel and Keys Figure 2- 1:Front panel Description: Illustration in multimeter mode Illustration in oscilloscope mode NCV measurement. Safety level. - Page 10 2.Quick Start Maximum current allowed to be measured. Operation indicator light. Reading hold button. Run/Stop button. Display area. The F1 - F4 keys are multi-function keys. In each menu mode, press the corresponding key to select the corresponding menu item. Function of direction keys Function of direction keys : used for changing range.
-
Page 11: Instrument Interface
2.Quick Start Instrument Interface Multimeter interface Description: Measurement type indication: Measurement type Description A,DC DC current measurement A,AC AC current measurement V,DC、mV,DC DC voltage measurement V,AC、mV,AC AC voltage measurement Resistance measurement Cont On/Off measurement Diode Diode measurement Capacitance measurement Freq Frequency measurement Non-contact AC voltage sensing Range indication: Manu means manual range;... -
Page 12: Oscilloscope Interface
2.Quick Start Current measurement range. Automatic shutdown sign: Display the flag when enabled. Closing will hide the identity. Bluetooth sign: Display the flag when enabled. Closing will hide the identity. Battery power and external power supply indication. Inrush mode (Only in ACA mode). Reading hold mode. -
Page 13: How To Connect With Android Device
2.Quick Start 2. Scale (In the vertical direction, each grid represents a specific voltage or current value.) 3. The trigger status indicates the following information: Trig:A trigger has been detected and post trigger information is being collected. Ready:All pre trigger data have been obtained and the oscilloscope is ready. - Page 14 2.Quick Start (2) Open the installed application on your mobile device (3) Turn on the multimeter, press and hold until appear on the display. (4) Click on "Device List" in the bottom navigation bar. (5) Click the "+" icon in the upper left corner to begin searching for devices and list out the multimeters found.
- Page 15 2.Quick Start (8) After "BDM" appears in the list of available devices, click and select to connect it to the mobile device. Note: When Bluetooth is enabled, the auto power-off function is disabled. After Bluetooth is turned off, the auto power-off function will be restored.
-
Page 16: Appendix
3.Appendix Appendix Appendix A: List of Accessories 1 set of probes 1 quick guide 1 USB-TYPE C line Appendix B: Maintenance and Cleaning General maintenance Do not store or place the instrument in a place where the LCD screen will be exposed to direct sunlight for a long time. -
Page 17: Charging And Replacement Of Battery
3.Appendix Charging and Replacement of Battery During the long-term storage of the device, the battery may be too low due to the self-discharge of the lithium battery and the device cannot be turned on. T his is a normal phenomenon. Please use the attached adapter to pre-charge the device for 0.5 to 1 hour ( depending on the storage time) before turning it on.
Need help?
Do you have a question about the CMS101 and is the answer not in the manual?
Questions and answers