Advertisement
Advertisement
Table of Contents

Related Manuals for Owon PC311-TY


Summary of Contents for Owon PC311-TY
- Page 1 Smart Life App PC311-TY Single-Phase Power Clamp Quick Start Guide...
-
Page 2: Safety Handling
Safety Handling WARNING: Failure to follow these safety notices could result in fire, electric shock, other injuries, or damage to the Power Clamp and other property. Read all the safety notices below before using the Power Clamp. • Avoid high humidity or extreme temperatures. •... -
Page 3: Technical Specifications
Technical Specifications Wireless Connectivity Wi-Fi • 802.11 B/G/N20/N40@2.4GHz • Bluetooth 4.2 Low Energy • Operating frequency: 2.4GHz RF Characteristics • Internal antenna Physical Specifications Operating Voltage • 90~250 Vac 50/60 Hz • ≤ 100W ( Within ±2W ) Calibrated Metering Accuracy •... - Page 4 Welcome PC311-TY Power Clamp helps you monitor the amount of electricity usage in your facility by connecting the clamp on to the power cable. It can also measure Voltage, Current, PowerFactor, ActivePower. This guide will provide you with an overview of the product and help you get through the initial setup to installation.
-
Page 5: Get To Know Your Device
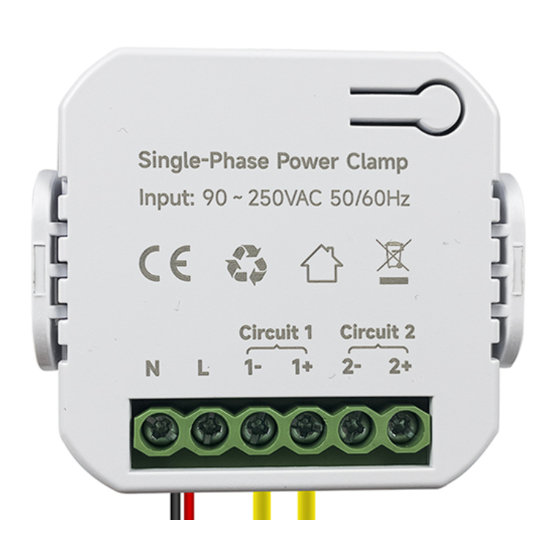
Get to know your device LED indicator Reset Button AC Input CT: Current Transformer AC input cable Clamp... -
Page 6: Reset Button
Mounting bracket Reset Button • Reset. Press and hold the reset button for 5 seconds until the LED indicator flashes Red 3 times quikly to clear the Wi-Fi information (energy data will not be cleared). After that, the LED indicator will blink Green and wait for pairing. -
Page 7: Important Safety Information
Installaion Important safety information! • The power clamp must be installed and serviced only by a qualified electrical personnel. • Do not touch the terminals of the device during testing. • Turn off all the power supply for this equipment before installing. •... - Page 8 Get started: Please make sure the main power in your facility is off before installing 1. Open the clamp to see the arrow (P1→P2) or (K→L) or you can find it on the sticker on the outside of the clamp. This is the direction of CT.
- Page 9 •To measure energy generation The arrow on the clamp should face to inverter like CT2 in the wiring diagram. In this case, the direction of the current is opposite to that of the CT . The power will be negative, and the energy generation will be accumulated.
- Page 10 •To measure 'From Grid' or 'To Grid' To monitor how much energy is pulling from and sending back from the grid, install the CT on the leads coming from your mains like the CT1 below. PC311 Grid Inverter Load Circuit 2 Circuit 1 (DC/AC) L 1- 1+ 2- 2+...
- Page 11 3. Connect AC Input cable to a socket near the Electrical Box to power on the Power Clamp according to the wiring diagram. PC311 Circuit 1 Circuit 2 Load1 Load2 L 1- 1+ 2- 2+ Circuit Breaker Wiring diagram...
- Page 12 Mounting The Power Clamp has a mounting bracket for mounting purposes. You can choose the following two mounting methods : • Use the mounting bracket as template to mark the two holes on the wall for installing screws. Screw the mounting bracket onto the wall according to marked location.
-
Page 13: Configure Network
Configure Network Download App Please download the application: Smart Life from App Store or App Market. Also you can scan below QR code to download and install. - Page 14 Method 1: 1. Open Smart Life app and click the 'Scan' button in the upper right corner of the App Home page. ←...
- Page 15 2. Scan the following QR code to configure the network . Method 2: 1. Power on the power clamp. 2. Make sure the LED indicator is flashing green. If not, please reset it. 3. Open Smart Life app and turn on Bluetooth on your phone.
- Page 16 4. Open the app and the scanned devices will pop up automatically. 5. If no prompt box pops up automatically, please click the '+' on the top right of the home page to add device. It will search nearby devices.
- Page 17 6. After clicking ' A dd', enter your home Wi-Fi account and password (Only support 2.4Ghz Wi-Fi) and wait for it to be added. If it fails, please refer to the FAQ. 1. Wi-Fi configuration of the device failed - Confirm the entered router password is correct. - If you have already upgrate the iOS system to 14, you need to enable the "Local network"...
- Page 18 - Confirm that both the location permission of phone system and Smart Life App are enabled. Phone system ← Smart Life ← ←...
- Page 19 - Ensure that the DHCP service is enabled for the router. If not, the IP address will be occupied. - If your router supports both 2.4Ghz and 5Ghz, please enable the 2.4Ghz channel and add device under 2.4G Wi-Fi channel. You can follow the following step on the App to configure the router.
- Page 20 2. Device offline - Confirm whether the Power Clamp is powered on. - Please confirm whether the home Wi-Fi network is normal, or whether the Wi-Fi name and password has been modified: Put the phone besides your device and make sure they are in the same network environment, try to open a website to judge if the network can be used.
Need help?
Do you have a question about the PC311-TY and is the answer not in the manual?
Questions and answers