
Related Manuals for SCIWIL SW-K80


Summary of Contents for SCIWIL SW-K80
- Page 1 No.:XSW-J-06-0032-2024 USERS GUIDE SW-K80 E-Bike Display Model:SW-K60A Protocol:UART2.0 Scan QR Code Version:V6.03 to Download PDF Changzhou Sciwil E-Mobility Technology Co., Ltd. Website Wechat 第 1 页...
-
Page 2: Table Of Contents
Contents Ⅰ. Safety Notes ..................... 3 Ⅱ. Overview ....................... 4 1. Product Name and Model ................4 2. Product Introduction ..................4 3. Specifications ....................4 4. Function ......................4 5. Size ........................5 6. Assembly ......................5 7. Serial Code ......................6 Ⅲ. -
Page 3: Ⅰ. Safety Notes
Ⅰ. Safety Notes PLEASE TAKE CAUTION WHEN USE,DO NOT PLUG OR UNPLUG THE DISPLAY WHILE YOUR E-BIKE IS POWERED ON. AVOID CLASHES OR BUMPS TO THE DISPLAY. AVOID USING IN HEAVY RAINS, SNOWS OR LONG EXPOSURE TO STRONG SUNLIGHT. DO NOT TEAR THE WATER-PROOF FILM ON THE SURFACE OF THE SCREEN, OTHERWISE THE WATER-TIGHT PERFORMANCE OF THE PRODUCT MAY BE DEGRADED. -
Page 4: Ⅱ. Overview
Ⅱ. Overview 1. Product Name and Model Product Name: E-Bike Display Product Model: SW-K60A 2. Product Introduction SW-K60A features high-brightness color LCD and minimalist interface, working as an ideal HMI solution for EN15194 electric bikes. 3. Specifications Working Voltage: DC 24V/36V/48V/52V/60V/72V ... -
Page 5: Size
Turning Signals: This function works with controller. Dual Drive Control and Display: This function works with controller. Status of Double Battery Packs: optional, works with controller. NFC Function: optional. Bluetooth Connection: optional, support OTA upgrade via mobile phone. 5. -
Page 6: Serial Code
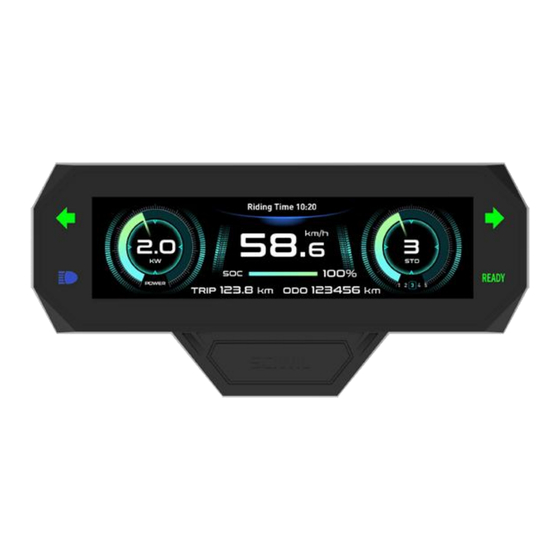
7. Serial Code Marked at the 111 22 333333 555 6666 Example: back of display 111:Customer Code 22:Protocol Code 333333:P.O. Date (YYMMDD) 555:Order Receiving Number 6666: Production Date (YYMM) Ⅲ. Operation 1. Display Interface 1.1 Riding Interface Status: Real-time Riding Status: Bluetooth, Front Light, Brake, Low Voltage, Turning, Cruise, Drive Status, etc. -
Page 7: Error Interface
In the above interface: Setting Item: System Unit, Parameter Value: km/h 1.3 Error Interface In the above interface: Error Indicator: ERROR, Error Note: Communications Error 2. Key Pad SWK2 Keypad Illustration: There are 5 keys on the SWK2 keypad, in the following instructions: is called Plus Key;... -
Page 8: On/Off
Key operation guide as follows: Press and Hold: means press and hold the key(s) for more than 2s. Press: means press the key(s) for less than 0.5s. Double Tap: means double tap the key(s) within 0.3s 3.1 On/Off Turn on the Display: When the display is off, press and hold the On/Off Key to turn on the display, it will show boot interface and then enter riding interface. -
Page 9: Light On/Off
3.4 Light On/Off Turn on the Front Light: when the front light is off, press the Light Key to turn it on, and the light icon will be shown on the riding interface (to remove this functions, please reconfigure the controller). Turn off the Front Light: when the front light is on, press the Light Key to turn it off, and the light icon will be off on the riding interface. -
Page 10: Settings
4. Settings 4.1 Setting Operations ① Enter the Settings: when the display is on, press and hold the Plus Key and the Minus/Walk Assist Key together to enter the Settings. Available setting items include: system voltage, wheel size (inch), magnetic steel number for speed gauge, speed limit etc (please refer to 4.2 Setting Items). - Page 11 4.4 Auto-Off Press Plus or Minus to select 1~60min as auto-off time, which means the display will turn off automatically if no operations detected within this period. Default Auto-Off time: 10min 4.5 Auto-Lamp On/Off Press and hold On/Off Key to turn on or off the front light automatically. Digital scenario or analog scenario switch.
- Page 12 Press Plus or Minus to set the correct wheel size. Default wheel size: 26inch. Incorrect or inaccurate wheel size may lead to incorrect speed display. Unit: inch, increment 0.1inch. 4.8 Voltage Level Press Plus or Minus to select. Working voltage range: 24~72V. 4.9 Low Battery Level In light of low battery protection volt level, press Plus or Minus to set low battery protection level for the vehicle.
- Page 13 4.11 Boot Password Press the Info Key to enter Passoword Settings. First to set is 4-digit boot password (as shown in the pictures below). Then you can set in turn passwords for setting menu, basic settings, advanced settings and change password.
-
Page 14: Advanced Settings
4.12 Advanced Settings Press On/Off Key to enter Advanced Settings. For password protected product, enter the correct password and press On/Off Key to enter Advanced Setting. Press Plus or Minus to set values, then press On/Off Key to save and switch to the next item. 4.13 Speed Limit Press Plus or Minus to set values for speed limit. -
Page 15: Assist Levels
4.16 Assist Levels Press Plus or Minus to select assist level mode: 3 levels / 5 levels. 4.17 Torque Level Range Press Plus or Minus to select signal voltage level for torque sensor: 500mV / 3500mV. 4.18 Poles in Motor Press Plus or Minus to set number of magnetic poles for speed gauge. -
Page 16: Start Mode
4.19 Start Mode Press Plus or Minus to select start mode : Throttle on demand and Throttle after pedal. “Zero” means Throttle on demand, “Non-Zero”means Throttle after pedal. 4.20 Drive Mode Press Plus or Minus to select drive mode: 0 / 1 / 2. 0 means pedal assist only, 1 means throttle only, 2 means both modes available. -
Page 17: Start Sensitivity
4.22 Start Sensitivity Press Plus or Minus to select start sensitivity range: 1~24. This value is the start latency after pedal. 4.23 Start Strength Press Plus or Minus to select start sensitivity range: 0~5. This value is the start power output after pedal. 4.24 Factory Reset Press the On/Off key to enter the Factory Reset Interface. - Page 18 4.25 Information Press the On/Off key to enter the information interface and check info like speed record, distance record and serial numbers, etc. 第 18 页...
-
Page 19: Error Code
5. Error Code Error Code Status Note (decimal) Normal Reserved Brake Error PAS Sensor Error (Riding Mark) Not Realized Walk Assist Mode Real-Time Cruise Low Voltage Protection Motor Error Throttle Error Controller Error Communications Error BMS Communications Error Front Light Error 6. -
Page 20: Warranty
The limited warranty shall not be transferred to a third party other than as specified in the agreement with Sciwil. Warranty Exclusions: Sciwil products that have been opened, modified or repaired without authorization. Damage on the connectors. Damage to the surface after leaving factory, including shell, screen, buttons, or other appearance parts.
Need help?
Do you have a question about the SW-K80 and is the answer not in the manual?
Questions and answers