Table of Contents
Advertisement
Available languages
Available languages
Quick Links
Lovibond
®
Tintometer
Photometer-System
MD50 • MD150
Instruction manual.................. 3
EN
Manual de instrucciones.......53
ES
Manual de instruções..........104
PT
Gebruiksaanwijzing.............154
NL
Инструкции по
RU
эксплуатации...................... 203
®
Water Testing
Group
Gebrauchsanleitung..............27
DE
Mode d'emploi....................... 78
FR
Manuale d'istruzione........... 130
IT
Kullanım Talimatları............ 179
TR
使用说明................................ 229
ZH
Advertisement
Chapters
Table of Contents

Subscribe to Our Youtube Channel
Related Manuals for Tintometer Lovibond MD50


Summary of Contents for Tintometer Lovibond MD50
- Page 1 ® Lovibond Water Testing ® Tintometer Group Photometer-System MD50 • MD150 Instruction manual....3 Gebrauchsanleitung....27 Manual de instrucciones..53 Mode d'emploi....... 78 Manual de instruções..104 Manuale d'istruzione... 130 Gebruiksaanwijzing.....154 Kullanım Talimatları.... 179 Инструкции по 使用说明........ 229 эксплуатации...... 203...
-
Page 3: Table Of Contents
Table of Contents Table of Contents Photometer Series 1 Introduction 1.1 General Information 1.1.1 Read instructions before use 1.1.2 Purpose of the Product 1.1.3 Authorized use 1.1.4 Requirements for safe use 1.1.5 Keep instructions 1.1.6 User qualification 1.1.7 Handling of hazardous chemicals 1.1.8 Disposal notes 1.2 List of all used signs in the document 2 Product overview... - Page 4 Table of Contents 9 Appendix 9.1 Copyright and Trademark Notice EN Photometer Series...
-
Page 5: Introduction
1 Introduction 1 Introduction 1.1 General Information 1.1.1 Read instructions before use This manual provides important information on the safe operation of the product. Please read this manual carefully and familiarize yourself with the product before use. 1.1.2 Purpose of the Product Lovibond photometers are designed to measure different parameters in aqueous samples in a variety of applications such as e.g. -
Page 6: Keep Instructions
1 Introduction 1.1.5 Keep instructions The manual must be kept in the vicinity of the product so you can always find the information you need. 1.1.6 User qualification The operating personnel must be able to understand and correctly implement the safety labels and safety instructions on the packages and inserts of the products. - Page 7 1 Introduction A hazard exists that may result in minor or moderate injury. Caution! Important information or specifc instructions need to be strictly followed. Notice! EN Photometer Series...
-
Page 8: Product Overview
2.3 Features Lovibond MD50 and MD150 photometers provide high level of accuracy and efficiency with user friendly interface. • Robust design, Water & Dust proof. • Innovative optics system to provide higher accuracy. -
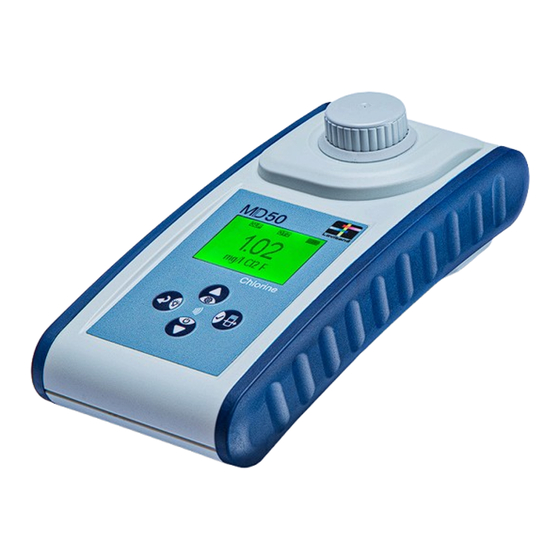
Page 9: Instrument View
2 Product overview 2.4.1 Instrument view Front Side 1 - Sample Chamber 2 - Display 3 - Variant Name 4 - Power button 2.4.2 Description of the keys and switches Function Down key Turns Instrument on or off Used for scrolling downward Test key Measure sample Select or confirm an action... -
Page 10: Interface Description
2 Product overview 2.4.3 Interface description 1. USB–C port for data transfer, updates and method import via PC software. USB-C Port (waterproof) USB-C USB-A 2. NFC for wireless data transfer to smart devices via App. NFC field EN Photometer Series... -
Page 11: Commissioning
3 Commissioning 3 Commissioning 3.1 Operating environment The instrument can be used in any indoor or outdoor environment that is deemed safe for an operator to perform the analysis. However it is recommended to not use instrument in bright sunlight to avoid errors caused by stray light. This environment includes a temperature range from 5 to 50 degrees C with a non-condensing humidity up to 90%. -
Page 12: Inserting And Replacing The Batteries
3 Commissioning 3.3 Inserting and replacing the batteries 1 - screw driver 2 - instrument back 3 - battery 4 - notch 5 - screw 6 - seal ring 7 - battery compartment cover Switch the instrument off. If necessary remove vial from the sample chamber. Place the instrument upside down on a clean and even surface. -
Page 13: Operation
4 Operation 4 Operation 4.1 First start up • Insert the batteries as described in chapter 3.3. • Turn the instrument on by pressing Down key. • The instrument will show company logo in sequence. • Instrument’s firmware version will be displayed on screen for a short while. •... -
Page 14: Control Elements
4 Operation 4.3 Control elements 4.3.1 List of control elements and their function Function Description How to execute function Turn • Press Down key to turn on the Instrument instrument. on/off • Press and hold Down key to turn off the instrument. Backlight •... - Page 15 4 Operation Function Description How to execute function • The countdown can be skipped by pressing the test button again, but it is strongly recommended that you follow the procedure. • After the measurement, the empty cuvette symbol changes to a full cuvette (bottom left of the display).
- Page 16 4 Operation Function Description How to execute function mg/L Cl F ⇄ mg/L Br Change • Result is displayed in default citation form citation form. • Press Up or Down key to change the citation form. • The new chosen citation form is saved by the instrument as default and will show results in this citation form unless reset to default.
- Page 17 4 Operation Function Description How to execute function Enter logs • When log symbol is displayed menu press Test key to enter logs. • The instrument displays a list of all saved results/ protocols • Press Up or Down key to scroll through the results in the list.
- Page 18 4 Operation Function Description How to execute function One Time Some methods offer a One Time Zero Zero to make the measurement process more efficient. • Press Up or Down key to scroll to the OTZ symbol in the settings menu. • Press Test key to enable or disable OTZ.
-
Page 19: Data Transfer
4 Operation Function Description How to execute function Attention: Please transfer all results before resetting the instrument. Select Selecting the reagent type allows you reagent type to display only selected methods in the Home menu and hide methods of other reagent types. •... - Page 20 4 Operation EN Photometer Series...
-
Page 21: Maintenance
5 Maintenance 5 Maintenance 5.1 Recommended maintenance schedule Task What to Do What not to do Clean instrument Clean measurement chamber Do not use vial and measurement using lint-free, moist cloths (oil which is not chamber free) or cotton buds. tightly closed. If the housing surface is dirty, Do not use wipe it with a soft cloth and mild... -
Page 22: Troubleshooting
6 Troubleshooting 6 Troubleshooting 6.1 Error messages and what to do Display Possible Causes What to do Over range - Reading is Dilute the sample. exceeding the range. Water sample is too Filtrate water sample. cloudy. Too much light on the Check the seal on the detector. -
Page 23: Accessories & Replacement Parts
7 Accessories & Replacement parts 7 Accessories & Replacement parts 7.1 List of Accessories 250 mL bottle, AF 631 375072 Brush, 11 cm length 380230 Cleaning cloth 197635 Cuvette stand for 6 round cuvettes Ø 24 mm 418951 Factory Calibration certificate ISO 9001 for MD50 999756 Factory Calibration certificate ISO 9001 for method Cl M100 999720... -
Page 24: Specifications
8 Specifications 8 Specifications Optics LED, spectrometer sensor, interference filter (selected variants only) Light Source Wavelength Variant specific (415, 445, 480, 515, 530, 555, 590, 630, 680) Photometric 0 - 3 Abs Range Photometric 3 % FS (T = 20 °C - 25 °C) Accuracy Suitable Vials •... - Page 25 8 Specifications Languages Full • Chinese User Manual • Dutch • English • French • German • Italian • Portuguese • Russian • Spanish • Turkish Dimensions 155 x 76 x 45 mm Weight 247 g Subject to technical modification! To ensure maximum accuracy of test results, always use the reagent systems supplied by the instrument manufacturer.
-
Page 26: Copyright And Trademark Notice
9 Appendix 9 Appendix 9.1 Copyright and Trademark Notice is a registered trademark of Cisco, Inc. and licensed to Apple, Inc. ® iTunes Store is a trademark of Apple, Inc., registered in the U.S. and other countries. ® Android™ and Google Play™ are trademark of Google, Inc. Excel is a trademark of Microsoft Corp., registered in the U.S. - Page 27 Inhaltsverzeichnis Inhaltsverzeichnis Photometer Serie 1 Einleitung 1.1 Allgemeine Informationen 1.1.1 Anleitung vor Gebrauch lesen 1.1.2 Zweck des Produktes 1.1.3 Bestimmungsgemäße Verwendung 1.1.4 Voraussetzungen für einen sicheren Gebrauch 1.1.5 Anleitung aufbewahren 1.1.6 Benutzerqualifikation 1.1.7 Umgang mit gefährlichen Chemikalien 1.1.8 Entsorgungshinweise 1.2 Liste aller verwendeten Zeichen im Dokument 2 Produktübersicht 2.1 Leitfaden zu Symbolen 2.3 Ausstattung...
- Page 28 Inhaltsverzeichnis 9 Appendix 9.1 Hinweis zu Copyright und Warenzeichen DE Photometer Series...
-
Page 29: Einleitung
1 Einleitung 1 Einleitung 1.1 Allgemeine Informationen 1.1.1 Anleitung vor Gebrauch lesen Diese Gebrauchsanleitung enthält wichtige Informationen zur sicheren Handhabung des Produkts. Lesen Sie diese Gebrauchsanleitung sorgfältig durch und machen Sie sich mit dem Produkt vertraut, bevor Sie damit arbeiten. 1.1.2 Zweck des Produktes Lovibond Photometer sind für Messungen verschiedener Parametern in den Bereichen wie Trinkwasseraufbereitung, Abwasserbehandlung, industrielles Prozesswasser,... -
Page 30: Anleitung Aufbewahren
1 Einleitung 1.1.5 Anleitung aufbewahren Die Gebrauchsanleitung muss in der Nähe des Produktes aufbewahrt werden, damit die benötigten Informationen immer verfügbar sind. 1.1.6 Benutzerqualifikation Das Bedienpersonal muss in der Lage sein, die Sicherheitsetiketten und Sicherheitshinweise auf den Verpackungen und Beilagen der Produkte zu verstehen und korrekt umzusetzen. - Page 31 1 Einleitung Ein unsachgemäßer Umgang mit bestimmten Reagenzien kann Ihre Gesundheit schädigen. Befolgen Sie in jedem Fall die Angaben auf den Sicherheitsetiketten der Verpackung, die Sicherheitshinweise Warnung! der Packungsbeilage und das verfügbare Sicherheitsdatenblatt. Dort festgelegte Schutzmaßnahmen müssen genau befolgt werden. Es besteht eine Gefahr, die zu leichten oder mittelschweren Verletzungen führen kann.
-
Page 32: Produktübersicht
Ihre örtlichen Behörden oder Ihren Händler und fragen Sie nach der richtigen Entsorgungsmethode. 2.3 Ausstattung Lovibond MD50 und MD150 Photometer bieten ein hohes Maß an Genauigkeit und Effizienz mit einer benutzerfreundlichen Oberfläche. • Robustes Design, wasser- und staubdicht. • Innovatives optisches System für eine höhere Genauigkeit. -
Page 33: Geräteansicht
2 Produktübersicht 2.4.1 Geräteansicht Vorderansicht 1 - Messschacht 2 - Display 3 - Modell 4 - Ein/Aus-Taste 2.4.2 Beschreibung der Tasten und Schalter Taste Funktion Abwärtstaste Schaltet das Gerät ein oder aus Im Menü nach unten blättern Test-Taste Probe messen Auswahl oder Bestätigen einer Aktion Zurück-Taste Zurück zum vorherigen Menü... -
Page 34: Beschreibung Der Schnittstellen
2 Produktübersicht 2.4.3 Beschreibung der Schnittstellen 1. USB-C Anschluss für eine Datenübertragung, Updates und Methodenimport über eine PC-Software. USB-C Anschluss (wasserdicht) USB-C USB-A 2. NFC für die drahtlose Datenübertragung auf Smart Devices via App. NFC-Feld DE Photometer Series... -
Page 35: Inbetriebnahme
3 Inbetriebnahme 3 Inbetriebnahme 3.1 Betriebsumgebung Das Gerät kann in jeder Innen- oder Außenumgebung verwendet werden, in der ein Bediener die Analyse sicher durchführen kann. Es wird jedoch empfohlen, das Gerät nicht in hellem Sonnenlicht zu verwenden, um Fehler durch Streulicht zu vermeiden. Diese Umgebung umfasst einen Temperaturbereich von 5 bis 40 °C und eine nicht kondensierende Luftfeuchtigkeit von bis zu 90 %. -
Page 36: Einsetzen Und Auswechseln Der Batterien
3 Inbetriebnahme 3.3 Einsetzen und Auswechseln der Batterien 1 - Schraubendreher 2 - Instrumentenrückwand 3 - Batterie 4 - Einkerbung 5 - Schraube 6 - Dichtungsring 7 - Batteriefachabdeckung 1. Das Gerät ausschalten. 2. Gegebenenfalls Küvette aus dem Messschacht nehmen. 3. -
Page 37: Arbeitsweise
4 Arbeitsweise 4 Arbeitsweise 4.1 Erstmalige Inbetriebnahme • Legen Sie die Batterien, wie in Kapitel 3.3 beschrieben, ein. • Schalten Sie das Gerät ein, indem Sie die Abwärtstaste drücken. • Auf dem Gerät wird zuerst das Firmenlogo angezeigt. • Die Firmware-Version des Geräts werden danach kurzzeitig auf dem Bildschirm angezeigt. -
Page 38: Bedienelemente
4 Arbeitsweise 4.3 Bedienelemente 4.3.1 Liste der Bedienelemente und deren Funktionen Funktion Beschreibung So führen Sie die Funktion aus Gerät ein/aus • Drücken Sie die Abwärtstaste, um schalten das Gerät einzuschalten. • Halten Sie die Abwärtstaste gedrückt, um das Gerät auszuschalten. - Page 39 4 Arbeitsweise Funktion Beschreibung So führen Sie die Funktion aus • Im Falle eines Countdowns erfolgt die Messung automatisch nach Ablauf des Countdowns. • Durch erneutes Drücken der Test-Taste kann den Countdown übersprungen werden, es wird jedoch dringend empfohlen, die Vorgehensweise zu befolgen. •...
- Page 40 4 Arbeitsweise Funktion Beschreibung So führen Sie die Funktion aus In diesem Fall wird das Ergebnis der ersten Teilmethode nicht angezeigt und das Gerät fährt mit der zweiten Teilmethode fort. Wenn die Durchführung abgeschlossen ist, drücken Sie die Abwärtstaste oder die Aufwärtstaste, um zwischen dem berechneten Endergebnis und dem Ergebnis der Teilmethode zu wechseln.
- Page 41 4 Arbeitsweise Funktion Beschreibung So führen Sie die Funktion aus Absorption Navigieren Sie durch die Methodenliste, um die Absorptionsmethode auszuwählen. 515 nm Die Absorptionsmethoden für jede verfügbare Wellenlänge werden in der Liste angezeigt. Einstellungsmenü • Wenn Sie sich im Home- Menü...
- Page 42 4 Arbeitsweise Funktion Beschreibung So führen Sie die Funktion aus • Drücken Sie die Test-Taste, um das Format zu bestätigen. • Stellen Sie mit Hilfe der Abwärtstaste oder der Aufwärtstaste das Datum ein. • Wenn der Pfeil auf der letzten Ziffer steht, drücken Sie die Test-Taste zur Bestätigung oder drücken Sie die Zurück- Taste, um zur vorherigen Position...
- Page 43 4 Arbeitsweise Funktion Beschreibung So führen Sie die Funktion aus angezeigt und in den Protokollen als separater Eintrag protokolliert. Hinweis: Sie können den OTZ jederzeit überschreiben, indem Sie die Zurück-Taste drücken und einen neuen Nullabgleich durchführen. Timer ein/aus • Drücken Sie die Aufwärts- oder Abwärtstaste, um im Einstellungsmenü...
-
Page 44: Übertragung Von Daten
4 Arbeitsweise Funktion Beschreibung So führen Sie die Funktion aus Achtung: Bitte übertragen Sie alle Ergebnisse, bevor Sie das Gerät zurücksetzen. Reagenztyp Die Auswahl des Reagenztyps auswählen ermöglicht es Ihnen, nur ausgewählte Methoden im Home-Menü anzuzeigen zu lassen und Methoden anderer Reagenztypen auszublenden. -
Page 45: Datenübertragung Über Nfc
4 Arbeitsweise 4.5.2 Datenübertragung über NFC • Um Messergebnisse über NFC zu übertragen, gehen Sie in das Menü Logs, wie in Kapitel 4.3.1 beschrieben, und wählen Sie bestimmte oder alle Ergebnisse für die Übertragung über NFC aus. • Drücken und halten Sie die Test-Taste für 3 Sekunden, um die Ergebnisse zum NFC- Tag hinzuzufügen. -
Page 46: Wartung
5 Wartung 5 Wartung 5.1 Empfohlener Wartungsplan Was man nicht Aufgabe Was zu tun ist macht Gerät und Reinigen Sie den Messschacht Keine Küvette Messschacht mit fusselfreien, feuchten verwenden, reinigen Tüchern (ölfrei) oder die nicht dicht Wattestäbchen. verschlossen ist. Wenn die Gehäuseoberfläche Verwenden verschmutzt ist, wischen Sie sie Sie keine... - Page 47 5 Wartung Ein unsachgemäßer Umgang mit bestimmten Reagenzien kann Ihre Gesundheit schädigen. Befolgen Sie in jedem Fall die Angaben auf den Sicherheitsetiketten der Verpackung, die Sicherheitshinweise Warnung! der Packungsbeilage und das verfügbare Sicherheitsdatenblatt. Dort festgelegte Schutzmaßnahmen müssen genau befolgt werden. DE Photometer Series...
-
Page 48: Fehlerbehebung
6 Fehlerbehebung 6 Fehlerbehebung 6.1 Fehlermeldungen und was zu tun ist Display Mögliche Ursache Maßnahme Messbereich überschritten Die Probe verdünnen. - Der Messwert liegt außerhalb des Bereichs. Trübungen in der Probe. Die Probe filtrieren. Zu viel Lichteinfall auf dem Die Dichtung des Detektor. -
Page 49: Zubehör & Ersatzteile
7 Zubehör & Ersatzteile 7 Zubehör & Ersatzteile 7.1 Zubehörliste 250 mL Flasche, AF 631 375072 Bürste, 11 cm Länge 380230 Festpreis-Servicepaket für MD50 19802710 Kunststofftrichter mit Griff 471007 Küvettendichtring für Rundküvetten 24 mm, 12er Set 197626 Küvettenständer für 6 Rundküvetten Ø 24 mm 418951 Messbecher, 100 ml 384801... -
Page 50: Spezifikationen
8 Spezifikationen 8 Spezifikationen Optik LED, Spektrometersensor, Interferenzfilter (nur ausgewählte Varianten) Lichtquelle Wellenlänge Variant specific (415, 445, 480, 515, 530, 555, 590, 630, 680) Photometerischer 0 - 3 Abs Bereich Photometerische 3 % FS (T = 20 °C - 25 °C) Genauigkeit geeignete •... - Page 51 8 Spezifikationen Sprachen • Chinesisch Bedienungsanleitung • Deutsch • Englisch • Französisch • Italienisch • Niederländisch • Portugiesisch • Russisch • Spanisch • Türkisch Abmessungen 155 x 76 x 45 mm Gewicht 247 g Technische Änderungen vorbehalten! Um eine maximale Genauigkeit der Testergebnisse zu gewährleisten, verwenden Sie immer die vom Gerätehersteller gelieferten Reagenzsysteme.
- Page 52 9 Appendix 9 Appendix 9.1 Hinweis zu Copyright und Warenzeichen ist eine eingetragene Marke von Cisco, Inc. und lizenziert an Apple, Inc. ® iTunes Store ist eine Marke von Apple, Inc. und in den USA und anderen Ländern ® eingetragen. Android™...
- Page 53 Contenido Contenido Photometer Series 1 Introducción 1.1 Información general 1.1.1 Leer las instrucciones antes de usar 1.1.2 Finalidad del producto 1.1.3 Uso autorizado 1.1.4 Requisitos para un uso seguro 1.1.5 Conserve las instrucciones 1.1.6 Cualificación del usuario 1.1.7 Manipulación de productos químicos peligrosos 1.1.8 Instrucciones de eliminación 1.2 Lista de todos los símbolos utilizados en el documento 2 Resumen del producto...
- Page 54 Contenido 9 Apéndice 9.1 Aviso de derechos de autor y marcas comerciales ES Photometer Series...
-
Page 55: Introducción
1 Introducción 1 Introducción 1.1 Información general 1.1.1 Leer las instrucciones antes de usar Este manual proporciona información importante sobre el funcionamiento seguro del producto. Lea atentamente este manual y familiarícese con el producto antes de utilizarlo. 1.1.2 Finalidad del producto Los fotómetros Lovibond están diseñados para medir diferentes parámetros en muestras acuosas en una variedad de aplicaciones como, por ejemplo, agua potable, aguas residuales, agua de procesos industriales, agua de piscinas y ciencia e... -
Page 56: Conserve Las Instrucciones
1 Introducción El producto no debe utilizarse si: • está visiblemente dañado (por ejemplo, después de ser transportado) • se ha almacenado en condiciones adversas durante un largo periodo de tiempo (condiciones de almacenamiento, véase el capítulo "Especificaciones") 1.1.5 Conserve las instrucciones El manual debe guardarse cerca del producto para que siempre pueda encontrar la información que necesita. - Page 57 1 Introducción La manipulación incorrecta de ciertos reactivos puede dañar su salud. En cualquier caso, siga la información de las etiquetas de seguridad del envase, las instrucciones de seguridad del ¡Atención! prospecto y la hoja de datos de seguridad disponible. Las medidas de protección allí...
-
Page 58: Resumen Del Producto
2.3 Características Los fotómetros Lovibond MD50 y MD150 proporcionan un alto nivel de precisión y eficiencia con una interfaz de usuario fácil de usar. • Diseño robusto, a prueba de agua y polvo. -
Page 59: Vista Del Instrumento
2 Resumen del producto 2.4.1 Vista del instrumento Lado frontal 1 - Compartimento de medición 2 - Pantalla 3 - Nombre del modelo 4 - Botón de encendido 2.4.2 Descripción de las teclas e interruptores Tecla Función Tecla abajo Enciende o apaga el instrumento se utiliza para desplazarse hacia abajo Tecla Test Mide la muestra... -
Page 60: Descripción De La Interfaz
2 Resumen del producto 2.4.3 Descripción de la interfaz 1. Puerto USB-C para transferencia de datos, actualizaciones e importación de métodos mediante software de PC. Puerto USB-C (resistente al agua) USB-C USB-A 2. NFC para la transferencia inalámbrica de datos a dispositivos inteligentes a través de App. -
Page 61: Puesta En Funcionamiento
3 Puesta en funcionamiento 3 Puesta en funcionamiento 3.1 Condiciones de funcionamiento El instrumento puede utilizarse en cualquier entorno interior o exterior que se considere seguro para que el operador realice el análisis. no obstante, se recomienda no utilizar el instrumento a plena luz del sol para evitar errores causados por la luz parásita.Este entorno incluye un rango de temperatura de 5 a 40 grados C con una humedad sin condensación de hasta el 90%. -
Page 62: Colocación Y Sustitución De Las Pilas
3 Puesta en funcionamiento 3.3 Colocación y sustitución de las pilas 1 - Destornillador 2 - Parte posterior del instrumento 3 - Baterías 4 - Muesca 5 - Tornillo 6 - Junta de sellado 7 - Tapa de baterías Conecte el instrumento. Si es necesario, retire la cubeta de la cámara de muestras. -
Page 63: Operación
4 Operación 4 Operación 4.1 Primera puesta en marcha • Coloque las pilas como se describe en el capítulo 3.3. • Encienda el instrumento pulsando la tecla abajo. • En primer lugar se muestra el logotipo de la empresa en el aparato. •... -
Page 64: Lista De Elementos De Control Y Su Función
4 Operación 4.3 Lista de elementos de control y su función 4.3.1 Lista de elementos de control y su función Función Descripción Cómo ejecutar la función Encender/Apagar el • Pulse la tecla abajo para encender instrumento el Instrumento. • Mantenga pulsada la tecla abajo para apagar el instrumento. - Page 65 4 Operación Función Descripción Cómo ejecutar la función automáticamente una vez finalizada la cuenta atrás. • La cuenta atrás puede saltarse pulsando de nuevo el botón de prueba, pero se recomienda encarecidamente seguir el procedimiento. • Después de la medición, el símbolo de la cubeta vacía cambia a una cubeta llena (parte inferior izquierda de la pantalla).
- Page 66 4 Operación Función Descripción Cómo ejecutar la función aparato continúa con el segundo método parcial. Una vez finalizado el procedimiento, pulse el tecla abajo o arriba para cambiar entre el resultado final calculado y el resultado del método parcial. mg/L Cl F ⇄...
- Page 67 4 Operación Función Descripción Cómo ejecutar la función Menú de • En el menú principal, mantenga configuración pulsada la tecla arriba durante 3 segundos para acceder al menú de configuración. • Desplácese hacia arriba y hacia abajo para ver las diferentes opciones de configuración.
- Page 68 4 Operación Función Descripción Cómo ejecutar la función • Se creará una entrada de protocolo en los registros para el cambio de fecha.. Ajuste de la hora • Pulse la tecla Test para abrir el menú de ajuste de la hora. •...
-
Page 69: Transferencia De Datos
4 Operación Función Descripción Cómo ejecutar la función • Para ello se crea una entrada con la marca de tiempo en los registros. Atención: Se recomienda seguir los temporizadores integrados en los procedimientos de los métodos para obtener resultados precisos. Reinicio de fábrica •... -
Page 70: Transferencia De Datos Por Usb
4 Operación Transferencia de datos mediante cable USB Transferencia de datos a través de NFC 4.5.1 Transferencia de datos por USB • La transferencia de datos mediante cable USB requiere el Lovibond Data Expert ® software, que puede descargarse gratuitamente de la página web de Lovibond. •... -
Page 71: Mantenimiento
5 Mantenimiento 5 Mantenimiento 5.1 Programa de mantenimiento recomendado Qué no se debe Tarea Qué hacer hacer Limpiar el Limpie la cámara de medición No utilice instrumento y la con paños húmedos que no una cubeta cámara de medición suelten pelusa (sin aceite) o que no esté... - Page 72 5 Mantenimiento La manipulación incorrecta de ciertos reactivos puede dañar su salud. En cualquier caso, siga la información de las etiquetas de seguridad del envase, las instrucciones de seguridad del ¡Atención! prospecto y la hoja de datos de seguridad disponible. Las medidas de protección allí...
-
Page 73: Resolución De Problemas
6 Resolución de problemas 6 Resolución de problemas 6.1 Mensajes de error y qué hacer Visualización Posible motivo Qué hay que hacer Sobre rango - La lectura Diluir la muestra. está sobrepasando el rango. La muestra de agua está Filtre la muestra de agua. demasiado turbia. -
Page 74: Accesorios Y Piezas De Repuesto
7 Accesorios y piezas de repuesto 7 Accesorios y piezas de repuesto 7.1 Lista de accesorios Anillo de obturación para cubeta redonda 24 mm, juego de 12 197626 Cable USB-C de 1 m, USB-C a A 19820-081 Cepillo, 11 cm longitud 380230 Certificado de calibración de fábrica ISO 9001 para el MD50 999756... -
Page 75: Especificaciones
8 Especificaciones 8 Especificaciones Óptica LED, sensor espectrómetro, filtro de interferencias (sólo variantes seleccionadas) Fuente luminosa Longitud de onda Variant specific (415, 445, 480, 515, 530, 555, 590, 630, 680) Rango 0 - 3 Abs fotométrico Precisión 3 % FS (T = 20 °C - 25 °C) fotométrica Cubetas •... - Page 76 8 Especificaciones Idiomas Manual • Alemán de usuario • Chino completo • Español • Francés • Holandés • Inglés • Italiano • Portugués • Ruso • Turco Medidas 155 x 76 x 45 mm Peso 247 g Sujeto a modificaciones técnicas. Para garantizar la máxima precisión de los resultados de las pruebas, utilice siempre los sistemas de reactivos suministrados por el fabricante del instrumento.
- Page 77 9 Apéndice 9 Apéndice 9.1 Aviso de derechos de autor y marcas comerciales es una marca registrada de Cisco Systems, Inc. y es usado por Apple, Inc. bajo ® licencia. iTunes Store es una marca comercial de Apple , Inc., registrada en los Estados Unidos ®...
- Page 78 Table des matières Table des matières Photometer Series 1 Introduction 1.1 Informations générales 1.1.1 Lire les instructions avant l'utilisation 1.1.2 Objet du produit 1.1.3 Utilisation autorisée 1.1.4 Exigences pour une utilisation sûre 1.1.5 Gardez les instructions 1.1.6 Qualification des utilisateurs 1.1.7 Manipulation de produits chimiques dangereux 1.1.8 Instructions pour la disposition du produit 1.2 Liste de tous les caractères utilisés dans le document...
- Page 79 Table des matières 9 Appendice 9.1 Avis sur les droits d'auteur et les marques de commerce FR Photometer Series...
-
Page 80: Introduction
1 Introduction 1 Introduction 1.1 Informations générales 1.1.1 Lire les instructions avant l'utilisation Ce manuel fournit des informations importantes sur un fonctionnement adéquat du produit en toute sécurité. Veuillez lire attentivement ce manuel et vous familiariser avec le produit avant de l'utiliser. 1.1.2 Objet du produit Les photomètres Lovibond sont conçus pour mesurer différents paramètres dans des échantillons aqueux dans une variété... -
Page 81: Gardez Les Instructions
1 Introduction 1.1.5 Gardez les instructions Le manuel doit être conservé à proximité du produit afin que vous puissiez toujours trouver les informations dont vous avez besoin. 1.1.6 Qualification des utilisateurs Le personnel d'exploitation doit être capable de comprendre et d'appliquer correctement les étiquettes et les consignes de sécurité... - Page 82 1 Introduction La manipulation incorrecte de certains réactifs peut nuire à votre santé. Dans tous les cas, suivez les informations figurant sur les étiquettes de sécurité de l'emballage, les consignes de sécurité de la Avertissement ! notice et la fiche de données de sécurité disponible. Les mesures de protection qui y sont spécifiées doivent être suivies à...
-
Page 83: Aperçu Du Produit
2.3 Fonctionnalités Les photomètres Lovibond MD50 et MD150 offrent un haut niveau de précision et d'efficacité avec une interface conviviale. • Conception robuste, étanche à l'eau et à la poussière •... -
Page 84: Vue Des Instruments
2 Aperçu du produit 2.4.1 Vue des instruments Vue frontale 1 - Chambre de mesure. 2 - Afficher 3 - Numéro de modèle 4 - Bouton d'alimentation 2.4.2 Description des touches et des interrupteurs Touche Fonction Touche bas Permet d'allumer ou d'éteindre l'instrument utilisée pour le défilement vers le bas Touche Test Mesure l'échantillon... -
Page 85: Description De L'interface
2 Aperçu du produit 2.4.3 Description de l'interface 1. Port USB-C pour le transfert de données, les mises à jour et l'importation de méthodes via un logiciel PC. Port USB-C (étanche) USB-C USB-A 2. NFC pour le transfert de données sans fil vers des appareils intelligents via l'application. -
Page 86: Mise En Service
3 Mise en service 3 Mise en service 3.1 Environnement opérationnel L'instrument peut être utilisé dans n'importe quel environnement intérieur ou extérieur jugé sûr pour qu'un opérateur puisse effectuer l'analyse. Cependant, il est recommandé de ne pas utiliser l'instrument en plein soleil pour éviter les erreurs causées par la lumière parasite. -
Page 87: Insertion Et Remplacement Des Piles
3 Mise en service 3.3 Insertion et remplacement des piles 1 - Tournevis 2 - dos de l'instrument 3 - piles 4 - Encoche 5 - Vis 6 - Joint d’étanchéité 7 - Couvercle compartiment à piles Mettre l‘appareil à l‘arrêt. Le cas échéant, sortir la cuvette de la chambre de mesure. -
Page 88: Opération
4 Opération 4 Opération 4.1 Premier démarrage • Insérez les piles comme décrit au chapitre 3.3. • Mettez l'instrument sous tension en appuyant sur la Touche bas. • Le logo de l'entreprise s'affiche d'abord sur l'appareil. • La version du micrologiciel de l'instrument s'affiche à l'écran pendant quelques instants. -
Page 89: Liste Des Éléments De Contrôle Et Leur Fonction
4 Opération 4.3 Liste des éléments de contrôle et leur fonction 4.3.1 Liste des éléments de contrôle et leur fonction Description de la Fonction fonction Comment exécuter la fonction Mise sous tension/ • Appuyez sur la touche bas pour hors tension de mettre l'instrument sous tension. - Page 90 4 Opération Description de la Fonction fonction Comment exécuter la fonction • En cas de compte à rebours, la mesure s'effectue automatiquement à la fin du compte à rebours. • Il est possible d'ignorer le compte à rebours en appuyant à nouveau sur le bouton test, mais il est fortement recommandé...
- Page 91 4 Opération Description de la Fonction fonction Comment exécuter la fonction Dans ce cas, le résultat de la première méthode partielle ne s'affiche pas et l'appareil passe à la deuxième méthode partielle. Lorsque l'exécution est terminée, appuyez sur la touche Bas ou Haut pour basculer entre le résultat final calculé...
- Page 92 4 Opération Description de la Fonction fonction Comment exécuter la fonction Mesure de La mesure de l'absorbance suit la l'absorbance même procédure que les méthodes de concentration. Faites défiler la 515 nm liste des méthodes pour sélectionner la méthode d'absorption. Les méthodes d'absorbance pour chaque longueur d'onde disponible sont affichées dans la liste.
- Page 93 4 Opération Description de la Fonction fonction Comment exécuter la fonction Réglage de la date • Appuyez sur la touche Test pour ouvrir le menu de réglage de la date. • Appuyez sur la touche Haut ou On / Off pour passer d'un format à l'autre.
- Page 94 4 Opération Description de la Fonction fonction Comment exécuter la fonction • Une icône OTZ s'affiche à l'écran pendant la mesure et est consignée dans les journaux sous forme d'entrée distincte. Remarque : il est toujours possible d'écraser OTZ en appuyant sur la touche retour et en effectuant un nouveau zéro.
-
Page 95: Transfert De Données
4 Opération Description de la Fonction fonction Comment exécuter la fonction Attention : Veuillez transférer tous les résultats avant de réinitialiser l'instrument. Sélection du type de La sélection du type de réactif réactif vous permet de n'afficher que les méthodes sélectionnées dans le menu d'accueil et de masquer les méthodes d'autres types de réactifs. -
Page 96: Transfert De Données Via Nfc
4 Opération 4.5.2 Transfert de données via NFC • Pour transférer des résultats de mesure via NFC, aller dans le menu Logs comme décrit au chapitre 4.3.1 et sélectionner des résultats spécifiques ou tous les résultats à transférer via NFC. •... -
Page 97: Maintenance
5 Maintenance 5 Maintenance 5.1 Programme d'entretien recommandé Ce qu'il ne faut pas Tâche Ce qu'il faut faire faire Nettoyer l'instrument Nettoyez la chambre de Ne pas utiliser et la chambre de mesure à l'aide de chiffons non de cuvette qui mesure pelucheux et humides (sans n'est pas fermée... - Page 98 5 Maintenance La manipulation incorrecte de certains réactifs peut nuire à votre santé. Dans tous les cas, suivez les informations figurant sur les étiquettes de sécurité de l'emballage, les consignes de sécurité de la Avertissement ! notice et la fiche de données de sécurité disponible. Les mesures de protection qui y sont spécifiées doivent être suivies à...
-
Page 99: Dépannage
6 Dépannage 6 Dépannage 6.1 Messages d'erreur et mesures à prendre Affichage Origine possible Que faire ? Dépassement de Diluez l'échantillon. l'intervalle - La lecture dépasse l'intervalle. Turbidités dans Filtrer l’échantillon. l’échantillon. Trop de lumière sur le Vérifiez le joint du bouchon détecteur. -
Page 100: Accessoires Et Pièces De Rechange
7 Accessoires et pièces de rechange 7 Accessoires et pièces de rechange 7.1 Liste des accessoires Agitateur en plastique, longueur 10 cm 364109 Agitateur en plastique, longueur 10 cm, lot de 10 364130 Agitateur en plastique, longueur 13 cm 364100 Agitateur en plastique, longueur 13 cm, lot de 10 364120 Bécher gradué, 100 ml... -
Page 101: Spécifications
8 Spécifications 8 Spécifications Optique LED, capteur spectrométrique, filtre interférentiel (variantes sélectionnées uniquement) Source lumineuse Longueurs Variant specific (415, 445, 480, 515, 530, 555, d'onde 590, 630, 680) Plage 0 - 3 Abs photométrique Précision 3 % FS (T = 20 °C - 25 °C) photométrique Flacons adaptés •... - Page 102 8 Spécifications Classe de IP 67 protection Conformité Langues Manuel • Allemand d’utilisateur • Anglais complet • Chinois • Espagnol • Français • Italien • Néerlandais • Portugais • Russe • Turc Dimensions 155 x 76 x 45 mm Poids 247 g Sous réserve de modifications techniques ! Pour garantir une précision maximale des résultats des tests,...
- Page 103 9 Appendice 9 Appendice 9.1 Avis sur les droits d'auteur et les marques de commerce est une marque enregistrée de Cisco, Inc. et est utilisée sous licence par Apple. ® iTunes Store est une marques de commerce de Apple, Inc., enregistré aux États-Unis ®...
- Page 104 Índice Índice Photometer Series 1 Introdução 1.1 Informações gerais 1.1.1 Leia as instruções antes de usar 1.1.2 Finalidade do Produto 1.1.3 Uso autorizado 1.1.4 Requisitos para uma utilização segura 1.1.5 Manual de instruções 1.1.6 Qualificação do usuário 1.1.7 Manuseio de produtos químicos perigosos 1.1.8 Observações para o descarte 1.2 Lista de todos os símbolos utilizados no documento 2 Resumo do produto...
- Page 105 Índice 9 Apêndice 9.1 Aviso de Direitos Autorais e Marca Registrada PT Photometer Series...
-
Page 106: Informações Gerais
1 Introdução 1 Introdução 1.1 Informações gerais 1.1.1 Leia as instruções antes de usar Este manual fornece informações importantes sobre o uso seguro do produto. Leia atentamente este manual e familiarize-se com o produto antes de utilizá-lo. 1.1.2 Finalidade do Produto Os fotômetros Lovibond são concebidos para medir diferentes parâmetros em amostras aquosas numa variedade de aplicações tais como, por exemplo, água potável, águas residuais, água de processamento industrial, água de piscinas, ciência e pesquisa. - Page 107 1 Introdução 1.1.5 Manual de instruções O manual deve ser mantido próximo do produto para que seja sempre possível encontrar a informação necessária. 1.1.6 Qualificação do usuário O usuário deve ser capaz de compreender e implementar corretamente os rótulos de segurança e as instruções de segurança nas embalagens e folhetos dos produtos.
- Page 108 1 Introdução Existe um perigo que poderá resultar em lesões menores ou moderadas. Cuidado! Devem ser observadas informações importantes ou instruções especiais. Nota! PT Photometer Series...
-
Page 109: Resumo Do Produto
2.3 Características Os fotómetros Lovibond MD50 e MD150 proporcionam um elevado nível de precisão e eficiência com uma interface de fácil utilização. • Desenho robusto, à prova de água e pó. - Page 110 2 Resumo do produto 2.4.1 Vista do instrumento Frontal 1 - Câmara de medição 2 - Tela 3 - Modelo 4 - Botão de ligar/desligarr 2.4.2 Descrição das teclas e interruptores Chave Função Tecla para baixo Liga ou desliga o instrumento Utilizada para deslocamento para baixo Tecla de teste Medir amostra...
- Page 111 2 Resumo do produto 2.4.3 Descrição da interface 1. Porta USB-C para transferência de dados, atualizações e importação de métodos através de software para PC. Porta USB-C (à prova de água) USB-C USB-A 2. NFC para transferência de dados sem fios para dispositivos inteligentes via App. Campo NFC PT Photometer Series...
-
Page 112: Ambiente Operacional
3 Comissionamento 3 Comissionamento 3.1 Ambiente operacional O instrumento pode ser utilizado em qualquer ambiente interior ou exterior que seja considerado seguro para um operador efectuar a análise. no entanto, recomenda-se não utilizar o instrumento sob luz solar intensa para evitar erros causados por luz difusa. este ambiente inclui uma gama de temperaturas de 5 a 40 graus C com uma humidade sem condensação até... - Page 113 3 Comissionamento 3.3 Instalação ou Substituição das Pilhas/ Baterias 1 - chave de fenda 2 - parte traseira do instrumento 3 - bateria 4 - entalhe 5 - parafuso 6 - anel de vedação 7 - tampa do compartimento da bateriaa Desligue o instrumento. Se necessário, retirar o frasco da câmara da amostra.
- Page 114 4 Operação 4 Operação 4.1 Comissionamento inicial • Inserir as baterias como descrito no capítulo 3.3. • Ligar o instrumento pressionando a tecla para baixo. • O logotipo da empresa será exibido no instrumento. • A versão de firmware do instrumento será apresentada na tela durante um curto intervalo de tempo.
-
Page 115: Elementos De Controlo
4 Operação 4.3 Elementos de controlo 4.3.1 Lista de elementos de controle e suas funções Função Descrição Como executar a função Ligar/desligar o • Pressionar a tecla para baixo para instrumento ligar o instrumento. • Pressionar e manter pressionada a tecla para baixo para desligar o instrumento. - Page 116 4 Operação Função Descrição Como executar a função • No caso de contagens decrescentes, a medição é realizada automaticamente após o fim da contagem decrescente. • A contagem decrescente pode ser ignorada ao pressionar novamente o botão de teste, mas recomenda-se enfaticamente que o procedimento seja seguido.
- Page 117 4 Operação Função Descrição Como executar a função F + Cl Métodos Alguns métodos estão ligados entre concatenados si para calcular a concentração de mg/L Cl comb parâmetros específicos. Neste caso, o resultado do primeiro método parcial não é apresentado e o aparelho continua com o segundo método parcial. ...
- Page 118 4 Operação Função Descrição Como executar a função Medição da A medição da absorbância segue absorbância o mesmo procedimento que os métodos de concentração. Percorrer 515 nm a lista de métodos para selecionar o método de absorbância. Os métodos de absorbância, para cada comprimento de onda disponível, são apresentados na lista de métodos.
- Page 119 4 Operação Função Descrição Como executar a função • Pressionar a tecla “Para cima” ou “Para Baixo” para ajustar a data. • Quando a seta estiver sobre o último dígito, pressionar a tecla Test para confirmar ou pressionar a tecla Voltar para retornar à posição anterior.
- Page 120 4 Operação Função Descrição Como executar a função retrocesso e efetuando um novo ajuste de zero. Ligar/desligar • Pressione a tecla “Para cima” ou temporizadores “Para Baixo” para se deslocar para o ícone Temporizadores no menu de definições. • É possível desativar os temporizadores integrados para todos os métodos através desta definição.
-
Page 121: Transferência De Dados
4 Operação Função Descrição Como executar a função • Pressione o botão “Test” para acessar o menu. • Pressione o botão “Para baixo” ou o botão “Para cima” para navegar para outras opções ou pressione o botão “Test” para selecionar o tipo de reagente desejado. - Page 122 4 Operação PT Photometer Series...
- Page 123 5 Manutenção 5 Manutenção 5.1 Rotina de manutenção recomendada Tarefa O que fazer O que não fazer Instrumento e Limpar a câmara de medição Não utilizar câmara de medição utilizando panos húmidos (sem uma cubeta que limpos óleo), sem fiapos, ou cotonetes. não esteja bem fechada.
- Page 124 5 Manutenção O manuseio inadequado de certos reagentes pode prejudicar a sua saúde. Em qualquer caso, seguir as informações das etiquetas de segurança da embalagem, as instruções de segurança no manual Advertência. da embalagem e a ficha de dados de segurança disponível. Deve- se seguir exatamente as medidas de proteção ali especificadas.
-
Page 125: Resolução De Problemas
6 Resolução de problemas 6 Resolução de problemas 6.1 Mensagens de erro e o que fazer Visor Causa possível O que fazer Acima do alcance - A Diluir a amostra. leitura está acima da faixa de medição. A amostra está muito Filtrar a amostra. -
Page 126: Acessórios E Peças De Substituição
7 Acessórios e peças de substituição 7 Acessórios e peças de substituição 7.1 Lista de Acessórios Anel de vedação da cubeta para cubetas redondas 24 mm, jogo 197626 de 12 Cabo USB-C de 1 m, USB-C para A 19820-081 Certificado de calibração de fábrica ISO 9001 para o MD50 999756 Certificado de calibração de fábrica ISO 9001 para o método Cl 999720... - Page 127 8 Especificações 8 Especificações Óptica LED, sensor do espetrómetro, filtro de interferência (apenas nas variantes seleccionadas) Fonte de Luz Comprimento de Variant specific (415, 445, 480, 515, 530, 555, Onda 590, 630, 680) Faixa 0 - 3 Abs Fotométrica Precisão 3 % FS (T = 20 °C - 25 °C) Fotométrica Cubetas...
- Page 128 8 Especificações Idiomas do • Alemão Manual Completo • Chinês do Usuário • Espanhol • Francês • Holandês • Inglês • Italiano • Português • Russo • Turco Dimensões 155 x 76 x 45 mm Peso 247 g Sujeito a modificações técnicas! Para assegurar a máxima precisão dos resultados das medições, utilizar sempre os acessórios e os reagentes fornecidos pelo fabricante do instrumento.
- Page 129 9 Apêndice 9 Apêndice 9.1 Aviso de Direitos Autorais e Marca Registrada é uma marca registrada da Cisco, Inc. e é utilizada pela Apple, Inc. sob licença. ® iTunes Store é uma marca comercial da Apple, Inc., registrada nos Estados Unidos e ®...
- Page 130 Indice Indice Photometer Series 1 Introduzione 1.1 Informazioni generali 1.1.1 Leggere le istruzioni prima dell'uso 1.1.2 Scopo del prodotto 1.1.3 Uso autorizzato 1.1.4 Requisiti per un uso sicuro 1.1.5 Mantenere le istruzioni 1.1.6 Qualificazione dell'utente 1.1.7 Manipolazione di prodotti chimici pericolosi 1.1.8 Istruzioni per lo smaltimento 1.2 Elenco di tutti i simboli usati nel documento 2 Panoramica del prodotto...
- Page 131 Indice 9 Appendice 9.1 Avviso di copyright e marchio commerciale IT Photometer Series...
-
Page 132: Informazioni Generali
1 Introduzione 1 Introduzione 1.1 Informazioni generali 1.1.1 Leggere le istruzioni prima dell'uso Questo manuale fornisce informazioni importanti sul funzionamento sicuro del prodotto. Si prega di leggere attentamente questo manuale e di familiarizzare con il prodotto prima dell'uso. 1.1.2 Scopo del prodotto I fotometri Lovibond sono progettati per misurare diversi parametri in campioni acquosi in una varietà... -
Page 133: Istruzioni Per Lo Smaltimento
1 Introduzione 1.1.5 Mantenere le istruzioni Il manuale deve essere tenuto nelle vicinanze del prodotto in modo da poter sempre trovare le informazioni necessarie. 1.1.6 Qualificazione dell'utente Il personale operativo deve essere in grado di comprendere e applicare correttamente le etichette di sicurezza e le istruzioni di sicurezza sulle confezioni e sugli inserti dei prodotti. - Page 134 1 Introduzione La manipolazione impropria di alcuni reagenti può danneggiare la tua salute. In ogni caso, seguite le informazioni sulle etichette di sicurezza sulla confezione, le istruzioni di sicurezza nel foglietto Attenzione! illustrativo e la scheda di sicurezza disponibile. Le misure di protezione ivi specificate devono essere seguite esattamente.
-
Page 135: Panoramica Del Prodotto
2.3 Caratteristiche I fotometri Lovibond MD50 e MD150 offrono un elevato livello di precisione ed efficienza con un'interfaccia di facile utilizzo. • Design robusto, resistente all'acqua e alla polvere •... - Page 136 2 Panoramica del prodotto 2.4.1 Vista dello strumento Lato anteriore 1 - Pozzetto di misurazione 2 - Display 3 - Numero di modello 4 - Pulsante di accensione 2.4.2 Description of the keys and switches Tasto Funzione Tasto giù Accende o spegne lo strumento utilizzato per scorrere verso il basso ...
- Page 137 2 Panoramica del prodotto 2.4.3 Descrizione dell'interfaccia 1. Porta USB-C per il trasferimento dei dati, gli aggiornamenti e l'importazione dei metodi tramite software per PC. Porta USB-C (impermeabile) USB-C USB-A 2. NFC per il trasferimento wireless dei dati ai dispositivi smart tramite app. Campo NFC IT Photometer Series...
-
Page 138: Ambiente Operativo
3 Commissioning 3 Commissioning 3.1 Ambiente operativo Lo strumento può essere utilizzato in qualsiasi ambiente interno o esterno che sia considerato sicuro per un operatore per eseguire l'analisi. tuttavia si raccomanda di non utilizzare lo strumento in piena luce solare per evitare errori causati dalla luce parassita.Questo ambiente comprende un intervallo di temperatura da 5 a 40 gradi C con un'umidità... -
Page 139: Inserimento E Sostituzione Delle Batterie
3 Commissioning 3.3 Inserimento e sostituzione delle batterie 1 - cacciavite 2 - retro dello strumento 3 - batteria 4 - tacca 5 - vite 6 - anello di tenuta 7 - coperchio del vano batteria Spegnere lo strumento. Se necessario rimuovere la fiala dalla camera del campione. Posizionare lo strumento capovolto su una superficie pulita e piana. -
Page 140: Operazione
4 Operazione 4 Operazione 4.1 Primo avvio • Inserire le batterie come descritto nel capitolo 3.3. • Accendere lo strumento premendo il tasto giù. • Per prima cosa viene visualizzato il logo dell'azienda sullo schermo. • La versione del firmware dello strumento viene visualizzata sullo schermo per un breve periodo. - Page 141 4 Operazione 4.3 Elenco degli elementi di controllo e della loro funzione 4.3.1 Elenco degli elementi di controllo e della loro funzione Funzione Descrizione Come eseguire la funzione Accensione/ • Premere il tasto giù per accendere spegnimento dello lo strumento. strumento •...
- Page 142 4 Operazione Funzione Descrizione Come eseguire la funzione automaticamente al termine del conto alla rovescia. • Il conto alla rovescia può essere saltato premendo di nuovo il pulsante di prova, ma si consiglia vivamente di seguire la procedura. • Dopo la misurazione, il simbolo della cuvetta vuota cambia in quello della cuvetta piena (in basso a sinistra del display).
- Page 143 4 Operazione Funzione Descrizione Come eseguire la funzione mg/L Cl F ⇄ Change citation form • Il risultato viene visualizzato nella forma di citazione predefinita. mg/L Br • Premere il pulsante su o giù per cambiare la forma della citazione. • La nuova forma di citazione scelta viene salvata dallo strumento come predefinita e mostrerà...
- Page 144 4 Operazione Funzione Descrizione Come eseguire la funzione Visualizza protocolli • Quando viene visualizzato il simbolo, premere il tasto Test per accedere ai registri. • Lo strumento visualizza l'elenco di tutti i risultati/protocolli salvati. • Premere i tasti Su o Giù per scorrere i risultati nell'elenco.
- Page 145 4 Operazione Funzione Descrizione Come eseguire la funzione per tornare indietro o annullare l'impostazione. • Per la modifica dell'ora verrà creata una voce di protocollo nei registri. One Time Zero Alcuni metodi offrono la funzione One Time Zero per rendere più efficiente il processo di misurazione. ...
- Page 146 4 Operazione Funzione Descrizione Come eseguire la funzione procedure dei metodi per ottenere risultati accurati. Reset di fabbrica • Premere il pulsante Giù o il pulsante Su per passare al menu Impostazioni di fabbrica. • Premere il pulsante Test per selezionare le impostazioni di fabbrica.
- Page 147 4 Operazione 4.5.1 Trasferimento dati via USB • Il trasferimento dei dati tramite cavo USB richiede il Lovibond Data Expert software, ® che viene fornito gratuitamente ed è disponibile per il download sul sito web Lovibond. • Installare il software sul PC e seguire le istruzioni manuale del software per il trasferimento dei dati.
-
Page 148: Manutenzione
5 Manutenzione 5 Manutenzione 5.1 Ricomincia il programma di manutenzione Compito Cosa fare Cosa non fare Pulire lo strumento e Pulire la camera di misura con Non utilizzare la camera di misura panni umidi e privi di lanugine cuvette non (senza olio) o cotton fioc. -
Page 149: Risoluzione Dei Problemi
6 Risoluzione dei problemi 6 Risoluzione dei problemi 6.1 Messaggi di errore e cosa fare Segnalazione Possibile causa Cosa fare Over range - La lettura Diluire il campione. supera l'intervallo. Torbidità nel campione. Filtrare il campione. Troppa luce sul rilevatore. Controllare la tenuta del tappo della cuvetta. -
Page 150: Accessori E Parti Di Ricambio
7 Accessori e parti di ricambio 7 Accessori e parti di ricambio 7.1 Elenco degli accessori Anello di tenuta per cuvette rotonde 24 mm, set da 12 197626 Asta di agitazione in plastica, lunghezza 10 cm 364109 Asta di agitazione in plastica, lunghezza 13 cm 364100 Asta per agitazione in plastica, lunghezza 10 cm, set da 10 364130... - Page 151 8 Specifiche 8 Specifiche Ottica LED, sensore spettrometrico, filtro antidisturbo (solo varianti selezionate) Sorgente luminosa Lunghezza Variant specific (415, 445, 480, 515, 530, 555, d'onda 590, 630, 680) Campo 0 - 3 Abs fotometrico Precisione 3 % FS (T = 20 °C - 25 °C) fotometrica Cuvette •...
- Page 152 8 Specifiche Lingue del • Cinese manuale • Francese operativo • Inglese • Italiano • Olandese • Portoghese • Russo • Spagnolo • Tedesco • Turco Dimensioni 155 x 76 x 45 mm Peso 247 g Con riserva di modifiche tecniche! Per garantire la massima precisione dei risultati dei test, utilizzare sempre i sistemi di reagenti forniti dal produttore dello strumento.
- Page 153 9 Appendice 9 Appendice 9.1 Avviso di copyright e marchio commerciale è un marchio registrato di Cisco, Inc. ed è utilizzato da Apple, Inc. su licenza. ® iTunes Store è un marchio da Apple, Inc., registrato negli Stati Uniti e altri paesi. ®...
- Page 154 Inhoudsopgave Inhoudsopgave Photometer Series 1 Inleiding 1.1 Algemene informatie 1.1.1 Belangrijke opmerking 1.1.2 Doel van het product 1.1.3 Beoogd gebruik 1.1.4 Eisen voor veilig gebruik 1.1.5 Instructies bewaren 1.1.6 Kwalificatie van de gebruiker 1.1.7 Hantering van gevaarlijke chemicaliën 1.1.8 Instructies voor afvoer 1.2 Lijst van alle in het document gebruikte symbolen 2 Product overzicht 2.1 Gids voor symbolen...
- Page 155 Inhoudsopgave 9 Aanhangsel 9.1 Copyright en handelsmerk kennisgeving NL Photometer Series...
-
Page 156: Algemene Informatie
1 Inleiding 1 Inleiding 1.1 Algemene informatie 1.1.1 Belangrijke opmerking Deze handleiding bevat belangrijke informatie over de veilige bediening van het product. Lees deze handleiding zorgvuldig door en maak u vertrouwd met het product voordat u het gebruikt. 1.1.2 Doel van het product Lovibond fotometers zijn ontworpen voor het meten van verschillende parameters in waterige monsters in uiteenlopende toepassingen, zoals drinkwater, afvalwater, industrieel proceswater, zwembadwater en wetenschap &... - Page 157 1 Inleiding Het product mag niet gebruikt worden indien: • het zichtbaar beschadigd is (b.v. na transport) • het gedurende lange tijd onder ongunstige omstandigheden opgeslagen is geweest (opslagcondities, zie hoofdstuk "Specificaties") 1.1.5 Instructies bewaren De handleiding moet in de buurt van het product worden bewaard, zodat u de informatie die u nodig hebt, altijd kunt vinden.
- Page 158 1 Inleiding 1.2 Lijst van alle in het document gebruikte symbolen De volgende symbolen worden in deze handleiding gebruikt om aan te geven welke gedeelten speciale aandacht vereisen: Er bestaat een gevaar dat de dood of ernstige verwondingen tot gevolg zal hebben als het niet vermeden wordt! Gevaar! Onjuiste omgang met bepaalde reagentia kan uw gezondheid schaden.
-
Page 159: Beschrijving Van Het Product
2.3 Kenmerken Lovibond MD50 en MD150 fotometers bieden een hoge mate van nauwkeurigheid en efficiëntie met een gebruiksvriendelijke interface. • Robuust ontwerp, water- en stofdicht. - Page 160 2 Product overzicht 2.4.1 Aanzicht instrument Voorzijde 1 - Meetschacht 2 - Beeldscherm 3 - Modelnummer 4 - Aan/uit-knop 2.4.2 Beschrijving van de toetsen en schakelaars Toets Functie Omlaag toets Schakelt het instrument in of uit gebruikt om naar beneden te scrollen Test toets Monster meten Selecteer of bevestig een actie...
- Page 161 2 Product overzicht 2.4.3 Interface beschrijving 1. USB-C-poort voor gegevensoverdracht, updates en methode-import via pc-software. USB-C Port (waterproof) USB-C USB-A 2. NFC voor draadloze gegevensoverdracht naar slimme apparaten via App. NFC-veld NL Photometer Series...
-
Page 162: Inhoud Van De Levering
3 Inbedrijfstelling 3 Inbedrijfstelling 3.1 Gebruiksomgeving Het instrument kan worden gebruikt in elke binnen- of buitenomgeving die veilig wordt geacht voor een operator om de analyse uit te voeren. Het wordt echter aanbevolen het instrument niet in fel zonlicht te gebruiken om fouten door strooilicht te voorkomen. Deze omgeving omvat een temperatuurbereik van 5 tot 40 °C met een niet-condenserende luchtvochtigheid tot 90%. - Page 163 3 Inbedrijfstelling 3.3 Plaatsen en vervangen van batterijen 1 - schroevendraaier 2 - instrument achterkant 3 - batterij 4 - inkeping 5 - schroef 6 - afdichtring 7 - deksel batterijcompartiment Schakel het instrument uit. Verwijder indien nodig de flacon uit de monsterkamer. Plaats het instrument ondersteboven op een schone en vlakke ondergrond.
- Page 164 4 Bediening 4 Bediening 4.1 Eerste opstart • Plaats de batterijen zoals beschreven in hoofdstuk 3.3. • Schakel het instrument in door op de Omlaag toets te drukken. • Het bedrijfslogo verschijnt eerst op het apparaat. • De firmwareversie van het instrument wordt even op het scherm weergegeven. •...
- Page 165 4 Bediening 4.3 Lijst van bedieningsorganen en hun functie 4.3.1 Lijst van bedieningsorganen en hun functie Functie Beschrijving Hoe de functie uitvoeren Instrument in-/ • Druk op de Omlaag-toets om het uitschakelen instrument in te schakelen. • Houd de Omlaag-toets ingedrukt om het instrument uit te schakelen.
- Page 166 4 Bediening Functie Beschrijving Hoe de functie uitvoeren • Het aftellen kan worden overgeslagen door nogmaals op de testknop te drukken. • Na de meting verandert het lege cuvet-symbool in een volle cuvet (linksonder op het scherm). Opmerking: Je kunt timers voor alle methoden uitschakelen via de instellingen.
- Page 167 4 Bediening Functie Beschrijving Hoe de functie uitvoeren mg/L Cl F ⇄ Citatieformulier • Het resultaat wordt weergegeven wijzigen in de standaard citatievorm. mg/L Br • Druk op de omhoog- of omlaagknop om de citatievorm te wijzigen. • De nieuw gekozen citatievorm wordt door het instrument opgeslagen als standaard en toont resultaten in deze citatievorm tenzij...
- Page 168 4 Bediening Functie Beschrijving Hoe de functie uitvoeren Instellingenmenu • Houd in het hoofdmenu de omhoog-toets 3 seconden ingedrukt om het instellingenmenu te openen. • Scroll omhoog en omlaag om de verschillende instellingsopties te bekijken. Logboeken • Wanneer het symbool wordt weergeven weergegeven, drukt u op Test om de logboeken te openen. ...
- Page 169 4 Bediening Functie Beschrijving Hoe de functie uitvoeren • Er wordt een protocolinvoer gemaakt in het logboek voor de datumwijziging. Tijd instellen • Druk op de Test toets om het tijdinstelmenu te openen. • Druk op de knop Omlaag of de knop Omhoog om de waarde te verlagen of te verhogen.
- Page 170 4 Bediening Functie Beschrijving Hoe de functie uitvoeren • Druk op de testknop om de timer te activeren/deactiveren. • Hiervoor wordt een item met tijdstempel aangemaakt in de logboeken. Let op: Het wordt aanbevolen om geïntegreerde timers te volgen in methodes om nauwkeurige resultaten te verkrijgen.
- Page 171 4 Bediening 4.5 Gegevensoverdracht Je kunt alle of geselecteerde gegevens overbrengen naar de app of de pc-software. Selecteer het logpictogram in het instellingenmenu om de opgeslagen resultaten weer te geven. De MD50 biedt twee opties voor gegevensoverdracht: Gegevensoverdracht via USB-kabel Gegevensoverdracht via NFC 4.5.1 Gegevensoverdracht via USB •...
- Page 172 5 Onderhoud 5 Onderhoud 5.1 Aanbevolen onderhoudsschema Taak Wat te doen Wat niet te doen Reinig instrument en Reinig de meetkamer met Gebruik geen meetkamer pluisvrije, vochtige doeken cuvet die niet (zonder olie) of wattenstaafjes. goed afgesloten Als het oppervlak van de behuizing vuil is, veeg het dan Gebruik geen af met een zachte doek en een...
- Page 173 5 Onderhoud Onjuiste omgang met bepaalde reagentia kan uw gezondheid schaden. Volg in ieder geval de informatie op de veiligheidsetiketten op de verpakking, de veiligheidsinstructies in de bijsluiter en het Waarschuwing. beschikbare veiligheidsinformatieblad. De daar voorgeschreven beschermingsmaatregelen moeten exact worden opgevolgd. NL Photometer Series...
- Page 174 6 Probleemoplossing 6 Probleemoplossing 6.1 Foutmeldingen en wat te doen Weergave Mogelijke oorzaken Wat te doen Over het bereik - De Verdun het monster. aflezing overschrijdt het bereik. Watermonster is te troebel. Filtreer het watermonster. Te veel licht op de Controleer de afdichting detector.
-
Page 175: Lijst Van Accessoires
7 Accessoires en vervangingsonderdelen 7 Accessoires en vervangingsonderdelen 7.1 Lijst van accessoires 250 mL flesje, AF 631 375072 Borstel, 11 cm lang 380230 Cuvetafdichting voor ronde cuvetten 24 mm, 12 set 197626 Cuvethouder voor 6 ronde cuvetten ø 24 mm 418951 Fabriekskalibratiecertificaat ISO 9001 voor MD50 999756 Fabriekskalibratiecertificaat ISO 9001 voor methode Cl M100... - Page 176 8 Specificaties 8 Specificaties Optiek LED, spectrometersensor, interferentiefilter (alleen geselecteerde varianten) Lichtbron Wellenlänge Variant specific (415, 445, 480, 515, 530, 555, 590, 630, 680) Fotometrisch 0 - 3 Abs bereik Fotometrische 3 % FS (T = 20 °C - 25 °C) nauwkeurigheid Geschikte •...
- Page 177 8 Specificaties Talen • Chinees gebruiksaanwijzing • Duits • Engels • Frans • Italiaans • Nederlands • Portugees • Russisch • Spaans • Turks Afmetingen 155 x 76 x 45 mm Gewicht 247 g Technische wijzigingen voorbehouden! Om een maximale nauwkeurigheid van de testresultaten te garanderen, moet u altijd de door de fabrikant van het instrument geleverde reagenssystemen gebruiken.
- Page 178 9 Aanhangsel 9 Aanhangsel 9.1 Copyright en handelsmerk kennisgeving is een gedeponeerd handelsmerk van Cisco, Inc. en in licentie gegeven aan Apple, ® Inc. iTunes Store® is een handelsmerk van Apple, Inc. en is geregistreerd in de VS en andere landen. Android™...
- Page 179 İçindekiler İçindekiler Photometer Series 1 Giriş 1.1 Genel bilgi 1.1.1 Kullanmadan önce talimatları okuyun 1.1.2 Ürünün Amacı 1.1.3 Yetkili kullanım 1.1.4 Güvenli kullanım için gereklilikler 1.1.5 Talimatları saklayın 1.1.6 Kullanıcı yeterliliği 1.1.7 Tehlikeli kimyasalların kullanımı 1.1.8 İmha Etme 1.2 Belgede kullanılan tüm karakterlerin listesi 2 Ürüne Genel Bakış...
- Page 180 İçindekiler 9 Ekler 9.1 Telif Hakkı ve Ticari Marka Bildirimi TR Photometer Series...
-
Page 181: Genel Bilgi
1 Giriş 1 Giriş 1.1 Genel bilgi 1.1.1 Kullanmadan önce talimatları okuyun Bu kılavuz, ürünün güvenli kullanımı hakkında önemli bilgiler sağlar. Lütfen bu kılavuzu dikkatlice okuyun ve kullanmadan önce ürüne alışın. 1.1.2 Ürünün Amacı Lovibond Fotometreler, örn. içme suyu, atık su, Endüstriyel işleme suyu, havuz suyu ve bilim ve araştırma gibi uygulamalarda likit numunelerde farklı... - Page 182 1 Giriş 1.1.6 Kullanıcı yeterliliği İşletme personeli, ürünlerin paket ve kesici uçlarındaki güvenlik etiketlerini ve güvenlik talimatlarını anlayabilmeli ve doğru bir şekilde uygulayabilmelidir. Kullanıcı, kullanıma aşina olmak ve güvenli kullanım sağlamak için bu kılavuzu okuyabilmeli ve anlayabilmelidir. 1.1.7 Tehlikeli kimyasalların kullanımı Bu ürünün kullanıldığı...
- Page 183 1 Giriş Önemli bilgilere veya özel talimatlara uyulmalıdır. Not! TR Photometer Series...
-
Page 184: Ürüne Genel Bakış
öğrenin. 2.3 Özellikleri Lovibond MD50 ve MD150 fotometreler, kullanıcı dostu arayüzü ile yüksek düzeyde doğruluk ve verimlilik sağlar. • Sağlam tasarım, Su ve Toz geçirmez. • Daha yüksek doğruluk sağlamak için yenilikçi optik sistem. - Page 185 2 Ürüne Genel Bakış 2.4.1 Enstrüman görünümü Ön taraf 1 - Numune Odası 2 - Ekran 3 - Model Numarası 4 - Güç düğmesi 2.4.2 Anahtarların ve anahtarların açıklaması Tuş İşlev Güç AÇMA/KAPAMA tuşu Enstrümanı açar veya kapatır aşağı doğru kaydırmak için kullanılır Test anahtarı...
- Page 186 2 Ürüne Genel Bakış 2.4.3 Arayüz açıklaması 1. PC yazılımı aracılığıyla veri aktarımı, güncellemeler ve yöntem içe aktarma için USB- C bağlantı noktası. USB-C Bağlantı Noktası (su geçirmez) USB-C USB-A 2. Uygulama aracılığıyla akıllı cihazlara kablosuz veri aktarımı için NFC. NFC alanı...
-
Page 187: Devreye Alma
3 Devreye alma 3 Devreye alma 3.1 Çalışma ortamı Cihaz, bir operatörün analizi gerçekleştirmesi için güvenli kabul edilen herhangi bir iç veya dış ortamda kullanılabilir. bununla birlikte, başıboş ışıktan kaynaklanan hataları önlemek için aleti parlak güneş ışığında kullanmamanız tavsiye edilir. Bu ortam, %90'a kadar yoğuşmasız nem ile 5 ila 40 derece C sıcaklık aralığını... - Page 188 3 Devreye alma Aleti kapatın. Gerekirse flakonu numune odasından çıkarın. Aleti temiz ve düz bir yüzeye baş aşağı yerleştirin. Pil bölmesi kapağının (7) bir vidasını (5) sökün. Pil bölmesi kapağını (7) çentikten (4) kaldırın. Eski pilleri (3) çıkarın. 2 yeni pil yerleştirin. Doğru polariteyi sağlamak! Pil bölmesi kapağını...
-
Page 189: İlk Devreye Alma
4 Operasyon 4 Operasyon 4.1 İlk devreye alma • Pilleri bölüm 3.3'te açıklandığı gibi yerleştirin. • Güç Aşağı tuşuna basarak cihazı açın. • Ünite üzerinde önce şirket logosu görüntülenir. • Cihazın aygıt yazılımı sürümü kısa bir süre için ekranda görüntülenecektir. •... - Page 190 4 Operasyon 4.3 Kontrol elemanlarının listesi ve işlevleri 4.3.1 Kontrol elemanlarının listesi ve işlevleri Fonksiyon Açıklama Fonksiyon nasıl yürütülür Enstrümanı açma/ • Cihazı açmak için Aşağı tuşu kapama basın. • Cihazı kapatmak için Aşağı tuşu basılı tutun. Arka Işık • Arka ışığı açmak veya kapatmak için geri tuşunu 3 saniye basılı...
- Page 191 4 Operasyon Fonksiyon Açıklama Fonksiyon nasıl yürütülür prosedürü takip etmeniz şiddetle tavsiye edilir. • Ölçümden sonra boş küvet sembolü dolu küvete dönüşür (ekranın sol alt kısmı). Not: Ayarlardan tüm yöntemler için zamanlayıcıları devre dışı bırakabilirsiniz. Dikkat: Yöntem prosedürleri takip edilmezse testlerin doğruluğu garanti edilemez.
- Page 192 4 Operasyon Fonksiyon Açıklama Fonksiyon nasıl yürütülür mg/L Cl F ⇄ Atıf formunu değiştir • Sonuç varsayılan atıf formunda görüntülenir. mg/L Br • Atıf formunu değiştirmek için yukarı veya aşağı düğmesine basın. • Seçilen yeni atıf formu cihaz tarafından varsayılan olarak kaydedilir ve varsayılana geri dönülmediği sürece sonuçları...
- Page 193 4 Operasyon Fonksiyon Açıklama Fonksiyon nasıl yürütülür Günlükleri görüntüle • Sembol görüntülendiğinde günlüklere girmek için Test tuşuna basın. • Cihaz, kaydedilen tüm sonuçların/ protokollerin listesini görüntüler • Listedeki sonuçlar arasında gezinmek için Yukarı veya Aşağı tuşuna basın. • Tüm sonuçlar ve protokoller aktarım için varsayılan olarak önceden seçilidir.
- Page 194 4 Operasyon Fonksiyon Açıklama Fonksiyon nasıl yürütülür Zaman ayarı • Zaman ayarı menüsünü açmak için Test tuşuna basın. • Değeri azaltmak veya artırmak için Aşağı düğmesine veya Yukarı düğmesine basın. • Ok son konuma geldiğinde, onaylamak için Test düğmesine basın veya geri dönmek ya da ayarı...
- Page 195 4 Operasyon Fonksiyon Açıklama Fonksiyon nasıl yürütülür zamanlayıcıların takip edilmesi önerilir. Fabrika ayarlarına • Fabrika ayarları menüsüne gitmek sıfırlama için Aşağı düğmesine veya Yukarı düğmesine basın. • Fabrika ayarlarını seçmek için Test düğmesine basın. • İşlemi onaylamak için Test düğmesine tekrar basın veya sıfırlamayı...
- Page 196 4 Operasyon 4.5.1 USB üzerinden veri aktarımı • USB kablosu ile veri aktarımı için Lovibond web sitesinden ücretsiz olarak indirilebilen yazılım Lovibond Data Expert gereklidir. ® • Lütfen yazılımı bilgisayarınıza kurun ve yazılımdaki veri aktarım talimatlarını izleyin. • Bağlandıktan sonra, cihaz durum çubuğunda USB Sembolü gösterecektir. •...
- Page 197 5 Bakım 5 Bakım 5.1 Yeniden başlatılan bakım programı Görev Ne Yapmalı Ne yapmamalısınız Cihazı ve ölçüm Ölçüm odasını tiftiksiz, nemli Sıkıca odasını temizleyin bezler (yağsız) veya pamuk kapatılmamış çubuklar kullanarak temizleyin. bir küvet kullanmayın. Muhafaza yüzeyi kirliyse, Solvent yumuşak bir bez ve hafif sabunlu içeren temizlik suyla silin.
-
Page 198: Sorun Giderme
6 Sorun giderme 6 Sorun giderme 6.1 Hata mesajları ve yapılması gerekenler Görüntülemek Olası Nedenler Ne yapmalı Aşırı aralık - Okuma aralığı Numuneyi seyreltin. aşıyor. Su numunesi çok bulanık. Su örneğini süzün. Dedektör üzerinde çok Küvet kapağındaki contayı fazla ışık var. kontrol edin. -
Page 199: Aksesuarlar Ve Yedek Parçalar
7 Aksesuarlar ve Yedek parçalar 7 Aksesuarlar ve Yedek parçalar 7.1 Aksesuar Listesi 6 yuvarlak küvet için küvet Ø 24 mm 418951 24 mm'lik yuvarlak küvetler için küvet keçesi, 12'li set 197626 250 mL şişe, AF 631 375072 250 mL şişe ve kapakla birlikte numune toplama ünitesi, AF 631 170500 Cl M100 (MD50) yöntemi için Fabrika Kalibrasyon sertifikası... - Page 200 8 Özellikler 8 Özellikler Optikler LED, spektrometre sensörü, parazit filtresi (yalnızca seçili varyantlar) ışık Kaynağı Dalga Boyu Variant specific (415, 445, 480, 515, 530, 555, 590, 630, 680) Fotometrik Aralık 0 - 3 Abs Fotometrik 3 % FS (T = 20 °C - 25 °C) Doğruluk Uygun Şişeler •...
- Page 201 8 Özellikler Diller Tam • Almanca Kullanım • Çince Kılavuzu • Flemenkçe • Fransızca • İngilizce • İspanyolca • İtalyanca • Portekizce • Rusça • Tükçe Boyutlar 155 x 76 x 45 mm Ağırlık 247 g Teknik değişikliğe tabidir! Test sonuçlarının maksimum doğruluğunu sağlamak için daima cihaz üreticisi tarafından sağlanan reaktif sistemlerini kullanın.
- Page 202 9 Ekler 9 Ekler 9.1 Telif Hakkı ve Ticari Marka Bildirimi , Cisco, Inc.'in tescilli ticari markasıdır ve Apple, Inc.'e lisanslanmıştır. ® iTunes Store , Apple, Inc.'in ABD ve diğer ülkelerde tescilli bir ticari markasıdır. ® Android™ ve Google Play™, Google, Inc.'in ticari markasıdır. Excel , Microsoft Corp.'un ABD ve diğer ülkelerde tescilli ticari markasıdır.
- Page 203 Оглавление Оглавление Photometer Series 1 Введение 1.1 Общая информация 1.1.1 Прочтите инструкцию перед использованием 1.1.2 Назначение продукта 1.1.3 Разрешенное использование 1.1.4 Требования к безопасному использованию 1.1.5 Соблюдайте инструкции 1.1.6 Квалификация пользователя 1.1.7 Обращение с опасными химическими веществами 1.1.8 Инструкции по утилизации 1.2 Список...
- Page 204 Оглавление 9 Appendix 9.1 Уведомление об авторских правах и товарных знаках RU Photometer Series...
-
Page 205: Введение
1 Введение 1 Введение 1.1 Общая информация 1.1.1 Прочтите инструкцию перед использованием В данном руководстве содержится важная информация о безопасной эксплуатации изделия. Пожалуйста, внимательно прочитайте данное руководство и ознакомьтесь с изделием перед использованием. 1.1.2 Назначение продукта Фотометры Lovibond предназначены для измерения различных параметров в водных... -
Page 206: Соблюдайте Инструкции
1 Введение Запрещается использовать изделие, если: • оно имеет видимые повреждения (например, после транспортировки) • оно длительное время хранилось в неблагоприятных условиях (условия хранения, см. главу "Технические характеристики") 1.1.5 Соблюдайте инструкции Руководство должно храниться рядом с изделием, чтобы вы всегда могли найти необходимую... -
Page 207: Список Всех Символов, Используемых В Документе
1 Введение 1.2 Список всех символов, используемых в документе Следующие символы используются в данном руководстве для обозначения разделов, требующих особого внимания: Существует опасность, которая может привести к смерти или серьезным травмам, если ее не избежать! Опасность! Неправильное обращение с некоторыми реагентами может нанести... -
Page 208: Обзор Продукции
• Программное обеспечение для ПК для импорта одного пользовательского метода и обновления прибора. 2.4 Описание продукта Lovibond MD50 и MD150 - это серии одно- и многопараметрических фотометров, разработанных специально для тех, кто хочет измерить конкретные параметры воды в бассейне, питьевой воды, промышленной воды или сточных вод. Благодаря... -
Page 209: Вид На Прибор
2 Обзор продукции реагентов и стандартов испытаний местного производства обеспечивают полное решение для удовлетворения требований в области анализа воды. 2.4.1 Вид на прибор Передняя сторона 1 - Камера для образцов 2 - дисплей 3 - Номер модели 4 - Кнопка питания 2.4.2 Описание... -
Page 210: Описание Интерфейса
2 Обзор продукции 2.4.3 Описание интерфейса 1. Порт USB-C для передачи данных, обновления и импорта методов через программное обеспечение ПК. Порт USB-C (водонепроницаемый) USB-C USB-A 2. NFC для беспроводной передачи данных на смарт-устройства через приложение. Поле NFC RU Photometer Series... -
Page 211: Ввод В Эксплуатацию
3 Ввод в эксплуатацию 3 Ввод в эксплуатацию 3.1 Условия эксплуатации Прибор можно использовать в любых условиях в помещении или на открытом воздухе, которые считаются безопасными для проведения анализа оператором. Однако рекомендуется не использовать прибор при ярком солнечном свете, чтобы избежать... -
Page 212: Установка И Замена Батареек
3 Ввод в эксплуатацию 3.3 Установка и замена батареек 1 - отвертка 2 - задняя панель прибора 3 - батарея 4 - выемка 5 - винт 6 - уплотнительное кольцо 7 - крышка батарейного отсека Выключите прибор. При необходимости извлеките пробирку из камеры для образца. Поместите... -
Page 213: Операция
4 Операция 4 Операция 4.1 Первый запуск • Bставьте батарейки, как описано в главе 3.3. • Включите прибор, нажав клавишу уменьшения мощности. • Сначала на экране устройства отобразится логотип компании. • На экране на короткое время отобразится версия прошивки прибора. •... -
Page 214: Список Элементов Управления И Их Функции
4 Операция 4.3 Список элементов управления и их функции 4.3.1 Список элементов управления и их функции Функция Описание Как выполнить функцию Включение/ • Нажмите Клавиша Вниз, чтобы выключение включить прибор. прибора • Нажмите и удерживайте Клавиша Вниз чтобы выключить прибор. Подсветка... - Page 215 4 Операция Функция Описание Как выполнить функцию • В случае обратного отсчета измерение происходит автоматически после окончания отсчета. • Обратный отсчет можно пропустить, повторно нажав кнопку тестирования, но настоятельно рекомендуется выполнить эту процедуру. • После измерения символ пустой кюветы меняется на символ полной...
- Page 216 4 Операция Функция Описание Как выполнить функцию В этом случае результат первого частичного метода не отображается, и прибор продолжает работу со вторым частичным методом. По завершении процедуры нажмите кнопку вниз или вверх, чтобы переключиться между рассчитанным итоговым результатом и результатом частичного...
- Page 217 4 Операция Функция Описание Как выполнить функцию Измерение Измерение абсорбции абсорбции выполняется по той же схеме, что и измерение концентрации. 515 nm Прокрутите список методов, чтобы выбрать метод абсорбции. В списке будут отображены методы абсорбции для каждой доступной длины волны. Меню...
- Page 218 4 Операция Функция Описание Как выполнить функцию • Нажмите кнопку Вверх или Вниз, чтобы настроить дату. • Когда стрелка окажется на последней цифре, нажмите клавишу Test для подтверждения или клавишу Back для возврата в предыдущее положение. Дата установлена, и прибор возвращается...
- Page 219 4 Операция Функция Описание Как выполнить функцию "Назад" и выполнив новое обнуление. Включение/ • Нажмите кнопку Вверх или выключение Вниз, чтобы прокрутить значок таймеров Таймеры в меню настроек. • С помощью этой настройки можно отключить встроенные таймеры для всех методов. •...
-
Page 220: Передача Данных
4 Операция Функция Описание Как выполнить функцию чтобы выбрать нужный тип реагента. 4.5 Передача данных Вы можете перенести все или выбранные данные в приложение или в программное обеспечение для ПК. Для отображения сохраненных результатов выберите значок журнала в меню настроек. MD 50 предоставляет... - Page 221 4 Операция RU Photometer Series...
-
Page 222: Техническое Обслуживание
5 Техническое обслуживание 5 Техническое обслуживание 5.1 Повторный график технического обслуживания Задание Что делать Что не делать Очистите прибор Очищайте измерительную Не используйте и измерительную камеру с помощью влажных кюветы с камеру безворсовых салфеток (без неплотно масла) или ватных палочек. закрытой... - Page 223 5 Техническое обслуживание Неправильное обращение с некоторыми реагентами может нанести вред вашему здоровью. В любом случае следуйте информации на этикетках безопасности на упаковке, Предупре- инструкциям по безопасности во вкладыше к упаковке и ждение! имеющемуся паспорту безопасности. Необходимо точно соблюдать указанные там защитные меры. RU Photometer Series...
-
Page 224: Устранение Неполадок
6 Устранение неполадок 6 Устранение неполадок 6.1 Сообщения об ошибках и что делать Дисплей Возможные причины Что делать Выход за пределы Разбавьте образец. диапазона - Показания выходят за пределы диапазона. Проба воды слишком Отфильтруйте пробу мутная. воды. Слишком много света на Проверьте... -
Page 225: Аксессуары И Запасные Части
7 Аксессуары и запасные части 7 Аксессуары и запасные части 7.1 Список принадлежностей Бутылка 250 мл, AF 631 375072 Заводской сертификат калибровки ISO 9001 для MD50 999756 Заводской сертификат калибровки ISO 9001 для метода Cl 999720 M100 (MD50) Заводской сертификат калибровки ISO 9001 для метода Cl 999721 M110 (MD50) Кабель... -
Page 226: Технические Характеристики
8 Технические характеристики 8 Технические характеристики Оптика Светодиод, датчик спектрометра, фильтр помех (только в некоторых вариантах) Источник света Длина волны Variant specific (415, 445, 480, 515, 530, 555, 590, 630, 680) Фотометрический 0 - 3 Abs диапазон Фотометрическая 3 % FS (T = 20 °C - 25 °C) точность... - Page 227 8 Технические характеристики Соответствие Языки • Английский руководства по • Голландский эксплуатации • Испанский • Итальянский • Китайский • Немецкий • Португальский • Русский • Турецкий • Французский Размеры 155 x 76 x 45 mm Вес 247 g Подлежит техническому изменению! Для...
- Page 228 9 Appendix 9 Appendix 9.1 Уведомление об авторских правах и товарных знаках является зарегистрированной торговой маркой компании Cisco, Inc. и ® лицензирована компанией Apple, Inc. iTunes Store является торговой маркой компании Apple, Inc., зарегистрированной в ® США и других странах. Android™...
- Page 229 目录 目录 Photometer Series 1 简介 1.1 一般信息 1.1.1 使用前请阅读说明 1.1.2 产品的目的 1.1.3 授权使用 1.1.4 安全使用的要求 1.1.5 保存说明书 1.1.6 用户资格 1.1.7 危险化学品的处理 1.1.8 处置说明 1.2 文件中使用的所有符号的清单 2 产品概况 2.1 符号指南 2.3 特点 2.4 产品描述 2.4.1 仪表视图 2.4.2 键和开关的描述 2.4.3 接口描述 3 开始准备...
- Page 230 目录 9 附录 9.1 版权和商标通知 ZH Photometer Series...
- Page 231 1 简介 1 简介 1.1 一般信息 1.1.1 使用前请阅读说明 本手册提供了有关本产品安全操作的重要信息。请仔细阅读本手册,并在使用前熟悉本 产品。 1.1.2 产品的目的 Lovibond 光度计系列带有不同的参数,适用于各种水质检测应用,例如饮用水、污水、 工业过程水、游泳池水以及科学和研究实验室。Lovibond 光度计系列含有适合在实验室 环境中使用的台式光度计,也包含适合在野外使用的便携式光度计。便携式仪器装在坚 固的手提箱中,并配有所需的配件,方便携带。若暴露在极端光线和温度下,仪器的性 能可能会受影响,因此仪器需要在建议的环境条件下使用。 1.1.3 授权使用 如出现不正当使用、不遵守本手册、由不合格人员使用或未经授权改变产品现象,制造 商不承担相关责任和损害保证。 制造商对用户或第三方因使用本产品而产生的费用或损失不承担任何责任,特别是在不 正确使用产品或误用或产品连接出现故障的情况下。 制造商对打印错误不承担任何责任。 1.1.4 安全使用的要求 为安全使用本设备,请注意以下几点: • 以未经制造商指定的方式使用本设备,可能会损害本设备的性能。 • 本产品只能按照本文规定的授权使用方式使用。 • 本产品需使用本操作手册提到的电源。 • 本产品只能在本操作手册中提到的环境条件下使用。 • 本产品不得被打开或修改。 出现下列情况,不得使用该产品:...
- Page 232 1 简介 1.1.7 危险化学品的处理 使用本产品的地方可能存在化学和/或生物危险。在使用本产品时,请遵守所有管理法律、 法规和协议。 对于产品的开发,Lovibond公司密切关注安全问题。一些危险物质的危害是无法避免的。 如果使用自制的试验或溶液,那么有关这些试验或溶液所造成的任何风险的责任由使用者 承担(个人责任)。 1.1.8 处置说明 根据当地法律规定,将电池和电气设备丢弃在合适的设施中。 将电池与生活垃圾一起处理是违法的。 在欧盟范围内,在设备的使用寿命结束后,电池要在专门的回收点进行处理。 标有此标志的仪器不得在正常的生活垃圾中处理。 1.2 文件中使用的所有符号的清单 本手册中使用了以下符号来表示需要特别注意的部分。 危险!若不加以避免,可能导致死亡或引起严重伤害! 危险! 对某些试剂处理不当会损害你的健康。在任何情况下,都要遵循包装 上的安全标签、包装内页的安全说明和可用的安全数据表上的信息。 必须严格遵守其中规定的保护措施。 警告! 存在可能导致轻度或中度伤害的危险。 注意! 必须遵守重要信息或特别指示。 注 ZH Photometer Series...
- Page 233 应严格遵守产品上的标签,以避免人身伤害或产品损坏。 在采取任何行动之前,如果存 在这种标签,请参考本章关于危险或风险的性质的信息。 适用于欧盟的专业用户。 如果你想丢弃电气和电子设备(EEE),请联系你的经销商或供应商 以获得更多信息。 对于欧盟以外的国家的处置。 该标志仅在欧盟(EU)有效。如果您想丢弃本产品,请联系当地政府 或经销商,并询问正确的处理方法。 2.3 特点 Lovibond MD50 和 MD150 光度计系列带有高水平的精准型测试系统、操作效率和用户 友好型操作界面。 • 坚固的外壳设计,防水防尘。 • 创新的光学系统,提供更高的精准度。 • 多色背景提示灯。 • 支持程序更新至新最新方法。 • 图标和符号显示,适用于全球不同语言用户。 • 数据储存 100 组数据。 • 通过 NFC 向 AquaLX 应用程序无线传输数据。 • 通过 USB 与电脑进行有线数据传输。...
- Page 234 2 产品概况 2.4.1 仪表视图 正面 1 - 样品室 2 - 显示器 3 - 型号 4 - 电源按钮 2.4.2 键和开关的描述 钥匙 功能 向下键 打开或关闭仪器 用于向下滚动 测试键 测量样品 选择或确认操作 返回键 返回上一个菜单 打开或关闭背光 上键 向上滚动列表 进入设置菜单 ZH Photometer Series...
- Page 235 2 产品概况 2.4.3 接口描述 1. USB-C端口用于数据传输,更新和通过PC软件导入方法。 USB-C 端口 (防水) USB-C USB-A 2. NFC用于通过App向智能设备进行无线数据传输。 NFC 领域 ZH Photometer Series...
- Page 236 3 开始准备 3 开始准备 3.1 操作环境 本仪器可以在任何被认为对操作者安全的室内或室外环境中进行分析。然而,建议不要在 明亮的阳光下使用仪器,以避免由杂光引起的错误。这个环境包括温度范围从5到40摄氏 度,非凝结湿度高达90%。仪器和环境之间的巨大温差会导致误差--例如,由于在镜头区 域或小瓶上形成的冷凝水。 3.2 交付的内容 仪器 2 节电池(AA) 3 个 24 毫米 ∅ 圆形比色皿 3 根 10 厘米塑料搅拌棒 刷子 11 厘米 螺丝刀 10 毫升注射器 USB 电缆 使用说明书 方法手册(二维码)) 合格证书 保修信息 带泡沫内胆的便携箱 方法试剂 3.3 插入和更换电池 1 - 螺丝刀...
- Page 237 3 开始准备 将仪器关机。 如有必要,从样品室中取出小瓶。 将仪器倒置在一个干净、平整的表面上。 拧下电池盒盖 (7) 的一个螺丝 (5)。 在凹槽(4)处提起电池盒盖(7)。 取出旧电池(3)。 放入2个新电池。确保极性正确! 关闭电池盒盖 (7)。检查槽口的密封环(6),确保它是紧固的。 仔细拧紧螺钉(5)。 为确保仪器的防水性。 密封环必须在位置上 电池盒盖必须拧上所有螺丝 注意! 按照所有联邦、州和当地的法规处理废旧电池。 注意! ZH Photometer Series...
- Page 238 4 操作步骤 4 操作步骤 4.1 首次启动 • 按照第3.3章所述,插入电池。 • 按电源下键打开仪器。 • 设备上首先显示公司标志。 • 屏幕上将短暂显示仪器的固件版本。 • 按照 4.3.1 中所述步骤设置日期和时间。 • 选择试剂类型,只显示所需方法。详情请参阅 4.3.1 中的步骤。 • 最后,显示一个方法列表,这是设备的启动屏幕。 注意:仪器背光默认打开,若要关闭背光,请按 Back 键 3 秒钟。 4.2 一般操作原则 样品池 光源 光导管 样品室 10 ml 光束 光谱传感器 + 检测器 光度计有根据标准分析程序预先编程的方法。为确保分析简便、无误,这些方法中都编入...
- Page 239 4 操作步骤 4.3 控制元素及其功能列表 4.3.1 控制元素及其功能列表 功能 说明 如何执行功能 打开/关闭仪器 • 按 向下 键打开仪器。 • 按住 向下 键关闭仪器。 背光 • 按住返回键 3 秒钟可打开或关闭背 光。 测量模式 • 显示屏上将显示上次使用的方法。 • 浏览方法列表并选择所需的方法。 • 按测试键选择方法。 返回上一视图 • 按返回键返回上一屏幕。 ZH Photometer Series...
- Page 240 4 操作步骤 功能 说明 如何执行功能 进行调零 • 在 24 毫米样品瓶中注入 10 毫升样 品,或在必要时使用 16 毫米试剂 空白瓶。 注:每种方法都有不同的空白要 求,请按照方法步骤正确地对仪器 进行空白处理。请扫描最后一页上 的二维码下载方法说明。 • 拧紧样品瓶。 • 将样品瓶放入样品室。注意定位! • 按 Test键 为仪器调零。 • 拧紧样品瓶。 • 在倒计时的情况下,测量将在倒计 时结束后自动进行。 • 再次按下测试按钮可以跳过倒计 时,但强烈建议您按照程序操作。 • 调零成功后,显示屏左下角的空白 比色皿符号将变为满比色皿。 注意: 您可以通过设置禁用所有方法 的计时器。...
- Page 241 4 操作步骤 功能 说明 如何执行功能 用户校准 • 用户校准时,请使用已知浓度的标 准物质代替水样进行测试。 • 显示结果时,按住 Test(测试)键 3 秒钟。 • 仪器进入校准模式。 • 按 "上 "键或 "下 "键增加/减少显示 值,使其与目标值一致。 • 按测试键接受调整值。按 背 键可随 时取消校准。 • 将创建一个带有方法编号的日志条 目。 "校准 "和校准因子,并带有日 期和时间戳。 吸光率测量 吸光度测量的步骤与浓度方法相同。 滚动方法列表,选择吸光度方法。每 个可用波长的吸光度测量方法将显示 515 nm 在列表中。...
- Page 242 4 操作步骤 功能 说明 如何执行功能 日期设置 • 按测试键打开日期设置菜单。 按向上或向下键切换格式。 按测试键确认格式。 按向上或向下键调整日期。 当箭头指向最后一位数字时,按测 试键确认,或按返回键返回上一位 置。日期已设定,仪器返回设置菜 单。 日期更改成功后仪器将在日志中自 动生成一条记录。 时间设置 • 按测试键打开时间设置菜单。 • 按 “向下 ”按钮或 “向上 ”按钮可减少 或增加数值。 • 当箭头位于最后一个位置时,按下 测试按钮确认,或按下返回按钮返 回或取消设置。 • 时间更改成功后仪器将在日志中自 动生成一条记录。 One Time Zero 有些方法提供一次性归零功能,使测 量过程更加高效。 • 按向下键或向上键,在设置菜单中 选择...
- Page 243 4 操作步骤 功能 说明 如何执行功能 计时器开/关 • 按向上或向下键滚动到设置菜单中 的定时器图标。 • 您可以通过此设置停用所有方法的 综合定时器。 • 按下测试按钮激活/禁用计时器。 • 日志中将为此创建一个带有时间戳 的条目。 注意: 建议在方法步骤中使用集成计 时器,以获得准确的结果。 出厂重置 • 按向下按钮或向上按钮导航至出厂 设置菜单。 • 按 "测试 "按钮选择出厂设置。 • 再次按下 "测试 "按钮确认重置过 程,或按下 "返回 "按钮取消重置。 • 日志中会创建一个带有时间戳的条 目。 注意: 重置会删除用户方法、用户校 准和所有保存的结果。...
- Page 244 4 操作步骤 4.5.2 通过NFC传输数据 • 要通过 NFC 传输测量结果,如第 4.3.1 章所述,进入日志菜单,选择要通过 NFC 传输 的特定或全部结果。 • 按住 UP 键将结果保存到 NFC 标签中。 • 打开 AquaLX 应用程序,将智能设备靠近仪器以传输结果(如图所示)。 • 按返回按钮返回设置菜单。 注意:返回设置菜单后,NFC 标签中的所有数据将被删除。 • 确保智能设备上的NFC已经启用。 ZH Photometer Series...
- Page 245 5 维护 5 维护 5.1 推荐采用维护计划 任务 该做什么 不应该做什么 清洁仪器和测量室 使用无绒毛的湿布(无油)或棉 请勿使用密封不 棒清洁测量室。 严的比色皿。 如果外壳表面很脏,用软布和温 不要使用含有溶 和的肥皂水擦拭。 剂的清洁剂。 尽快清除任何化学品的飞溅。 不要将任何化学 品直接喷洒或倒 为了消毒,可以使用异丙醇进行 入样品室。 短时间的清洁。 清洁附件 每次分析后应彻底清洗小瓶、瓶 不要使用有明显 盖和搅拌棒以防止干扰。 缺陷的样品池, 例如缺陷、划痕 或裂纹。 使用从外面看没 有完全干燥的样 品瓶。 更换电池 长时间存放仪器时,应取出电 请勿使用非指定 池,以避免电池泄漏。 型号的电池。 始终使用不可充电的电池。 储存...
- Page 246 6 故障排除 6 故障排除 6.1 错误信息和如何处理 显示 可能的原因 该怎么做 超过范围 - 读数超过范围。 稀释样品。 水样太浑浊。 滤去水样。 检测器上有太多的光。 检查比色皿盖的密封情况。 量程不足 - 读数低于方法的 确保试剂剂量和反应时间符 检测限。 合方法的说明。 检查样品,确保其中含有足 够高浓度的待测参数。 检测器上的光线不足。 清洁测量室,清除阻挡光线 的任何灰尘颗粒。 计算错误。 仪器立即关闭 电池电量不足。 更换电池。 ZH Photometer Series...
- Page 247 7 配件和替换零件 7 配件和替换零件 7.1 配件列表 250 mL 瓶子,AF 631 375072 MD50 固定价格服务包 19802710 MD50 的 ISO 9001 工厂校准证书 999756 USB-C电缆1米,USB-C到A 19820-081 刷子,长 11 cm 380230 圆形比色杯,盖子直径 Ø 24 mm,高 48 mm,10 ml,5 件套 197629 塑料搅拌棒,长 10 cm 364109 塑料搅拌棒,长 10 cm,10 件套 364130 塑料搅拌棒,长...
- Page 248 8 技术参数 8 技术参数 光学性质 LED、光谱仪传感器、干扰滤波器(仅限特定型 号) 光源 波长 Variant specific (415, 445, 480, 515, 530, 555, 590, 630, 680) 光度范围 0 - 3 Abs 光度精度 3 % FS (T = 20 °C - 25 °C) 适用比色皿 • 比色管16 mm •...
- Page 249 8 技术参数 多语言用户操作 • 中文 手册 • 俄语 • 土耳其语 • 德文 • 意大利 • 法文 • 英文 • 荷兰语 • 葡萄牙 • 西班牙 尺寸 155 x 76 x 45 mm 重量 247 g 可进行技术修改! 为确保测试结果的最大准确性,请始终使用仪器制造商提供的试剂系 统。 注意! ZH Photometer Series...
- Page 250 9 附录 9 附录 9.1 版权和商标通知 是Cisco, Inc.的注册商标,并授权给Apple, Inc. ® iTunes Store 是苹果公司的商标,在美国和其他国家注册。 ® Android™和Google Play™是谷歌公司的商标。 Excel 是微软公司的商标,在美国和其他国家注册。 ® ZH Photometer Series...
- Page 252 Tel: +91 (0) 40 23883300 www.lovibond.com www.lovibond.com Toll Free: 1 800 599 3891/ 3892 Spain France indiaoffice@lovibond.in www.lovibondwater.in India Technical changes without notice Printed in Germany 09/24 No.: 00386701 Lovibond ® and Tintometer ® Trademarks of the Tintometer Group of Companies...
Need help?
Do you have a question about the Lovibond MD50 and is the answer not in the manual?
Questions and answers