Tintometer Lovibond TB 350 Instruction Manual
Hide thumbs
Also See for Lovibond TB 350:
- Quick start manual (263 pages) ,
- Quick start manual (105 pages)
Table of Contents
Advertisement
Available languages
Available languages
Quick Links
Lovibond
®
Tintometer
Turbidimeter
TB 350
Instruction manual.................. 3
EN
Manual de instrucciones.......86
ES
Manual de instruções..........172
PT
Gebruiksaanwijzing.............256
NL
Инструкции по
RU
эксплуатации...................... 340
®
Water Testing
Group
Gebrauchsanleitung..............44
DE
Mode d'emploi..................... 128
FR
Manuale di istruzione..........214
IT
Kullanım için talimatlar....... 298
TR
使用说明................................ 383
ZH
Advertisement
Chapters
Table of Contents

Related Manuals for Tintometer Lovibond TB 350


Summary of Contents for Tintometer Lovibond TB 350
- Page 1 ® Lovibond Water Testing ® Tintometer Group Turbidimeter TB 350 Instruction manual....3 Gebrauchsanleitung....44 Manual de instrucciones..86 Mode d'emploi..... 128 Manual de instruções..172 Manuale di istruzione..214 Gebruiksaanwijzing.....256 Kullanım için talimatlar..298 Инструкции по 使用说明........ 383 эксплуатации...... 340...
-
Page 3: Table Of Contents
Table of Contents Table of Contents Page 1 Introduction 1.1 General Information 1.1.1 Read instructions before use 1.1.2 Purpose of the Product 1.1.3 Authorized use 1.1.4 Requirements for safe use 1.1.5 Keep instructions 1.1.6 User qualification 1.1.7 Handling of hazardous chemicals 1.1.8 Disposal notes 1.2 List of all used signs in the document 1.3 Abbreviations... - Page 4 Table of Contents Page 4.7 Logs 4.7.1 Selecting a Log Type 4.7.2 Retrieving a Log 4.8 Instrument Settings 5 Maintenance 5.1 Recommended maintenance schedule 6 Troubleshooting 6.1 Error messages and what to do 7 Accessories & Replacement parts 7.1 List of Accessories 7.2 Replacement Parts 8.1 Specifications 8.2 Specifications - Mains adapter...
-
Page 5: Introduction
1 Introduction 1 Introduction 1.1 General Information 1.1.1 Read instructions before use This manual provides important information on the safe operation of the product. Please read this manual carefully and familiarize yourself with the product before use. 1.1.2 Purpose of the Product The TB Series Portable Turbidimeter is designed to analyze aqueous samples that are collected into a glass vial that is then capped. -
Page 6: Keep Instructions
1 Introduction Prerequisites for safe use of the plug-in power supply unit Observe the following points for safe use: • Check for visible damage before use. If damaged, do not put into operation. • Use only in dry rooms. • Handle only with dry hands. •... -
Page 7: List Of All Used Signs In The Document
1 Introduction 1.2 List of all used signs in the document The following symbols are used in this manual to identify sections that require special attention: A hazard exists that will result in death or severe injury if not avoided. Danger! Improper handling of certain reagents can cause damage to your health. -
Page 8: Product Overview
FCC radio frequency emission limits. Caution! Modifications Any modifications made to this device that are not approved by Tintometer may void the authority granted to the user by the FCC to operate this equipment. Caution! EN TB 350... -
Page 9: Features
2 Product overview DOC Class A Notice - Avis DOC, Class A This Class A digital apparatus meets all requirements of the Canadian Interference- Causing Equipment Regulations. 2.2 Features Laboratory accuracy meets portability The Lovibond TB Series eliminates the complexities in turbidity measurement. This ®... -
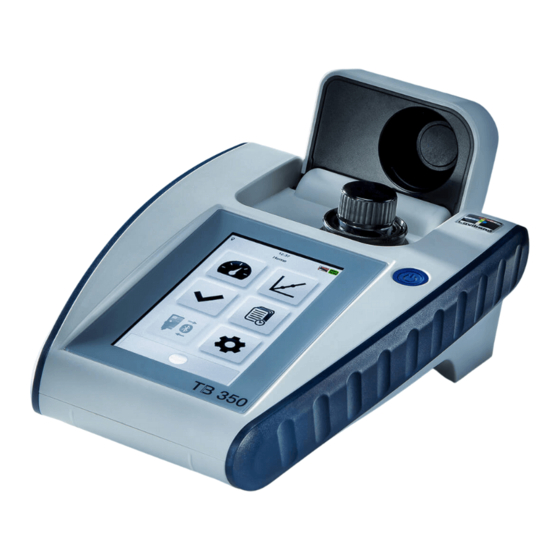
Page 10: Instrument View
2 Product overview 2.4 Instrument view Position Description Function 1. Lid When lifted, allows the user to place the sample cell in the instrument for a reading. 2. Power button Powers the instrument ON and OFF. 3. Touch Screen Displays the user interface of the instrument. -
Page 11: Commissioning
3 Commissioning 3 Commissioning 3.1 Operating environment The instrument can be used in any indoor or outdoor environment that is deemed safe for an operator to perform the analysis. The instrument can accept aqueous samples from 0 to 70 °C. The instrument should be level ±... -
Page 12: Inserting And Replacing The Batteries
3 Commissioning 3.3 Inserting and replacing the batteries When using batteries Step Description Use a screwdriver to remove the four screws on the back of the instrument and remove the panel. Insert four AA batteries in the correct orientation. Attach the panel back onto the instrument. - Page 13 3 Commissioning When using rechargeable batteries Step Description Use a screwdriver to remove the four screws on the back of the instrument, remove the panel and the battery tray. Insert the rechargeable battery pack in the correct orientation. Attach the panel back onto the instrument. EN TB 350...
-
Page 14: Operation
4 Operation 4 Operation 4.1 First start up 1. Welcome Screen Initial screen user sees upon first power on. Press > button 2. Select Language Select desired language to set. Press > button 3. Set Date and Time Choose between 12- and 24-hour format. Change values using up and down arrows. -
Page 15: General Operation Principles
4 Operation 4.2 General operation principles The designs of the TB Series Portable Turbidimeters are broken down into their respective functional components that are discussed in detail. These include the light source, the 90-degree scattered light trap, the scattered light detector, turbidimeter sample vial and how these key components work together to deliver the turbidity result. -
Page 16: List Of Control Elements And Their Function
4 Operation 4.3 List of control elements and their function 4.3.1 Display Overview 12:36 Description Function 1 Status Bar Displays the icons and labels that are universal including Time, Bluetooth , USB, Security, Light Source & Power. ® 2 Action Area Area that displays application steps and interaction. -
Page 17: Status Bar
4 Operation Icon Description Measurement Mode Calibration Mode Verification Mode Data Logs Bluetooth connection to PTV process turbidimeter (not available for TB 350) Instrument settings 4.3.2 Status Bar Icon Description Function Application Name Title of the app that the user is currently using. Time Time set by user in initial setup or by accessing 12:16... - Page 18 4 Operation Icon Description Function Red Light Source – Instrument contains a red LED light source; light Filled is switched on for measurement. Red Light Source – Instrument contains a red LED light source; no Outline measurement is active. White Light Source – Instrument contains a white LED light source;...
-
Page 19: Home Bar
4 Operation Icon Description Function Battery Power – Indicates 50% of battery life remains. Orange Battery Power - Red Indicates 25% of battery life remains. Sample chamber Indicates open Sample chamber cover. cover open Sample chamber Indicates closed Sample chamber cover. cover closed only TB 600 not TB 350... -
Page 20: Measurement
4 Operation Icon Description Function Measurement Button Starts or Begins or Initiates a measurement. Measurement Button – Takes a measurement with Bluetooth while connected to a PTV ®2) unit. Bluetooth Refresh Button Refreshes the list of ® available PTV units within proximity of the instrument. -
Page 21: Performing A Measurement
4 Operation Description Function 1 Application Bar Navigation path to help the user through the process steps. 2 Measurement Value Display of measured sample value with unit type. 3 Settings Settings applied to measurement are displayed. 4 Log Button Creates a Log when pressed. 5 Measurement Button Starts a measurement when pressed. -
Page 22: Measurement Tips
4 Operation 6. Press measure button Starts Measurement. 7. Data Log Enter Data Log to save measurement. 8. Save measurement If desired, press Save Button in order to create a measurement log 9. Pause Pauses the measurement in "continuous" measurement mode. •... -
Page 23: Measurement Settings
4 Operation Samples containing excess bubbles • Allow sample to stand for a minimum of five minutes. • Gently invert sample two to three times to resuspend the turbidity. • Place in instrument and proceed as instructed. Other Notes •... -
Page 24: Calibration
4 Operation 4.5 Calibration 4.5.1 Calibration Overview 12:36 Calibration Calibration Curve: T-CAL 0-4000 NTU Standard Set: None Description Function 1 Application Bar Breadcrumb to help the user through the process steps. 2 Calibration Curve Specifies calibration type. 3 Standard Set Unique identifier of standard set. -
Page 25: Performing A Calibration
4 Operation 4.5.2 Performing a Calibration Please prepare the T-CAL standards included in the scope of delivery before ® calibration. Make sure that the T-CAL vials are free of stains, scratches or ® blemishes. • T-CAL standards for TB 350 IR: 20 / 800 / 4000 NTU ®... -
Page 26: Calibration Settings
4 Operation 4.5.3 Calibration Settings Press the Settings Button to access the settings mode. Icon Description Option Function Cal Curve T-CAL Selects prepared stabilized formazine ® standard at pre-defined concentrations User Selects user prepared formazine standard Formazin at pre-defined concentrations Standard Set Default Used if no unique identifier is set. -
Page 27: Verification
4 Operation 4.6 Verification 4.6.1 Verification Overview 12:36 Verification Verification Standard: T-CAL 5.0 NTU Pass/Fail Criteria: ± 10 % Standard Set: None Description Function 1 Application Bar Breadcrumb to help the user through the process steps. 2 Verification standard Value of Standard to be measured. 3 Pass / Fail Tolerance used for determining if a verification passes or fails. -
Page 28: Performing A Verification
4 Operation 4.6.2 Performing a Verification 1. Prepare Vial Oil sample vial if necessary. 3. Insert Standard Insert standard value specified on screen. 4. Modal Represents active process. 5. Log Summary Press Save button to save log. Press Cancel Button to return to beginning of Verification process. -
Page 29: Verification Settings
4 Operation 4.6.3 Verification Settings Press the Settings button to enter the settings mode. Icon Description Option Function Standard T-CAL 5.0 NTU Selects prepared stabilized formazin standard at 5.0 NTU concentration. User Prepared Selects user prepared standard between 1 and 1000 NTU. Pass/Fail criteria ±10% Tolerance used for determining if... -
Page 30: Logs
4 Operation 4.7 Logs 4.7.1 Selecting a Log Type Press the Log Type Button in the Action Area to access the Logs. Application Bar: Measurement Logs: Displays all recorded measurements. Calibration Logs: Displays all calibration records. Verification Logs: Displays all verification records. GLP Mode Logs: Displays record of GLP mode being enabled or disabled. -
Page 31: Instrument Settings
4 Operation 4.8 Instrument Settings Press the Settings Button to access the Settings Mode. Icon Description Option Function Security Enable Set up, verify, and change password. Disable Default Setting. Power Screen Brightness Adjust brightness of Settings the screen. Backlight Sleep 20 Seconds 30 Seconds 1 Minute*... - Page 32 4 Operation Enable If enabled, when a Shortcuts USB storage device is connected, the user is presented with a modal which presents an option for “transferring logs” or “backup/restore” settings. By selecting an option, the user is directed to the appropriate function.
- Page 33 4 Operation Unit Type Select unit displayed. Defines the unit type of the displayed mg.l Kaolin measurement value. mg.l PSL NTU is Default setting. Degrees mNTU mFNU Custom Allow user defined unit type and ability to set a factor based on NTU/FNU values.
-
Page 34: Maintenance
5 Maintenance 5 Maintenance 5.1 Recommended maintenance schedule Task Do not 1. Clean 1. Ensure the measurement 1. Spray or pour any measurement chamber is clean and dry prior fluid directly into chamber to measurement. Use a dry the measurement microfiber cloth to remove chamber. - Page 35 5 Maintenance Task Do not Verification Verify instrument performance under Use expired the following conditions: standards. 1. After performing a calibration. 2. Per internal quality control procedures. 3. As required by regional regulatory authorities. Carefully follow the instructions for preparation and use of standards.
-
Page 36: 6 Troubleshooting
6 Troubleshooting 6 Troubleshooting 6.1 Error messages and what to do Symptom Possible Cause Solution Overrange The turbidity of the sample is • Dilute the sample beyond the measuring range • Verify calibration using a of the instrument. high-range standard. Under range The turbidity of the sample is •... - Page 37 6 Troubleshooting Symptom Possible Cause Solution Calibration Error Calibration standards were Repeat calibration with ran in the wrong order standards run from lowest to highest value. Calibration Error Calibration standards were Mix standards as instructed not adequately mixed. immediately prior to performing the calibration.
-
Page 38: Accessories & Replacement Parts
7 Accessories & Replacement parts 7 Accessories & Replacement parts 7.1 List of Accessories Title Part Number Batteries (AA), set of 4 TB350 IR, TB350 1950025 Brush, 11 cm length TB350 IR, TB350 380230 Cleaning cloth TB350 IR, TB350 197635 Cuvette stand for 6 round cuvettes Ø... -
Page 39: Specifications
8.1 Specifications Model Model WM-040-1004 (IR) Model WM-040-1001 (WL) Light Source IR LED (860 nm) White LED Regulatory ISO 7027 Compliance EPA pending Measuring Nephelometric (Multipath 90° BLAC) Principle Measuring 0 - 4000 NTU (FNU) Range Resolution Auto ranging: 0.01-9.99: 0.01 NTU ; 10.0-99.9: 0.1 NTU ;... - Page 40 Power Alkaline batteries, 4 x AA (included) ; Requirements Rechargeable battery pack, 3 x AA NiMH (optional) ; Power supply set, AC 100 - 240 V, 50/60 Hz (optional) " Environmental Temperature: 0 - 50 °C (32 - 122 °F) Conditions Humidity: 0 - 90 % at 30 °C, noncondensing Humidity: 0 - 80 % at 40 °C, noncondensing...
-
Page 41: Specifications - Mains Adapter
Languages Full • Chinese User Manual • Dutch • English • French • German • Italian • Portuguese • Russian • Spanish • Turkish Dimensions 155 x 83 x 225 mm Weight 804 g (898 g with four AA alkaline batteries) Weight with (898 g with four AA alkaline batteries) Packaging... - Page 42 Type WR9QA2500USB52NMR6B Weight, with EU adapter 48 g (without primary adapter blades) Approval, EMC CE, FCC Permitted altitude meters 5000 m Pollution level Subject to technical modification! To ensure maximum accuracy of test results, always use the reagent systems supplied by the instrument manufacturer. Caution! EN TB 350...
-
Page 43: Appendix
Tintometer ® ® asserted as trademarks of The Tintometer Group. ® The Bluetooth mark, figure mark and combination mark are trademarks owned by the ® Bluetooth SIG and any use by the Tintometer Group is under license. ® EN TB 350... - Page 44 Inhaltsverzeichnis Inhaltsverzeichnis Seite 1 Einleitung 1.1 Allgemeine Informationen 1.1.1 Anleitung vor Gebrauch lesen 1.1.2 Zweck des Produkts 1.1.3 Bestimmungsgemäße Verwendung 1.1.4 Voraussetzungen für einen sicheren Gebrauch 1.1.5 Anleitung aufbewahren 1.1.6 Benutzerqualifikation 1.1.7 Umgang mit gefährlichen Chemikalien 1.1.8 Entsorgungshinweise 1.2 Liste aller verwendeten Zeichen im Dokument 1.3 Abkürzungen 2 Produktübersicht 2.1 Zertifizierung...
- Page 45 Inhaltsverzeichnis Seite 4.7 Protokolle 4.7.1 Auswahl einer Protokollart 4.7.2 Abrufen eines Protokolls 4.8 Geräteeinstellungen 5 Wartung 5.1 Empfohlener Wartungsplan 6 Fehlerbehebung 6.1 Fehlermeldungen und was zu tun ist 7 Zubehör & Ersatzteile 7.1 Zubehörliste 7.2 Ersatzteile 8.1 Spezifikationen 8.2 Spezifikationen - Netzadapter 9 Appendix 9.1 Hinweis zu Copyright und Warenzeichen DE TB 350...
-
Page 46: Einleitung
1 Einleitung 1 Einleitung 1.1 Allgemeine Informationen 1.1.1 Anleitung vor Gebrauch lesen Diese Gebrauchsanleitung enthält wichtige Informationen zur sicheren Handhabung des Produkts. Lesen Sie diese Gebrauchsanleitung sorgfältig durch und machen Sie sich mit dem Produkt vertraut, bevor Sie damit arbeiten. 1.1.2 Zweck des Produkts Das tragbare Trübungsmessgerät der TB-Serie wurde entwickelt, um wässrige Proben zu analysieren, die in Glasküvetten gesammelt und dann verschlossen werden. -
Page 47: Anleitung Aufbewahren
1 Einleitung Das Produkt darf nicht in Gebrauch genommen werden, wenn: • es sichtbar beschädigt ist (z. B. nach dem Transport) • es über einen längeren Zeitraum unter ungünstigen Bedingungen gelagert wurde (Lagerbedingungen; siehe Kapitel "Spezifikationen") Voraussetzungen für einen sicheren Gebrauch des Steckernetzteil Beachten Sie die folgenden Punkte für einen sicheren Gebrauch: •... -
Page 48: Entsorgungshinweise
1 Einleitung 1.1.8 Entsorgungshinweise Entsorgen Sie die Batterien und elektrischen Geräte in einer geeigneten Einrichtung gemäß den örtlichen gesetzlichen Bestimmungen. Es ist illegal, die Batterien mit dem Hausmüll zu entsorgen. Innerhalb der Europäischen Union werden die Batterien am Ende der Lebensdauer des Gerätes in einer spezialisierten Recycling-Sammelstelle entsorgt. -
Page 49: Produktübersicht
Kabeln hergestellt werden, um die Einhaltung der FCC-Grenzwerte für Funkfrequenzen zu gewährleisten. Vorsicht! Modifikationen Jegliche Änderungen an diesem Gerät, die nicht von Tintometer genehmigt wurden, können dazu führen, dass die dem Benutzer von der FCC erteilte Genehmigung zum Betrieb dieses Geräts erlischt. Vorsicht! -
Page 50: Ausstattung
2 Produktübersicht DOC Klasse A Hinweis - Avis DOC, Klasse A Dieses digitale Gerät der Klasse A erfüllt alle Anforderungen der Canadian Interference- Causing Equipment Regulations. 2.2 Ausstattung Laborgenauigkeit trifft Tragbarkeit Die Lovibond TB-Serie vereinfacht die Trübungsmessung. Mit ihrer neuen Technologie ®... -
Page 51: Geräteansicht
2 Produktübersicht 2.4 Geräteansicht Position Beschreibung Funktion Wenn er angehoben wird, kann der Messschachtdeckel Benutzer die Probenküvette für eine Messung in das Gerät einsetzen. 2. Ein/Aus-Taste Schaltet das Gerät EIN und AUS. 3. Touchscreen Zeigt die Benutzeroberfläche des Geräts 4 4. Bezeichnet die Geräteversion. -
Page 52: Inbetriebnahme
3 Inbetriebnahme 3 Inbetriebnahme 3.1 Betriebsumgebung Das Gerät kann in jeder Innen- oder Außenumgebung verwendet werden, die für einen Bediener als sicher gilt, um die Analyse durchzuführen. Mit dem Gerät können wässrige Proben von 0 bis 70 °C gemessen werden. Das Gerät sollte bei der Durchführung einer Messung waagerecht ±... -
Page 53: Einsetzen Und Auswechseln Der Batterien
3 Inbetriebnahme 3.3 Einsetzen und Auswechseln der Batterien Bei Verwendung von Batterien Schritt Beschreibung Verwenden Sie einen Schraubendreher, um die vier Schrauben auf der Rückseite des Geräts zu entfernen und den Batteriefachdeckel abzunehmen. Legen Sie vier AA-Batterien in der richtigen Ausrichtung ein. Bringen Sie den Batteriefachdeckel wieder am Gerät an. - Page 54 3 Inbetriebnahme Bei der Verwendung von wiederaufladbaren Batterien Schritt Beschreibung Entfernen Sie mit einem Schraubendreher die vier Schrauben auf der Rückseite des Geräts, nehmen Sie die Abdeckung und das Batteriefach Legen Sie die wiederaufladbare Batterie in der richtigen Ausrichtung ein. Bringen Sie die Blende wieder am Gerät an.
-
Page 55: Arbeitsweise
4 Arbeitsweise 4 Arbeitsweise 4.1 Erstmalige Inbetriebnahme 1. Willkommensbildschirm Startbildschirm, den der Benutzer beim ersten Einschalten sieht. Drücken Sie die Taste > 2. Sprache wählen Wählen Sie die gewünschte Sprache aus. Drücken Sie die Taste > 3. Datum und Uhrzeit einstellen Zwischen 12- und 24-Stunden-Format wählen. -
Page 56: Allgemeine Funktionsprinzipien
4 Arbeitsweise 4.2 Allgemeine Funktionsprinzipien Die Konstruktionen der tragbaren Trübungsmessgeräte der TB-Serie werden in ihre jeweiligen funktionellen Komponenten unterteilt, die im Detail besprochen werden. Dazu gehören die Lichtquelle, die 90-Grad-Streulichtfalle, der Streulichtdetektor, die Probenküvette und die Art und Weise, wie diese Hauptbestandteile zusammenarbeiten, um das Trübungsergebnis zu liefern. -
Page 57: Liste Der Bedienelemente Und Deren Funktion
4 Arbeitsweise 4.3 Liste der Bedienelemente und deren Funktion 4.3.1 Display Übersicht 12:36 Beschreibung Funktion 1 Statuszeile Zeigt die universellen Symbole und Beschriftungen an, einschließlich Zeit, Bluetooth , USB, Sicherheit, Lichtquelle und ® Stromversorgung. 2 Aktionsfläche Bereich, der Anwendungsschritte und Interaktion anzeigt. 3 Home-Taste Dient in erster Linie zur Navigation, zum Starten oder Speichern oder Verwerfen von Aktionen und zur Rückkehr auf die Startseite. -
Page 58: Statuszeile
4 Arbeitsweise Symbol Beschreibung Messmodus Kalibrierungsmodus Verifikationsmodus Datenprotokolle Bluetooth-Verbindung zum PTV-Prozesstrübungsmessgerät (nicht verfügbar für TB 350) Geräteeinstellungen 4.3.2 Statuszeile Symbol Beschreibung Funktion Anwendung Titel der Anwendung, die der Benutzer gerade Bezeichnung verwendet. Zeit Die Zeit wird vom Benutzer bei der 12:16 Ersteinrichtung oder durch Zugriff auf die Geräteeinstellungen eingestellt. - Page 59 4 Arbeitsweise Symbol Beschreibung Funktion Rote Lichtquelle - Instrument zeigt eine rote LED-Lichtquelle; Licht ausgefüllt wird zur Messung eingeschaltet. Rote Lichtquelle – Instrument zeigt eine rote LED-Lichtquelle; Umriss Messung nicht aktive. Weiße Lichtquelle - Instrument zeigt eine weiße LED-Lichtquelle; ausgefüllt Licht wird zur Messung eingeschaltet.
-
Page 60: Startseite
4 Arbeitsweise Symbol Beschreibung Funktion Batterieleistung – Zeigt an, dass noch 50 % der Batterielaufzeit Orange übrig sind. Batterieleistung - Rot Zeigt an, dass noch 25 % der Batterielaufzeit übrig sind. Messschachtdeckel Zeigt an, wenn der Messschacht geöffnet ist. geöffnet Messschachtdeckel Zeigt an, wenn der Messschacht geschlossen ist. -
Page 61: Messung
4 Arbeitsweise Symbol Beschreibung Funktion Taste Messung Startet oder beginnt oder leitet eine Messung ein. Taste Messung – mit Nimmt eine Messung Bluetooth vor, während das Gerät ®2) mit einer PTV-Einheit verbunden ist. Bluetooth Aktualisieren- Aktualisiert die Liste ® Taste der verfügbaren PTV- Einheiten in der Nähe des Geräts. - Page 62 4 Arbeitsweise Beschreibung Funktion 1 Anwendungsleiste Navigationspfad, um den Benutzer durch die Prozessschritte zu führen. 2 Messwert Anzeige des Messergebnis mit Einheit. 3 Einstellungen Die für die Messung geltenden Einstellungen werden angezeigt. 4 Taste "Protokoll" Erzeugt beim Drücken ein Protokoll. 5 Taste "Messung"...
-
Page 63: Durchführen Einer Messung
4 Arbeitsweise 4.4.2 Durchführen einer Messung Bitte bereiten Sie die im Lieferumfang enthaltenen Probenküvetten vor der Messung vor. Stellen Sie sicher, dass die Probenküvetten frei von Flecken, Kratzern oder Unreinheiten sind. 1. Probe sammeln: Stellen Sie sicher, dass die Probe gut durchgemischt ist. Die Glaswaren sollten frei von Flecken, Kratzern oder anderen Verunreinigungen sein. -
Page 64: Tipps Zur Messung
4 Arbeitsweise • Keine Gegenstände in den Messschacht bringen, außer die für die Messungen vorgesehenen Küvetten. • Keine Flüssigkeiten in den Schacht bringen. Warnung! 4.4.3 Tipps zur Messung Indizieren einer Küvette: Benutzen Sie eine Küvette, die mit Wasser gefüllt ist, das durch einen 0,2 µm-Filter gefiltert wurde. -
Page 65: Messeinstellungen
4 Arbeitsweise 4.4.4 Messeinstellungen Drücken Sie die Taste "Einstellungen", um den Modus "Messeinstellungen" aufzurufen. Symbol Beschreibung Option Funktion Modus Single Drü c ken um einen Test auszulösen. Kontinuierlich Die Messung wird alle X Sekunden aktualisiert, bis sie gestoppt wird. Fast Settling Empfohlen für Proben mit schnellem Absetzverhalten. -
Page 66: Kalibrierung
4 Arbeitsweise 4.5 Kalibrierung 4.5.1 Anzeige der Kalibrierung 12:36 Calibration Calibration Curve: T-CAL 0-4000 NTU Standard Set: None Bescheibung Funktion 1 Anwendungsleiste Navigationspfad, um den Benutzer durch die Prozessschritte zu führen. 2 Kalibrierkurve Gibt den Kalibriertyp an. 3 Standard Set Anzeige des zu verwendenden Standardsatzes. -
Page 67: Durchführung Einer Kalibrierung
4 Arbeitsweise 4.5.2 Durchführung einer Kalibrierung Bitte bereiten Sie die im Lieferumfang enthaltenen T-CAL -Standards vor der ® Kalibrierung vor. Achten Sie darauf, dass die T-CAL -Küvetten frei von Flecken, ® Kratzern oder Verunreinigungen sind. • T-CAL -Standards für TB 350 IR: 20 / 800 / 4000 NTU ®... -
Page 68: Kalibrierungseinstellungen
4 Arbeitsweise 4.5.3 Kalibrierungseinstellungen Drücken Sie die Taste "Einstellungen", um den Einstellungsmodus aufzurufen. Symbol Beschreibung Option Funktion Kal-Kurve T-CAL Wählt vorbereitete stabilisierte ® Formazin-Standards in vordefinierten Konzentrationen aus Anwender- Wählt vom Anwender hergestellten Formazin Formazin-Standard in vordefinierten Konzentrationen aus Standard Set Standard- Wird verwendet, wenn keine eindeutige einstellung... -
Page 69: Verifikation
Wenn während des Kalibrierungsvorgangs ein einzelner Standard außerhalb der Toleranz liegt, wird der Benutzer nicht benachrichtigt, dass ein Standard außerhalb des von Tintometer vordefinierten Bereichs liegt. Der Protokollbildschirm enthält eine Zeile für den "Calibration Checker" und zeigt den Status "Aus" oder "Deaktiviert" an. -
Page 70: Durchführen Einer Verifizierung
4 Arbeitsweise 4.6.2 Durchführen einer Verifizierung 1.Küvette vorbereiten: Küvette bei Bedarf ölen. 3. Standard in das Gerät einsetzen: Den auf dem Bildschirm angegebenen Standard einsetzen. 4. Aktion: Steht für einen aktiven Prozess. 5. Protokoll-Zusammenfassung: Drücken Sie die Taste "Speichen", um das Protokoll zu speichern. -
Page 71: Verifikationseinstellungen
4 Arbeitsweise 4.6.3 Verifikationseinstellungen Drücken Sie die Taste "Einstellungen", um den Modus "Einstellungen" aufzurufen. Symbol Beschreibung Option Funktion Standard T-CAL 5,0 NTU Wählt einen vorbereiteten stabilisierten Formazin-Standard bei einer Konzentration von 5,0 NTU aus. Benutzer Wählt den vom Benutzer vorbereitet vorbereiteten Standard zwischen 1 und 1000 NTU. -
Page 72: Protokolle
4 Arbeitsweise 4.7 Protokolle 4.7.1 Auswahl einer Protokollart Drücken Sie auf die Schaltfläche Protokolltyp im Aktionsbereich, um auf die Protokolle zuzugreifen. Anwendungsleiste: Messprotokolle: Zeigt alle aufgezeichneten Messungen an. Kalibrierungsprotokolle: Zeigt alle Kalibrierungsprotokolle an. Verifizierungsprotokolle: Zeigt alle Verifizierungsprotokolle an. GLP-Modus-Protokolle: Zeigt an, ob der GLP-Modus aktiviert oder deaktiviert wurde. -
Page 73: Geräteeinstellungen
4 Arbeitsweise 4.8 Geräteeinstellungen Drücken Sie die Taste "Einstellungen", um den Modus "Geräteeinstellungen" aufzurufen. Symbol Beschreibung Option Funktion Sicherheit Aktivieren Passwort einrichten, überprüfen und ändern. deaktiviert Standardeinstellung Energie- Bildschirmhelligkeit Helligkeit des einstellungen Bildschirms einstellen. Hintergrundlicht 20 Sekunden 30 Sekunden 1 Minute* 5 Minuten Systemabschaltung 1 Minute... - Page 74 4 Arbeitsweise USB-Ver- Aktivieren Wenn diese Option knüpfungen aktiviert ist, wird dem Benutzer beim Anschließen eines USB-Speichergeräts ein Dialogfenster angezeigt, in dem er die Option "Übertragung von Protokollen" oder "Sicherung/ Wiederherstellung" auswählen kann. Durch Auswahl einer Option wird der Benutzer zur entsprechenden Funktion weitergeleitet.
- Page 75 4 Arbeitsweise Einheit Wählen Sie eine angezeigte Einheit. Legt die Art der Einheit für den angezeigten mg.l Kaolin Messwert fest. mg.l PSL NTU ist die Standardeinstellung. Grad mNTU mFNU Benutzerdefiniert Benutzerdefinierte Einheiten und die Möglichkeit, einen Faktor auf der Grundlage von NTU/FNU-Werten festzulegen.
-
Page 76: Wartung
5 Wartung 5 Wartung 5.1 Empfohlener Wartungsplan Was man nicht Aufgabe Was zu tun ist macht 1. Messschacht 1. Stellen Sie sicher, dass 1. Sprühen oder reinigen der Messschacht vor der gießen Sie Messung sauber und trocken keine Flüssigkeit 2. Touchscreen ist. - Page 77 5 Wartung Was man nicht Aufgabe Was zu tun ist macht Kalibrierung Kalibrieren Sie bei Bedarf unter den Keine abgelaufene folgenden Bedingungen: Standards 1. Verifizierungsfehler. verwenden. 2. Wartung von optischen oder elektronischen Systemen. 3. Wie von den regionalen Aufsichtsbehörden gefordert. Befolgen Sie sorgfältig die ...
-
Page 78: Fehlerbehebung De
6 Fehlerbehebung 6 Fehlerbehebung 6.1 Fehlermeldungen und was zu tun ist Anzeichen Mögliche Ursache Lösung Messbereichs- Die Trübung der Probe liegt • Probe verdünnen überschreitung außerhalb des Messbereichs • Überprüfen Sie die des Geräts. Kalibrierung mit einem hohen Standard Messbereichs- Die Trübung der Probe liegt •... - Page 79 6 Fehlerbehebung Anzeichen Mögliche Ursache Lösung Kalibrierungsfehler Kalibrierstandards wurden Wiederholen Sie die in der falschen Reihenfolge Kalibrierung mit den verwendet. Standards, vom niedrigsten zum höchsten Wert aufsteigend. Kalibrierungsfehler Kalibrierstandards Mischen Sie die Standards wurden nicht ausreichend wie angegeben unmittelbar durchmischt. vor der Durchführung der Kalibrierung.
-
Page 80: Zubehör & Ersatzteile
7 Zubehör & Ersatzteile 7 Zubehör & Ersatzteile 7.1 Zubehörliste Titel Bestell-Nr. Batterien (AA), 4er Set TB350 IR, TB350 1950025 Bürste, 11 cm Länge TB350 IR, TB350 380230 Küvettenständer für 6 Rundküvetten Ø 24 TB350 IR, TB350 418951 Messküvetten mit schwarzem Deckel, Höhe TB350 IR, TB350 197655 55 mm, ø... -
Page 81: Spezifikationen
8.1 Spezifikationen Model Model WM-040-1004 (IR) Model WM-040-1001 (WL) Lichtquelle Infrarot LED (860 nm) Weißlicht (LED) Einhaltung von ISO 7027 Vorschriften EPA pending Messprinzip Nephelometrisch (Multipath 90° BLAC) Messbereich 0,01 - 4000 NTU (FNU) Messwertauflösung Autoranging: 0.01-9.99: 0.01 NTU ; 10.0-99.9: 0.1 NTU ;... - Page 82 Umgebungsbedingungen Temperatur: 0 - 50 °C (32 - 122 °F) Luftfeuchtigkeit: 0 - 90 % bei 30 °C, nicht kondensierend Luftfeuchtigkeit: 0 - 80 % bei 40 °C, nicht kondensierend Luftfeuchtigkeit: 0 - 70% bei 60 °C, nicht kondensierend Schutzklasse IP 67 (Gerät) Konformität •...
-
Page 83: Spezifikationen - Netzadapter
Sprachen • Chinesisch Bedienungsanleitung • Deutsch • Englisch • Französisch • Italienisch • Niederländisch • Portugiesisch • Russisch • Spanisch • Türkisch Abmessungen 155 x 83 x 225 mm Gewicht 804 g (898 g mit vier AA Alkalibatterien) Gewicht mit (898 g with four AA alkaline batteries) Verpackung Technische Änderungen vorbehalten! - Page 84 WR9QA2500USB52NMR6B EN 55032 FCC Part 15 Class B EN 55024 Abmessungen [mm] 31,5 x 41 x 71 (ohne Primäradapter) Gewicht, mit EU Adapter 48 g (ohne primäre Adapterflügel) Zulassung, EMC CE, FCC Zugelassene Höhenmeter 5000 m Verschmutzungsgrad Technische Änderungen vorbehalten! Um eine maximale Genauigkeit der Testergebnisse zu gewährleisten, verwenden Sie immer die vom Gerätehersteller gelieferten Reagenzsysteme.
-
Page 85: Appendix
Marken von The Tintometer Group geltend gemacht. ® ® Die Bluetooth -Marke, die Bildmarke und die Kombinationsmarke sind Marken im Besitz ® der Bluetooth SIG, und jegliche Verwendung durch die Tintometer -Gruppe erfolgt unter ® Lizenz. DE TB 350... - Page 86 Contenido Contenido Página 1 Introducción 1.1 Información general 1.1.1 Leer las instrucciones antes de usar 1.1.2 Finalidad del producto 1.1.3 Uso autorizado 1.1.4 Requisitos para un uso seguro 1.1.5 Conserve las instrucciones 1.1.6 Cualificación del usuario 1.1.7 Manipulación de productos químicos peligrosos 1.1.8 Instrucciones de eliminación 1.2 Lista de todos los símbolos utilizados en el documento 1.3 Abreviaturas...
- Page 87 Contenido Página 4.7 Registros 4.7.1 Seleccionar un tipo de registro 4.7.2 Recuperar un registro 4.8 Ajustes del instrumento 5 Mantenimiento 5.1 Programa de mantenimiento delete reanudado 6 Resolución de problemas 6.1 Mensajes de error y qué hacer 7 Accesorios y piezas de repuesto 7.1 Lista de accesorios 7.2 Lista de accesorios 8.1 Especificaciones...
-
Page 88: Introducción
1 Introducción 1 Introducción 1.1 Información general 1.1.1 Leer las instrucciones antes de usar Este manual proporciona información importante sobre el funcionamiento seguro del producto. Lea atentamente este manual y familiarícese con el producto antes de utilizarlo. 1.1.2 Finalidad del producto El turbidímetro portátil de la serie TB está... -
Page 89: Conserve Las Instrucciones
1 Introducción El producto no debe utilizarse si: • está visiblemente dañado (por ejemplo, después de ser transportado) • se ha almacenado en condiciones adversas durante un largo periodo de tiempo (condiciones de almacenamiento, véase el capítulo "Especificaciones") Requisitos para el uso seguro de la fuente de alimentación enchufable Tenga en cuenta los siguientes puntos para un uso seguro: •... -
Page 90: Lista De Todos Los Símbolos Utilizados En El Documento
1 Introducción En la Unión Europea, al final de la vida útil del aparato, las pilas se eliminan en un punto de recogida especializado en reciclaje. Los instrumentos marcados con este símbolo no deben eliminarse con la basura doméstica normal. 1.2 Lista de todos los símbolos utilizados en el documento Los siguientes símbolos se utilizan en este manual para indicar las secciones que requieren una atención especial:... -
Page 91: Resumen Del Producto
FCC. Precaución! Modificaciones Cualquier modificación realizada en este dispositivo que no esté aprobada por Tintometer puede anular la autoridad otorgada al usuario por la FCC para operar este equipo. Precaución! ES TB 350... -
Page 92: Características
2 Resumen del producto Aviso de DOC Clase A - Avis DOC, Clase A Este aparato digital de clase A cumple todos los requisitos de la normativa canadiense sobre equipos causantes de interferencias. 2.2 Características La precisión del laboratorio se une a la portabilidad La serie Lovibond TB elimina las complejidades en la medición de la turbidez. -
Page 93: Vista Del Instrumento
2 Resumen del producto 2.4 Vista del instrumento Posición Descripción Función 1. Tapa Cuando se levanta, permite al usuario colocar la cubeta de muestra en el instrumento para una lectura. 2. Botón de Enciende y apaga el instrumento. encendido 3. Pantalla táctil Muestra la interfaz de usuario del instrumento. -
Page 94: Puesta En Funcionamiento
3 Puesta en funcionamiento 3 Puesta en funcionamiento 3.1 Entorno operativo El instrumento puede utilizarse en cualquier entorno interior o exterior que se considere seguro para que un operador realice el análisis. El instrumento puede aceptar muestras acuosas de 0 a 70 °C. El instrumento debe estar nivelado ±... -
Page 95: Colocación Y Sustitución De Las Pilas
3 Puesta en funcionamiento 3.3 Colocación y sustitución de las pilas Cuando se utilizan baterías Paso Descripción Utilice un destornillador para quitar los cuatro tornillos de la parte posterior del instrumento y retire el panel. Inserte cuatro pilas AA en la orientación correcta. Vuelva a colocar el panel en el instrumento. - Page 96 3 Puesta en funcionamiento Cuando se utilizan baterías recargables Paso Descripción Utilice un destornillador para quitar los cuatro tornillos de la parte posterior del instrumento, retire el panel y la bandeja de las pilas. Inserte el paquete de baterías recargables en la orientación correcta. Vuelva a colocar el panel en el instrumento.
-
Page 97: Operación
4 Operación 4 Operación 4.1 Primera puesta en marcha 1. Pantalla de bienvenida Pantalla inicial al encender el instrumento por primera vez Pulse el botón > 2. Seleccione el idioma Seleccione el idioma deseado para establecer Pulse el botón > 3. -
Page 98: Principios Generales De Funcionamiento
4 Operación 4.2 Principios generales de funcionamiento Los diseños de los turbidímetros portátiles de la serie TB se desglosan en sus respectivos componentes funcionales que se discuten en detalle. Estos incluyen la fuente de luz, la trampa de luz difusa de 90 grados, el detector de luz difusa, el vial de muestra del turbidímetro y cómo estos componentes clave trabajan juntos para ofrecer el resultado de turbidez. -
Page 99: Lista De Elementos De Control Y Su Función
4 Operación 4.3 Lista de elementos de control y su función 4.3.1 Lista de elementos de control y su función 12:36 Descripción Función 1 Barra de Muestra los iconos y etiquetas que son universales, incluyendo estado Hora, Bluetooth , USB, Seguridad, Fuente de luz y Alimentación. ®... -
Page 100: Lista De Elementos De Control Y Su Función
4 Operación Icono Descripción Modo de medición Modo de calibración Modo de verificación Registros de datos Conexión Bluetooth con el turbidímetro de proceso PTV (no disponible para el TB 350) Ajustes del instrumento 4.3.2 Lista de elementos de control y su función Icono Descripción Función... - Page 101 4 Operación Icono Descripción Función Fuente de luz roja - El instrumento contiene una fuente de luz LED rellena roja; la luz se enciende para la medición. Fuente de luz roja - El instrumento contiene una fuente de luz LED Esquema roja;...
-
Page 102: Barra De Estado
4 Operación Icono Descripción Función Energía de la batería Indica que queda el 50% de la vida útil de la – Naranja batería. Energía de la batería Indica que queda el 25% de la vida útil de la - Rojo batería. -
Page 103: Medición
4 Operación Icono Descripción Función Botón de medición Comienza o inicia una medición. Botón de medición - con Realiza una medición Bluetooth mientras está conectado a ®2) una unidad PTV. Botón de actualización de Actualiza la lista de Bluetooth unidades PTV disponibles ®2) en las proximidades del instrumento. - Page 104 4 Operación Descripción Función 1 Barra de aplicaciones Ruta de navegación para ayudar al usuario en los pasos del proceso. 2 Valor de medición Visualización del resultado con la unidad seleccionada. 3 Ajustes Se muestran los ajustes aplicados a la medición. 4 "Protocol"...
-
Page 105: Realizar Una Medición
4 Operación 4.4.2 Realizar una medición Por favor, prepare las cubetas de muestra incluidas en el volumen de suministro antes de la medición. Asegúrese de que las cubetas de muestra no tengan manchas, arañazos ni imperfecciones. 1. Recoger la muestra Asegúrese de que la muestra es representativa (bien mezclada). -
Page 106: Consejos De Medición
4 Operación • No introduzca ningún objeto en la cámara de medición, excepto las cubetas destinadas a las mediciones. • No introduzca ningún líquido en la cámara. ¡Atención! 4.4.3 Consejos de medición Indexación del vial: La mejor manera de hacerlo es con un vial lleno de agua filtrada a través de un filtro de 0,2 µm. -
Page 107: Ajustes De Medición
4 Operación 4.4.4 Ajustes de medición Pulse el botón de configuración para acceder al modo de configuración de las mediciones. Icono Descripción Opción Función Modo Individual Empuje para leer. Continuo Measurement updates every X seconds until stopped. Muestra con Recommended for samples with rapid sedimentos settling characteristics. -
Page 108: Calibración
4 Operación 4.5 Calibración 4.5.1 Visión general de la calibración 12:36 Calibration Calibration Curve: T-CAL 0-4000 NTU Standard Set: None Descripción Función 1 Barra de aplicaciones Ruta de navegación para ayudar al usuario en los pasos del proceso. 2 Curva de calibración Especifica el tipo de calibración. -
Page 109: Realización De Una Calibración
4 Operación 4.5.2 Realización de una calibración Prepare los estándares T-CAL® incluidos en el volumen de suministro antes de la calibración. Asegúrese de que los frascos de T-CAL no tengan manchas, arañazos ® o imperfecciones. • Estándares T-CAL para TB 350 IR: 20 / 800 / 4000 NTU ®... -
Page 110: Ajustes De Calibración
4 Operación 4.5.3 Ajustes de calibración Pulse el botón de configuración para acceder al modo de configuración. Icono Descripción Opción Función Curva de T-CAL Selecciona el estándar de formazina ® calibrado estabilizado preparado en concentraciones predefinidas Formazina Selecciona el estándar de formazina propia preparado por el usuario en usuario... -
Page 111: Verification
4 Operación de Calibración y mostrará un estado "Activado" o "Habilitado". Apagado Durante el procedimiento de calibración, si un estándar individual está fuera de la tolerancia, el usuario no será notificado de que un calibrador está fuera del rango predefinido de los Tintómetros. La pantalla de registro tendrá... -
Page 112: Realización De Una Verificación
4 Operación 4.6.2 Realización de una verificación 1. Prepare la cubeta: Cubeta de muestra de aceite si es necesario. 3. Insertar estándar: Inserta el valor estándar especificado en la pantalla. 4. Modal: Representa el proceso activo. 5. Resumen del registro: Pulse el botón Guardar para guardar el registro. -
Page 113: Configuración De La Verificación
4 Operación 4.6.3 Configuración de la verificación Pulse el botón de configuración para entrar en el modo de configuración. Icono Descripción Opción Función Estándar T-CAL 5.0 NTU Selecciona el estándar de formazina estabilizado preparado a una concentración de 5,0 NTU. Usuario Selecciona el estándar preparado preparado... -
Page 114: Registros
4 Operación 4.7 Registros 4.7.1 Seleccionar un tipo de registro Pulse el botón de tipo de registro en el área de acción para acceder a los registros. Barra de aplicación: Registros de medición: Muestra todas las mediciones registradas. Registros de Calibración: Muestra todos los registros de calibración. -
Page 115: Ajustes Del Instrumento
4 Operación no TB 350 4.8 Ajustes del instrumento Pulse el botón de configuración para acceder al modo de configuración. Icono Descripción Opción Función Seguridad Habilitar Configurar, verificar y cambiar la contraseña. Desactivar Configuración por defecto. Configura- Brillo de la pantalla Ajustar el brillo de la ciones de pantalla. - Page 116 4 Operación Atajos USB Habilitar Si se activa, cuando se conecta un dispositivo de almacenamiento USB, el usuario se encuentra con un modal que presenta una opción para la "transferencia de registros" o la configuración de "copia de seguridad/ restauración". Al seleccionar una opción, el usuario es dirigido a la función...
- Page 117 4 Operación Tipo de Seleccione la unidad unidad mostrada. Define el tipo de unidad del valor de mg/L Kaolin medición mostrado. mg/L PSL NTU es el ajuste por defecto. Grados mNTU mFNU Personalizado Permitir el tipo de unidad definida por el usuario y la capacidad de establecer un factor basado en los valores NTU/FNU.
-
Page 118: Mantenimiento
5 Mantenimiento 5 Mantenimiento 5.1 Programa de mantenimiento delete reanudado Tarea Hacer No hacer 1. Limpiar la cámara 1. Asegúrese de que la cámara de 1. Rocíe o vierta de medición medición esté limpia y seca antes cualquier líquido de la medición. Utilice un paño de directamente 2. - Page 119 5 Mantenimiento Tarea Hacer No hacer Verificación Verifique el rendimiento del Utilizar estándares instrumento bajo las siguientes caducados. condiciones: 1. Después de realizar una calibración. 2. Según los procedimientos internos de control de calidad. 3. Según lo exigido por las autoridades reguladoras regionales.
-
Page 120: Resolución De Problemas Es
6 Resolución de problemas 6 Resolución de problemas 6.1 Mensajes de error y qué hacer Síntoma Posible causa Solución Rango elev. La turbidez de la muestra • Diluir la muestra está más allá del rango de • Verificar la calibración medición del instrumento. - Page 121 6 Resolución de problemas Síntoma Posible causa Solución Error de calibración Los estándares de Repita la calibración con calibración se ejecutaron en los estándares de menor a el orden equivocado. mayor valor. Error de calibración Los estándares de Mezcle los estándares calibración no se mezclaron según las instrucciones adecuadamente.
-
Page 122: Accesorios Y Piezas De Repuesto
7 Accesorios y piezas de repuesto 7 Accesorios y piezas de repuesto 7.1 Lista de accesorios Título Referencia No Aceite de silicona TB350 IR, TB350 194295 Cable USB-C de 1 m, USB-C a A TB350 IR, TB350 19820-081 Cepillo, 11 cm longitud TB350 IR, TB350 380230 Cubetas de medición con tapa, altura 55 mm,... -
Page 123: Especificaciones
8.1 Especificaciones Model Model WM-040-1004 (IR) Model WM-040-1001 (WL) Fuente luminosa LED infrarrojo (860 nm) LED blanco Cumplimiento ISO 7027 regulaciones EPA pending Principio de Nefelométrica (Multipath 90° BLAC) medición Rango de 0,01 - 4000 NTU (FNU) medición Resolución Autoranging: 0.01-9.99: 0.01 NTU ; 10.0-99.9: 0.1 NTU ;... - Page 124 Modo de ahorro Sí de energía Auto – OFF Seleccionable Requerimientos AC 100 - 240 V, 50/60 Hz (Serie TB 600: Diodo de energía láser) para el adaptador de corriente USB; 4 AA pilas alcalinas recargables NiMH (para uso con USB/módulo de alimentación) Recarga en el instrumento no con todos los tipos de TB Condiciones...
-
Page 125: Especificaciones - Adaptador De Red
Idiomas Manual • Alemán de usuario • Chino completo • Español • Francés • Holandés • Inglés • Italiano • Portugués • Ruso • Turco Medidas 155 x 83 x 225 mm Peso 804 g (898 g con cuatro pilas alcalinas AA) Peso con (898 g with four AA alkaline batteries) embalaje... - Page 126 Tipo WR9QA2500USB52NMR6B EN 55032 FCC Part 15 Clase B EN 55024 Dimensiones [mm] 31.5 x 41 x 71 (sin adaptador primario) Peso, con adaptador UE 48 g (sin adaptador primario) Aprobación, EMC CE, FCC Altitud permitida metros 5000 m Nivel de polución Sujeto a modificaciones técnicas.
-
Page 127: Apéndice
Lovibond , Tintometer y T-CAL son marcas registradas del grupo de empresas ® ® ® Tintometer. Todas las traducciones y transliteraciones de Lovibond y Tintometer ® ® afirman como marcas comerciales del grupo Tintometer ® La marca Bluetooth , la marca de la figura y la marca combinada son marcas ®... - Page 128 Table des matières Table des matières Page 1 Introduction 1.1 Informations générales 1.1.1 Lire les instructions avant l'utilisation 1.1.2 Objet du produit 1.1.3 Utilisation autorisée 1.1.4 Exigences pour une utilisation sûre 1.1.5 Gardez les instructions 1.1.6 Qualification des utilisateurs 1.1.7 Manipulation de produits chimiques dangereux 1.1.8 Instructions pour la disposition du produit 1.2 Liste de tous les caractères utilisés dans le document 1.3 Abréviations...
- Page 129 Table des matières Page 4.7 Enregistrements 4.7.1 Sélection d'un type de journal 4.7.2 Récupération d'un journal 4.8 Paramètres de l'instrument 5 Maintenance 5.1 Programme d'entretien recommandé 6 Dépannage 6.1 Messages d'erreur et mesures à prendre 7 Accessoires et pièces de rechange 7.1 Liste des accessoires 7.2 Pièces de rechange 8.1 Spécifications...
-
Page 130: Introduction
1 Introduction 1 Introduction 1.1 Informations générales 1.1.1 Lire les instructions avant l'utilisation Ce manuel fournit des informations importantes sur le fonctionnement sûr du produit. Veuillez lire attentivement ce manuel et vous familiariser avec le produit avant de l'utiliser. 1.1.2 Objet du produit Le turbidimètre portable de la série TB est conçu pour analyser des échantillons aqueux qui sont recueillis dans des cuvettes en verre puis scellés. -
Page 131: Gardez Les Instructions
1 Introduction Le produit ne doit pas être utilisé si : • il est visiblement endommagé (par exemple, après avoir été transporté) • il a été stocké dans des conditions défavorables pendant une longue période (conditions de stockage, voir chapitre "Spécifications") Conditions pour une utilisation sûre du bloc d'alimentation Respectez les points suivants pour une utilisation en toute sécurité... -
Page 132: Liste De Tous Les Caractères Utilisés Dans Le Document
1 Introduction Il est illégal de jeter les piles avec les déchets ménagers. Au sein de l'Union européenne, à la fin de la vie de l'appareil, les piles sont éliminées dans un point de collecte de recyclage spécialisé. Les instruments marqués de ce symbole ne doivent pas être jetés avec les déchets domestiques normaux. -
Page 133: Aperçu Du Produit
à l'aide de câbles blindés afin de maintenir la conformité aux limites d'émission de fréquences radio de la FCC. Attention! Modifications Toute modification apportée à cet appareil qui n'est pas approuvée par Tintometer peut annuler l'autorisation accordée à l'utilisateur par la FCC d'utiliser cet équipement. Attention! FR TB 350... -
Page 134: Fonctionnalités
2 Aperçu du produit DOC Class A Notice - Avis DOC, Class A Cet appareil numérique de classe A satisfait à toutes les exigences de la norme canadienne sur les interférences. 2.2 Fonctionnalités La précision du laboratoire et la portabilité La série Lovibond TB élimine les complexités de la mesure de la turbidité. -
Page 135: Vue Des Instruments
2 Aperçu du produit 2.4 Vue des instruments Position Description Fonction 1. Couvercle Lorsqu'il est soulevé, il permet à l'utilisateur de placer la cellule d'échantillon dans l'instrument pour une lecture. 2. Bouton Met l'instrument sous tension et hors d'alimentation tension. 3. -
Page 136: Mise En Service
3 Mise en service 3 Mise en service 3.1 Environnement opérationnel L'instrument peut être utilisé dans tout environnement intérieur ou extérieur jugé sûr pour qu'un opérateur puisse effectuer l'analyse. L'instrument peut accepter des échantillons aqueux de 0 à 70 °C. L'instrument doit être à... -
Page 137: Insertion Et Remplacement Des Piles
3 Mise en service 3.3 Insertion et remplacement des piles Lors de l'utilisation de piles Étape Description À l'aide d'un tournevis, retirez les quatre vis situées à l'arrière de l'instrument et retirez le panneau. Insérez quatre piles AA en les orientant correctement. Remettez le panneau en place sur l'instrument. - Page 138 3 Mise en service En cas d'utilisation de piles rechargeables Étape Description À l'aide d'un tournevis, retirez les quatre vis situées à l'arrière de l'instrument, puis retirez le panneau et le bac à piles. Insérez le bloc de piles rechargeables dans le bon sens. Remettez le panneau en place sur l'instrument.
-
Page 139: Opération
4 Opération 4 Opération 4.1 Premier démarrage 1. Écran de bienvenue Écran initial que l'utilisateur voit lors de la première mise sous tension. Appuyez sur le bouton > 2. Sélectionner la langue Sélectionnez la langue souhaitée pour le réglage. Appuyez sur la touche > 3. -
Page 140: Principes Généraux De Fonctionnement
4 Opération 4.2 Principes généraux de fonctionnement La conception des turbidimètres portables de la série TB est décomposée en composants fonctionnels respectifs qui sont discutés en détail. Il s'agit de la source lumineuse, du piège à lumière diffusée à 90 degrés, du détecteur de lumière diffusée, de la fiole à... -
Page 141: Liste Des Éléments De Contrôle Et Leur Fonction
4 Opération 4.3 Liste des éléments de contrôle et leur fonction 4.3.1 Aperçu de l'affichage 12:36 Description Fonction 1 Barre d'état Affiche les icônes et les étiquettes qui sont universelles, notamment Heure, Bluetooth , USB, Sécurité, Source de lumière ®... -
Page 142: Liste Des Éléments De Contrôle Et Leur Fonction
4 Opération Icône Description Mode de mesure Mode Calibrage Mode Vérification Enregistrements de données Connexion Bluetooth au turbidimètre de process PTV (non disponible pour TB 350) Paramètres de l'instrument 4.3.2 Liste des éléments de contrôle et leur fonction Icône Description Function ... - Page 143 4 Opération Icône Description Function Source de lumière L'instrument contient une source lumineuse LED rouge – remplie rouge ; la lumière est allumée pour la mesure. Source de lumière L'instrument contient une source lumineuse LED rouge – contour rouge ; aucune mesure n'est active. Source de lumière L'instrument contient une source de lumière LED blanc –...
-
Page 144: Barre D'état
4 Opération Icône Description Function Alimentation par Indique qu'il reste 50 % de l'autonomie de la batterie – orange batterie. Alimentation par Indique qu'il reste 25 % de l'autonomie de la batterie - rouge batterie. Couvercle de la Indique si la couvercle de la compartiment de compartiment de mesure est ouverte. -
Page 145: La Mesure
4 Opération Icône Description Function Bouton de mesure Démarre ou Commence ou Initie une mesure. Bouton de mesure– avec Prend une mesure lorsqu'il Bluetooth est connecté à une unité ®2) PTV. Bluetooth Bouton de Rafraîchit la liste des ® rafraîchissement unités PTV disponibles à... - Page 146 4 Opération Description Function 1 Barre d'application Un fil d'Ariane pour aider l'utilisateur à parcourir les étapes du processus. 2 Valeur de la mesure Affichage de la valeur mesurée de l'échantillon avec le type d'unité. 3 Paramètres Les paramètres appliqués à la mesure sont affichés. 4 Bouton Crée un journal lorsqu'on appuie dessus.
-
Page 147: Exécution D'une Mesure
4 Opération 4.4.2 Exécution d'une mesure Veuillez préparer les cellules d'échantillon incluses dans l'étendue de la livraison avant la mesure. Assurez-vous que les cellules d'échantillon sont exemptes de taches, de rayures ou d'imperfections. 1. Prélever l'échantillon Assurez-vous que l'échantillon est représentatif (bien mélangé). La verrerie doit être exempte de taches, de rayures ou d'autres imperfections. -
Page 148: Conseils De Mesure
4 Opération • Ne pas introduire d'objets dans le puits de mesure, à l'exception des cuvettes prévues pour les mesures. • Ne pas introduire de liquides dans le puits. Avertissement ! 4.4.3 Conseils de mesure Indexation de la cuvette : Cette opération est mieux réalisée avec une cuvette remplie d'eau filtrée à... -
Page 149: Réglages Des Mesures
4 Opération 4.4.4 Réglages des mesures Appuyez sur le bouton Paramètres pour accéder au mode Paramètres de mesure. Icône Description Option Function Mode Unitaire Appuyez pour déclencher une mesure Continu Les mesures sont mises à jour toutes les X secondes jusqu'à leur arrêt. Règlement Recommandé... -
Page 150: Étalonnage
4 Opération 4.5 Étalonnage 4.5.1 Aperçu de l'étalonnage 12:36 Calibration Calibration Curve: T-CAL 0-4000 NTU Standard Set: None Description Function 1 Barre d'application Un fil d'Ariane pour aider l'utilisateur à parcourir les étapes du processus. 2 Courbe d'étalonnage Spécifie le type d'étalonnage. 3 Ensemble de normes Identifiant unique du jeu de normes. -
Page 151: Effectuer Un Étalonnage
4 Opération 4.5.2 Effectuer un étalonnage Veuillez préparer les étalons T-CAL inclus dans la livraison avant l'étalonnage. ® Assurez-vous que les flacons T-CAL sont exempts de taches, de rayures ou ® d'imperfections. • Etalons T-CAL pour TB 350 IR : 20 / 800 / 4000 NTU ®... -
Page 152: Réglages De L'étalonnage
4 Opération 4.5.3 Réglages de l'étalonnage Appuyez sur le bouton Paramètres pour accéder au mode Paramètres de mesure. Icône Description Option Function Courbe T-CAL Sélectionne la formazine standard ® d'étalonnage stabilisée préparée à des concentrations prédéfinies. Utilisateur Sélectionne la formazine standard Formazin préparée par l'utilisateur à... -
Page 153: Vérification
4 Opération une ligne pour le vérificateur d'étalonnage et affichera un état "On" ou "Enabled". Pendant la procédure d'étalonnage, si un étalon individuel est hors tolérance, l'utilisateur ne sera pas averti qu'un étalonneur est hors de la plage prédéfinie des tintomètres. L'écran du journal comportera un élément de ligne pour le vérificateur d'étalonnage et il affichera un état "Off"... -
Page 154: Effectuer Une Vérification
4 Opération 4.6.2 Effectuer une vérification 1.Préparer la cuvette : Huiler le cuvette d'échantillon si nécessaire. 3. Insérer la standard : Insérer la valeur standard spécifiée à l'écran. 4. Modale : Représente le processus actif. 5. Résumé du journal : Appuyez sur le bouton Enregistrer pour sauvegarder le journal. -
Page 155: Paramètres De Vérification
4 Opération 4.6.3 Paramètres de vérification Appuyez sur le bouton Paramètres pour accéder au mode paramètres. Icône Description Option Function Standard T-CAL 5.0 NTU Sélectionne le standard de formazine stabilisé préparé à une concentration de 5,0 NTU. Préparé par Sélectionne la standard préparé l'utilisateur par l'utilisateur entre 1 et 1000 NTU. -
Page 156: Enregistrements
4 Opération 4.7 Enregistrements 4.7.1 Sélection d'un type de journal Appuyez sur le bouton Type de journal dans la zone d'action pour accéder aux journaux. Barre d'application : Journaux de mesures : Affiche toutes les mesures enregistrées. Journaux d'étalonnage : Affiche tous les enregistrements d'étalonnage. -
Page 157: Paramètres De L'instrument
4 Opération pas TB 350 4.8 Paramètres de l'instrument Appuyez sur le bouton Paramètres pour accéder au mode Paramètres. Icône Description Option Function Sécurité Activer Configurer, vérifier et changer le mot de passe. inactivé Réglage par défaut. Paramètres Luminosité de l'écran Réglez la luminosité... - Page 158 4 Opération Raccourcis Activer Si elle est activée, lorsqu'un périphérique de stockage USB est connecté, l'utilisateur voit apparaître une modale qui présente une option pour les paramètres de "transfert des journaux" ou de "sauvegarde/ restauration". En sélectionnant une option, l'utilisateur est dirigé...
- Page 159 4 Opération Sauvegarde / Sauvegarder tous les paramètres Possibilité Restauration d'enregistrer les paramètres sur la carte SD locale ou sur un lecteur USB externe. Restaurer tous les paramètres Récupère les paramètres précédemment enregistrés sur la carte SD locale ou le lecteur USB externe.
- Page 160 4 Opération Activer Établit un protocole pour l'intégrité des données pour les laboratoires qui suivent les bonnes pratiques de laboratoire. inactivé Réglage par défaut. Propriétaire Coordonnées du propriétaire de l'instrument. Nous Coordonnées des contacter bureaux Lovibond ® À propos ...
-
Page 161: Maintenance
5 Maintenance 5 Maintenance 5.1 Programme d'entretien recommandé Tâche Faire Ne pas faire 1. Nettoyer la 1. Assurez-vous que la chambre de 1. Vaporisez ou chambre de mesure est propre et sèche avant versez tout liquide mesure la mesure. Utilisez un chiffon sec directement dans en microfibres pour éliminer les la chambre de... - Page 162 5 Maintenance Tâche Faire Ne pas faire Calibrage Calibrez au besoin dans les Utiliser des normes conditions suivantes : périmées. 1. Échec de la vérification. 2. Une maintenance des systèmes optiques ou électroniques est effectuée. 3. Comme l'exigent les autorités réglementaires régionales.
-
Page 163: Messages D'erreur Et Mesures À Prendre
6 Dépannage 6 Dépannage 6.1 Messages d'erreur et mesures à prendre Symptôme Cause possible Solution Dépassement de La turbidité de l'échantillon • Diluer l'échantillon gamme est au-delà de la plage de • Vérifier l'étalonnage en mesure de l'instrument. utilisant un standard à haute gamme. - Page 164 6 Dépannage Symptôme Cause possible Solution Erreur d'étalonnage Les standards d'étalonnage Répétez l'étalonnage avec ont été passés dans le les étalons en allant de la mauvais ordre. valeur la plus basse à la plus haute. Erreur d'étalonnage Les standards de calibrage Mélangez les étalons n'ont pas été...
-
Page 165: Accessoires Et Pièces De Rechange
7 Accessoires et pièces de rechange 7 Accessoires et pièces de rechange 7.1 Liste des accessoires Titre Code Bloc d’alimentation serie TB TB 350 IR 19820-170 turbidimètre portable, TB 350 WL turbidimètre portable Brosse, longueur 11 cm TB 350 IR 380230 turbidimètre portable, TB 350... -
Page 166: Pièces De Rechange
7 Accessoires et pièces de rechange Titre Code Lot d’étalons de turbidité T-CAL (5, 20, 800, TB 350 WL 194152 2000, 4000 NTU) turbidimètre portable Lot d’étalons de turbidité T-CAL (5, 20, 800, TB 350 IR 194154 4000 NTU) turbidimètre portable Piles (AA), lot de 4 TB 350 IR... -
Page 167: Spécifications
8.1 Spécifications Model Model WM-040-1004 (IR) Model WM-040-1001 (WL) Source LED infrarouge (860 nm) lumineuse LED blanche Conformité ISO 7027 réglementaire EPA pending Principe Néphélométrique (Multipath 90° BLAC) Gamme de 0,01 - 4000 NTU (FNU) mesure Résolution Autoranging: 0.01-9.99: 0.01 NTU ; 10.0-99.9: 0.1 NTU ;... - Page 168 Besoins en AC 100 - 240 V, 50/60 Hz (TB 600 série: électricité Laserdiode) pour l'adaptateur d'alimentation USB; 4 AA piles alcalines rechargeables NiMH (pour utilisation avec le module USB/ alimentation) Recharge dans l'instrument pas avec tous les types de TB Conditions Température : 0 - 50 °C (32 - 122 °F) environnementales...
-
Page 169: Spécifications - Adaptateur Secteur
Langues Manuel • Allemand d’utilisateur • Anglais complet • Chinois • Espagnol • Français • Italien • Néerlandais • Portugais • Russe • Turc Dimensions 155 x 83 x 225 mm Poids 804 g (898 g avec quatre piles alcalines AA) Poids avec (898 g with four AA alkaline batteries) emballage... - Page 170 Type WR9QA2500USB52NMR6B Dimensions [mm] 31,5 x 41 x 71 (sans adaptateur primaire) Poids, avec adaptateur EU 48 g (sans lames d'adaptateur primaire) Approbation, EMC CE, FCC Altitude autorisée mètres 5000 m Niveau de pollution Sous réserve de modifications techniques ! Pour garantir une précision maximale des résultats des tests, utilisez toujours les systèmes de réactifs fournis par le fabricant de l'instrument.
-
Page 171: Appendice
Tintometer Group. ® La marque Bluetooth , la marque figurative et la marque combinée sont des marques ® commerciales appartenant à Bluetooth SIG et toute utilisation par le Tintometer Group ® est sous licence. FR TB 350... - Page 172 Índice Índice Página 1 Introdução 1.1 Informações gerais 1.1.1 Leia as instruções antes de usar 1.1.2 Finalidade do Produto 1.1.3 Uso autorizado 1.1.4 Requisitos para uma utilização segura 1.1.5 Manual de instruções 1.1.6 Qualificação do utilizador 1.1.7 Manuseio de produtos químicos perigosos 1.1.8 Observações para o descarte 1.2 Lista de todos os símbolos utilizados no documento 1.3 Abreviaturas...
- Page 173 Índice Página 4.7 Registos 4.7.1 Selecção de um tipo de registo 4.7.2 Recuperar um registo 4.8 Configuração de instrumentos 5 Manutenção 5.1 Rotina de manutenção recomendada 6 Resolução de problemas 6.1 Mensagens de erro e o que fazer 7 Acessórios e peças de substituição 7.1 Lista de Acessórios 7.2 Lista de acessórios 8.1 Especificações...
- Page 174 1 Introdução 1 Introdução 1.1 Informações gerais 1.1.1 Leia as instruções antes de usar Este manual fornece informações importantes sobre o uso seguro do produto. Leia atentamente este manual e familiarize-se com o produto antes de utilizá-lo. 1.1.2 Finalidade do Produto O turbidímetro portátil da série TB foi projetado para analisar amostras aquosas que são recolhidas em cubtas de vidro e depois fechadas.
- Page 175 1 Introdução Pré-requisitos para o uso seguro da fonte de alimentação encaixável (plug-in). Observar os seguintes pontos para uma utilização segura: • Verificar se existem danos visíveis antes de usar. Se o equipamento estiver danificado, não colocá-lo em funcionamento. • Utilizá-lo apenas em salas secas. •...
- Page 176 1 Introdução Os instrumentos marcados com este símbolo não devem ser eliminados nos resíduos domésticos normais. 1.2 Lista de todos os símbolos utilizados no documento Os seguintes símbolos são utilizados neste manual para indicar as seções que requerem atenção especial: Indica um perigo que poderá...
- Page 177 2 Resumo do produto 2 Resumo do produto 2.1 Certificação EMC Emissões CISPR 11 Marca CE conduzidas e irradiadas (Limites da Classe A) EMC Imunidade EN 61326-1 Marca CE (Limites industriais) Segurança EN 61010-1 Marca de segurança TÜV FCC Classe A Marca FCC Aviso FCC Classe A Este dispositivo está...
- Page 178 2 Resumo do produto Modificações Quaisquer modificações feitas a este dispositivo que não sejam aprovadas pelo Tintometer podem anular a autorização concedida ao utilizador pela FCC para operar este equipamento. Cuidado! Aviso DOC Classe A - Avis DOC, Classe A Este aparelho digital de Classe A cumpre todos os requisitos do Canadian Interference- Causing Equipment Regulations.
- Page 179 2 Resumo do produto 2.4 Vista do instrumento Posição Descrição Função 1. Tampa Quando levantada, permite ao utilizador colocar a cubeta de amostra no instrumento para efetuar a leitura. 2. Botão de Liga e desliga o instrumento. alimentação 3. Tela de toque Apresenta a interface do utilizador do instrumento.
- Page 180 3 Comissionamento 3 Comissionamento 3.1 Ambiente operacional O instrumento pode ser utilizado em qualquer ambiente interior ou exterior que seja considerado seguro para um usuário realizar a análise. O instrumento pode aceitar amostras aquosas, de 0 a 70 °C. O instrumento deve estar nivelado, a ± 15°, ao realizar uma medição. O instrumento deve ser colocado sobre uma superfície plana para que se obtenha o melhor desempenho na medição.
- Page 181 3 Comissionamento 3.3 Instalação ou Substituição das Pilhas/ Baterias Ao utilizar pilhas Passo Descrição Utilizar uma chave de fenda para remover os quatro parafusos na parte de traseira do instrumento e remover o painel. Inserir as quatro pilhas AA na orientação adequada. Fixar o painel de volta ao instrumento.
- Page 182 3 Comissionamento Ao utilizar baterias recarregáveis Passo Descrição Utilizar uma chave de fenda para retirar os quatro parafusos na parte traseira do instrumento, retirar o painel e o suporte de pilhas. Inserir o conjunto de baterias recarregáveis na orientação correcta. Fixar o painel de volta ao instrumento.
- Page 183 4 Operação 4 Operação 4.1 Comissionamento inicial 1. Tela de boas-vindas A primeira tela que o usuário vê ao ligar. Aperte > botão 2. Selecione o Idioma Selecione o idioma desejado. Aperte > botão 3. Definir data e hora Escolha entre o formato de 12 e 24 horas. Alterar valores usando setas para cima e para baixo.
- Page 184 4 Operação 4.2 Princípios gerais de funcionamento Os desenhos dos Turbidímetros Portáteis da Série TB são decompostos nos seus respectivos componentes funcionais que são discutidos em detalhe. Estes incluem a fonte de luz, a armadilha de luz dispersa a 90 graus, o detector de luz dispersa, o frasco de amostra do turbidímetro e a forma como estes componentes-chave trabalham em conjunto para fornecer o resultado da turbidez.
- Page 185 4 Operação 4.3 Lista de ícones e suas funções 4.3.1 Lista de ícones e sua função 12:36 Descrição Função 1 Barra de Apresenta os ícones e etiquetas que são universais, incluindo estado Tempo, Bluetooth , USB, Segurança, Fonte de Luz e Energia. ®...
- Page 186 4 Operação Ícone Descrição Modo de medição Modo de Calibração Modo de Verificação Registos de dados Conexão Bluetooth ao turbidímetro de processo PTV (não disponível para TB 350) Configurações do instrumento 4.3.2 Lista de elementos de controlo e sua função Ícone Descrição Função...
- Page 187 4 Operação Ícone Descrição Função Fonte de luz O instrumento contém uma fonte de luz LED vermelha - vermelha; a luz é ligada para medição. preenchidas Fonte de luz O instrumento contém uma fonte de luz LED vermelha - esboço vermelha;...
- Page 188 4 Operação Ícone Descrição Função Energia da bateria – Indica 50% da duração da bateria restante. Laranja Energia da bateria - Indica 25% da duração da bateria restante. Vermelho Tampa da câmara de Indica que a tampa da câmara de medição está medição aberta aberta.
- Page 189 4 Operação Ícone Descrição Função Botão de medição Inicia ou Começa ou Inicia uma medição. Botão de medição - com Efectua uma medição Bluetooth enquanto ligado a uma ®2) unidade PTV. Botão de Actualização Actualiza a lista de Bluetooth unidades PTV disponíveis ®2) na proximidade do instrumento.
- Page 190 4 Operação Descrição Função 1 Barra de aplicação Caminho de navegação para ajudar o utilizador ao longo das etapas do processo. 2 Valor de Medição Exibição do resultado da medição com unidade. 3 Configurações São apresentadas as configurações aplicadas à medição.
- Page 191 4 Operação 4.4.2 Realização de uma medição Por favor, antes da medição preparar as cubetas de amostra fornecidas. Certifique- se de que as cubetas de amostra estejam limpas e livres de arranhões ou manchas. 1. Coleta da amostra Assegurar-se que a amostra seja representativa (bem misturada).
- Page 192 4 Operação • Não inserir quaisquer objetos na câmara de medição, excepto as cubetas destinadas às medições. • Não inserir quaisquer líquidos na câmara de medição. Advertência! 4.4.3 Dicas de medição Indexação do célula: A melhor forma de o fazer é com um célula que é enchido com água que é...
- Page 193 4 Operação 4.4.4 Configurações para a medição Prima o botão Definições para aceder ao Modo de Definições de Medição. Ícone Descrição Opção Função Modo Única Pressione para activar uma medição Contínuo As medições são actualizadas a cada X segundos até serem interrompidas. Sedimentação Recomendado para amostras com Rápida...
- Page 194 4 Operação 4.5 Calibração 4.5.1 Visão Geral da Calibração 12:36 Calibration Calibration Curve: T-CAL 0-4000 NTU Standard Set: None Descrição Função 1 Barra de aplicação Caminho de navegação para ajudar o utilizador ao longo das etapas do processo. 2 Curva de Calibração Especifica o tipo de calibração.
- Page 195 4 Operação 4.5.2 Realizar uma Calibração Por favor, preparar os padrões T-CAL incluídos no âmbito da entrega antes da ® calibração. Certifique-se de que os frascos de padrão T-CAL estejam limpos e ® livres de arranhões ou manchas. • Padrões T-CAL para TB 350 IR: 20 / 800 / 4000 NTU ®...
- Page 196 4 Operação 4.5.3 Configurações de Calibração Premir o Botão de Definições para aceder ao modo de definições. Ícone Descrição Opção Função Curva de T-CAL Selecciona padrão de formazina ® calibração estabilizada preparada em concentrações pré-definidas Formazin Selecciona o padrão de formazina (usuário) preparado pelo utilizador em concentrações pré-definidas...
- Page 197 4 Operação de linha para o Verificador de Calibração e mostrará um estado "On" ou "Enabled". Fora Durante o procedimento de calibração, se um padrão individual estiver fora de tolerância, o utilizador não será notificado de que um calibrador está fora da gama pré-definida de Tintómetros.
- Page 198 4 Operação 4.6.2 Realização de uma Verificação 1. Preparar o célula: Célula de amostra de óleo, se necessário. 3. Inserir Standard: Inserir o valor standard especificado no ecrã. 4. Modal: Representa um processo activo. 5. Resumo do registo: Prima o botão Guardar para guardar o registo. Premir o botão Cancelar para voltar ao início do processo de Verificação.
- Page 199 4 Operação 4.6.3 Configurações de verificação Premir o botão Settings para entrar no modo settings. Ícone Descrição Opção Função Padrão T-CAL 5.0 NTU Selecciona padrão de formazina estabilizada preparada a 5,0 NTU de concentração. Usuário Selecciona o padrão preparado preparado pelo utilizador entre 1 e 1000 NTU.
- Page 200 4 Operação 4.7 Registos 4.7.1 Selecção de um tipo de registo Prima o botão de tipo de registo na área de acção para aceder aos registos. Barra de aplicação: Registros de medição: Mostra todas as medições registadas. Registos de Calibração: Exibe todos os registos de calibração.
- Page 201 4 Operação 4.8 Configuração de instrumentos Premir o botão Settings Button para aceder ao Modo Settings. Ícone Descrição Opção Função Segurança Habilitar Configurar, verificar e alterar a palavra- passe. Desactivar Definição por defeito. Configura- Brilho da tela Ajustar a ções de luminosidade do ecrã.
- Page 202 4 Operação Atalhos de Habilitar Se activado, quando um dispositivo de armazenamento USB é ligado, o utilizador é apresentado com um modal que apresenta uma opção de "transferência de registos" ou definições de "cópia de segurança/ restauro". Ao seleccionar uma opção, o utilizador é...
- Page 203 4 Operação Tipo de Seleccione a unidade unidade apresentada. Define o tipo de unidade do valor de mg/L Kaolin medição apresentado. mg/L PSL NTU é a configuração por defeito. Graus mNTU mFNU Personalizado Permitir o tipo de unidade definida pelo utilizador e a capacidade de definir um factor baseado em valores NTU/FNU.
- Page 204 5 Manutenção 5 Manutenção 5.1 Rotina de manutenção recomendada Tarefa Fazer Não fazer 1. Câmara de 1. Assegurar-se de que a câmara 1. Pulverizar medição limpa de medição esteja limpa e seca ou verter antes da medição. Utilizar um qualquer fluido 2.
- Page 205 5 Manutenção Tarefa Fazer Não fazer Verificação Verificar o desempenho do Utilização de padrões instrumento de acordo com as vencidos. seguintes condições: 1. Após realizar uma calibração. 2. Devido à procedimentos internos de controle de qualidade. 3. Conforme exigido pelas autoridades reguladoras regionais.
- Page 206 6 Resolução de problemas 6 Resolução de problemas 6.1 Mensagens de erro e o que fazer Sintoma Possível Causa Solução Acima da faixa A turbidez da amostra é • Diluir a amostra superior a faixa de medição • Verificar a calibração do instrumento.
- Page 207 6 Resolução de problemas Sintoma Possível Causa Solução Erro de Calibração Os padrões de calibração Repetir a calibração com a foram utilizados na ordem ordem dos padrões do valor errada. mais baixo para o mais alto. Erro de Calibração Os padrões de calibração Misturar os padrões não foram adequadamente conforme as instruções...
- Page 208 7 Acessórios e peças de substituição 7 Acessórios e peças de substituição 7.1 Lista de Acessórios Título Artigo No Cabo USB-C de 1 m, USB-C para A TB350 IR, TB350 19820-081 Conjunto de padrões de turbidez T-CAL (5, TB350 WL 194152 20, 800, 2000, 4000 NTU) Conjunto de padrões de turbidez T-CAL (5,...
- Page 209 8.1 Especificações Model Model WM-040-1004 (IR) Model WM-040-1001 (WL) Fonte de Luz LED infravermelho (860 nm) LED branco Conformidade ISO 7027 EPA pending Princípio de Nefelométrica (Multipath 90° BLAC) Medição Faixa de 0,01 - 4000 NTU (FNU) Medição Resolução 0,01 NTU na faixa mais baixa Precisão ±...
- Page 210 Modo de economia de energia Auto – OFF Seleccionável Requisitos de AC 100 - 240 V, 50/60 Hz (Série TB 600: diodo Energia laser) para adaptador de alimentação USB; 4 pilhas alcalinas AA ou recarregáveis NiMH (para a utilização com módulo alimentação USB). Recarga no instrumento não disponível em todos os modelos da Série TB.
- Page 211 Idiomas do Guia • Alemão de Início Rápido • Chinês • Espanhol • Francês • Holandês • Inglês • Italiano • Português • Russo • Turco Idiomas do • Alemão Manual Completo • Chinês do Usuário • Espanhol • Francês •...
- Page 212 Tipo WR9QA2500USB52NMR6B Corrente máxima de saída 2,5 A Proteção de saída Encerramento da saída e reinício automático Condições ambientais 0 °C a 40 °C, com um máximo de 95 % de humidade relativa do ar Classe de eficiência energética Norma de segurança EN 62368 EN 55032 FCC Part 15 Classe B...
- Page 213 The Tintometer ® A marca Bluetooth , o logotipo e a marca combinada são marcas registadas e de ® propriedade da Bluetooth SIG e qualquer utilização pelo Grupo Tintometer está sob ® licença. PT TB 350...
- Page 214 Indice Indice Pagina 1 Introduzione 1.1 Informazioni generali 1.1.1 Leggere le istruzioni prima dell'uso 1.1.2 Scopo del prodotto 1.1.3 Uso autorizzato 1.1.4 Requisiti per un uso sicuro 1.1.5 Mantenere le istruzioni 1.1.6 Qualificazione dell'utente 1.1.7 Manipolazione di prodotti chimici pericolosi 1.1.8 Istruzioni per lo smaltimento 1.2 Elenco di tutti i simboli usati nel documento 1.3 Abbreviazioni...
- Page 215 Indice Pagina 4.6 Verifica 4.6.1 Panoramica della verifica 4.6.2 Esecuzione di una verifica 4.6.3 Impostazioni di verifica 4.7 Registro 4.7.1 Selezione di un tipo di registro 4.7.2 Recuperare un registro 4.8 Impostazioni dello strumento 5 Manutenzione 5.1 Ricomincia il programma di manutenzione 6 Risoluzione dei problemi 6.1 Messaggi di errore e cosa fare 7 Accessori e parti di ricambio...
- Page 216 1 Introduzione 1 Introduzione 1.1 Informazioni generali 1.1.1 Leggere le istruzioni prima dell'uso Questo manuale fornisce importanti informazioni sul funzionamento sicuro del prodotto. Si prega di leggere attentamente questo manuale e di familiarizzare con il prodotto prima dell'uso. 1.1.2 Scopo del prodotto Il torbidimetro portatile della serie TB è...
- Page 217 1 Introduzione Presupposti per un uso sicuro dell'alimentatore a spina Osservare i seguenti punti per un uso sicuro: • Controllare che non ci siano danni visibili prima dell'uso. Se danneggiato, non mettere in funzione. • Usare solo in stanze asciutte. •...
- Page 218 1 Introduzione Gli strumenti contrassegnati da questo simbolo non devono essere smaltiti nei normali rifiuti domestici. 1.2 Elenco di tutti i simboli usati nel documento I seguenti simboli sono usati in questo manuale per indicare sezioni che richiedono un'attenzione speciale: C'è...
- Page 219 FCC. Attenzione! Modifiche Qualsiasi modifica apportata a questo dispositivo che non sia stata approvata dalla Tintometer può annullare l'autorità concessa all'utente dalla FCC per utilizzare questa apparecchiatura. Attenzione! IT TB 350...
- Page 220 2 Panoramica del prodotto Avviso DOC Classe A - Avis DOC, Classe A Questo apparecchio digitale di classe A soddisfa tutti i requisiti delle norme canadesi sulle apparecchiature che causano interferenze. 2.2 Caratteristiche L'accuratezza del laboratorio incontra la portabilità La serie Lovibond TB elimina le complessità...
- Page 221 2 Panoramica del prodotto 2.4 Vista dello strumento Posizione Descrizione Funzione 1. Coperchio Quando viene sollevato, permette all'utente di posizionare la cella del campione nello strumento per una lettura 2. Pulsante di Accende e spegne lo strumento. accensione 3. Touch Screen Visualizza l'interfaccia utente dello strumento.
- Page 222 3 Commissioning 3 Commissioning 3.1 Ambiente operativo Lo strumento può essere utilizzato in qualsiasi ambiente interno o esterno che sia ritenuto sicuro per un operatore per eseguire l'analisi. Lo strumento può accettare campioni acquosi da 0 a 70 °C. Lo strumento deve essere a livello ± 15° quando si esegue una misurazione. Lo strumento deve essere posizionato su una superficie piana per ottenere le migliori prestazioni di misurazione.
- Page 223 3 Commissioning 3.3 Inserimento e sostituzione delle batterie Quando si usano le batterie Passo Descrizione Usare un cacciavite per rimuovere le quattro viti sul retro dello strumento e rimuovere il pannello. Inserire quattro batterie AA nell'orientamento corretto. Fissare di nuovo il pannello sullo strumento. ...
- Page 224 3 Commissioning Quando si usano batterie ricaricabili Passo Descrizione Usare un cacciavite per rimuovere le quattro viti sul retro dello strumento, rimuovere il pannello e il vassoio delle batterie. Inserire il pacco batterie ricaricabile nell'orientamento corretto. Fissare di nuovo il pannello sullo strumento. IT TB 350...
- Page 225 4 Operazione 4 Operazione 4.1 Primo avvio 1. Schermata di benvenuto Schermata iniziale che l'utente vede alla prima accensione Premere il pulsante > 2. Selezionare la lingua Seleziona la lingua desiderata da impostare Premere il pulsante > 3. Imposta data e ora Scegliere tra il formato 12 e 24 ore Cambia i valori usando le frecce su e giù...
- Page 226 4 Operazione 4.2 Principi generali di funzionamento I design dei torbidimetri portatili della serie TB sono suddivisi nei loro rispettivi componenti funzionali che vengono discussi in dettaglio. Questi includono la sorgente di luce, la trappola di luce diffusa a 90 gradi, il rilevatore di luce diffusa, la fiala del campione del turbidimetro e come questi componenti chiave lavorano insieme per fornire il risultato di torbidità.
- Page 227 4 Operazione 4.3 Elenco degli elementi di controllo e della loro funzione 4.3.1 Elenco degli elementi di controllo e della loro funzione 12:36 Descrizione Funzione 1 Barra di stato Visualizza le icone e le etichette universali, tra cui Time, Bluetooth , USB, Security, Light Source &...
- Page 228 4 Operazione Icona Descrizione Modalità di misurazione Modalità di calibrazione Modalità di verifica Registri di dati Connessione Bluetooth al turbidimetro di processo PTV (non disponibile per TB 350) Impostazioni dello strumento 4.3.2 Elenco degli elementi di controllo e della loro funzione Icona Descrizione Funzione...
- Page 229 4 Operazione Icona Descrizione Funzione Sorgente di luce Lo strumento contiene una fonte di luce LED rossa - riempita rossa; la luce è accesa per la misurazione. Sorgente di luce Lo strumento contiene una fonte di luce LED rossa - Schema rossa;...
- Page 230 4 Operazione Icona Descrizione Funzione Alimentazione a Indica che rimane il 50% della durata della batteria – Arancione batteria. Alimentazione a Indica che rimane il 25% della durata della batteria - Rosso batteria. Coperchio del Indica che il coperchio del pozzetto di pozzetto di misurazione è...
- Page 231 4 Operazione Icona Descrizione Funzione Tasto di misurazione Avvia o inizia una misurazione. Tasto di misurazione – con Esegue una misurazione Bluetooth mentre è collegato a ®2) un'unità PTV. Bluetooth Tasto di Aggiorna l'elenco delle ® aggiornamento unità PTV disponibili in prossimità...
- Page 232 4 Operazione Descrizione Funzione 1 Barra delle Percorso di navigazione per guidare l'utente attraverso i applicazioni passi del processo. 2 Valore di misurazione Visualizzazione del valore del campione misurato con il tipo di unità. 3 Impostazioni Vengono visualizzate le impostazioni applicate alla misurazione.
- Page 233 4 Operazione 4.4.2 Esecuzione di una misurazione Si prega di preparare le celle campione incluse nella fornitura prima della misurazione. Assicurarsi che le celle campione siano prive di macchie, graffi o imperfezioni. 1. Raccogliere il campione Assicurarsi che il campione sia rappresentativo (ben mescolato). La vetreria deve essere priva di macchie, graffi o altri difetti.
- Page 234 4 Operazione • Non portare alcun oggetto nella camera di misurazione, tranne le cuvette destinate alle misurazioni. • Non portare liquidi nella camera. Attenzione! 4.4.3 Suggerimenti per la misurazione Indicizzazione della cuvetta: questa operazione viene eseguita al meglio con una cuvetta riempita d'acqua filtrata attraverso un filtro da 0,2 µm.
- Page 235 4 Operazione 4.4.4 Impostazioni di misurazione Premere il pulsante Impostazioni per accedere alla modalità Impostazioni di misurazione. Icona Descrizione Opzione Funzione Modalità Singolo Spingere a leggere. Continuo La misurazione si aggiorna ogni X secondi fino all'arresto. Fast Settling Raccomandato per campioni con caratteristiche di sedimentazione rapida.
- Page 236 4 Operazione 4.5 Descrizione delle singole fasi di lavoro o delle singole sezioni dell'interfaccia utente 4.5.1 Panoramica sulla calibrazione 12:36 Calibration Calibration Curve: T-CAL 0-4000 NTU Standard Set: None Descrizione Funzione 1 Barra delle Percorso di navigazione per guidare l'utente attraverso i applicazioni passi del processo.
- Page 237 4 Operazione 4.5.2 Esecuzione di una calibrazione Si prega di preparare gli standard T-CAL inclusi nella fornitura prima della ® calibrazione. Assicurarsi che le fiale T-CAL siano prive di macchie, graffi o ® imperfezioni. • Standard T-CAL per TB 350 IR: 20 / 800 / 4000 NTU ®...
- Page 238 4 Operazione 4.5.3 Impostazioni di calibrazione Premere il pulsante Impostazioni per accedere alla modalità impostazioni. Icona Descrizione Opzione Funzione Curva di T-CAL Seleziona lo standard di formazina ® calibrazione stabilizzata preparato a concentrazioni predefinite Formazina Seleziona lo standard di formazina utente preparato dall'utente a concentrazioni predefinite...
- Page 239 4 Operazione voce di riga per Calibration Checker e mostrerà uno stato "On" o "Enabled". Spendo Durante la procedura di calibrazione, se un singolo standard è fuori tolleranza, l'utente non sarà avvisato che un calibratore è fuori dal range predefinito di Tintometri. La schermata di registro avrà...
- Page 240 4 Operazione 4.6.2 Esecuzione di una verifica 1. Preparare la fiala Oliate la fiala del campione, se necessario. 3. Inserisci standard Inserire il valore standard specificato sullo schermo. 4. Modale Rappresenta il processo attivo. 5. Riassunto del registro Premere il pulsante Salva per salvare il registro. Premere il pulsante Annulla per tornare all'inizio del processo di verifica.
- Page 241 4 Operazione 4.6.3 Impostazioni di verifica Premere il pulsante Impostazioni per entrare nella modalità impostazioni. Icona Descrizione Opzione Funzione Standard T-CAL 5.0 NTU Seleziona lo standard di formazina stabilizzata preparato alla concentrazione di 5,0 NTU. Preparato Seleziona lo standard preparato dall'utente dall'utente tra 1 e 1000 NTU.
- Page 242 4 Operazione 4.7 Registro 4.7.1 Selezione di un tipo di registro Premi il pulsante Tipo di registro nell'Area di azione per accedere ai registri. Barra di applicazione: Registri delle misurazioni: Visualizza tutte le misurazioni registrate. Registri di calibrazione: Visualizza tutte le registrazioni di calibrazione.
- Page 243 4 Operazione non TB 350 4.8 Impostazioni dello strumento Premere il pulsante Impostazioni per accedere alla modalità Impostazioni. Icona Descrizione Opzione Funzione Sicurezza Attivare Impostare, verificare e cambiare la password. Disabilita Impostazione predefinita. Impostazioni Luminosità dello schermo Regolare la luminosità di potenza dello schermo.
- Page 244 4 Operazione Scorciatoie Attivare Se abilitato, quando un dispositivo di archiviazione USB è collegato, l'utente viene presentato con un modale che presenta un'opzione per le impostazioni di "trasferimento dei log" o "backup/ripristino". Selezionando un'opzione, l'utente viene indirizzato alla funzione appropriata. Disabilita Impostazione predefinita;...
- Page 245 4 Operazione Unità Selezionare l'unità visualizzata. Definisce il tipo di unità del valore mg.l Kaolin di misurazione mg.l PSL visualizzato. NTU è l'impostazione Gradi predefinita. mNTU mFNU Personalizzato Permettere un tipo di unità definito dall'utente e la possibilità di impostare un fattore basato sui valori NTU/ FNU.
- Page 246 5 Manutenzione 5 Manutenzione 5.1 Ricomincia il programma di manutenzione Compito. Fare Non fare 1. Camera di misura 1. Assicurarsi che la camera di 1. Spruzzare pulita misurazione sia pulita e asciutta o versare prima della misurazione. Usare un qualsiasi liquido 2.
- Page 247 5 Manutenzione Compito. Fare Non fare Verifica Verificare le prestazioni dello Utilizzare standard strumento nelle seguenti condizioni: scaduti. 1. Dopo aver eseguito una calibrazione. 2. Secondo le procedure interne di controllo della qualità. 3. Come richiesto dalle autorità regionali di regolamentazione. Seguire attentamente le istruzioni ...
- Page 248 6 Risoluzione dei problemi 6 Risoluzione dei problemi 6.1 Messaggi di errore e cosa fare Sintomo Possibile causa Soluzione Sopra la gamma La torbidità del campione è • Diluire il campione oltre il campo di misura dello • Verificare la calibrazione strumento.
- Page 249 6 Risoluzione dei problemi Sintomo Possibile causa Soluzione Errore di calibrazione Gli standard di calibrazione Ripetere la calibrazione con sono stati eseguiti nell'ordine gli standard dal valore più sbagliato basso a quello più alto. Errore di calibrazione Gli standard di calibrazione Miscelare gli standard come non erano adeguatamente indicato immediatamente...
- Page 250 7 Accessori e parti di ricambio 7 Accessori e parti di ricambio 7.1 Elenco degli accessori Titolo N. ordine Alimentatore TB series TB350 IR, TB350 19820-170 Batterie (AA), set da 4 TB350 IR, TB350 1950025 Cavo USB-C 1 m, da USB-C a A TB350 IR, TB350 19820-081 Cuvette di misura con coperchio nero,...
- Page 251 8.1 Specifiche Model Model WM-040-1004 (IR) Model WM-040-1001 (WL) Sorgente LED infrarossi (860 nm) luminosa LED bianco Conformità ISO 7027 normativa EPA pending Principio di Nefelometrica (Multipath 90° BLAC) misura Campo di misura 0,01 - 4000 NTU (FNU) Precisione del Autoranging: 0.01-9.99: 0.01 NTU ;...
- Page 252 Modalità di Sì risparmio energetico Auto – OFF Selezionabile Requisito per AC 100 - 240 V, 50/60 Hz (TB 600 serie: alimentazione Laserdiode) per adattatore di alimentazione USB; elettrica 4 AA batterie alcaline ricaricabili NiMH (per l'uso con USB/modulo di alimentazione) Ricarica nello strumento non con tutti i tipi di TB Condizioni Temperatura: 0 - 50 °C (32 - 122 °F)
- Page 253 Lingue del • Cinese manuale • Francese operativo • Inglese • Italiano • Olandese • Portoghese • Russo • Spagnolo • Tedesco • Turco Dimensioni 155 x 83 x 225 mm Peso 804 g (898 g con quattro batterie alcaline AA) Peso con (898 g with four AA alkaline batteries) imballaggio...
- Page 254 Tipo WR9QA2500USB52NMR6B Dimensioni [mm] 31,5 x 41 x 71 (senza adattatore primario) Peso, con adattatore EU 48 g (senza lame dell'adattatore primario) Approvazione, EMC CE, FCC Metri di altitudine consentita 5000 m Livello di inquinamento Con riserva di modifiche tecniche! Per garantire la massima precisione dei risultati dei test, utilizzare sempre i sistemi di reagenti forniti dal produttore dello strumento.
- Page 255 ® commerciali del gruppo Tintometer ® Il marchio Bluetooth , il marchio di figure e il marchio combinato sono marchi di ® proprietà di Bluetooth SIG e qualsiasi uso da parte del Gruppo Tintometer è sotto ® licenza. IT TB 350...
- Page 256 Inhoudsopgave Inhoudsopgave Zijde 1 Inleiding 1.1 Algemene informatie 1.1.1 Belangrijke opmerking 1.1.2 Doel van het product 1.1.3 Beoogd gebruik 1.1.4 Eisen voor veilig gebruik 1.1.5 Instructies bewaren 1.1.6 Kwalificatie van de gebruiker 1.1.7 Hantering van gevaarlijke chemicaliën 1.1.8 Instructies voor afvoer 1.2 Lijst van alle in het document gebruikte symbolen 1.3 Afkortingen 2 Product overzicht...
- Page 257 Inhoudsopgave Zijde 4.7 Logboeken 4.7.1 Het selecteren van een log type 4.7.2 Een logboek ophalen 4.8 Instrument Instellingen 5 Onderhoud 5.1 Aanbevolen onderhoudsschema 6 Probleemoplossing 6.1 Foutmeldingen en wat te doen 7 Accessoires en vervangingsonderdelen 7.1 Lijst van accessoires 7.2 Lijst van accessoires 8.1 Specificaties 8.2 Specificaties - Netadapter 9 Aanhangsel...
- Page 258 1 Inleiding 1 Inleiding 1.1 Algemene informatie 1.1.1 Belangrijke opmerking Deze handleiding bevat belangrijke informatie over de veilige bediening van het product. Lees deze handleiding zorgvuldig door en maak u vertrouwd met het product voordat u het gebruikt. 1.1.2 Doel van het product De draagbare troebelheidsmeter van de TB-serie is ontworpen voor de analyse van waterige monsters die in glazen cuvetten worden verzameld die vervolgens worden afgesloten.
- Page 259 1 Inleiding Het product mag niet gebruikt worden indien: • het zichtbaar beschadigd is (b.v. na transport) • het gedurende lange tijd onder ongunstige omstandigheden opgeslagen is geweest (opslagcondities, zie hoofdstuk "Specificaties") Voorwaarden voor een veilig gebruik van de stekkervoeding Neem de volgende punten in acht voor een veilig gebruik: •...
- Page 260 1 Inleiding Het is illegaal om batterijen bij het huishoudelijk afval te gooien. Binnen de Europese Unie worden de batterijen aan het einde van de levensduur van het apparaat naar een gespecialiseerd inzamelpunt voor recycling gebracht. Instrumenten die met dit symbool zijn gemarkeerd, mogen niet bij het normale huisvuil worden weggegooid.
- Page 261 FCC- limieten voor radiofrequentie-emissie. Let op! Modificaties Wijzigingen aan dit apparaat die niet door Tintometer zijn goedgekeurd, kunnen de door de FCC aan de gebruiker verleende toestemming voor het bedienen van dit apparaat ongeldig maken. Let op!
- Page 262 2 Product overzicht DOC klasse A kennisgeving - Avis DOC, klasse A Dit Klasse A digitale apparaat voldoet aan alle eisen van de Canadese voorschriften voor interferentie veroorzakende apparatuur. 2.2 Kenmerken Laboratoriumnauwkeurigheid ontmoet draagbaarheid De Lovibond TB-serie maakt een einde aan de complexiteit van troebelheidsmetingen. ®...
- Page 263 2 Product overzicht 2.4 Aanzicht instrument Positie Omschrijving Functie 1. Deksel Indien geopend kan de gebruiker het testcuvet voor een meting in het apparaat plaatsen. 2. Aan/uit-toets Schakelt het apparaat aan en uit. 3. Touchscreen Geeft het bedienmenu van het apparaat aan.
- Page 264 3 In bedrijf name 3 In bedrijf name 3.1 Gebruiksomgeving Het instrument kan worden gebruikt in elke binnen- of buitenomgeving die veilig wordt geacht voor een operator om de analyse uit te voeren. Het instrument is geschikt voor waterige monsters van 0 tot 70 °C. Het instrument moet bij het uitvoeren van een meting ±...
- Page 265 3 In bedrijf name 3.3 Plaatsen en vervangen van batterijen Bij gebruik van batterijen Stap Beschrijving Gebruik een schroevendraaier om de vier schroeven aan de achterkant van het instrument los te draaien en het paneel te verwijderen. Plaats vier AA-batterijen in de juiste richting. Bevestig het paneel weer op het instrument.
- Page 266 3 In bedrijf name Bij gebruik van oplaadbare batterijen Stap Beschrijving Gebruik een schroevendraaier om de vier schroeven aan de achterkant van het instrument te verwijderen, verwijder de afdekking en het batterijvak. Plaats de oplaadbare batterij in de juiste richting. Bevestig de afdekking weer op het instrument.
- Page 267 4 Bediening 4 Bediening 4.1 Eerste opstart 1. Welkomstscherm Beginscherm dat de gebruiker ziet bij de eerste keer inschakelen. Druk op > toets 2. Selecteer Taal Selecteer de gewenste taal om in te stellen. Druk op > toets 3. Datum en tijd instellen Kies tussen 12- en 24-uurs formaat.
- Page 268 4 Bediening 4.2 Algemene werkingsprincipes De ontwerpen van de TB Series Draagbare Turbidimeters worden opgesplitst in hun respectieve functionele componenten die in detail worden besproken. Deze omvatten de lichtbron, de 90-graden strooilichtval, de strooilichtdetector, de monsterfles van de turbidimeter en hoe deze hoofdcomponenten samenwerken om het troebelingsresultaat te leveren.
- Page 269 4 Bediening 4.3 Lijst van bedieningsorganen en hun functie 4.3.1 Lijst van bedieningsorganen en hun functie 12:36 Beschrijving Functie 1 Statusbalk Geeft de pictogrammen en labels weer die universeel zijn, waaronder Tijd, Bluetooth , USB, Beveiliging, Lichtbron & ® Stroom. 2 Actiegebied Gebied dat toepassingsstappen en interactie weergeeft.
- Page 270 4 Bediening Icoon Beschrijving Meetmodus Kalibratiemodus Verificatie mode Gegevens logboeken Bluetooth-verbinding met PTV-procesturbidimeter (niet beschikbaar voor TB 350) Instrument instellingen 4.3.2 Lijst van bedieningsorganen en hun functie Icoon Beschrijving Functie Naam van de Titel van de app die de gebruiker op dat moment toepassing gebruikt.
- Page 271 4 Bediening Icoon Beschrijving Functie Rode Lichtbron - Het instrument bevat een rode LED-lichtbron; het gevuld licht wordt ingeschakeld voor de meting. Rode lichtbron - Instrument bevat een rode LED lichtbron; er is contouren geen meting actief. Witte lichtbron - Het instrument bevat een witte LED-lichtbron;...
- Page 272 4 Bediening Icoon Beschrijving Functie Batterijvoeding - Geeft aan dat de batterij nog voor 50% mee gaat. Oranje Batterijvoeding - Geeft aan dat de batterij nog voor 25% mee gaat. Rood Meetkamer deksel Geeft aan of het deksel van de meetkamer open open Deksel meetkamer Geeft aan of het deksel van de meetkamer...
- Page 273 4 Bediening Icoon Beschrijving Functie Meting Knop Start of Begint een meting. Meetknop - met Neemt een meting op Bluetooth terwijl aangesloten op een ®2) PTV-unit. Bluetooth Vernieuwt de lijst van ® Vernieuwingsknop beschikbare PTV- eenheden in de nabijheid van het instrument. Annuleer knop Geeft de optie om de huidige activiteit in...
- Page 274 4 Bediening Beschrijving Functie 1 Toepassingsbalk Navigatiepad om de gebruiker door de processtappen te helpen. 2 Gemeten waarde Weergave van het meetresultaat met eenheid. 3 Instellingen De op de meting toegepaste instellingen worden weergegeven. 4 Log-toets Creëert een logboek wanneer erop gedrukt wordt. 5 Meet-toets Start een meting wanneer ingedrukt.
- Page 275 4 Bediening 4.4.2 Een meting uitvoeren Bereid de meetcuvetten die bij de levering inbegrepen zijn voor op de meting. Zorg ervoor dat de meetcuvetten vrij zijn van vlekken, krassen of oneffenheden. 1. Verzamel het monster Zorg ervoor dat het monster representatief is (goed gemengd). Het glaswerk moet vrij zijn van vlekken, krassen of andere oneffenheden.
- Page 276 4 Bediening • Breng geen voorwerpen in de meetkamer, behalve de voor de metingen bestemde cuvetten. • Breng geen vloeistoffen in de kamer. Waarschuwing! 4.4.3 Tips voor metingen Indexeren van de spoelbakje: Dit kan het best worden uitgevoerd met een spoelbakje dat gevuld is met water dat door een 0,2 µm filter is gefilterd.
- Page 277 4 Bediening 4.4.4 Meting Instellingen Druk op de Instellingen knop om naar de Meetinstellingen modus te gaan. Icoon Beschrijving Optie Functie Modus Single Druk om een test te starten. Continu De meting wordt elke X seconden bijgewerkt tot ze wordt gestopt. Snel Aanbevolen voor monsters met snelle uitzakkend...
- Page 278 4 Bediening 4.5 Kalibratie 4.5.1 Uitlezing van de kalibratie 12:36 Calibration Calibration Curve: T-CAL 0-4000 NTU Standard Set: None Beschrijving Functie 1 Toepassingsbalk Navigatiepad om de gebruiker door de processtappen te helpen. 2 Kalibratiecurve Specificeert type kalibratie. 3 Ingestelde standaard Weergave van de te gebruiken standaardset 4 Instellingen-toets Wordt gebruikt om instellingen te wijzigen.
- Page 279 4 Bediening 4.5.2 Een kalibratie uitvoeren Bereid de bijgeleverde T-CAL standaarden voor voordat u gaat kalibreren. Zorg ® ervoor dat de T-CAL flesjes vrij zijn van vlekken, krassen of verontreiniging. ® • T-CAL standaarden voor TB 350 IR: 20 / 800 / 4000 NTU ®...
- Page 280 4 Bediening 4.5.3 Kalibratie-instellingen Druk op de knop Settings om de instellingenmodus te openen. Icoon Beschrijving Optie Functie Kalibratiecurve T-CAL Selecteert geprepareerde gestabiliseerde ® formazine standaard op voorgedefinieerde concentraties Gebruiker selecteert door de gebruiker bereide Formazine formazine-standaard met vooraf gedefinieerde concentraties Ingestelde Standaard Wordt gebruikt als geen unieke standaard...
- Page 281 Tijdens de kalibratieprocedure, als een individuele standaard buiten tolerantie is, wordt de gebruiker niet gewaarschuwd dat een kalibrator buiten het voorgedefinieerde bereik van de Tintometer is. Het logboekscherm heeft een regel voor Kalibratiecontrole en toont een "Uit" of "Uitgeschakeld" status.
- Page 282 4 Bediening 4.6.2 Een verificatie uitvoeren 1. Spoelbakje voorbereiden: Olie het monsterflesje indien nodig. 3. Standaard invoegen Voegt de standaardwaarde in die op het scherm is gespecificeerd. 4.Modaal: Vertegenwoordigt actief proces. 5. Log Samenvatting Druk op de Bewaar knop om het logboek op te slaan. Druk op Annuleren om terug te keren naar het begin van het verificatieproces.
- Page 283 4 Bediening 4.6.3 Verificatie-instellingen Druk op de knop Settings om de instellingenmodus te openen. Icoon Beschrijving Optie Functie Standaard T-CAL 5.0 NTU Selecteert geprepareerde gestabiliseerde formazin-standaard op 5,0 NTU concentratie. Gebruiker Selecteert door de gebruiker voorbereid ingestelde standaard tussen 1 en 1000 NTU.
- Page 284 4 Bediening 4.7 Logboeken 4.7.1 Het selecteren van een log type Druk op de Log Type knop in het Actie Gebied om de Logs te openen. Toepassingsbalk: Meetlogboeken: Geeft alle geregistreerde metingen weer. Kalibratielogs: Geeft alle kalibratierecords weer. Verificatielogs: Geeft alle verificatierecords weer.
- Page 285 4 Bediening niet TB 350 4.8 Instrument Instellingen Druk op de Instellingen knop om naar de Instellingen modus te gaan. Pictogram Beschrijving Optie Functie Veiligheid Inschakelen Wachtwoord instellen, verifiëren en wijzigen. Uitschakelen Standaard instelling. Stroom- Scherm helderheid Pas de helderheid van instellingen het scherm aan.
- Page 286 4 Bediening USB-snel- Inschakelen Indien ingeschakeld, koppelingen krijgt de gebruiker, wanneer een USB- opslagapparaat is aangesloten, een modal te zien met een optie voor "logs overbrengen" of "backup/herstel" instellingen. Door een optie te selecteren, wordt de gebruiker naar de juiste functie geleid.
- Page 287 4 Bediening Eenheid Kies de weergegeven eenheid. Bepaalt het eenheidstype van mg/L Kaolien de weergegeven mg/L PSL meetwaarde. NTU is de Graden standaardinstelling. mNTU mFNU Aangepast Door de gebruiker te definiëren eenheidstype en mogelijkheid om een factor in te stellen op basis van NTU/FNU- waarden.
- Page 288 5 Onderhoud 5 Onderhoud 5.1 Aanbevolen onderhoudsschema Taak Doen Niet doen 1. Reinig de 1. Zorg ervoor dat de meetkamer 1. Een vloeistof meetkamer vóór de meting schoon rechtstreeks in en droog is. Gebruik een de meetkamer 2. Reinig het display droge microvezeldoek om spuiten of gieten.
- Page 289 5 Onderhoud Taak Doen Niet doen Verificatie Controleer de werking van het Het gebruiken instrument onder de volgende van verlopen omstandigheden: standaarden. 1. Na het uitvoeren van een kalibratie. 2. Volgens interne kwaliteitscontroleprocedures. 3. Zoals voorgeschreven door regionale regelgevende instanties. Volg de aanwijzingen voor de ...
- Page 290 6 Probleemoplossing 6 Probleemoplossing 6.1 Foutmeldingen en wat te doen Mogelijke Symptoom oorzaak Oplossing Overrange De troebelheid • Verdun het monster van het monster • Verifieer de ijking met een standaard ligt buiten het met een hoog bereik. meetbereik van het instrument.
- Page 291 6 Probleemoplossing Mogelijke Symptoom oorzaak Oplossing Kalibratie fout De kalibratie- Herhaal de kalibratie met de standaarden standaarden van de laagste naar de werden in de hoogste waarde. verkeerde volgorde gebruikt. Kalibratie fout De kalibratie- Meng de standaarden volgens de standaarden instructies onmiddellijk vóór het waren niet uitvoeren van de ijking.
- Page 292 7 Accessoires en vervangingsonderdelen 7 Accessoires en vervangingsonderdelen 7.1 Lijst van accessoires Omschrijving Bestelnr. Batterijen (AA), set van 4 TB350 IR, TB350 1950025 Borstel, 11 cm lang TB350 IR, TB350 380230 Cuvethouder voor 6 ronde cuvetten ø 24 mm TB350 IR, TB350 418951 Meetcuvetten met zwart deksel, hoogte 55 TB350 IR, TB350...
- Page 293 8.1 Specificaties Model Model WM-040-1004 (IR) Model WM-040-1001 (WL) Lichtbron Infrarot LED (860 nm) Witte LED Overeenkomstig ISO 7027 norm EPA pending Meetbeginsel Nefelometrisch (Multipath 90° BLAC®) Meetbereik 0,01 - 4000 NTU (FNU) Resolutie Autoranging: 0.01-9.99: 0.01 NTU ; 10.0-99.9: 0.1 meetwaarde NTU ;...
- Page 294 Bedrijfsomstandigheden Temperatuur: 0 - 50 °C (32 - 122 °F) Vochtigheid: 0 - 90 % bij 30 °C, niet- condenserend Vochtigheid: 0 - 80 % bij 40 °C (104 °F), niet- condenserend Vochtigheid: 0 - 70 % bij 60 °C, niet- condenserend Beschermingsklasse IP 67 (Instrument)
- Page 295 Talen • Chinees gebruiksaanwijzing • Duits • Engels • Frans • Italiaans • Nederlands • Portugees • Russisch • Spaans • Turks Afmetingen 155 x 83 x 225 mm Gewicht 804 g (898 g met vier AA alkaline batterijen) Gewicht met (898 g with four AA alkaline batteries) verpakking Technische wijzigingen voorbehouden!
- Page 296 Type WR9QA2500USB52NMR6B Gewicht, met EU adapter 48 g (zonder primaire adapter bladen) Goedkeuring, EMC CE, FCC Toegestane hoogte meters 5000 m Vervuilingsniveau Technische wijzigingen voorbehouden! Om een maximale nauwkeurigheid van de testresultaten te garanderen, moet u altijd de door de fabrikant van het instrument geleverde reagenssystemen gebruiken.
- Page 297 Tintometer ® ® worden beschouwd als handelsmerken van de Tintometer -groep. ® Het Bluetooth -merk, het beeldmerk en het combinatiemerk zijn handelsmerken van ® Bluetooth SIG en elk gebruik door de Tintometer -groep vindt plaats onder licentie. ® NL TB 350...
- Page 298 İçindekiler İçindekiler Sayfa 1 Giriş 1.1 Genel bilgi 1.1.1 Kullanmadan önce talimatları okuyun 1.1.2 Ürünün Amacı 1.1.3 Yetkili kullanım 1.1.4 Güvenli kullanım için gereklilikler 1.1.5 Talimatları saklayın 1.1.6 Kullanıcı yeterliliği 1.1.7 Tehlikeli kimyasalların kullanımı 1.1.8 İmha Etme 1.2 Belgede kullanılan tüm karakterlerin listesi 1.3 Kısaltmalar 2 Ürüne Genel Bakış...
- Page 299 İçindekiler Sayfa 4.7 Kayıtlar 4.7.1 Günlük Türü Seçme 4.7.2 Günlük Alma 4.8 Enstrüman Ayarları 5 Bakım 5.1 Yeniden başlatılan bakım programı 6 Sorun giderme 6.1 Hata mesajları ve yapılması gerekenler 7 Aksesuarlar ve Yedek parçalar 7.1 Aksesuar Listesi 7.2 Aksesuar listesi 8.1 Şartname 8.2 Şartname - Şebeke adaptörü...
- Page 300 1 Giriş 1 Giriş 1.1 Genel bilgi 1.1.1 Kullanmadan önce talimatları okuyun Bu kılavuz, ürünün güvenli kullanımı hakkında önemli bilgiler sağlar. Lütfen bu kılavuzu dikkatlice okuyun ve kullanmadan önce ürüne alışın. 1.1.2 Ürünün Amacı TB serisi portatif türbidimetre, cam küvetlerde toplanan ve ardından kapatılan sulu numuneleri analiz etmek için tasarlanmıştır.
- Page 301 1 Giriş Geçmeli güç kaynağı ünitesinin güvenli kullanımı için ön koşullar Güvenli kullanım için aşağıdaki noktalara dikkat edin: • Kullanmadan önce görünür hasar olup olmadığını kontrol edin. Hasar görmüşse çalıştırmayın. • Sadece kuru odalarda kullanın. • Sadece kuru ellerle tutun. •...
- Page 302 1 Giriş 1.2 Belgede kullanılan tüm karakterlerin listesi Bu kılavuzda, özel dikkat gerektiren bölümleri tanımlamak için aşağıdaki semboller kullanılır: Önlenmezse ölüme veya ciddi yaralanmaya yol açan bir tehlike vardır! Tehlike! Bazı reaktiflerin yanlış kullanımı sağlığınıza zarar verebilir. Her durumda, ambalaj üzerindeki güvenlik etiketleri, paket broşüründeki güvenlik talimatları...
- Page 303 FCC radyo frekansı emisyon limitlerine uygunluğu sağlamak için sistem ve çevre birimleri arasındaki bağlantılar blendajlı kablolar kullanılarak yapılmalıdır. Dikkat! Değişiklikler Bu cihazda Tintometer tarafından onaylanmayan herhangi bir değişiklik, FCC tarafından kullanıcıya bu ekipmanı çalıştırması için verilen yetkiyi geçersiz kılabilir. Dikkat! TR TB 350...
- Page 304 2 Ürüne Genel Bakış DOC Sınıf A Bildirimi - Avis DOC, Sınıf A Bu A Sınıfı dijital cihaz, Kanada Girişime Neden Olan Ekipman Düzenlemelerinin tüm gereksinimlerini karşılar. 2.2 Özellikleri Laboratuvar doğruluğu taşınabilirlikle buluşuyor Lovibond TB Serisi, bulanıklık ölçümündeki karmaşıklıkları ortadan kaldırır. Bu yeni ®...
- Page 305 2 Ürüne Genel Bakış 2.4 Enstrüman görünümü Durum Açıklama Fonksiyon 1. Kapak Kaldırıldığında, kullanıcının bir okuma için numune hücresini cihaza yerleştirmesine olanak tanır. 2. Güç düğmesi Aleti AÇAR ve KAPATIR. 3. Dokunmatik Cihazın kullanıcı arayüzünü görüntüler. ekran 4 4. Model Enstrüman sürümünü...
- Page 306 3 Devreye alma 3 Devreye alma 3.1 Çalışma ortamı Cihaz, bir operatörün analizi gerçekleştirmesi için güvenli kabul edilen herhangi bir iç veya dış ortamda kullanılabilir. Cihaz, 0 ila 70 °C arasında sulu numuneleri kabul edebilir. Bir ölçüm gerçekleştirirken cihaz, ± 15° düzeyde olmalıdır. En iyi ölçüm performansını...
- Page 307 3 Devreye alma 3.3 Pilleri Takma ve Değiştirme Pilleri kullanırken Adım Tanım Cihazın arkasındaki dört vidayı çıkarmak için bir tornavida kullanın ve paneli çıkarın. Dört adet AA pili doğru yönde yerleştirin. Paneli tekrar cihaza takın. • Yalnızca onaylı türü kullanın: 1,5 V voltajlı alkalin manganez pil, LR6.
- Page 308 3 Devreye alma Şarj edilebilir piller kullanırken Adım Tanım Cihazın arkasındaki dört vidayı çıkarmak için bir tornavida kullanın, paneli ve pil tepsisini çıkarın. Şarj edilebilir pil takımını doğru yönde yerleştirin. Paneli tekrar cihaza takın. TR TB 350...
- Page 309 4 Operasyon 4 Operasyon 4.1 İlk devreye alma 1. Karşılama ekranı Kullanıcının ilk açılışta gördüğü ilk ekran. > düğmesine basın 2. Dil Seçin Ayarlamak istediğiniz dili seçin. > düğmesine basın 3. Tarih ve Saati Ayarla 12 ve 24 saatlik format arasında seçim yapın. Yukarı...
- Page 310 4 Operasyon 4.2 Genel çalışma prensipleri TB Serisi Taşınabilir Türbidimetrelerin tasarımları, detaylı olarak tartışılan ilgili fonksiyonel bileşenlerine ayrılmıştır. Bunlar arasında ışık kaynağı, 90 derecelik saçılan ışık kapanı, saçılan ışık detektörü, türbidimetre numune şişesi ve bu önemli bileşenlerin bulanıklık sonucunu sağlamak için birlikte nasıl çalıştığı yer alır. ...
- Page 311 4 Operasyon 4.3 Kontrol elemanlarının listesi ve işlevleri 4.3.1 Kontrol elemanlarının listesi ve işlevleri 12:36 Tanım İşlev 1 Durum Zaman, Bluetooth , USB, Güvenlik, Işık Kaynağı ve Güç dahil ® çubuğu evrensel olan simgeleri ve etiketleri görüntüler. 2 Eylem Alanı Uygulama adımlarını...
- Page 312 4 Operasyon Simge Tanım Ölçüm Modu Kalibrasyon Modu Doğrulama Modu Veri Günlükleri PTV proses türbidimetresine Bluetooth bağlantısı (TB 350 için mevcut değildir) Enstrüman ayarları 4.3.2 Kontrol elemanlarının listesi ve işlevleri Simge Açıklama İşlev Uygulama Adı Kullanıcının şu anda kullanmakta olduğu uygulamanın başlığı.
- Page 313 4 Operasyon Simge Açıklama İşlev Kırmızı Işık Kaynağı Cihaz, kırmızı bir LED ışık kaynağı içerir; ölçüm – Dolu için ışık yanar. Kırmızı Işık Kaynağı Cihaz, kırmızı bir LED ışık kaynağı içerir; hiçbir - Anahat ölçüm etkin değil. Beyaz Işık Kaynağı – Cihaz beyaz bir LED ışık kaynağı...
- Page 314 4 Operasyon Simge Açıklama İşlev Pil Gücü – Turuncu Pil ömrünün %50'sinin kaldığını gösterir. Pil Gücü - Kırmızı Pil ömrünün %25'sinin kaldığını gösterir. Ölçüm milinin kapağı Ölçüm şaftının kapağının açık olup olmadığını açık gösterir. Ölçüm milinin kapağı Ölçüm mili kapağının kapalı olup olmadığını kapalı...
- Page 315 4 Operasyon Simge Açıklama İşlev Ölçüm Düğmesi Bir ölçümü başlatır veya başlatır veya başlatır. Ölçüm Düğmesi – Bir PTV ünitesine Bluetooth bağlıyken ölçüm yapar. ®2) Bluetooth Yenileme Enstrümanın yakınındaki ® Düğmesi mevcut PTV birimlerinin listesini yeniler. İptal Düğmesi Aktif alandaki mevcut aktiviteyi iptal etme seçeneği sunar.
- Page 316 4 Operasyon Tanım İşlev 1 Uygulama Çubuğu Kullanıcıya işlem adımlarında yardımcı olacak gezinme yolu. 2 Ölçüm değeri Birim ile ölçüm sonucunun görüntülenmesi. 3 Ayarları Ölçüme uygulanan ayarlar görüntülenir. 4 Günlük Düğmesi Basıldığında bir Günlük oluşturur. 5 Ölçüm Düğmesi Basıldığında bir ölçüm başlatır. 6 Ayarlar Düğmesi Ayarları...
- Page 317 4 Operasyon 4.4.2 Ölçüm Yapma Lütfen teslimat kapsamındaki numune hücrelerini ölçümden önce hazırlayın. Numune hücrelerinde leke, çizik veya leke olmadığından emin olun. 1. Örnek Topla Numunenin temsili olduğundan emin olun (iyice karıştırılmış). Züccaciye leke, çizik veya diğer kusurlardan arındırılmış olmalıdır. Numune toplamadan önce toplama kabını...
- Page 318 4 Operasyon • Ölçümler için tasarlanan küvetler dışında, ölçüm şaftına herhangi bir nesne koymayın. • Milin içine herhangi bir sıvı koymayın. Uyarı! 4.4.3 Ölçüm İpuçları Şişenin indekslenmesi: Bu, en iyi şekilde 0,2 µm'lik bir filtreden filtrelenmiş suyla doldurulmuş bir şişeyle gerçekleştirilir. •...
- Page 319 4 Operasyon 4.4.4 Ölçüm Ayarları Ölçüm Ayarları Moduna erişmek için Ayarlar Düğmesine basın. Simge Tanım Option İşlev Bir ölçümü başlatmak için basın. Sürekli Ölçüm, durdurulana kadar her X saniyede bir güncellenir. Hızlı Hızlı çökelme özelliğine sahip numuneler Yerleşim için önerilir. Konum Varsayılan Özel Kimlik ayarlanmazsa kullanılır.
- Page 320 4 Operasyon 4.5 Kalibrasyon 4.5.1 Kalibrasyona Genel Bakış 12:36 Calibration Calibration Curve: T-CAL 0-4000 NTU Standard Set: None Tanım İşlev 1 Uygulama Çubuğu Kullanıcıya işlem adımlarında yardımcı olacak gezinme yolu. 2 Kalibrasyon eğrisi Kalibrasyon türünü belirtir. 3 Standard Set Standart setin benzersiz tanımlayıcısı. 4 Ayarlar Düğmesi Ayarları...
- Page 321 4 Operasyon 4.5.2 Kalibrasyon Gerçekleştirme Lütfen kalibrasyondan önce teslimat kapsamındaki T-CAL standartlarını hazırlayın. ® T-CAL flakonlarının leke, çizik veya kusur içermediğinden emin olun. ® • TB 350 IR için T-CAL standartları: 20 / 800 / 4000 NTU ® • TB 350 WL için T-CAL standartları: 20 / 800 / 2000 / 4000 NTU ®...
- Page 322 4 Operasyon 4.5.3 Kalibrasyon Ayarları Ayarlar moduna erişmek için Ayarlar Düğmesine basın. Simge Tanım Seçenek İşlev Kal. Eğrisi T-CAL Önceden tanımlanmış konsantrasyonlarda ® hazırlanmış stabilize formazin standardını seçer Kullanıcı Önceden tanımlanmış konsantrasyonlarda Formazin kullanıcı tarafından hazırlanan formazin standardını seçer Standart Set Varsayılan Benzersiz tanımlayıcı...
- Page 323 4 Operasyon öğesi olacak ve "Açık" veya "Etkin" durumu gösterecek. kapalı Kalibrasyon prosedürü sırasında, bireysel bir standart tolerans dışındaysa, kullanıcıya bir kalibratörün Tintometers tarafından önceden tanımlanmış aralığın dışında olduğu bildirilmez. Günlük ekranında Kalibrasyon Denetleyicisi için bir satır öğesi olacak ve "Kapalı" veya "Devre Dışı"...
- Page 324 4 Operasyon 4.6.2 Doğrulama Gerçekleştirme 1. Flakon hazırlayın Gerekirse yağ numunesi şişesi. 3. Standart Ekle Ekranda belirtilen standart değeri girin. 4.Modal: Aktif süreci temsil eder. 5. Günlük Özeti Günlüğü kaydetmek için Kaydet düğmesine basın. Doğrulama işleminin başına dönmek için İptal Düğmesine basın. TR TB 350...
- Page 325 4 Operasyon 4.6.3 Doğrulama Ayarları Ayarlar moduna erişmek için Ayarlar Düğmesine basın. Simge Tanım Seçenek İşlev Standart T-CAL 5.0 NTU 5.0 NTU konsantrasyonunda hazırlanmış stabilize formazin standardını seçer. Kullanıcının 1 ile 1000 NTU arasında kullanıcı Hazırladığı tarafından hazırlanmış standardı seçer. Pass/ ±10% Bir doğrulamanın geçip...
- Page 326 4 Operasyon 4.7 Kayıtlar 4.7.1 Günlük Türü Seçme Günlüklere erişmek için Eylem Alanındaki Günlük Türü Düğmesine basın. Uygulama çubuğu: Ölçüm Kayıtları: Kaydedilen tüm ölçümleri görüntüler. Kalibrasyon Günlükleri: Tüm kalibrasyon kayıtlarını görüntüler. Doğrulama Günlükleri: Tüm doğrulama kayıtlarını görüntüler. ILU Modu Günlükleri: Etkinleştirilen veya devre dışı...
- Page 327 4 Operasyon TB 350 değil 4.8 Enstrüman Ayarları Ayarlar Moduna erişmek için Ayarlar Düğmesine basın. Simge Tanım Seçenek İşlev Güvenlik Etkinleştirme Parolayı ayarlayın, doğrulayın ve değiştirin. devre dışı bırakmak Varsayılan ayarlar. Güç ayarları Ekran parlaklığı Ekranın parlaklığını ayarlayın. Arka ışığı kapat kapalı...
- Page 328 4 Operasyon Etkinleştirme Etkinleştirilirse, bir Kısayolları USB depolama aygıtı bağlandığında, kullanıcıya "günlükleri aktarma" veya "yedekleme/geri yükleme" ayarları için bir seçenek sunan bir modal sunulur. Bir seçenek seçilerek kullanıcı uygun fonksiyona yönlendirilir. devre dışı bırakmak Varsayılan ayarlar; kullanıcılar, USB depolama aygıtı bağlandığında “Günlükler”...
- Page 329 4 Operasyon Birim Tipi Görüntülenen birimi seçin. Görüntülenen ölçüm değerinin birim tipini mg/L Kaolin tanımlar. mg/L PSL NTU Varsayılan ayardır. derece mNTU mFNU Özel Kullanıcı tanımlı birim tipine ve NTU/FNU değerlerine dayalı bir faktör ayarlama yeteneğine izin verin. Etkinleştirmek İyi Laboratuvar Uygulamalarını takip eden laboratuvarlar için veri bütünlüğü...
- Page 330 5 Bakım 5 Bakım 5.1 Yeniden başlatılan bakım programı Görev Yapmak Yapma 1. Temiz ölçüm 1. Ölçümden önce ölçüm odasının 1. Herhangi bir odası temiz ve kuru olduğundan emin sıvıyı doğrudan olun. Kirleri temizlemek için kuru ölçüm odasına 2. Temiz gösterge bir mikrofiber bez kullanın.
- Page 331 5 Bakım Görev Yapmak Yapma Doğrulama Cihaz performansını aşağıdaki Süresi dolmuş koşullar altında doğrulayın: standartları kullanın. 1. Kalibrasyon yaptıktan sonra. 2. Dahili kalite kontrol prosedürlerine göre. 3. Bölgesel düzenleyici makamların gerektirdiği şekilde. Standartların hazırlanması ve kullanımı için talimatları dikkatlice izleyin.
- Page 332 6 Sorun giderme 6 Sorun giderme 6.1 Hata mesajları ve yapılması gerekenler Belirti Muhtemel neden Çözüm Aralığında Numunenin bulanıklığı, • Numuneyi seyreltin cihazın ölçüm aralığının • Yüksek aralıklı bir standart dışında. kullanarak kalibrasyonu doğrulayın. Aralığın altında Numunenin bulanıklığı, • Dağınık ışık ölçümünü cihazın tespit limitinin (sıfır ayarı) belirtildiği altındadır.
- Page 333 6 Sorun giderme Belirti Muhtemel neden Çözüm Kalibrasyon Hatası Kalibrasyon standartları En düşük değerden en yanlış sırada çalıştırıldı. yüksek değere doğru çalışan standartlarla kalibrasyonu tekrarlayın. Kalibrasyon Hatası Kalibrasyon standartları Kalibrasyonu yeterince karıştırılmamış. gerçekleştirmeden hemen önce standartları belirtildiği şekilde karıştırın. Kalibrasyon Hatası Kalibrasyon Standartları...
- Page 334 7 Aksesuarlar ve Yedek parçalar 7 Aksesuarlar ve Yedek parçalar 7.1 Aksesuar Listesi Başlık Ürün No 6 yuvarlak küvet için küvet Ø 24 mm TB350 IR, TB350 418951 12 adet siyah kapaklı numune küveti TB350 IR, TB350 197655 Yükseklik 55 mm ø 24 mm Bulanıklık standartları...
- Page 335 8.1 Şartname Model Model WM-040-1004 (IR) Model WM-040-1001 (WL) ışık Kaynağı Kızılötesi LED (860 nm) Beyaz LED Mevzuata ISO 7027 uygunluk EPA pending Ölçüm Prensibi Nefelometrik (Multipath 90° BLAC) Ölçüm Aralığı 0 - 4000 NTU (FNU) Kararlılık Otomatik değişen: 0.01-9.99: 0.01 NTU ; 10.0-99.9: 0.1 NTU ;...
- Page 336 Güç Gereklilikleri USB güç adaptörü için AC 100 - 240 V, 50/60 Hz (TB 600 serisi: Lazer Diyot); 4 adet AA alkalin pil şarj edilebilir NiMH (USB/güç modülü ile kullanım için) Tüm TB tiplerinde olmayan cihazda şarj etme Çevre Koşulları Sıcaklık: 0 - 50 °C (32 - 122 °F) Nem: 30 °C'de %0 - 90, yoğuşmasız Nem: 40 °C'de %0 - 80, yoğuşmasız...
- Page 337 Diller Tam • Almanca Kullanım • Çince Kılavuzu • Flemenkçe • Fransızca • İngilizce • İspanyolca • İtalyanca • Portekizce • Rusça • Tükçe Boyutlar 155 x 83 x 225 mm Ağırlık 804 g (898 g dört adet AA alkalin pil ile) Ambalajlı...
- Page 338 WR9QA2500USB52NMR6B Ağırlık, EU adaptörüyle 48 g (birincil adaptör bıçakları olmadan) Onay, EMC CE, FCC İzin verilen yükseklik ölçerler 5000 m Kirlilik seviyesi Teknik değişikliğe tabidir! Test sonuçlarının maksimum doğruluğunu sağlamak için daima cihaz üreticisi tarafından sağlanan reaktif sistemlerini kullanın. Dikkat! TR TB 350...
- Page 339 9 Appendix 9 Appendix 9.1 Telif Hakkı ve Ticari Marka Bildirimi Lovibond , Tintometer ve T-CAL , Tintometer şirketler grubunun tescilli ticari ® ® ® markalarıdır. Lovibond ve Tintometer 'in tüm çevirileri ve transliterasyonları, The ® ® Tintometer Group'un ticari markaları olarak kabul edilir.
- Page 340 Оглавление Оглавление Сторона 1 Введение 1.1 Общая информация 1.1.1 Прочтите инструкцию перед использованием 1.1.2 Назначение продукта 1.1.3 Разрешенное использование 1.1.4 Требования к безопасному использованию 1.1.5 Соблюдайте инструкции 1.1.6 Квалификация пользователя 1.1.7 Обращение с опасными химическими веществами 1.1.8 Инструкции по утилизации 1.2 Список...
- Page 341 Оглавление Сторона 4.6 Верификация 4.6.1 Обзор верификации 4.6.2 Выполнение верификации 4.6.3 Настройки верификации 4.7 Журналы 4.7.1 Выбор типа журнала 4.7.2 Извлечение журнала 4.8 Настройки прибора 5 Техническое обслуживание 5.1 Повторный график технического обслуживания 6 Устранение неполадок 6.1 Сообщения об ошибках и что делать 7 Аксессуары...
-
Page 342: Введение
1 Введение 1 Введение 1.1 Общая информация 1.1.1 Прочтите инструкцию перед использованием В данном руководстве содержится важная информация о безопасной эксплуатации изделия. Пожалуйста, внимательно прочитайте данное руководство и ознакомьтесь с изделием перед использованием. 1.1.2 Назначение продукта Портативный турбидиметр серии TB предназначен для анализа водных образцов, которые... -
Page 343: Соблюдайте Инструкции
1 Введение Запрещается использовать изделие, если: • оно имеет видимые повреждения (например, после транспортировки) • оно длительное время хранилось в неблагоприятных условиях (условия хранения, см. главу "Технические характеристики") Необходимые условия для безопасного использования штекерного блока питания Для безопасного использования соблюдайте следующие пункты: •... -
Page 344: Инструкции По Утилизации
1 Введение 1.1.8 Инструкции по утилизации Утилизируйте батареи и электрооборудование на подходящем объекте в соответствии с местным законодательством. Выбрасывать батарейки вместе с бытовыми отходами запрещено законом. В Европейском Союзе по окончании срока службы устройства батареи утилизируются в специализированных пунктах приема вторсырья. Приборы, отмеченные... -
Page 345: Обзор Продукции
2 Обзор продукции 2 Обзор продукции 2.1 Сертификация EMC Кондуктивные CISPR 11 знак CE и радиационные (Пределы класса А) излучения EMC Иммунитет EN 61326-1 знак CE (Промышленные ограничения) Безопасность EN 61010-1 Знак безопасности TÜV FCC Класс A знак FCC Уведомление FCC класса A Данное... -
Page 346: Характеристики
2 Обзор продукции Модификации Любые изменения, внесенные в данное устройство и не одобренные компанией Tintometer, могут привести к аннулированию полномочий, предоставленных пользователю Федеральной комиссией по связи (FCC) для эксплуатации данного оборудования. Внимание! Уведомление о DOC класса A - Avis DOC, класс A Данный... -
Page 347: Вид На Прибор
2 Обзор продукции 2.4 Вид на прибор Позиция Описание Функция 1. Крышка При поднятии позволяет пользователю поместить ячейку с образцом в прибор для снятия показаний. 2. Кнопка Включает и выключает питание питания прибора. 3. Сенсорный Отображает пользовательский экран интерфейс прибора. 4. -
Page 348: Ввод В Эксплуатацию
3 Ввод в эксплуатацию 3 Ввод в эксплуатацию 3.1 Условия эксплуатации Прибор может использоваться в любой внутренней или внешней среде, которая считается безопасной для проведения анализа оператором. Прибор может принимать водные образцы от 0 до 70 °C. При выполнении измерения прибор должен находиться на уровне ± 15 °. Для... -
Page 349: Установка И Замена Батареек
3 Ввод в эксплуатацию 3.3 Установка и замена батареек При использовании аккумуляторов Шаг Описание С помощью отвертки открутите четыре винта на задней панели прибора и снимите панель. Вставьте четыре батарейки AA в правильной ориентации. Прикрепите панель обратно к прибору. •... - Page 350 3 Ввод в эксплуатацию При использовании перезаряжаемых батареек Шаг Описание С помощью отвертки выкрутите четыре винта на задней панели прибора, снимите панель и лоток для батарей. Вставьте аккумуляторную батарею в правильной ориентации. Прикрепите панель обратно к прибору. RU TB 350...
-
Page 351: Операция
4 Операция 4 Операция 4.1 Первый запуск 1. Экран приветствия Начальный экран, который пользователь видит при первом включении Нажмите кнопку > 2. Выберите язык Выберите нужный язык для настройки Нажмите кнопку > 3. Установите дату и время Выберите 12- или 24-часовой формат Изменяйте... -
Page 352: Общие Принципы Работы
4 Операция 4.2 Общие принципы работы Конструкция портативных турбидиметров серии TB разбита на соответствующие функциональные компоненты, которые обсуждаются подробно. К ним относятся источник света, 90-градусная ловушка рассеянного света, детектор рассеянного света, пробирка для образца турбидиметра и то, как эти ключевые компоненты работают... -
Page 353: Список Элементов Управления И Их Функции
4 Операция 4.3 Список элементов управления и их функции 4.3.1 Список элементов управления и их функции 12:36 Описание Функция 1 Строка Отображает значки и ярлыки, которые являются состояния универсальными, включая Время, Bluetooth , USB, ® Безопасность, Источник света и Питание. 2 Зона... -
Page 354: Список Элементов Управления И Их Функции
4 Операция Икона Описание Режим измерения Режим калибровки Режим верификации Журналы данных Bluetooth-соединение с технологическим турбидиметром PTV (недоступно для TB 350) Настройки прибора 4.3.2 Список элементов управления и их функции Икона Описание Функция Имя приложения Название приложения, которое пользователь использует... - Page 355 4 Операция Икона Описание Функция Источник красного Прибор содержит красный светодиодный света - заполнен источник света; свет включается для измерения. Красный Источник Прибор содержит красный светодиодный света - контур источник света; измерение не активно. Белый Прибор содержит белый светодиодный Источник света - источник...
-
Page 356: Строка Состояния
4 Операция Икона Описание Функция Питание от батареи Указывает на то, что осталось 50% заряда - Апельсин батареи. Питание от батареи Указывает на то, что осталось 25% заряда - Красный батареи. Крышка Указывает, открыта ли крышка измерительной измерительной камеры. камеры открыта Крышка... -
Page 357: Измерение
4 Операция Икона Описание Функция Кнопка измерения Запускает или Начинает или Инициирует измерение. Кнопка измерения - с Выполняет измерение Bluetooth при подключении к ®2) устройству PTV. Кнопка обновления Обновляет список Bluetooth доступных устройств ®2) PTV в непосредственной близости от прибора. Кнопка... - Page 358 4 Операция Описание Функция 1 Планка для Путь навигации, помогающий пользователю пройти нанесения все этапы процесса. 2 Измеренное Отображение результата измерения с единицами значение измерения. 3 Настройки Отображаются настройки, применяемые при измерении. 4 Кнопка журнала Создает журнал при нажатии. 5 Кнопка измерения При...
-
Page 359: Выполнение Измерения
4 Операция 4.4.2 Выполнение измерения Пожалуйста, подготовьте образцы ячеек, входящие в комплект поставки, перед измерением. Убедитесь, что на ячейках нет пятен, царапин или дефектов. 1. Соберите пробу Убедитесь, что проба репрезентативна (хорошо перемешана). Стеклянная посуда должна быть без пятен, царапин и других дефектов. -
Page 360: Советы По Измерению
4 Операция • Не вносите в измерительную камеру никаких предметов, кроме кювет, предназначенных для измерений. • Не вносите в камеру никаких жидкостей. Внимание! 4.4.3 Советы по измерению Индексирование пробирки: Это лучше всего делать с пробиркой, заполненной водой, отфильтрованной через фильтр 0,2 мкм. •... -
Page 361: Настройки Измерений
4 Операция 4.4.4 Настройки измерений Нажмите кнопку Settings (Настройки), чтобы перейти в режим настроек измерений. Иконка Описание Опция Функция Режим Одиночный Нажмите для запуска теста Непрерывный Измерение обновляется каждые X секунд, пока не будет остановлено. Fast Settling Рекомендуется для образцов с быстрым оседанием. -
Page 362: Описание Отдельных Этапов Работы Или Отдельных Разделов
4 Операция 4.5 Описание отдельных этапов работы или отдельных разделов пользовательского интерфейса 4.5.1 Обзор калибровки 12:36 Calibration Calibration Curve: T-CAL 0-4000 NTU Standard Set: None Описание Функция 1 Планка для Путь навигации, помогающий пользователю пройти нанесения все этапы процесса. 2 Калибровочная Указывает... -
Page 363: Выполнение Калибровки
4 Операция 4.5.2 Выполнение калибровки Перед калибровкой подготовьте стандарты T-CAL , входящие в комплект ® поставки. Убедитесь, что на флаконах T-CAL нет пятен, царапин или пятен. ® • Стандарты T-CAL для TB 350 IR: 20 / 800 / 4000 NTU ®... -
Page 364: Настройки Калибровки
4 Операция 4.5.3 Настройки калибровки Нажмите кнопку Настройки, чтобы перейти в режим настроек. Иконка Описание Опция Функция Калибровочная T-CAL Выбирает готовый стабилизированный ® кривая стандарт формазина в заранее определенных концентрациях Формазин Выбор подготовленного пользователем пользователя стандарта формазина в заранее определенных концентрациях Стандартный... -
Page 365: Верификация
4 Операция будет показывать состояние "On" или "Enabled". вы́ к лючено Во время процедуры калибровки, если отдельный стандарт выходит за пределы допуска, пользователь не будет уведомлен о том, что калибратор вышел за пределы заданного диапазона Тинтометров. На экране журнала будет строка... -
Page 366: Выполнение Верификации
4 Операция 4.6.2 Выполнение верификации 1. Подготовьте пробирку При необходимости смажьте пробирку маслом. 3. Вставить стандарт Вставка стандартного значения, указанного на экране. 4. Модальный Представляет собой активный процесс. 5. Сводка журнала Нажмите кнопку Сохранить, чтобы сохранить журнал. Нажмите кнопку Отмена, чтобы вернуться к началу процесса верификации. -
Page 367: Настройки Верификации
4 Операция 4.6.3 Настройки верификации Нажмите кнопку Настройки, чтобы войти в режим настроек. Иконка Описание Опция Функция Стандарт T-CAL 5.0 NTU Выбирает готовый стабилизированный стандарт формазина в концентрации 5,0 NTU. Подготовлено Выбор подготовленного пользователем пользователем стандарта в диапазоне от 1 до 1000 NTU. Критерии... -
Page 368: Журналы
4 Операция 4.7 Журналы 4.7.1 Выбор типа журнала Нажмите кнопку Тип журнала в области действий для доступа к журналам. Планка для нанесения: Журналы измерений: Отображает все записанные измерения. Журналы калибровки: Отображает все записи калибровки. Журналы поверки: Отображает все записи о поверке. Журналы... - Page 369 4 Операция не TB 350 4.8 Настройки прибора Нажмите кнопку Настройки, чтобы перейти в режим настроек. Иконка Описание Опция Функция Безопасность включить Настройка, проверка и изменение пароля. Отключить Настройка по умолчанию. Настройки Яркость экрана Настройка яркости питания экрана. Выключение подсветки На...
- Page 370 4 Операция Ярлыки включить Если эта функция включена, при подключении USB-накопителя пользователю открывается модальное окно, в котором предлагается выбрать параметры "передача журналов" или "резервное копирование/ восстановление". При выборе опции пользователь переходит к соответствующей функции. Отключить Настройка по умолчанию; пользователи должны получить доступ...
- Page 371 4 Операция Резервное Резервное копирование всех Возможность копирование / настроек сохранения настроек восстановление на локальной SD-карте или на внешнем USB- накопителе. Восстановить все настройки Восстанавливает ранее сохраненные настройки, сохраненные на локальной SD-карте или внешнем USB- накопителе. Восстановление заводских Сброс всех настроек настроек...
- Page 372 4 Операция включить Устанавливает протокол целостности данных для лабораторий, соблюдающих надлежащую лабораторную практику. Отключить Настройка по умолчанию. Владелец Контактные данные владельца прибора. Связаться Контактная информация представительств Lovibond ® Об О компании Lovibond ® не TB 350 * Настройка по умолчанию RU TB 350...
-
Page 373: Техническое Обслуживание
5 Техническое обслуживание 5 Техническое обслуживание 5.1 Повторный график технического обслуживания Задание Сделать Не делать 1. Чистая 1. Перед измерением убедитесь, 1. Распылять измерительная что измерительная камера или заливать камера чистая и сухая. Для удаления любую жидкость загрязнений используйте сухую непосредственно... - Page 374 5 Техническое обслуживание Задание Сделать Не делать Калибровка Калибруйте по мере Использовать необходимости при следующих стандарты с условиях: истекшим сроком 1. Сбой верификации. действия. 2. Проводится техническое обслуживание оптических или электронных систем. 3. В соответствии с требованиями региональных регулирующих органов. Тщательно...
-
Page 375: Устранение Неполадок
6 Устранение неполадок 6 Устранение неполадок 6.1 Сообщения об ошибках и что делать Симптом Возможная причина Решение За пределы Мутность образца • Разбавьте образец диапазона находится за пределами • Проверьте калибровку диапазона измерения с помощью стандарта прибора. высокого диапазона. Под диапазоном Мутность... - Page 376 6 Устранение неполадок Симптом Возможная причина Решение Ошибка калибровки Калибровочные стандарты Повторите калибровку с были запущены в эталонами от наименьшего неправильном порядке. к наибольшему значению. Ошибка калибровки Калибровочные стандарты Смешайте стандарты не были надлежащим в соответствии образом перемешаны. с инструкциями непосредственно...
-
Page 377: Аксессуары И Запасные Части
7 Аксессуары и запасные части 7 Аксессуары и запасные части 7.1 Список принадлежностей Заголовок Номер заказа Батареи (AA), комплект из 4 штук TB350 IR, TB350 1950025 Блок питания для TB series TB350 IR, TB350 19820-170 Измерительные кюветы с черной крышкой, TB350 IR, TB350 197655 высота... -
Page 378: Технические Характеристики
8.1 Технические характеристики Model Model WM-040-1004 (IR) Model WM-040-1001 (WL) Источник света Инфракрасный светодиод (860 нм) Белый светодиод Соответствие ISO 7027 нормативным EPA pending требованиям Принцип Hефелометрического (Multipath 90° BLAC) измерения Диапазон 0 - 4000 NTU (FNU) измерений Разрешение Автоматический диапазон: 0.01-9.99: 0.01 измеренных... - Page 379 Режим Да энергосбережения Auto – OFF Выбираемый Требование AC 100 - 240 В, 50/60 Гц (серия TB 600: к источнику лазердиод) для адаптера питания USB; 4 питания щелочные батареи AA перезаряжаемые NiMH (для использования с USB/модулем питания) Зарядка в приборе не для всех типов TB Окружающие...
-
Page 380: Технические Характеристики - Сетевой Адаптер
Языки краткого • Английский руководства • Голландский • Испанский • Итальянский • Китайский • Немецкий • Португальский • Русский • Турецкий • Французский Языки • Английский руководства по • Голландский эксплуатации • Испанский • Итальянский • Китайский • Немецкий • Португальский •... - Page 381 Тип WR9QA2500USB52NMR6B Выходное напряжение, 5.2 V, DC частота Макс. выходной ток 2.5 A Защита выхода Отключение выхода и автоматический перезапуск Условия окружающей От 0 °C до 40 °C, при макс. 95 % относительной среды влажности воздуха Класс энергоэффективности Стандарт безопасности EN 62368 EN 55032 FCC Part 15 Класс...
-
Page 382: Appendix
9.1 Уведомление об авторских правах и товарных знаках Lovibond , Tintometer и T-CAL являются зарегистрированными торговыми ® ® ® марками группы компаний Tintometer. Все переводы и транслитерации Lovibond и ® Tintometer утверждаются как торговые марки группы компаний Tintometer ® ® Знак Bluetooth , фигурный... - Page 383 目录 目录 Page 1 简介 1.1 一般信息 1.1.1 使用前请阅读说明 1.1.2 产品的目的 1.1.3 授权使用 1.1.4 安全使用的要求 1.1.5 保存说明书 1.1.6 用户资格 1.1.7 危险化学品的处理 1.1.8 处置说明 1.2 文件中使用的所有符号的清单 1.3 缩略语 2 产品概况 2.1 认证 2.2 特点 2.3 产品描述 2.4 仪器视图 3 开始准备 3.1 操作环境 3.3 插入和更换电池...
- Page 384 目录 Page 4.7 日志 4.7.1 选择一个日志类型 4.7.2 检索日志 4.8 仪器设置 5 维护 5.1 推荐采用维护计划 6 故障排除 6.1 错误信息和如何处理 7 配件和替换零件 7.1 配件列表 7.2 配件清单 8.1 技术参数 8.2 技术参数 - 主电源适配器 9 附录 9.1 版权和商标通知 ZH TB 350...
- Page 385 1 简介 1 简介 1.1 一般信息 1.1.1 使用前请阅读说明 本手册提供了有关本产品安全操作的重要信息。请仔细阅读本手册,并在使用前熟悉本 产品。 1.1.2 产品的目的 TB 系列便携式浊度仪用于分析收集并密封于专用玻璃试样瓶中的水样的浊度。试样瓶采 用了缜密的技术,以减少灰尘和划痕对测量过程的干扰。准备完毕后,将试样瓶放在仪 器中进行测量。 该仪器可以在实验室使用,也可以带到现场,在收集样品时即刻测量。 请小心运输。如果将仪器带入野外,应使用手提箱。 若应用于监管,建议与当地政府联系,确保选择正确的仪器型号。 1.1.3 授权使用 如出现不正当使用、不遵守本手册、由不合格人员使用或未经授权改变产品现象,制造 商不承担相关责任和损害保证。 制造商对用户或第三方因使用本产品而产生的费用或损失不承担任何责任,特别是在不 正确使用产品或误用或产品连接出现故障的情况下。 制造商对打印错误不承担任何责任。 1.1.4 安全使用的要求 为安全使用本设备,请注意以下几点: • 如果以制造商未指定的方式使用本设备,可能会损害本设备的性能。 • 本产品只能按照上面规定的授权使用方式使用。 • 本产品只能由本操作手册中提到的电源。 • 本产品只能在本操作手册中提到的环境条件下使用。 • 本产品不得被打开或修改。 出现下列情况,不得使用该产品:...
- Page 386 1 简介 安全使用插入式电源装置的先决条件 为安全使用,请遵守以下几点: • 在使用前检查是否有明显的损坏。如果损坏,请不要投入使用。 • 只在干燥的房间内使用。 • 只能用干手操作。 • 只能使用制造商推荐的电源。 • 不得打开或修改该产品。 • 只能使用制造商推荐的USB-C电缆为设备供电。 1.1.5 保存说明书 手册必须放在产品的附近,以便你能随时找到你需要的信息。 1.1.6 用户资格 操作人员必须能够理解并正确执行产品包装和插页上的安全标签和安全说明。 用户必须有能力并且能够阅读和理解本手册,以熟悉操作并确保安全使用。 1.1.7 危险化学品的处理 使用本产品的地方可能存在化学和/或生物危险。在使用本产品时,请遵守所有管理法律、 法规和协议。 对于产品的开发,Lovibond 公司密切关注安全问题。一些危险物质的危害是无法避免 ® 的。 如果使用自制的试验或溶液,那么这些试验或溶液所造成的任何风险的责任由使用者承担 (个人责任)。 为了保护您自己,使用高于 5 NTU 的浊度标准,建议戴上防护手套和护目镜。请遵守相 关的安全数据表指示。 化学品安全数据表(SDS)指示包括安全处理、可能发生的危险、在危险情况下应采取的 预防措施以及应采取的措施。 1.1.8 处置说明...
- Page 387 1 简介 危险!若不加以避免,可能导致死亡或引起严重伤害! 危险! 对某些试剂处理不当会损害你的健康。在任何情况下,都要遵循包装 上的安全标签、包装内页的安全说明和可用的安全数据表上的信息。 必须严格遵守其中规定的保护措施。 警告! 存在可能导致轻度或中度伤害的危险。 注意! 1.3 缩略语 缩略语 注释 比浊法浊度单位 福尔马肼比浊法单位 mg/l 浓度单位 ZH TB 350...
- Page 388 (工业极限) 安全性 EN 61010-1 TÜV安全标志 FCC Class A FCC标志 FCC A类通知 本设备符合FCC规则的第15部分。操作须符合以下两个条件。 • 本设备不得造成有害干扰。 • 本设备必须接受收到的任何干扰,包括可能导致不希望的操作的干扰。 注意:根据FCC规则第15部分的规定,本设备经过测试,符合A类数字设备的限制。这些 限制旨在为设备在商业环境中运行时提供合理的保护,防止有害干扰。本设备会产生、使 用并能辐射无线电频率能量,如果不按照说明书的要求安装和使用,可能会对无线电通信 造成有害干扰。在住宅区操作本设备可能会造成有害干扰,在这种情况下,用户将被要求 纠正干扰,费用自理。 屏蔽电缆 系统与其外围设备之间的连接必须使用屏蔽电缆,以保持符合FCC无线电 频率发射限制。 注意事 项! 修改 对本设备所做的任何未经Tintometer批准的修改都可能使FCC授予用户的 操作本设备的权力失效。 注意事 项! DOC A类通知 - Avis DOC, A类 本A类数字仪器符合加拿大致干扰设备条例的所有要求。 ZH TB 350...
- Page 389 2 产品概况 2.2 特点 实验室准确性与便携性的结合 Lovibond TB系列消除了浊度测量中的复杂问题。这项新技术提供了最高水平的准确 ® 性、操作和监管效率。 • 触摸屏界面,便于操作 • 图片指导说明,引导用户完成流程步骤,避免错误。 • 简单的数据管理协议以确保数据的完整性 2.3 产品描述 浊度是样品光学特性的一种表现,它使光线在流体样品中被散射和吸收,而不是以直线 传输。在水中,浊度通常是由粘土、淤泥、细小的有机物、浮游生物、其他微观生物、 有机酸和颜料等物质的存在造成的。浊度测量用于监测去除或改变溶液中颗粒浓度的过 程,如饮用水的生产过程。这些Lovibond 浊度计的设计结合了实验室浊度计应有的高精 ® 度和高灵敏度以及便携性。 2.4 仪器视图 职位 描述 功能 1. 测量槽盖 抬起时,允许用户将样品池放在仪器中进 行读取。 2. 电源按钮 打开和关闭仪器的电源。 3. 触摸屏 显示仪器的用户界面。 4. 型号 确定仪器版本。...
- Page 390 3 开始准备 3 开始准备 3.1 操作环境 该仪器可以在任何被认为对操作者安全的室内或室外环境下进行分析 本仪器可接受0至70°C的水样 进行测量时,仪器应保持水平±15°。 仪器应放置在一个水平面上,以达到最佳的测量性能。 ZH TB 350...
- Page 391 3 开始准备 3.3 插入和更换电池 使用电池时 步骤 说明 用螺丝刀卸下仪器背面的四颗螺丝,卸下面板。 按照正确的方向插入四节AA电池。 将面板装回仪器上。 • 只能使用经批准的类型:碱性电池,LR6,电压为 1.5V。 • 尽快从设备中取出空电池。 • 如果设备长时间不使用,请从设备中取出电池。 注意! ZH TB 350...
- Page 392 3 开始准备 使用可充电电池时 步骤 说明 用螺丝刀卸下仪器背面的四颗螺丝,卸下面板和电池托盘。 按照正确的方向插入可充电电池组。 将面板装回仪器上。 ZH TB 350...
- Page 393 4 操作步骤 4 操作步骤 4.1 首次启动 1.欢迎屏幕 用户在第一次开机时看到的初始屏幕 按>按钮 2. 选择语言 选择所需的语言来设置 按>按钮 3. 设置日期和时间 选择12小时和24小时格式 使用向上和向下的箭头改变数值 按>按钮 4. 密码 设置一个用户选择的密码来实现仪器的安全功能 按保存按钮 如果不需要密码,选择"跳过" 按>按钮 5. 默认单位 选择所需的单位类型来设置 按>按钮 6. 用户信息 输入仪器所有者信息 按保存按钮 如果不需要任何细节,选择"跳过" 按>按钮 7. 信息摘要 检查初始设置 按<,在继续前改变设置 按<,进入主屏幕 用户可在仪器上选择需要的操作 ZH TB 350...
- Page 394 4 操作步骤 4.2 一般操作原则 TB系列便携式浊度仪的设计被分解成各自的功能部件,并进行了详细的讨论。这些部件包 括光源、90度散射光捕获器、散射光检测器、浊度计样品瓶以及这些关键部件如何协同工 作以提供浊度结果。 TB系列便携式浊度仪的简化光学配置。 该图显示了入射光路和90°散射光检测器的视图。 照明器(LED和光学元件) 入射光路 90°杂散光捕集器 样品瓶 散射光(10°-20°探测器视图) 散射光检测器和光学器件 ZH TB 350...
- Page 395 4 操作步骤 4.3 显示屏及其功能列表 4.3.1 显示屏 12:36 描述 职能 1 状态栏 显示通用的图标和标签,包括时间、蓝牙 、USB、安全、光源和 ® 电源。 2 功能栏 显示应用步骤和互动的区域。 3 导航栏 主要用于导航,开始或保存或取消行动及返回主页。 ZH TB 350...
- Page 396 4 操作步骤 图标 描述 测量模式 校准模式 验证模式 数据记录 蓝牙连接到PTV过程浊度仪(TB 350不提供)。 仪器设置 4.3.2 控制元素及其功能列表 图标 描述 职能 应用名称 用户目前正在使用的应用程序的标题。 时间 时间由用户在初始设置中或通过访问仪器设置来设 12:16 定。有12小时或24小时格式可供选择。 如果显示,表明有一个USB模块连接到设备上。 蓝牙图标 - 普通 如果显示,则表示蓝牙 模块已连接。 ® 蓝牙图标 - 带箭头 如果显示,说明蓝牙 模块已连接,并正在与PTV ® 或AquaLX应用程序进行通信。 ZH TB 350...
- Page 397 4 操作步骤 图标 描述 职能 红色光源 - 填充 仪器包含一个红色的LED光源;测量时光被打开。 红光源 - 概要 仪器包含一个红色LED光源;没有测量活动。 白色光源 - 填充 仪器包含一个白色的LED光源;测量时光被打开。 白光源 - 概要 仪器包含一个白色LED光源;没有测量活动。 红外线光源 - 开 仪器包含一个红外LED光源;测量时光被打开。 红外线光源 - 关闭 仪器包含一个红外LED光源;没有测量活动。 激光光源 - 填充 仪器包含一个激光LED光源;测量时光被打开。 激光光源 - 概要 仪器包含一个激光LED光源;没有测量活动。 交流电池充电 交流电池正在充电。 交流电源图标 表示仪器通过AC电源供电...
- Page 398 4 操作步骤 图标 描述 职能 电池电源 -橙色 表示还有50%的电池寿命。 电池电源 -红色 表示还有25%的电池寿命。 测量室盖打开 表明测量室盖是否打开。 测量室盖关闭 表示测量室的盖子是否关闭。 只有 TB 600 不 TB 350 4.3.3 状态栏 图标 图标 职能 主页按钮 让用户返回主屏幕。 主页按钮 - 已锁定 安全性已被激活;密码已被 启用,需要执行某些功能。 主页按钮 - 已解锁 安全是不活跃的;没有任何 功能被阻止给用户。 保存按钮 保存显示在活动区域的内 容。...
- Page 399 4 操作步骤 图标 图标 职能 测量按钮 开始或开始或启动一个测 量。 测量按钮 - 带有蓝牙 在连接到PTV装置时进行测 ®2) 量。 蓝牙 刷新按钮 刷新仪器附近的可用PTV单 ® 元列表。 取消按钮 提供取消当前活动区域的活 动的选项。 右边的雪佛龙 在一个过程中推进到下一个 步骤。 左边的雪弗龙 返回到一个过程中的前一个 步骤。 不 TB350 4.4 测量 4.4.1 测量界面描述 0 . 86 ZH TB 350...
- Page 400 4 操作步骤 描写 职能 1 应用程序栏 导航路径,帮助用户完成流程步骤。 2 测量结果 显示带单位的测量结果。 3 设定 显示应用于测量的设置。 4 日志按钮 当按下时创建一个日志。 5 测量按钮 按下后开始测量。 6 设置钮 用来改变设置。 7 主页按钮 使用户返回主屏幕。 ZH TB 350...
- Page 401 4 操作步骤 4.4.2 执行测量 在测量之前,请准备好交付范围内的试样瓶。请确保试样瓶没有污点、划痕或瑕疵。 1. 收集样品 确保样品具有代表性(充分混合)。 玻璃器皿应无污点、划痕或其他瑕疵。 在收集样品前,用样品至少冲洗收集容器两次。 2. 准备好试样瓶 使用无绒布,擦干试样瓶的外部。 使用硅油以减少杂散光的反射。 3. 将试样瓶插入仪器 插入前,确保样品无气泡。 在插入前慢慢倒置混合,不要摇晃。 4. 关闭盖子 合盖前禁止测试。 5. 检查设置 确保测量设置是正确的。测量发生后不能改变测量的设置。 6. 按下测量按钮 开始测量。 7. 数据记录 进入数据日志,保存测量结果。 8. 保存测量结果 如果需要,请按 "保存 "按钮,以创建一个测量日志。 9. 暂停 在 "连续 "测量模式下暂停测量。 ZH TB 350...
- Page 402 4 操作步骤 • 除了用于测量的试样瓶,不要将任何物体放入测量室。 • 请避免任何液体进入测量室。 警告! 4.4.3 测量提示 对小瓶进行分度:最好用装满通过0.2微米过滤器过滤的水的小瓶来进行。 • 按下测量按钮。 • 转动样品。在旋转小瓶的同时,确定最低的读数。 • 确定位置后,停止测量。在小瓶上做标记。 • 在继续进行其他测量之前,如有必要,确保测量模式得到更新。 • 如果玻璃器皿上有明显的划痕或凹坑,建议对样品瓶进行索引。 硅油的使用 • 请注意只用顶部的三分之一来处理小瓶。 • 用提供的清洁布擦拭小瓶,去除水、灰尘和指纹。 • 用硅油涂抹小瓶的外部。 • 在小瓶的侧面涂上很薄的硅油珠子。将油珠均匀地涂在小瓶底部的2/3处。 • 通过旋转小瓶,用一块干净的无尘布擦拭小瓶中的硅油。 • 在测量预期浊度低于0.5NTU的样品时,给细胞上油是很关键的,建议使用。 含有多余气泡的样品 • 让样品静置至少5分钟。 •...
- Page 403 4 操作步骤 4.4.4 测量设定 按下设置按钮,进入测量设置模式。 图标 描写 选项 职能 模式 单次测量 按下触发一个测试。 连续 测量每X秒更新一次,直到停止。 快速沉淀测量 建议用于具有快速沉降特性的样品。 位置 默认 如果没有设置自定义ID,则使用。 自定义 用户定义的测量位置描述 和测量极限。 信号平均 开启了 如果开启,可设置为255个测量值。 如果测量不稳定,应利用该功能。 关 已停用 样品液ID 默认 如果没有设置自定义ID,则使用。 自定义 样品的唯一标识符;用户可选择。 不 TB350 1) 4.5 校准 4.5.1 校准 12:36 Calibration Calibration Curve:...
- Page 404 4 操作步骤 描述 功能 1 应用程序栏 导航路径,帮助用户完成流程步骤。 2 校准曲线 指定校准类型。 3 标准液套件 标准液套装特定标识 4 设置按钮 用来改变设置。 5 主页按钮 使用户返回主屏幕。 6 下一个按钮 进展到下一个屏幕。 4.5.2 执行校准 在校准之前,请准备好交货范围内的 T-CAL 标准液。确保 T-CAL 试样瓶没有污 ® ® 点、划痕或瑕疵。 • 用于 TB 350 IR 的T-CAL® 标准液:20 / 800 / 4000 NTU •...
- Page 405 默认校准 可选择恢复到出厂校准设置。 校准后验证 开启了 要求用户在校准完成后进行验证 关 默认设置。 检查校准 开启了 在校准过程中,如果个别标准件超出公差, (默认) 用户必须纠正标准件才能继续或取消校准过 程。该功能可以防止用户因标准不正确而出 现校准错误。日志屏幕上会有一个 "校准检 查器 "的行项,它将显示 "开 "或 "启用 "状 态。 关 在校准过程中,如果个别标准超出公差, 用户不会被通知校准器超出了Tintometer的 预定范围。日志屏幕上会有一个 "校准检查 器 "的行项目,它将显示 "关闭 "或 "禁用 "状 态。 不 TB350 1) ZH TB 350...
- Page 406 4 操作步骤 4.6 核查 4.6.1 核查概述 12:36 Verification Verification Standard: T-CAL 5.0 NTU Pass/Fail Criteria: ± 10 % Standard Set: None 描写 职能 1 应用程序栏 导航路径,帮助用户完成流程步骤。 2 核查标准 要测量的标准值。 3 通过/失败 用于确定验证通过或失败的公差。 4 标准液套件 标准集的唯一标识符。 5 设置钮 用来改变设置。 6 主页按钮 使用户返回主屏幕。 7 下一个按钮...
- Page 407 4 操作步骤 4.6.2 执行验证 1.准备好小瓶。 必要时给样品瓶上油 3.插入标准。 插入屏幕上指定的标准值。 4.模态。 代表活动过程。 5.日志摘要。 按 "保存 "按钮,保存日志。 按 "取消 "按钮,回到验证过程的起点。 4.6.3 描述各个工作步骤或用户界面的各个部分 按下设置按钮,进入测量设置模式。 图标 描写 选项 职能 标准 T-CAL 5.0 NTU 选择5.0NTU浓度的准备好的稳定 的formazin标准 用户准备 在1到1000NTU之间选择用户准备 的标准。 Pass/Fail 标准 ±10% 用于确定验证通过或失败的公差。 ± 5% ±0.05 NTU ±0.10 NTU 自定义...
- Page 408 4 操作步骤 4.7 日志 4.7.1 选择一个日志类型 按行动区的日志类型按钮来访问日志。 应用栏 测量日志。 显示所有的测量记录。 校准记录。 显示所有校准记录。 验证记录。 显示所有验证记录 GLP模式日志。 显示GLP模式被启用或禁用的记录。 不是TB350 4.7.2 检索日志 1. 选择日志类型 显示用户想查看的日志类型的记录。 2. 导出单个日志 如果选择了一条记录,该日志将以CSV格式导出。 所有与日志相关的细节都会被导出 3. 选择转移方法 USB:将协议导出到USB存储器。 蓝牙 。) 将日志导出到AquaLX移动应用程序。 ®1) 在TB 350上不可用。 注意:需要一个外部Lovibond 蓝牙 加密狗来连接到USB-A端口。 ®...
- Page 409 4 操作步骤 不是TB350 4.8 仪器设置 按下设置按钮,进入设置模式。 图标 说明 选项 功能 安全 启用 设置、验证和更改密 码。 禁用 默认设置。 电源设置 屏幕亮度 调整屏幕的亮度。 背景光休眠 关 20秒 30秒 1分钟* 5分钟 系统关闭 关 1分钟 2分钟 5分钟 15分钟* 注意:当使用USB-C 电源线时,系统关机 被设置为 "关闭",直到 设备被拔掉,然后返 回到所选的选项。 蓝牙 启用 在有硬件的情况下, 启用蓝牙...
- Page 410 4 操作步骤 日期/时间 选择显示的时间和格 式。 备份/还原 备份所有设置 可以选择将设置存储 到本地SD卡或保存到 外部USB驱动器。 恢复所有设置 恢复以前保存在本地 SD卡或外部USB驱动 器上的设置。 还原出厂设置 将所有设置重置为出 厂默认值。 保存的日志仍然可 用。 单位类型 选择显示的单位。 定义显示的测量值的 单位类型。 mg/L Kaolin 默认设置为NTU。 mg/L PSL 度 mNTU mFNU 自定义 允许用户定义单位类 型,并能够根据NTU/ FNU值设置一个系 数。 启用 为遵循良好实验室规 范的实验室制定了数 据完整性协议。 禁用...
- Page 411 5 维护 5 维护 5.1 推荐采用维护计划 任务 做 不做 1. 清洁测量室 1. 在测量之前,确保测量室的清洁和 1. 将任何液体直接喷 干燥。使用干的微纤维布来清除杂 入或倒入测量室。 2. 清洁仪表显示屏 质。 2. 测量一个没有被紧 2. 用干燥或微湿的微纤维布擦拭触摸 紧盖住的试样瓶。 屏。 清洁外壳 用温和的洗涤剂溶液或稀释的酒精清 洁外壳。 试剂瓶的储存与护理 使用后一定要用不含浊度的水冲洗试 未擦掉试样瓶上过量 样瓶。 的硅油。一滴硅油就 足够。 用去离子水填充试试样瓶。盖上小瓶 试样瓶不加盖子,以 以防止形成水斑。 便风干。 用超细纤维布将试样瓶外侧擦干。...
- Page 412 6 故障排除 6 故障排除 6.1 错误信息和如何处理 错误信息 可能的原因 解决方案 超出范围 样品的浊度超出仪器的测量范 • 稀释样品 围。 • 使用高量程标准液校准。 低范围 样品的浊度低于仪器的检测极 • 按规定重复杂散光测量(零 限。 点调整),并确保测量室盖 子关闭。 • 在确定杂散光后重复校准。 浊度仪不开机 电池有缺陷 • 更换一套新的碱性电池 电池没有正确插入 "保存 "按钮没有出 缺少必要的信息。 确保填写用户信息和所有必填 现,所以不能创建日 字段。 志。 仪器无法进行测量 盖子没有关闭。 关上盖子。 低电量提醒...
- Page 413 7 配件和替换零件 7 配件和替换零件 7.1 配件列表 标题 货号 T-CAL 标准,4000 NTU,125 ml TB350 IR, TB350 48012912 ® T-CAL 标准,4000 NTU,500 ml TB350 IR, TB350 48012950 ® USB-C电缆1米,USB-C到A TB350 IR, TB350 19820-081 刷子,长 11 cm TB350 IR, TB350 380230 带黑色盖子的试样瓶,高 55 mm,直径 24 TB350 IR, TB350 197655 mm,12 件套...
- Page 414 8.1 技术参数 Model Model WM-040-1004 (IR) Model WM-040-1001 (WL) 光源 红外线LED (860 nm) 白光LED 标准 ISO 7027 EPA pending 测量原理 比浊法 (Multipath 90° BLAC) 测量范围 0 - 4000 NTU (FNU) 解析度 0.01-9.99: 0.01 NTU ; 10.0-99.9: 0.1 NTU ; 100-4000: 1 NTU 精度...
- Page 415 保护等级 IP67 (仪器) 一致性 • CE • CSA • FCC • RoHS • TÜV • UL • WEE 多语言操作界面 • 中文 • 土耳其语 • 德文 • 日语 • 法文 • 波兰 • 英文 • 荷兰语 • 葡萄牙 • 西班牙 多语言快速操作 •...
- Page 416 多语言用户操作 • 中文 手册 • 俄语 • 土耳其语 • 德文 • 意大利 • 法文 • 英文 • 荷兰语 • 葡萄牙 • 西班牙 尺寸 155 x 83 x 225 mm 重量 804 g (898 g 使用四节AA碱性电池) 带包装的重量 (898 g with four AA alkaline batteries) 可进行技术修改! 为确保测试结果的最大准确性,请始终使用仪器制造商提供的试剂系...
- Page 417 类型 WR9QA2500USB52NMR6B 重量,含欧盟适配器 48 g (不含垫片) 认证, EMC CE, FCC 允许的海拔高度 米 5000 m 污染程度 可进行技术修改! 为确保测试结果的最大准确性,请始终使用仪器制造商提供的试剂系 统。 注意! ZH TB 350...
- Page 418 9 附录 9 附录 9.1 版权和商标通知 罗维朋 、罗威邦 、Lovibond 、Tintometer 和 T-CAL 是 Tintometer 公司集团的注册商 ® ® ® ® ® 标。Lovibond 和 Tintometer 的所有翻译和音译都被主张为 Tintometer 集团的商标。 ® ® ® Bluetooth 标记、数字标记和组合标记是 Bluetooth SIG 拥有的商标,Tintometer 集团的 ® ® 任何使用都是经过许可的。 ZH TB 350...
- Page 420 Tel: +91 (0) 40 23883300 www.lovibond.com Toll Free: 1 800 599 3891/ 3892 Spain indiaoffice@lovibond.in www.lovibondwater.in India Technical changes without notice Printed in Germany 05/22 No.: 19820-039 Lovibond ® and Tintometer ® Trademarks of the Tintometer Group of Companies...
Need help?
Do you have a question about the Lovibond TB 350 and is the answer not in the manual?
Questions and answers