
Related Manuals for Wyrestorm MX-0402-MST


Summary of Contents for Wyrestorm MX-0402-MST
- Page 1 MX-0402-MST 4K HDR 4x2 Presentation Matrix with USB 3.2 KVM and MST User Manual Version: V1.0.0...
-
Page 2: Important Safety Instructions
Important Safety Instructions 1. Do not expose this apparatus to rain, moisture, dripping or 6. Clean this apparatus splashing and that no objects only with dry cloth. filled with liquids, such as vases, shall be placed on the apparatus. 2. Do not install or place this unit 7. -
Page 3: Table Of Contents
Table of Contents Introduction ..............................................3 Overview ..................................................3 Features ..................................................3 Package Contents ............................................... 3 Specifications ................................................4 Panel Description ................................................. 5 Installation and Wiring ................................................. 6 Installation ..................................................6 Wiring ..................................................... 6 Auto Switching ..................................................7 Button Control ..................................................7 RS-232 Operation ................................................. -
Page 4: Introduction
• Support CEC control, and can be set through API commands or web UI. • Front panel buttons provide basic switching operations. Package Contents • 1x MX-0402-MST • 1x Power Adapter 20V/10A DC • 2x USB-C 2m cables • 2x USB 3.0 A to B 1.8m cables •... -
Page 5: Specifications
Specifications Audio and Video 2x HDMI In: 19-pin Type A Inputs 2x USB-C 2x HDMI Out: 19-pin Type A Outputs 1x Analog Audio Out (5-pin Phoenix Male Connector) Output Video Encoding HDMI 18Gbps USB-C IN/HDMI IN/ HDMI OUT: Up to 7.1ch, including PCM 2.0/5.1/7.1ch, Dolby Digital, Dolby Digital Plus, Dolby TrueHD, Dolby Audio Formats Atmos, DTS 5.1, DTS-HD Master Audio and DTS:X. -
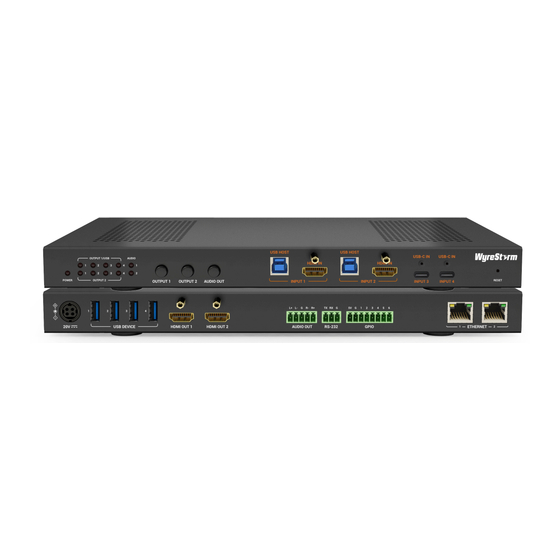
Page 6: Panel Description
Panel Description Front Panel Name Description On: The device is powered on. Power LED Off: The device is powered off. OUTPUT 1 & USB/ On: The corresponding input source is selected. OUTPUT 2 LEDs Off: The corresponding input are notselected. On: The corresponding de-embedded audio from HDMI OUT 1/2 is selected as source for AUDIO OUT. -
Page 7: Installation And Wiring
2. Repeat step 1 for the other side of the enclosure. 3. Attach the brackets to the surface or location desired using screws (not included in the package). Wiring Dual-Screen Conference Room with Room PC Room PC Laptop Laptop MX-0402-MST Front HDMI USB-C Ethernet MX-0402-MST Rear Ceiling Ceiling... -
Page 8: Auto Switching
Room PC Laptop Laptop HDMI USB-C Ethernet MX-0402-MST Speakerphone Keyboard & Mouse Network Switch Display Device CAM-210-PTZ Note: By default, USB-C IN 4 is in DP SST mode, use the command “SET USBC4_M prm<CR><LF>” to set the USB-C IN 4 to MST mode. -
Page 9: Rs-232 Operation
IPADDR 172.16.18.173 MASK 255.255.255.0 GATEWAY 172.16.18.1 Note: When all is configured properly, users can control the device through commands, which are available in the separate document “API Command Set_ MX-0402-MST”. Telnet Connect a control PC to the LAN port of the device. Before you intend to control the device through telnet API, you shall establish connection between this device and your computer. -
Page 10: Web Ui Introduction
5. Input a new password in the dialog box and click “Save and Continue” to enter the main page. The password shall be alphanumeric with 4 to 16 characters in length. Note: If users forget the login password, the following ways can be used to restore the default password: •... - Page 11 This section allows users to switch input for output, set USB-A switching, set audio switching, and mute audio. • VIDEO SWITCH table: Click the button in the tale to switch one input source for VIDEO OUT 1 / VIDEO OUT 2 (Button turns from white to blue when the selection is done).
- Page 12 Select Port: Click to select an output port from the drop-down menu. • Read: Click to read the EDID of the selected output. The result shows on the table of the page. • Save As: Click to save the read EDID as a bin file to local PC. •...
- Page 13 Control This section allows users to control the connected CEC enabled displays to power on/off, and set auto-CEC function. • Display ON/OFF: Click to control the corresponding CEC-enabled display to power on/off immediately. • Output: Select an output from the drop-down menu to set its auto-CEC function. •...
-
Page 14: Network Settings
Network Settings This section is to set between the static and dynamic IP address. IP Mode • DHCP: When enabled, the IP address of the Matrix is assigned automatically by the DHCP server connected. • Static: When enabled, you need to set up the IP address manually. Default setting: DHCP Apply Click to save and perform the network setting, and the setting change will take effect immediately. -
Page 15: Restore Factory
Update a) Click “Browse” to select the update file from local PC. b) Click “Update” to start the upgrading. Note: The device will reboot automatically when firmware update is completed successfully. Please wait for about 2-3 minutes, then refresh and log in again.
Need help?
Do you have a question about the MX-0402-MST and is the answer not in the manual?
Questions and answers