
Related Manuals for Fluke ii500


Summary of Contents for Fluke ii500
- Page 1 Acoustic Imager Users Manual June 2024 © 2024 Fluke Corporation. All rights reserved. All product names are trademarks of their respective companies.
- Page 2 LIMITED WARRANTY AND LIMITATION OF LIABILITY Each Fluke product is warranted to be free from defects in material and workmanship under normal use and service. The warranty period is two years and begins on the date of shipment. Parts, product repairs, and services are warranted for 90 days. This warranty extends only to the original buyer or end-user customer of a Fluke authorized reseller, and does not apply to fuses, disposable batteries, or to any product which, in Fluke's opinion, has been misused, altered, neglected, contaminated, or damaged by accident or abnormal conditions of operation or handling.
-
Page 3: Table Of Contents
Table of Contents Title Page Introduction ....................................1 Contact Fluke ....................................1 Safety Information ..................................1 Specifications ....................................1 Before You Start .................................... 2 Terms to Know..................................3 Power On/Off ..................................4 Battery ....................................4 Features/Buttons ..................................6 Hand Strap/Neck Strap.................................. 7 Display ...................................... - Page 4 Test Microphones ................................13 Save Diagnostic Information ............................13 Basic Operation ..................................... 14 File Transfer....................................15 Import Saved Images or Video Files with Fluke Connect Desktop ....................15 Firmware Update ................................... 16 Maintenance ....................................16 How to Clean the Case ................................16 Acoustic Sensor Care................................
-
Page 5: Introduction
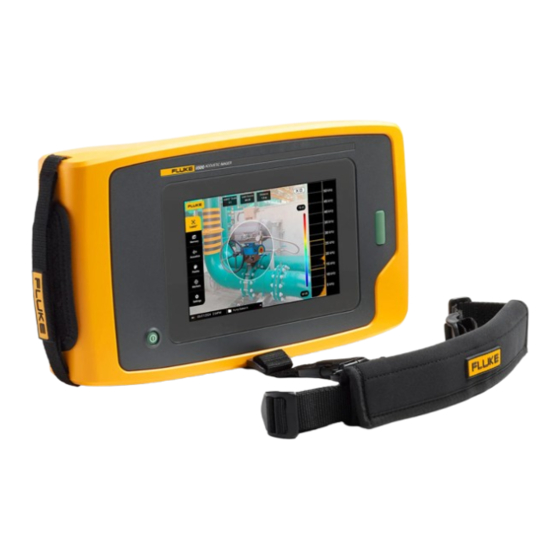
Introduction Contact Fluke The Fluke ii500 is an Acoustic Imager (the Product or Imager) that Fluke Corporation operates worldwide. For local contact information, detects and locates an acoustic signature. These signatures can indicate go to our website: www.fluke.com. leaks in compressed air, compressed gas, and vacuum systems. -
Page 6: Before You Start
Before You Start Table 1 is a list of items included with the Imager. Use the part numbers to order additional accessories. Table 1. Standard Equipment Item Description Part Number ii500 Acoustic Imager Rechargeable Lithium-ion Battery Pack 3894688 ... -
Page 7: Terms To Know
Acoustic Imager Before You Start Terms to Know Background Noise. The noise that exists in the surroundings that the microphone sensors detect along with the sound sources Use this section to familiarize yourself with these terms that are of possible leaks. Generally, background noise is higher in lower unique to this Imager and sound pressure measurements. -
Page 8: Power On/Off
LEDs are on, the battery charge is at 100 % of available capacity. before the Battery. • Use only Fluke approved power adapters to charge the battery. • Keep cells and battery packs clean and dry. Clean dirty connectors with a dry, clean cloth. - Page 9 Acoustic Imager Before You Start To charge the battery: Figure 1. Battery Connect the ac power supply to the ac wall outlet and connect the dc output to the charger base. See Figure Put one or two batteries into bay of charger base. Charge battery.
-
Page 10: Features/Buttons
Users Manual Features/Buttons Table 2 is a list of the Imager features. Table 2. Feature/Control Descriptions Button Function Button Function Power On/Off Acoustic Sensor Hand Strap Battery Compartment Touchscreen Display USB-C Connector Capture Button for Image or Start/Stop Video Neck Strap Anchor ... -
Page 11: Hand Strap/Neck Strap
Acoustic Imager Hand Strap/Neck Strap Hand Strap/Neck Strap Table 3. Touchscreen The Imager includes a hand strap and a neck strap that makes it easy to hold and operate as you take measurements. See Figure 2 for information about setup. Figure 2. -
Page 12: Menus
Users Manual Menus Image To view the tool menu, tap your finger on the display. This action Image mode captures a still photo of the scene with overlapping reveals the menu for parameter settings. Tap anywhere on the sound image and saves it in a .PNG or .JPG format. The Image display outside the menu to hide the menu. -
Page 13: Capture Analysis Modes
The Imager uses the entered distance to calculate the LeakQ value. Online tools and calculators are available to create reports. For more If the measured distance requires additional adjustment, tap information, go to: www.fluke.com/ii-reporting. the Distance box to update. Push Capture button or Save in the menu. -
Page 14: Memory
Users Manual Memory Annotations The Memory menu shows an overview of all saved files with a You have 2 methods to access the annotation menu: thumbnail image. Each thumbnail includes an icon to indicate the • After a capture (image or video), tap on the small thumbnail... -
Page 15: Photo Note
Acoustic Imager Menus Photo Note Tag Note A Photo Note is an additional photo attached to the file. Examples A Tag Note is a set of predefined fields attached to a file. These fields include a photo of a label or location that adds additional information store data about the file that is useful for comparison and evaluation. -
Page 16: Acoustics
Users Manual Palette For QR code-based Asset ID recognition: to use the camera to capture and read QR code. Select the palette for the acoustic image. The color palettes offer an equal, linear presentation of colors for the best presentation of data Inspection Status: Asset Inspection Status helps you to select detail. -
Page 17: Settings
• verify the correct operation of the microphones Display Save Diagnostic Information • turn on or turn off the display logo • use at request of Fluke Customer Service to save diagnostic Localization information • select language Note • set decimal separator to point or comma The diagnostic info file is saved in the Imager memory •... -
Page 18: Basic Operation
Users Manual Basic Operation Table 4. Frequency Band Adjustment The Imager works much like a point-and-shoot camera. W Caution Do not place hand on or obstruct the acoustic sensor. Always use the sensor cover when the Product is not in use. -
Page 19: File Transfer
Tip: Sound signals reflect, particularly on smooth and flat surfaces. In certain conditions, the Imager shows a steady spot on the source Fluke Connect Desktop is an application installed on a local PC. of noise and one or more steady spots from the reflections. Move... -
Page 20: Firmware Update
Use the provided USB cable to connect the Imager to a PC with these surfaces and protect these surfaces against dirt and damage. the current version of Fluke Connect Desktop software installed. Fluke Connect Desktop software detects the connected How to Clean the Case Imager, checks the firmware version, and updates the Imager if Clean the case with a clean, damp cloth. -
Page 21: Environmental
Premium Care includes (depending on type of product and geographic availability) priority services, extended warranty coverage, calibration assistance, and access to loaner units during repairs. For further details on Fluke Premium Care and its features, please visit the Fluke website at www.fluke.com/premiumcare...
Need help?
Do you have a question about the ii500 and is the answer not in the manual?
Questions and answers