
Related Manuals for Kolin KPA-100-R10N410


Summary of Contents for Kolin KPA-100-R10N410
- Page 1 Owner’s Manual PORTABLE AIR CONDITIONER KPA-100-R10N410 Please read this owner’s manual before operation and retain it for future reference.
- Page 2 -------------------------------------------------------------------------- Safety Instruction -------------------------------------------------------------------------- -------------------------------------------------------------------------- -------------------------------------------------------------------------- -------------------------------------------------------------------------- -------------------------------------------------------------------------- -------------------------------------------------------------------------- ----------...
- Page 3 II. SAFETY INSTRUCTION . CAUTIONS Please read the operating instructions carefully before using your dehumidifier for the first time.
- Page 4 4. Do not operate the unit if the cable or other connector is damaged or if something abnormal may happen. Please call the Kolin hotline for help. 5. Disconnect the unit from the power supply when it is not in use, or before relocating or cleaning it.
-
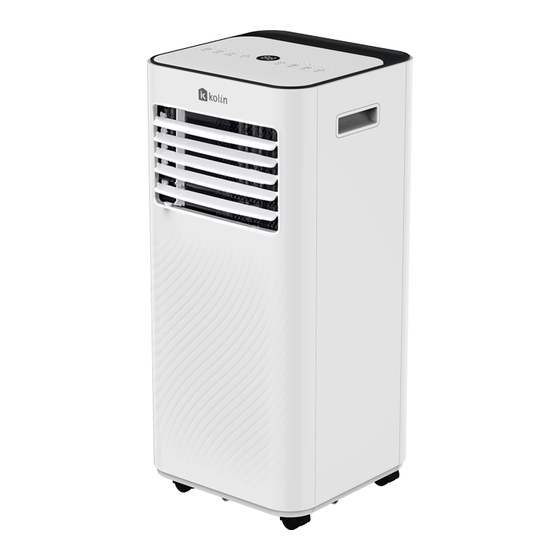
Page 5: Product Diagram
II. PRODUCT DIAGRAM 1. Control panel 2. Cold air outlet with adjustable louver 3. Handle 4. Air inlet with air lter 5. Hot air exhaust outlet 6. Continous drain outlet ( Dehumidify mode and Cooling mode) 7. Drainage Hole 8. Caster NOTE: The appearance is only for reference. -
Page 6: Installation
III.FEATURES High Capacity in a compact size with fan, cooling and dehumidifying function. Temperature setting and display LED Digital display Electronic control with built-in timer, sleep mode Self-evaporating system for better efficient Auto shut off when base pan is full. Automatic restart in the event of power outage Auto defrosting function at low ambient temperatures Remote control... - Page 7 Choose your location • If tipped more than 45°, allow the unit to set upright for at least 2 hours before start up. Place the unit on a firm, level surface in an area with at least 50cm of free space around it to allow •...
- Page 8 Step 2: Connect the windows kit adapter to the other end of the exhaust hose. Step 3: Extend the adjustable window kit the length of your window. Connect the exhaust hose to the window kit. Step 4: Close your window to secure the kit in place. It needs to hold the windows kit firmly in place, secure the window kit with duct tape if required.
- Page 9 Step 5: Attach the hose connector to the exhaust air outlet of unit. Step 6: Adjusting the length of the flexible exhaust hose, and avoid bends in the hose. Then place AC near an electrical outlet. Step 7: Adjust the louver at the air outlet, and then switch on the unit.
-
Page 10: Operation
V. Operation Control Panel and Display Function Keys and Indicators... -
Page 11: Remote Control
Remote Control... -
Page 12: Cooling Your Room
Settings Start- up and Shutdown Press POWER to turn the unit on. • Press MODE button to select the desired operation mode. • Press POWER again to turn off the power. • Operation mode • The unit has four operation modes: Fan, Cool, Dehumidifier, Sleep. A. -
Page 13: Automatic Defrost
Timer Setting ( 1hour-24 hours ) The timer has two ways of operation: Automatic Defrost Overload Protection... - Page 14 Drainage Manual drainage: 1) When the machine stops after the water is full, please unplug the power plug. Notes: Please move the machine carefully, so as not to spill the water in the water pan at the bottom of the body. 2) Place the water container below the side water outlet behind the body.
-
Page 15: Continuous Drainage
Continuous drainage The self-evaporating system uses the collected water to cool the condenser coils for better efficient performance. It is no need to empty the drainage tank in cooling operation except in drying operation and high humidity conditions. The condensate water evaporates at the condenser and evacuated through the exhaust hose. -
Page 16: Cleaning And Care
VI. Cleaning and Care Cleaning the air ilter (every two weeks) Dust collects on the filter and restricts the airflow. The restricted airflow reduces the efficiency of the system and if it becomes blocked it can cause damage to the unit. The air filter requires regular cleaning. - Page 17 Cleaning up of Refrigerant General Measures: 1. Gas/vapor heavier than air. May accumulate in confined spaces, particularly at or below ground level. 2. Eliminate every possible source of ignition. 3. Use appropriate personal protection equipment (PPE). 4. Evacuate unnecessary personnel, isolate, and ventilate area. 5.
-
Page 18: Troubleshooting
VII. Troubleshooting... - Page 19 VIII. Decommissioning 8. DECOMMISSIONING STORAGE Long-Term Storage - If you will not be using the unit for an extended period of time (more than a few weeks) it is best to clean the unit and dry it out completely. Please store the unit per the following steps: Unplug the unit and emove exhaust hose and window kit store with the...
- Page 20 notice for product improvement. Any updates to the manual will be uploaded to the service website, please check for the latest version. If you have any concerns, please contact us at the following: Customer hotline: (02) 8852-6868 Text hotline: +63 917-881-8982 Email: customerservice@kolinphil.com.ph Also, please like and follow us on our social media accounts:...
Need help?
Do you have a question about the KPA-100-R10N410 and is the answer not in the manual?
Questions and answers