Advertisement
Quick Links
Advertisement

Subscribe to Our Youtube Channel
Related Manuals for ADIROffice ADI628-WBLK


Summary of Contents for ADIROffice ADI628-WBLK
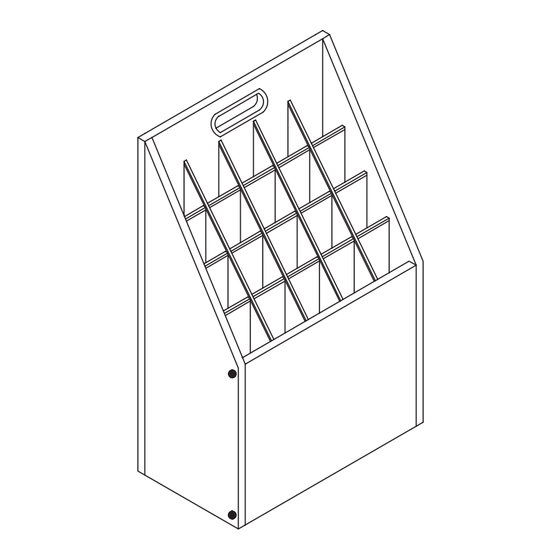
- Page 1 Wooden Upright Roll File With 20 Openings ADI628-WBLK USER GUIDE...
- Page 2 Thank you for your purchase. AdirOffice has a commitment to delivering quality and stylish office furniture and equipment. We understand starting and maintaining a business is expensive enough. We can help you make it cost effective and beautiful. Plus, our expert team makes sure everything...
- Page 3 Table of Contents Parts and Hardware Assembly Instructions Notes Limited Warranty...
- Page 4 Parts and Hardware Parts: Left Side Panel Right Side Panel Front Panel Back Panel Bottom Panel Horizontal Panel (x 3)
- Page 5 Parts and Hardware Vertical Panel (x4) Hardware: M4 x 45MM Screw Handle Screw Hole Cover (x 10) (x 10) Horizontal Edge Channel Vertical Edge Channel PVC Nail Leg (x 4) (x 3) (x 4) Tools Required (But Not Included) • Phillips Head Screwdriver •...
- Page 6 Assembly Instructions STEP 1: A. Locate the Left Side Panel (A), the Front Panel (C), the Back Panel (D), and 5 M4 x 45mm Screws (1). B. Connect the Front Panel (C) to the Left Side Panel (A) using M4 x 45mm Screws (1) and a screwdriver.
- Page 7 Assembly Instructions STEP 2: A. Turn the assembled structure so that it’s lying down on the Left Side Panel (A). B. Locate and slide in the Bottom Panel (E) in between the grooves located between the Back Panel (D) and the Front Panel (C), as pictured...
- Page 8 Assembly Instructions STEP 3: A. Locate and place the Right Side Panel (B) on top of the assembled structure, as pictured. B. Insert and tighten two M4 x 45mm Screws (1) into the predrilled holes, with the assistance of a screwdriver, to connect the Right Side Panel (B) and the Front Panel (C).
- Page 9 Assembly Instructions STEP 4: A. Turn the assembled structure so that it’s resting on the Bottom Panel (E). B. Locate the three Horizontal Panels (F) and all four Vertical Panels (G). C. Stand all three Horizontal Panels (F) upright and insert each Vertical Panel (G) into the slots until they are all flush, as pictured.
- Page 10 Assembly Instructions STEP 5: A. Locate the Handle (2) assembly and insert each piece of the Handle (2) into the pre-cut hole, as shown, until secure.
- Page 11 Assembly Instructions STEP 6: A. Locate and insert all of the Screw Hole Covers (3) into each screw hole, as shown. B. If needed, gently tap them in with a hammer until they are flush with the structure.
- Page 12 Assembly Instructions STEP 7: A. Place the horizontal and vertical panel assembly into the assembled role file, as shown.
- Page 13 Assembly Instructions STEP 8: A. Locate and slide the Horizontal Edge Channels (4) and Vertical Edge Channels (5) until secure, as shown. B. Lay the structure on the Back Panel (D) and insert all 4 PVC Nail Legs (6). C. If needed, gently tap them in with a hammer until they are flush with the structure.
- Page 14 Assembly Instructions STEP 9: A. Rest the assembled structure on the PVC Nail Legs (6), and your Wooden Upright Role File with 20 Openings is ready to use.
- Page 15 Notes...
- Page 16 Notes...
- Page 17 Notes...
- Page 18 Limited Warranty Adir Corp (the “Company” or “Tiger Companies”) warrants to the purchaser that the product will be free from defects in workmanship and materials for a period of 6 months from the date of purchase. The warranty period is not extended if we repair, replace, exchange, or provide a refund for the product (as determined in our sole discretion).
- Page 19 ADI628-WBLK ©2023 All Rights Reserved. adircorp.com...
Need help?
Do you have a question about the ADI628-WBLK and is the answer not in the manual?
Questions and answers