Advertisement
Quick Links
6
Ersatzteil - Regelung / Ordering spares / Pièces de rechange / Parti di ricambio
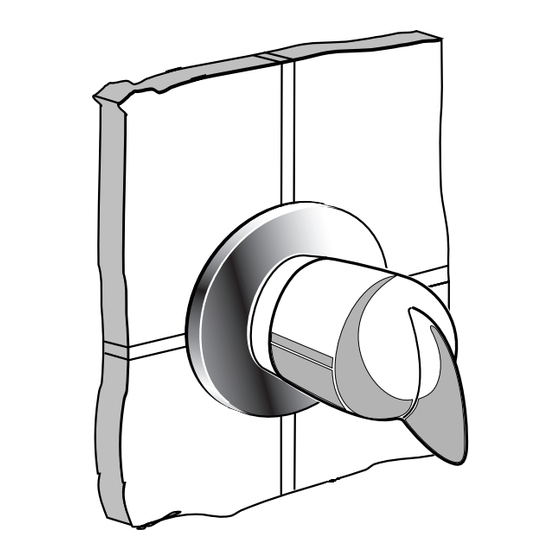
Bestellnummern für
Ersatzteile siehe neben-
stehende Zeichnung. Bei Be-
stellung der Teile in Farbe o.
anderer Oberfläche ( bei
Chrom die Nr. ohne XX ver-
wenden ) Anhängeziffer ein-
setzen.
Anhängeziffern siehe Ersatz-
teilbuch.
Spare part numbers are
shown in diagram opposite.
When ordering coloured parts
or other finishes ( for chrome
use the number without XX )
add the appropriate number
suffix.
See Spare part catalogue for
suffixes..
Les numéros de
commande des pièces de
rechange sont indiqués dans
le schéma ci-contre. Pour
commander des pièces de
couleur ou d'une autre finition
inscrire
les
suffixes
correspondants.
Pour le chrome indiquer les
numéros sans XX.
Les suffixes sont indiqués
dans le catalogue des piéces
de rechange.
I codici di ordinazione dei
ricambio sono riportati sul
disegno
a
lato.
Per
l'ordinazione di ricambi
colorati o in altre superfici, (
per il chromato indicare il
codice senza il suffisso XX )
indicare il relativo suffisso
numerico. I suffissi numerici
sono riportati nel catalogo
ricambi.
Austausch der Umschaltelemente mit O-Ringen / Replacing the diverter
7
elements and O-rings / Remplacement des éléments d'inversion avec joints
toriques / Sostituzione degli elementi di deviazione unitamente agli O-ring
Zulaufleitungen absperren. Abdeckkappe
18 herausziehen, Zapfenschraube 18 lösen und
Griff15 abziehen. Schraube 17 lösen, Griff-
innenteil 16 entfernen. Spindel 12 abschrauben
(Schlüsselweite 17). Kopfstück 8 abschrauben
(Schlüsselweite 19). Teile 2, 3 und 7 abnehmen
und die alten Umschaltelemente mit O-Ringen
herausnehmen. Neue O-Ringe einfetten und
mit den neuen Umschaltelementen in den
Armaturenkörper einsetzen. Die restlichen Tei-
le in umgekehrter Reihenfolge wieder montie-
ren. Zulaufleitungen öffnen und Dichtheit und
Funktion prüfen.
Fermer les conduites d'arrivée. Placer un
petit tournevis dans l'évidement prévu pour cela
au bord du couvercle de robinet et déboîter le
couvercle de robinet 18. Desserrer la vis du
robinet 17 et retirer les pièces 14, 15 et 16.
Dévisser la broche 12 (surplat 17). Dévisser
l'embout 8 (surplat 19). Retirer les pièces 2, 3 et
7, puis les vieux éléments d'inversion avec les
joints toriques 1. Graisser les nouveaux joints
toriques et les mettre en place dans le corps de
la robinetterie avec les nouveaux éléments
inverseurs. Remonter les autres pièces en
procédant dans l'ordre inverse à celui du
démontage. Ouvrier les conduites d'arrivée et
vérifier l'étanchéité et le bon fonctionnement.
Ihr Installateur / Your plumber / Votre installateur / L'installatore
6
1
A963 470 NU
A 963 471 NU
6a
A 963 473 XX
6b
6c
Close off supply pipes. Use a small
screwdriver in the recess on the edge of handle
cap 18 and prise it off. Undo handle nut 17 and
remove parts 14, 15 and 16. Screw off spindle 12
(spanner width 17). Srew off head piece 8
(spanner width 19). Remove parts 2, 3 and 7 and
take out the old diverter elements with O-rings 1.
Grease the new O-rings and insert into the body
of the fitting with the new diverter elements.
Replace the remaining parts in reverse order.
Open the supply pipes and check that the fitting
works correctly and does not leak.
Chiudere i tubi di alimentazione. Posizionare
un piccolo cacciavite all'altezza dell'incavo
predisposto al margine del cappuccio per la
manopola, fare leva sotto il cappuccio 18 e
rimuoverlo. Allentare la vite per la manopola 17
e rimuovere i componenti 14, 15 e 16. Svitare il
mandrino 12 (chiave n. 17). Svitare l'elemento di
testa 8 (chiave n. 19). Rimuovere i componenti
2, 3 e 7 ed estrarre i vecchi elementi di deviazione
unitamente agli O-ring 1. Lubrificare i nuovi
elementi di deviazione nel corpo del raccordo.
Rimontare i restanti componenti nell'ordine
inverso. Aprire i tubi di alimentazione e controllare
la tenuta e il funzionamento.
Ideal Standard
Euskirchener Straße 80
Postfach 53008
D-53121 BONN
Telefon ( 0228 ) 521 - 0
Telefax ( 0228 ) 52 12 41
Ideal Standard
Service-Center Neuss
Telefon ( 02131 ) 189 -0
7
2
3
A 963 472 NU
4
A 963 469 NU
10
A 963 474 XX
12
11
13
T
ENDENCE
Mehrwegeumschaltung
Multiway diverter
Inverseur multivoies
Gruppo deviatore a più'vie
Typ / Type / Tipo
Bausatz 2 / Kit 2 / Jeu de montage 2 / Kit di montaggio 2
für Fertigmontage / for final assembly / pour montage final / per montaggio finale
G 1/2
80
41 min
G 1/2
66 max
Montage- und Bedienungsanleitung
Installation Instructions
Instructions de montage
Istruzioni di montaggio
Bausatz 1
8
9
M A X
5
A 962 574 NU
Bausatz 2
A 963 432 NU
14
A 963 775 XX
16
A 962 998 NU
17
18
19
A 963 477 NU
TDA 093 / 599 / 965 684
A 3013 ..
passend zu Bausatz 1:
A 2390 NU
A 2391 NU
A 2392 NU
A 2393 NU
Ø 70
Hochwertige Armatur
Garantie nur bei Montage
durch den Fach-Installateur
82
Dem Benutzer der Armatur aushändigen.
Please hand over to the user of the fitting.
A remettre à l'utilisateur de la robinetterie.
Si prega di voler consegnare le presenti
istruzioni l'utilizzatore della rubinetteria.
15
Made in Germany
Advertisement

Subscribe to Our Youtube Channel
Related Manuals for Ideal-Standard TENDENCE A 3013 Series


Summary of Contents for Ideal-Standard TENDENCE A 3013 Series
- Page 1 Ersatzteil - Regelung / Ordering spares / Pièces de rechange / Parti di ricambio Bestellnummern für Ersatzteile siehe neben- stehende Zeichnung. Bei Be- stellung der Teile in Farbe o. anderer Oberfläche ( bei Chrom die Nr. ohne XX ver- Bausatz 1 wenden ) Anhängeziffer ein- setzen.
- Page 2 Vor Beginn der Montage bitte sorgfältig durchlesen. / Please read these instruction carefully before Technische Daten / Technical Data / Ca- commencing installation. / Lire attentivement avant de commencer le montage. / Prima di iniziare il montaggio ractéristiques techniques / Dati tecnici leggere attentamente le seguenti istruzioni.
Need help?
Do you have a question about the TENDENCE A 3013 Series and is the answer not in the manual?
Questions and answers