Tsun TSOL-MS300 Balcony User Manual
Balcony microinverter
Hide thumbs
Also See for TSOL-MS300 Balcony:
- User manual (268 pages) ,
- Quick installation manual (8 pages) ,
- Quick installation (2 pages)
Chapters
Table of Contents

Related Manuals for Tsun TSOL-MS300 Balcony


Summary of Contents for Tsun TSOL-MS300 Balcony
- Page 1 Balcony Microinverter Balcony Microinverter Multilingual user manual reading instructions English version user manual: 1-24 pages Bedienungsanleitung in deutscher Version: Seiten 26-48 V1.1 - 1 -...
- Page 2 Balcony Microinverter TSOL-MS300 Balcony TSOL-MS350 Balcony TSOL-MS400 Balcony TSOL-MS600 Balcony TSOL-MS700 Balcony TSOL-MS800 Balcony TSOL-MS2000(600) TSOL-MS2000(800) V1.1 - 2 -...
-
Page 3: Trademarks And Permissions
Balcony Microinverter Trademarks and Permissions TSUN and other TSUNESS trademarks are trademarks of TSUNESS Co., Ltd. All other trademarks and trade names mentioned in this document are the property of their respective holders. TSUNESS Co., Ltd makes no representations express or implied, concerning this... -
Page 4: Table Of Contents
Balcony Microinverter Content Trademarks and Permissions ............................. - 2 - Audience .................................... - 3 - Content ....................................- 4 - Read This First ...................................- 5 - Important Safety Information ..................................- 5 - Product Label ......................................- 5 - System Introduction ................................- 6 - Product Description .................................... -
Page 5: Read This First
Balcony Microinverter Read This First Dear customer, thank you for choosing the Balcony microinverter from TSUN. We hope you will find our products meet your needs for renewable energy. Meantime, we appreciate your feedback regarding our products. A solar microinverter, or simply microinverter, is a plug-and-play device used in photovoltaics, that converts direct current (DC) generated by a single solar module to alternating current (AC). -
Page 6: System Introduction
The Balcony microinverter is used in grid-tied applications, comprised of two key elements: Balcony Microinverter. TSUN monitoring system. The microinverter converts the DC electricity generated by solar panels into AC electricity which is in accordance with the requirements of the public grid and sends the AC into the grid, reducing the load pressure of the grid. - Page 7 TSOL-MS600 Balcony TSOL-MS700 Balcony TSOL-MS800 Balcony TSOL-MS2000(600) TSOL-MS2000(800) The microinverter is integrated with the Wi-Fi module and connects to the home Wi-Fi router directly. Users can monitor the power generation of the system by TSUN monitoring App. V1.1 - 7 -...
-
Page 8: Product Description
Balcony Microinverter Product Description TSOL-MS300 Balcony TSOL-MS350 Balcony TSOL-MS400 Balcony TSOL-MS600 Balcony TSOL-MS700 Balcony TSOL-MS800 Balcony V1.1 - 8 -... -
Page 9: Datasheet
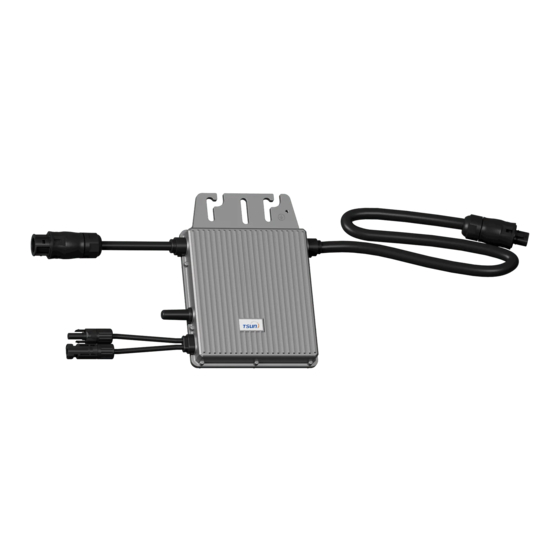
Balcony Microinverter TSOL-MS2000(600) TSOL-MS2000(800) Mounting Hole AC Cable Grounding Hole Antenna DC Cables Status Light Datasheet TSOL-MS400 TSOL-MS350 TSOL-MS300 Model Balcony Balcony Balcony Input Data (DC) Recommended Module Power (W) 300 ~ 550 300 ~ 550 300 ~ 550 Start-up Voltage per Input (V) Rated Input Voltage (V) MPPT Voltage Range per Input (V) 16~60... - Page 10 Over-heat protection Integrated Mechanical Data Dimensions (W×H×D mm) 164 * 225 * 30 Weight [kg] 1.75 General Data Display LED indicators; TSUN APP+WEB Communication built-in WiFi module Type of Isolation Galvanically Isolated HF Transformer Type of Enclosure IP67 Cooling Natural convection Operating Ambient Temperature -40 ~ +65 (derating of over 50°C Ambient Temperature)
- Page 11 Over-heat protection Integrated Mechanical Data Dimensions (W×H×D mm) 250 * 223 * 30 Weight [kg] General Data Display LED indicators; TSUN APP+WEB Communication built-in WiFi module Type of Isolation Galvanically Isolated HF Transformer Type of Enclosure IP67 V1.1 - 11 -...
- Page 12 Balcony Microinverter Cooling Natural convection Operating Ambient Temperature -40 ~ +65 (derating of over 50°C Ambient Temperature) Range Relative Humidity 100% Max. Operating Altitude Without 2000 Derating [m] WiFi Standard 802.11b/g/n WiFi Frequency Range 2.412GHz-2.472GHz 802.11b: +17dBm + 1.5dBm (@11Mbps) WiFi Transmitting Power 802.11g:+15dBm + 1.5dBm(@54Mbps) 802.11n: +14dBm + 1.5dBm(@HT20, MCS7)
- Page 13 AC overvoltage protection Integrated Over-heat protection Integrated Dimensions (W×H×D mm) 331 * 261 * 44 Weight [kg] Display LED indicators; TSUN APP+WEB Communication built-in WiFi module Type of Isolation Galvanically Isolated HF Transformer Type of Enclosure IP67 Cooling Natural convection Operating Ambient Temperature -40 ~ +65 (derating of over 50°C Ambient Temperature)
-
Page 14: Microinverter Installation
Pre-installation Check Check the Package Although TSUN’s microinverters have surpassed stringent testing and are checked before they leave the factory, it is uncertain that the microinverters may suffer damage during transportation. Please check the package for any obvious signs of damage, and if such evidence is present, do not open the package and contact your dealer as soon as possible. - Page 15 Balcony Microinverter Choose a suitable position, fix the buffer strip on the railing, and then use stainless steel rolling strip to fix the bracket. Wall Installation Fix the bracket to the wall with screws in a suitable position. Step 2. Connect the ground cable DANGER ·Do not install the equipment in adverse environment conditions such as flammable, explosive, corrosive, extreme high or low temperature, and humid.
- Page 16 Balcony Microinverter Wall Installation Using two pairs of screws and nuts to fix the micrioinverter on the frame. Make sure that the label of microinverter should be upside. Step 3. Connect the ground cable. WARNING ·Ensure that all the microinverters are well grounded. ·Use ɸ6 screw for the ground port.
- Page 17 Balcony Microinverter Step 4. Connect AC end cable WARNING ·Ensure that all AC cables are correctly wired and that none of the wires are pinched or damaged. ·Use AWG 16 (1.5 mm²) cable for AC end cable. CAUTION .The AC connecters may be provided by different suppliers. The port definitions are subject to actual objects.
- Page 18 Balcony Microinverter Live (Brown/Red) Neutral (Blue/Black) Ground (Yellow-Green) Reassemble the AC connector as shown below. Plug the AC connector into the microinverter and connect the AC cable to the AC distribution box. Step 5. Connect the DC cable DANGER ·When the photovoltaic array is exposed to light, it provides a DC voltage to the inverter. WARNING ·Ensure that all DC cables are correctly wired and that none of the wires are pinched or damaged.
- Page 19 The LED will flash green and red at start-up. The definition of LED is shown below. Status Indicates Flashing Green (0.2-0.8s ) Working normally Flashing Red Working abnormally Solid Red Fault or Scan the QR code below to find the latest User Guidance of TSUN Monitoring System. V1.1 - 19 -...
-
Page 20: Remote Active Power Control
(input port) to cease the output of active power or limit active power to a regulated level. This logic input can be the RS485 port, Ethernet port, and so on. TSUN microinverter provides an extra power control device that contains an RS485 port for this remote active power control. For more information, refer to the “User Manual of TSUN power control device”. -
Page 21: Fault Code And Troubleshooting
Check the voltage of the PV module and make sure that the PV1VoltOver_Fault below the maximum DC input voltage of the voltage is microinverter. If this fault appears continuously, please contact the TSUN PV2VoltOver_Fault service. This warning mostly appears in the morning or at dusk. It’s PV1VoltLow_Fault normal and will disappear automatically. -
Page 22: Maintenance Guide
Balcony Microinverter Maintenance Guide Routine Maintenance Only authorized personnel are allowed to carry out the maintenance operations and are responsible for reporting any anomalies. Always use the personal protective equipment provided by the employer when carrying out maintenance. ... -
Page 23: Warranty Service
Balcony Microinverter Warranty Service This Warranty is subject to the following conditions: The products must have been installed and correctly commissioned by an authorized and licensed installer. Proof may be required of correct commissioning of the Product (such as a certificate of compliance). -
Page 24: Distributor Responsibility
Within the warranty period of the microinverter, the invoice and date of purchase are required for the service. Besides, the trademark on the product should be visible, otherwise, warranty is not available. More information can be found in TSUN Warranty Policy. V1.1... - Page 25 Balcony Microinverter TSOL-MS300 Balcony TSOL-MS350 Balcony TSOL-MS400 Balcony TSOL-MS600 Balcony TSOL-MS700 Balcony TSOL-MS800 Balcony TSOL-MS2000(600) TSOL-MS2000(800) V1.1 - 25 -...
- Page 26 Balcony Microinverter Marken und Berechtigungen TSUN und andere TSUNESS-Marken sind Marken von TSUNESS Co., Ltd. Alle anderen in diesem Dokument erwähnten Marken und Handelsnamen sind Eigentum ihrer jeweiligen Inhaber. TSUNESS Co., Ltd übernimmt keine ausdrücklichen oder stillschweigenden Zusicherungen bezüglich dieser Dokumentation oder der darin beschriebenen Geräte und / oder Software, einschließlich (ohne Einschränkung) jegliche implizite Garantie der Nützlichkeit,...
- Page 27 Balcony Microinverter Publikum Dieses Handbuch richtet sich an professionelles Installations- und Wartungspersonal. Inhalt Marken und Genehmigungen ............................- 2 - Publikum ..................................- 3 - Inhalt ....................................- 4 - Lesen Sie dies zuerst ................................- 5 - Wichtige Sicherheitsinformationen ................................- 5 - Produktetikett ......................................- 5 - Systemeinführung ................................
-
Page 28: Lesen Sie Dies Zuerst
Lesen Sie dies zuerst Sehr geehrter Kunde, vielen Dank, dass Sie sich für den Balcony-Mikrowechselrichter von TSUN entschieden haben. Wir hoffen, dass unsere Produkte Ihren Anforderungen an erneuerbare Energien gerecht werden. In der Zwischenzeit freuen wir uns über Ihr Feedback zu unseren Produkten. -
Page 29: Systemeinführung
Sie den umliegenden Bereich nicht weiter als 25 Zentimeter. Systemeinführung Der Balcony-Mikrowechselrichter wird in netzgebundenen Anwendungen eingesetzt und besteht aus zwei Schlüsselelementen: Balkon-Mikrowechselrichter. TSUN-Überwachungssystem. des öffentlichen Netzes entspricht, und sendet den Wechselstrom in das Netz, wodurch der V1.1 - 29 -... - Page 30 Balcony Microinverter Lastdruck des Netzes verringert wird. TSOL-MS300 Balcony TSOL-MS350 Balcony TSOL-MS400 Balcony TSOL-MS600 Balcony TSOL-MS700 Balcony TSOL-MS800 Balcony TSOL-MS2000 (600) TSOL-MS2000 (800) Der Mikrowechselrichter ist in das WLAN-Modul integriert und verbindet sich direkt mit dem heimischen WLAN-Router. Benutzer können die Stromerzeugung des Systems mit der TSUN-Überwachungs-App überwachen .
-
Page 31: Produktbeschreibung
Balcony Microinverter Produktbeschreibung TSOL-MS300 Balcony TSOL-MS350 Balcony TSOL-MS400 Balcony TSOL-MS600 Balcony TSOL-MS700 Balcony TSOL-MS800 Balcony V1.1 - 31 -... -
Page 32: Datenblatt
Balcony Microinverter TSOL-MS2000 (600) TSOL-MS2000 (800) Montageloch A C-Kabel Erdungsloch Antenne Gleichstromkabel Status Licht Datenblatt TSOL-MS400 TSOL-MS350 TSOL-MS300 Modell Balcony Balcony Balcony Eingangsdaten (DC) Empfohlene Modulleistung (W) 30 0 ~ 55 0 30 0 ~ 55 0 30 0 ~ 55 0 Startspannung pro Eingang (V) Nenneingangsspannung (V) MPPT- Spannungsbereich pro... - Page 33 Integriert Überhitzungsschutz Integriert Mechanische Daten Abmessungen (B×H×T mm) 164 * 225 * 30 Gewicht (kg] 1,75 Allgemeine Daten Anzeige LED-Anzeigen; TSUN APP+WEB Kommunikation integriertes WLAN-Modul Art der Isolierung Galvanisch isolierter HF-Transformator Art des Gehäuses IP67 Kühlung Natürliche Konvektion Betriebsumgebungstemperaturberei - 40 ~ +65 (Leistungsreduzierung bei über 50 °C...
- Page 34 Balcony Microinverter BLE-Empfangsempfindlichkeit -97 dBm ※ Der Wechselspannungs- und Frequenzbereich kann je nach Stromnetz des jeweiligen Landes unterschiedlich sein. TSOL-MS800 TSOL-MS700 TSOL-MS600 Modell Balcony Balcony Balcony Eingangsdaten (DC) Empfohlene Modulleistung (W) 30 0 ~ 55 0 30 0 ~ 55 0 30 0 ~ 55 0 Anlaufspannung pro Eingang (V) Nenn -Eingangsspannung (V)
- Page 35 AC-Überspannungsschutz Integriert Überhitzungsschutz Integriert Mechanische Daten Abmessungen (B×H×T mm) 250 * 223 * 30 Gewicht (kg] Allgemeine Daten Anzeige LED-Anzeigen; TSUN APP+WEB Kommunikation integriertes WLAN-Modul Art der Isolierung Galvanisch isolierter HF-Transformator Art des Gehäuses IP67 Kühlung Natürliche Konvektion Betriebsumgebungstemperaturberei - 40 ~ +65 (Leistungsreduzierung bei über 50 °C...
- Page 36 AC-Kurzschlussschutz Integriert AC-Überspannungsschutz Integriert Überhitzungsschutz Integriert Abmessungen (B×H×T mm) 331 * 261 * 44 Gewicht (kg] Anzeige LED-Anzeigen; TSUN APP+WEB Kommunikation integriertes WLAN-Modul Art der Isolierung Galvanisch isolierter HF-Transformator Art des Gehäuses IP67 Kühlung Natürliche Konvektion Betriebsumgebungstemperaturberei - 40 ~ +65 (Leistungsminderung bei über 50°C Umgebungstemperatur)
-
Page 37: Installation
Überprüfung vor der Installation Überprüfen Sie das Paket Obwohl die Mikrowechselrichter von TSUN strenge Tests durchlaufen und vor Verlassen des Werks überprüft werden, ist es nicht sicher, ob die Mikrowechselrichter während des Transports beschädigt werden. Bitte überprüfen Sie die Verpackung auf offensichtliche Schäden. Öffnen Sie die Verpackung nicht, wenn solche Anzeichen vorhanden sind, und wenden Sie sich so schnell wie möglich an Ihren Händler. -
Page 38: Installationsschritte
Balcony Microinverter Überprüfen Sie mit einem Mobiltelefon die WLAN-Signalstärke am Installationsort. Wenn das WLAN-Signal schlecht ist, versuchen Sie, den Mikro-Wechselrichter an einer anderen Position zu installieren oder den WLAN-Router zu verschieben. Installationsschritte GEFAHR · Überprüfen Sie vor der Installation das Gerät, um sicherzustellen, dass keine Transport- oder Handhabungsschäden vorliegen, die die Isolationsintegrität oder Sicherheitsabstände beeinträchtigen könnten. - Page 39 Balcony Microinverter Schritt 2. Erdungskabel anschließen GEFAHR · Installieren Sie das Gerät nicht in widrigen Umgebungsbedingungen wie als entzündlich, explosiv, ätzend, extrem hohe oder niedrige Temperaturen, und feucht. Balkonmontage Mit zwei Paar Schrauben und Muttern wird der Mikroinverter am Rahmen. Achten Sie darauf, dass das Etikett des Mikrowechselrichters nach oben zeigt.
- Page 40 Balcony Microinverter Schritt 3. Schließen Sie das Erdungskabel an. WARNUNG ·Stellen Sie sicher, dass alle Mikrowechselrichter gut geerdet sind. ·Verwenden Sie eine ɸ6- Schraube für den Erdungsanschluss. Verbinden Sie das Erdungskabel mit dem Gehäuse des Mikrowechselrichters. Schritt 4: Schließen Sie das AC-Endkabel an WARNUNG ·Stellen Sie sicher, dass alle AC-Kabel richtig verdrahtet sind und keines der Kabel Drähte sind eingeklemmt oder beschädigt.
- Page 41 Balcony Microinverter objektabhängig. Trennen Sie den AC-Stecker wie unten gezeigt. Führen Sie das AC-Kabel durch das Gehäuse des AC-Anschlusses und schließen Sie das Kabel an den richtigen Anschluss an. Die Definition des Ports ist unten dargestellt: Live (Brown/Red) Neutral (Blue/Black) Ground (Yellow-Green) Bauen Sie den AC-Anschluss wie unten gezeigt wieder zusammen.
- Page 42 Sie ein DC-Verlängerungskabel, um PV-Module an den Mikro-Wechselrichter anzuschließen. ·Verwenden Sie MC4-kompatible DC-Anschlüsse auf der Wechselrichterseite des DC -Verlängerungskabels oder beziehen Sie die DC-Anschlüsse von TSUN . die DC-Anschlüsse auf der Modulseite des DC-Verlängerungskabels an die Hersteller von PV-Modulen .
- Page 43 Logikschnittstelle ausgestattet sind (Eingangsanschluss), um die Ausgabe der Wirkleistung zu stoppen oder die Wirkleistung auf ein reguliertes Niveau zu begrenzen. Dieser Logikeingang kann Dies kann der RS485-Anschluss, der Ethernet-Anschluss usw. sein. Der TSUN-Mikrowechselrichter bietet ein zusätzliches Leistungssteuergerät , das einen RS485-Anschluss enthält für diese Fernsteuerung der Wirkleistung.
-
Page 44: Selbsttestfunktion Für Italien
Balcony Microinverter Selbsttestfunktion für Italien TSUN-Mikrowechselrichter und TSUN-Überwachungssystem bieten eine Selbsttestfunktion für den italienischen Markt. Weitere Informationen finden Sie in der „Benutzeranleitung zur Selbsttestfunktion“. V1.1 - 44 -... -
Page 45: Fehlercode Und Fehlerbehebung
Spannung DC-Eingangsspannung des Mikrowechselrichters liegt. Sollte dieser Fehler dauerhaft auftreten, kontaktieren Sie PV2VoltOver_Fault bitte den TSUN-Service. Diese Warnung erscheint meist morgens oder in der PV1VoltLow_Fault Abenddämmerung. Das ist normal und verschwindet automatisch. Sollte diese Warnung tagsüber erscheinen, überprüfen Sie bitte den Anschluss des PV -Moduls. -
Page 46: Lagerung Und Demontage
Balcony Microinverter Wartungshandbuch Routinewartung Nur autorisiertes Personal darf die Wartungsarbeiten durchführen und ist für die Meldung etwaiger Anomalien verantwortlich. Bei Wartungsarbeiten stets die vom Arbeitgeber bereitgestellte persönliche Schutzausrüstung verwenden. Überprüfen Sie während des normalen Betriebs, ob die Umgebungs- und Logistikbedingungen angemessen sind. -
Page 47: Recycling Und Entsorgung
Balcony Microinverter Recycling und Entsorgung Dieses Gerät darf nicht als Hausmüll entsorgt werden . Ein Mikrowechselrichter, der das Ende seiner Lebensdauer erreicht hat, muss nicht an den Händler zurückgegeben werden. Benutzer müssen eine zugelassene Sammel- und Recyclinganlage in ihrer Nähe finden. Garantieleistungen Diese Garantie unterliegt den folgenden Bedingungen: ... -
Page 48: Verantwortung Des Vertriebshändlers
Innerhalb der Garantiezeit des Mikrowechselrichters sind für den Service die Rechnung und das Kaufdatum erforderlich. Außerdem muss das Markenzeichen auf dem Produkt sichtbar sein, andernfalls besteht keine Garantie. Weitere Informationen finden Sie in den Garantiebestimmungen von TSUN. V1.1 - 48 -... - Page 49 Balcony Microinverter V1.1 - 49 -...
Need help?
Do you have a question about the TSOL-MS300 Balcony and is the answer not in the manual?
Questions and answers