Chapters
Table of Contents

Related Manuals for Tsun G3


Summary of Contents for Tsun G3
- Page 1 G3&G3 Plus Multilingual user manual reading instructions English version user manual: 1-26 pages Manual do utilizador da versão portuguesa: páginas 27-46 Bedienungsanleitung in deutscher Version: Seiten 47-77...
- Page 2 G3&G3 plus Microinverter TSOL-MS300 TSOL-MS1600 TSOL-MS350 TSOL-MS1800 TSOL-MS400 TSOL-MS2000 TSOL-MS600 TSOL-MS2000(1500) TSOL-MS700 TSOL-MS800 TSOL-MS600-D TSOL-MS700-D TSOL-MS800-D V1.0...
-
Page 3: Trademarks And Permissions
G3&G3 plus Microinverter Trademarks and Permissions TSUN and other TSUNESS trademarks are trademarks of TSUNESS Co., Ltd. All other trademarks and trade names mentioned in this document are the property of their respective holders. TSUNESS Co., Ltd makes no representations express or implied, concerning this... -
Page 4: Table Of Contents
G3&G3 plus Microinverter Content Trademarks and Permissions ........................错误!未定义书签。 Audience ....................................2 Content ....................................3 Read This First ..................................4 Important Safety Information ..................................4 Product Label ........................................4 System Introduction ................................5 Product Description ......................................7 Datasheet ......................................... 8 Microinverter Installation ..............................16 Pre-installation Check ....................................16 Installation Steps ......................................16... -
Page 5: Read This First
G3&G3 plus Microinverter Read This First Dear customer, thank you for choosing the series microinverter from TSUN. We hope you will find our products meet your needs for renewable energy. Meantime, we appreciate your feedback regarding our products. A solar microinverter, or simply microinverter, is a plug-and-play device used in photovoltaics, that converts direct current (DC) generated by a single solar module to alternating current (AC). -
Page 6: System Introduction
G3&G3 plus Microinverter The symbols on the microinverter are listed below and illustrated in detail. Symbol Description This device is directly connected to the public grid, thus all work to the inverter shall only be carried out by qualified personnel. - Page 7 TSOL- MS300/MS350/MS400 TSOL- MS600/MS700/MS800 MS600-D/MS700-D/MS800-D TSOL-MS1600/MS1800/MS2000/MS2000(1500) The microinverter is integrated with the Wi-Fi module and connects to the home Wi-Fi router directly. Users can monitor the power generation of the system by TSUN monitoring App. V1.0...
-
Page 8: Product Description
G3&G3 plus Microinverter Product Description TSOL- MS600/MS700/MS800 MS600-D/MS700-D/MS800-D TSOL- MS400/MS350/MS300 TSOL-MS1600/MS1800/MS2000/MS2000(1500) V1.0... -
Page 9: Datasheet
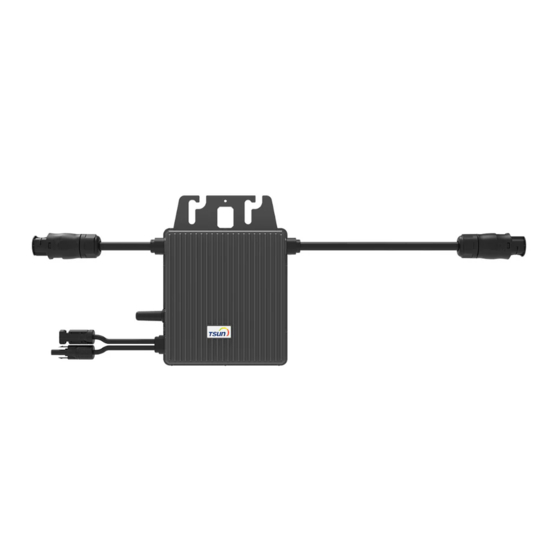
G3&G3 plus Microinverter Mounting Hole AC Cable Grounding Hole Antenna DC Cables Status Light Datasheet Model TSOL-MS800 TSOL-MS700 TSOL-MS600 Input Data (DC) Recommended Module Power (W) 300 ~ 550 300 ~ 550 300 ~ 550 Start-up Voltage per Input (V) - Page 10 G3&G3 plus Microinverter Weight [kg] General Data Display LED indicators; TSUN APP+WEB Communication built-in WiFi module Type of Isolation Galvanically Isolated HF Transformer Type of Enclosure IP67 Cooling Natural convection Operating Ambient Temperature -40 ~ +65 (derating of over 50°C Ambient Temperature)
- Page 11 G3&G3 plus Microinverter Nominal Continuous Output Power Nominal Output Current (A) 3.48 3.04 2.61 Max. Output Current (A) 3.19 Nominal Output Voltage/Range (V)* 220/230/240, 175 – 270, L/N/PE Nominal Frequency (Hz)* 50/60 Power Factor >0.99 default, 0.8 leading … 0.8 lagging Output Current Harmonic Distortion <3%...
- Page 12 G3&G3 plus Microinverter 802.11n:-73dBm(@MCS7 BLE Standard BLE5.0 BLE Frequency Range 2.402GHz-2.480GHz BLE Transmitting Power Max 15dBm BLE Receiving Sensitivity -97 dBm ※ The AC voltage and frequency range may vary depending on specific country grid. Model TSOL-MS400 TSOL-MS350 TSOL-MS300 Input Data (DC)
- Page 13 G3&G3 plus Microinverter Dimensions (W×H×D mm) 164 * 225 * 30 Weight [kg] General Data Display LED indicators; TSUN APP+WEB Communication built-in WiFi module Type of Isolation Galvanically Isolated HF Transformer Type of Enclosure IP67 Cooling Natural convection Operating Ambient Temperature -40 ~ +65 (derating of over 50°C Ambient Temperature)
- Page 14 G3&G3 plus Microinverter Max. Output Power (VA) 1600 1800 2000 Nominal Continuous Output Power 1600 1800 2000 Nominal Output Current (A) Max. Output Current (A) Inrush Current (A) Max. Output Fault Current (A) Max. Output Overcurrent Protection Nominal Output Voltage/Range (V)* 220/230/240, 175 –...
- Page 15 G3&G3 plus Microinverter 802.11n: +14dBm + 1.5dBm(@HT20, MCS7) 802.11b:-96dBm(@1Mbps) 802.11b:-89dBm(@11Mbps) 802.11g:-91dBm(@6Mbps) WiFi Receiving Sensitivity 802.11g:-76dBm(@54Mbps 802.11n:-91dBm(@MCS0) 802.11n:-73dBm(@MCS7 BLE Standard BLE5.0 BLE Frequency Range 2.402GHz-2.480GHz BLE Transmitting Power Max 15dBm BLE Receiving Sensitivity -97 dBm ※ The AC voltage and frequency range may vary depending on specific country grid.
- Page 16 G3&G3 plus Microinverter Nighttime Power Consumption <50mW Protection Anti-Islanding protection Integrated Insulation monitoring Integrated AC surge protection TYPE II AC overcurrent protection Integrated AC short-circuit protection Integrated AC overvoltage protection Integrated Over-heat protection Integrated Mechanical Data Dimensions (W×H×D mm) 331 * 261 * 44...
-
Page 17: Microinverter Installation
Wi-Fi router. Installation Steps DANGER ·Only qualified personnel should install, troubleshoot, or replace G3 micro inverters or the cable and accessories. ·Before installation, check the unit to ensure the absence of any transport or handling damage, which could affect insulation integrity or safety clearances. - Page 18 G3&G3 plus Microinverter WARNING ·Choose the installation location carefully and adhere to specified cooling requirements. Micro-inverter should be installed in a suitable position with good ventilation and no direct sunshine. CAUTION ·There are no screws and nuts in the package.
- Page 19 G3&G3 plus Microinverter Step 2. Connect the ground cable WARNING ·Ensure that all the microinverters are well grounded. ·Use ɸ6 screw for the ground port. Connect the ground cable to the enclosure of the microinverter. Step 3. Connect the AC cable of two microinverters WARNING ·According to the max current of the AC cables, there is a max installation quantity for the...
- Page 20 G3&G3 plus Microinverter TSOL-MS400 TSOL-MS350 TSOL-MS300 Every micro-inverter could be connected to the other one by its AC cables. Plug the female AC connector of one microinverter into a male AC connector of another microinverter to form a continuous AC branch circuit.
- Page 21 G3&G3 plus Microinverter CAUTION ·The installation technician is responsible for selecting a kind of AC cable and connecting the micro-inverter system to the home distribution network correctly. ·The AC connectors may be provided by different suppliers. The port definitions are subject to actual objects.
- Page 22 ·Use MC4 compatible DC connectors in the inverter side of the DC extension cable, or get the DC connectors from TSUN. ·Contact PV module manufacturers for the requirements of the DC connectors in the module side of DC extension cable.
- Page 23 G3&G3 plus Microinverter Step 6. Make an installation map CAUTION ·If there is more than one installation site, please make the installation map separately and give a clear description of the installation site. ·The row of the table corresponds to the shorter side of the PV module and the column of the table corresponds to the longer side of the PV module.
-
Page 24: Remote Active Power Control
(input port) to cease the output of active power or limit active power to a regulated level. This logic input can be the RS485 port, Ethernet port, and so on. TSUN microinverter provides an extra power control device that contains an RS485 port for this remote active power control. For more information, refer to the “User Manual of TSUN power control device”. -
Page 25: Fault Code And Troubleshooting
Check the voltage of the PV module and make sure that the PV1VoltOver_Fault below the maximum DC input voltage of the voltage is microinverter. If this fault appears continuously, please contact the TSUN PV2VoltOver_Fault service. This warning mostly appears in the morning or at dusk. It’s PV1VoltLow_Fault normal and will disappear automatically. -
Page 26: Storage And Dismantling
G3&G3 plus Microinverter Always use the personal protective equipment provided by the employer when carrying out maintenance. During normal operation, check that the environmental and logistic conditions are appropriate. Make sure that the conditions have not changed over time and that the equipment is not exposed to adverse weather conditions and has not been covered with foreign bodies. -
Page 27: Exclusions
G3&G3 plus Microinverter original Warranty period will apply. The replacement product or part(s) do not carry a new voluntary warranty. The product must have its original serial number and rating labels intact and readable. This Warranty does not extend to any product that has been completely or partially disassembled or modified, except where such disassembly is carried out by TSUNESS ... - Page 28 Within the warranty period of the microinverter, the invoice and date of purchase are required for the service. Besides, the trademark on the product should be visible, otherwise, warranty is not available. More information can be found in TSUN Warranty Policy. Manual do usuário...
-
Page 29: Marcas Registradas E Permissões
Para garantir a confiabilidade ideal e atender aos requisitos de garantia, o microinversor TSUN deve ser instalado de acordo com as instruções deste Manual. Para obter o Texto da Garantia, consulte www.tsun-ess.com. © 2022 TSUNESS Co., Ltd Todos os direitos reservados. -
Page 30: Conteúdo
G3&G3 plus Microinverter Conteúdo Marcas Registradas e Permissões ............................28 Público ....................................28 Conteúdo ....................................29 Leia isto Primeiro ................................. 30 Informações Importantes sobre Segurança ..............................30 Etiqueta do Produto ....................................... 30 Introdução ao Sistema ................................31 Descrição do Produto .....................................33 Datasheet ........................................33 Instalação do Microinversor .............................. -
Page 31: Leia Isto Primeiro
G3&G3 plus Microinverter Leia isto Primeiro Prezado cliente, obrigado por escolher o microinversor série G3&G3 Plus da TSUN. Queremos que você saiba que os nossos produtos atendem às suas necessidades de energia renovável. Agradecemos seus comentários sobre nossos produtos. Um Microinversor solar, ou simplesmente Microinversor, é um dispositivo plug-and-play usado em energia fotovoltaica, que converte corrente contínua (DC) gerada por um único módulo solar em... -
Page 32: Introdução Ao Sistema
Este aparelho atende aos requisitos da ANATEL. O número do Certificado é 11057-23-15833. Introdução ao Sistema O Microinversor G3&G3 Plus é utilizado em aplicações ligadas à rede e é composto por dois elementos principais: G3&G3 Plus Microinversor. TSUN Sistema de Monitoramento. - Page 33 CA para a rede, reduzindo a pressão de carga da mesma. TSOL-MS2000 O Microinversor é integrado ao módulo Wi-Fi e se conecta diretamente ao roteador Wi-Fi doméstico. Os usuários podem monitorar a geração de energia do sistema pelo aplicativo TSUN Monitoring. V1.0...
-
Page 34: Descrição Do Produto
G3&G3 plus Microinverter Descrição do Produto TSOL-MS2000 Encaixe de Montagem Cabo AC Orifício de Aterramento Antena Cabos DC Luz de Status Datasheet Modelos TSOL-MS2000 Dado de Entrada (DC) Potência recomendada do Módulo (W) 300 - 700+ Tensão de Partida (V) Tensão de entrada nominal (V) - Page 35 Integrada Dados Mecânicos Dimensões (L×A×C mm) 331 * 261 * 44 Peso [Kg] Dados Gerais Display Indicadores de LED ; TSUN APP+WEB Comunicação Módulo WiFi integrado Tipo de Isolamento Transformador HF isolado galvanicamente Grau de Proteção do Gabinete IP67 Classe de Proteção Resfriamento Convecção natural...
-
Page 36: Instalação Do Microinversor
Verificação de pré-instalação Verificação da Embalagem Embora os Microinversores da TSUN tenham passado por testes rigorosos e sejam verificados antes de saírem da fábrica, é pouco provável que eles possam sofrer danos durante o transporte. Verifique se há sinais óbvios de danos na embalagem e, se tal evidência estiver presente, não a abra e entre em contato com seu Revendedor o mais rápido possível. -
Page 37: Etapas De Instalação
DANGER •Somente pessoal qualificado deve instalar, solucionar problemas ou substituir os Microinversores G3 Plus, o cabo e os acessórios. •Antes da instalação, verifique a unidade para garantir a ausência de quaisquer danos de transporte ou manuseio, que possam afetar a integridade do isolamento ou as distâncias de segurança. - Page 38 G3&G3 plus Microinverter Escolha a melhor posição de instalação. Utilize dois pares de parafusos e porcas para fixar o Microinversor na estrutura. Certifique-se de que a etiqueta do Microinversor esteja voltada para cima. Passo 2. Conecte o Cabo de aterramento WARNING •Certifique-se de que todos os Microinversores estejam bem aterrados.
- Page 39 G3&G3 plus Microinverter Passo 3. Conecte o cabo AC de dois Microinversores WARNING · De acordo com a corrente máxima dos cabos AC, existe uma quantidade limite de instalação do Microinversor em cada seção de cabo. Modelos Quant. para cada seção de cabo.
- Page 40 G3&G3 plus Microinverter •Para evitar choques elétricos, certifique-se de que o sistema Microinversor esteja desconectado da rede de distribuição doméstica e que o disjuntor AC esteja aberto. WARNING •Certifique-se de que todos os cabos AC estejam conectados corretamente e que nenhum dos fios esteja comprimido ou danificado.
- Page 41 Módulos Fotovoltaicos ao Microinversor. •Use conectores DC compatíveis com MC4 no lado do Inversor do cabo de extensão DC ou obtenha os conectores DC da TSUN. •Entre em contato com os fabricantes de Módulos Fotovoltaicos para obter os detalhes dos conectores DC, no lado do Módulo do cabo de extensão DC.
- Page 42 G3&G3 plus Microinverter Passo 6. Faça um mapa ou desenho da Instalação CAUTION •Se houver mais de um local de instalação, faça um mapa ou desenho de instalação separadamente e forneça uma descrição clara do local. •A linha horizontal da Tabela, corresponde ao lado mais curto do Módulo Fotovoltaico e a coluna da Tabela, corresponde ao lado mais longo do Módulo Fotovoltaico.
-
Page 43: Controle Remoto De Energia Ativa
Esta entrada lógica pode ser a porta RS485, porta Ethernet e assim por diante. O Microinversor TSUN fornece um dispositivo de controle de potência extra que contém uma porta RS485 para este controle remoto de potência ativa. Para obter mais informações, consulte o “Manual do usuário do dispositivo de controle de energia TSUN”. -
Page 44: Guia De Manutenção
1) Verifique a fiação CA na caixa de distribuição ou tomada. Fora de Serviço 2) Verifique a conexão e os cabos do conector CA. 3) Se a falha persistir, entre em contato com a TSUN. Se a falha se mantiver o tempo todo, entre em contato com a Falha 09 TSUN. -
Page 45: Armazenamento E Desmontagem
G3&G3 plus Microinverter Realize uma inspeção anual em vários componentes e limpe o equipamento com aspirador de pó ou escovas especiais. A versão do Firmware pode ser verificada, usando o sistema de monitoramento. Sempre desenergize o circuito derivado CA, antes de fazer manutenção. -
Page 46: Exceções
G3&G3 plus Microinverter ou modificado, exceto quando tal desmontagem for realizada pela TSUNESS. Os termos desta Garantia não podem ser alterados, exceto por escrito, por um de nossos representantes autorizados. Deve haver um relatório de comissionamento assinado pelo usuário final e pelo Instalador, para as devidas instruções de comissionamento e manuseio do produto. - Page 47 Dentro do período de garantia do Microinversor, é necessária a nota fiscal e a data de compra para a realização do serviço. Além disso, a marca registrada do produto deve estar visível, caso contrário a garantia não estará disponível.. Mais informações podem ser encontradas na Política de Garantia TSUN. Suporte Técnico Brasil Email: suporte@tsun-ess.com Tel.
- Page 48 G3&G3 plus Microinverter TSOL-MS300 TSOL-MS1600 TSOL-MS350 TSOL-MS1800 TSOL-MS400 TSOL-MS2000 TSOL-MS600 TSOL-MS2000(1500) TSOL-MS700 TSOL-MS800 TSOL-MS600-D TSOL-MS700-D TSOL-MS800-D V1.0...
- Page 49 Marken und Berechtigungen TSUN und andere TSUNESS-Marken sind Marken von TSUNESS Co., Ltd. Alle anderen in diesem Dokument erwähnten Marken und Handelsnamen sind Eigentum ihrer jeweiligen Inhaber. TSUNESS Co., Ltd übernimmt keine ausdrücklichen oder stillschweigenden Zusicherungen bezüglich dieser Dokumentation oder der darin beschriebenen Geräte und / oder Software, einschließlich (ohne Einschränkung) jegliche implizite Garantie der Nützlichkeit,...
- Page 50 G3&G3 plus Microinverter Publikum Dieses Handbuch für Gebrauch durch professionelles Installations- Wartungspersonal vorgesehen. Inhalt Warenzeichen und Genehmigungen ............................. 1 Publikum ....................................2 Inhalt .....................................3 Lesen Sie dies zuerst ................................4 Wichtige Sicherheitsinformationen ................................4 Produktetikett .........................................4 Systemeinführung .................................5 Produktbeschreibung ..................................... 7 Datenblatt ........................................8...
-
Page 51: Lesen Sie Dies Zuerst
Lesen Sie dies zuerst Sehr geehrter Kunde, vielen Dank, dass Sie sich für den Serien-Mikrowechselrichter von TSUN entschieden haben. Wir hoffen, dass unsere Produkte Ihren Bedarf an erneuerbarer Energie decken. In der Zwischenzeit freuen wir uns über Ihr Feedback zu unseren Produkten. - Page 52 G3&G3 plus Microinverter WARNUNG · weist auf Anweisungen hin , die vollständig verstanden und befolgt werden müssen, um mögliche Sicherheitsrisiken wie Geräteschäden oder Verletzungen zu vermeiden. VORSICHT · weist darauf hin, dass der beschriebene Vorgang nicht ausgeführt werden darf. Der Leser sollte mit der Arbeit aufhören und die erläuterten Vorgänge vollständig verstehen, bevor er...
-
Page 53: Systemeinführung
G3&G3 plus Microinverter Systemeinführung Der Mikrowechselrichter wird in netzgekoppelten Anwendungen eingesetzt und besteht aus zwei Hauptelementen: Mikrowechselrichter. TSUN-Überwachungssystem. des öffentlichen Netzes entspricht, und sendet den Wechselstrom in das Netz, wodurch der Lastdruck des Netzes verringert wird. TSOL-MS300/MS350/MS400 TSOL-MS600/MS700/MS800 MS600-D / MS700-D / MS800-D... -
Page 54: Produktbeschreibung
G3&G3 plus Microinverter TSOL-MS1600 / MS1800 / MS2000 /MS2000 (1500) Der Mikrowechselrichter ist in das WLAN-Modul integriert und verbindet sich direkt mit dem heimischen WLAN-Router. Benutzer können die Stromerzeugung des Systems mit der TSUN-Überwachungs-App überwachen . Produktbeschreibung TSOL-MS600/MS700/MS800 MS600-D / MS700-D / MS800-D... -
Page 55: Datenblatt
G3&G3 plus Microinverter TSOL-MS400/MS350/MS300 TSOL-MS1600 / MS1800 / MS2000 /MS2000 (1500) Montageloch Ein C-Kabel Erdungsloch Antenne Gleichstromkabel Status Licht Datenblatt Modell TSOL-MS800 TSOL-MS700 TSOL-MS600 Eingangsdaten (DC) Empfohlene Modulleistung (W) 30 0 ~ 55 0 30 0 ~ 55 0 30 0 ~ 55 0... - Page 56 G3&G3 plus Microinverter Ausgangsdaten (AC) Max. Ausgangsleistung (VA) 8 00 7 00 6 00 Nominale Dauerausgangsleistung 8 00 7 00 6 00 Nennausgangsstrom (A) 3 .48 3 .04 2 .61 Max. Ausgangsstrom (A) 3.19 Nennausgangsspannung /-bereich 220/230/240, 175 – 270, L/N/PE...
- Page 57 G3&G3 plus Microinverter 802.11b: -96 dBm (bei 1 Mbit/s) 802.11b: -89 dBm (bei 11 Mbit/s) 802.11g: -91 dBm (bei 6 Mbit/s) WiFi-Empfangsempfindlichkeit 802.11g: -76 dBm (bei 54 Mbit/s 802.11n: -91 dBm (@MCS0) 802.11n: -73 dBm (@MCS7 BLE-Standard BLE5.0 BLE-Frequenzbereich 2,402 GHz bis 2,480 GHz BLE-Sendeleistung Max.
- Page 58 G3&G3 plus Microinverter Stromverbrauch in der Nacht < 50 mW < 50 mW < 50 mW Schutz Anti-Islanding-Schutz Integriert Isolationsüberwachung Integriert AC-Überspannungsschutz TYP II AC-Überstromschutz Integriert AC-Kurzschlussschutz Integriert AC-Überspannungsschutz Integriert Überhitzungsschutz Integriert Mechanische Daten Abmessungen (B×H×T mm) 250 * 223 * 30 Gewicht (kg] 3 .1...
- Page 59 G3&G3 plus Microinverter Anlaufspannung pro Eingang (V) Nenn -Eingangsspannung (V) MPPT- Spannungsbereich pro 1 6 ~60 Eingang (V) Max. Eingangsspannung pro Eingang M ax. Kurzschlussstrom pro Eingang Max. Eingangsstrom pro Eingang (A) Menge an MPPT Max . Rückspeisestrom des Wechselrichters zum Array (A) Ausgangsdaten (AC) Max.
- Page 60 G3&G3 plus Microinverter Art des Gehäuses IP67 Kühlung Natürliche Konvektion Betriebsumgebungstemperaturberei - 40 ~ +65 (Leistungsminderung bei über 50°C Umgebungstemperatur) Relative Luftfeuchtigkeit 100% Max. Betriebshöhe ohne 2000 Leistungsminderung [m] WLAN-Standard 802.11b/g/n WiFi-Frequenzbereich 2,412 GHz bis 2,472 GHz 802.11b: +17 dBm + 1,5 dBm (bei 11 Mbit/s) WiFi-Sendeleistung 802.11g:+15dBm + 1,5dBm(bei 54Mbps)
- Page 61 G3&G3 plus Microinverter Nennausgangsstrom (A) Max. Ausgangsstrom (A) I nrush Strom (A) M ax. Ausgangsfehlerstrom (A) Max. Ausgangs-Überstromschutz (A) Nennausgangsspannung /-bereich 220/230/240, 175 – 270, L/N/PE (V)* Nennfrequenz (Hz)* 50/60 Leistungsfaktor >0,99 Standard, 0,8 voraus … 0,8 nacheilend Harmonische Verzerrung des <3 %...
- Page 62 G3&G3 plus Microinverter 802.11b: -96 dBm(@1 Mbit/s) 802.11b: -89 dBm(@11 Mbit/s) 802.11g: -91 dBm(@6Mbps) WLAN-Empfangsempfindlichkeit 802.11g: -76 dBm(@54 Mbit/s). 802.11n:-91dBm(@MCS0) 802.11n:-73dBm(@MCS7 BLE-Standard BLE5.0 BLE-Frequenzbereich 2,402 GHz-2,480 GHz BLE-Sendeleistung Maximal 15 dBm BLE-Empfangsempfindlichkeit -97 dBm ※ Die Wechselspannung und der Frequenzbereich können je nach Netz im jeweiligen Land variieren.
- Page 63 G3&G3 plus Microinverter Spitzenwirkungsgrad des 9 6,7 % Wechselrichters CEC-gewichteter Wirkungsgrad 9 6,5 % Nomineller Mppt-Wirkungsgrad 99,9 % Stromverbrauch in der Nacht < 50 mW Schutz Anti-Islanding-Schutz Integriert Isolationsüberwachung Integriert AC-Überspannungsschutz TYP II AC-Überstromschutz Integriert AC-Kurzschlussschutz Integriert AC-Überspannungsschutz Integriert Überhitzungsschutz...
-
Page 64: Installation
Überprüfung vor der Installation Überprüfen Sie das Paket Obwohl die Mikrowechselrichter von TSUN strenge Tests durchlaufen und vor Verlassen des Werks überprüft werden, ist es nicht sicher, ob die Mikrowechselrichter während des Transports beschädigt werden. Bitte überprüfen Sie die Verpackung auf offensichtliche Schäden. Öffnen Sie die Verpackung nicht, wenn solche Anzeichen vorhanden sind, und wenden Sie sich so schnell wie möglich an Ihren Händler. - Page 65 G3&G3 plus Microinverter falsche Installation Bedienung können ernsthaften Sicherheits- Stromschlaggefahren oder Geräteschäden führen. ·Beachten Sie, dass bei der Installation dieses Geräts die Gefahr eines Stromschlags besteht. Schritt 1: Befestigen Sie den Mikrowechselrichter. GEFAHR · Installieren Sie das Gerät nicht unter ungünstigen Umgebungsbedingungen wie entzündlichen, explosiven, korrosiven, extrem hohen oder niedrigen Temperaturen und...
- Page 66 G3&G3 plus Microinverter Wählen Sie die beste Installationsposition. Befestigen Sie den Mikrowechselrichter mit zwei Paar Schrauben und Muttern am Rahmen. Achten Sie darauf, dass das Etikett des Mikrowechselrichters nach oben zeigt . Schritt 2. Erdungskabel anschließen WARNUNG · Stellen Sie sicher, dass alle Mikrowechselrichter gut geerdet sind.
- Page 67 G3&G3 plus Microinverter T SOL-MS800/800-D T SOL-MS700/700-D T SOL-MS600/MS600-D T SOL-MS400 T SOL-MS350 T SOL-MS300 Jeder Mikro-Wechselrichter kann über seine Wechselstromkabel mit dem anderen verbunden werden. Stecken Sie die AC-Buchse eines Mikrowechselrichters in einen AC-Stecker eines Mikrowechselrichters einen weiteren Mikrowechselrichter, um einen kontinuierlichen Wechselstrom-Zweigkreis zu bilden.
- Page 68 G3&G3 plus Microinverter · Installieren Wechselstrom-Anschlusskasten nicht, ohne zuvor Wechselstromversorgung vom System zu trennen. · elektrische Gefahren vermeiden, stellen sicher, dass Mikro-Wechselrichtersystem Hausverteilungsnetz getrennt AC-Leistungsschalter geöffnet ist. WARNUNG · Stellen Sie sicher, dass alle AC-Kabel richtig angeschlossen sind und dass keines der Kabel eingeklemmt oder beschädigt ist.
- Page 69 G3&G3 plus Microinverter Live (Brown/Red) Neutral (Blue/Black) Ground (Yellow-Green) Bauen Sie den AC-Stecker wie unten gezeigt wieder zusammen. Stecken Sie den AC-Stecker in den Mikrowechselrichter und verbinden Sie das AC-Kabel mit dem AC-Verteilerkasten. Schritt 5: Schließen Sie das Gleichstromkabel an GEFAHR ·...
- Page 70 · Verwenden Sie MC4-kompatible DC-Anschlüsse auf der Wechselrichterseite des DC -Verlängerungskabels oder beziehen Sie die DC-Anschlüsse von TSUN . · Wenden Sie sich an den Hersteller des PV-Moduls, um die Anforderungen an die DC-Anschlüsse auf der Modulseite des DC-Verlängerungskabels zu erfahren.
- Page 71 G3&G3 plus Microinverter Schritt 7: Starten Sie das System GEFAHR ·Nur qualifiziertes Personal sollte dieses System an das öffentliche Stromnetz anschließen. VORSICHT ·Schließen Sie Mikro-Wechselrichter nicht an das Stromnetz an und schalten Sie den/die Wechselstromkreis(e) erst dann ein, wenn Sie alle Installationsverfahren abgeschlossen und die vorherige Genehmigung des Energieversorgungsunternehmens erhalten haben.
-
Page 72: Selbsttestfunktion Für Italien
Leistungssteuergerät , das einen RS485-Port enthält für diese Fernsteuerung der Wirkleistung. Weitere Informationen finden Sie im „Benutzerhandbuch des TSUN-Leistungssteuerungsgeräts“. Selbsttestfunktion für Italien Der TSUN-Mikrowechselrichter und das TSUN-Überwachungssystem bieten eine Selbsttestfunktion für den italienischen Markt. Weitere Informationen finden Sie in der „Benutzeranleitung zur Selbsttestfunktion“. -
Page 73: Fehlercode Und Fehlerbehebung
G3&G3 plus Microinverter Fehlercode und Fehlerbehebung Code Fehlerinformationen Fehlerbehebung Überprüfen Sie die Spannung des PV -Moduls und stellen Sie PV1VoltOver_Fault unter der maximalen sicher, dass die Spannung DC-Eingangsspannung des Mikrowechselrichters liegt. Tritt dieser Fehler dauerhaft auf, wenden Sie sich bitte an PV2VoltOver_Fault den TSUN-Service. -
Page 74: Routinewartung
G3&G3 plus Microinverter Wartungshandbuch Routinewartung Nur autorisiertes Personal darf die Wartungsarbeiten durchführen und ist für die Meldung etwaiger Anomalien verantwortlich. Verwenden Sie bei Wartungsarbeiten stets die vom Arbeitgeber bereitgestellte persönliche Schutzausrüstung. Überprüfen Sie während des normalen Betriebs, ob die Umgebungs- und Logistikbedingungen angemessen sind. -
Page 75: Recycling Und Entsorgung
G3&G3 plus Microinverter Recycling und Entsorgung Dieses Gerät darf nicht als Hausmüll entsorgt werden . Ein Mikrowechselrichter, der das Ende seiner Lebensdauer erreicht hat, muss nicht an den Händler zurückgegeben werden. Benutzer müssen eine zugelassene Sammel- und Recyclinganlage in ihrer Nähe finden. - Page 76 Anweisung erfüllen . Innerhalb der Garantiezeit des Mikrowechselrichters sind für den Service die Rechnung und das Kaufdatum erforderlich. Außerdem muss das Markenzeichen auf dem Produkt sichtbar sein, da sonst keine Garantie besteht. Weitere Informationen finden Sie in den Garantiebestimmungen von TSUN. V1.0...
Need help?
Do you have a question about the G3 and is the answer not in the manual?
Questions and answers