Advertisement
SMART HEAVY-DUTY
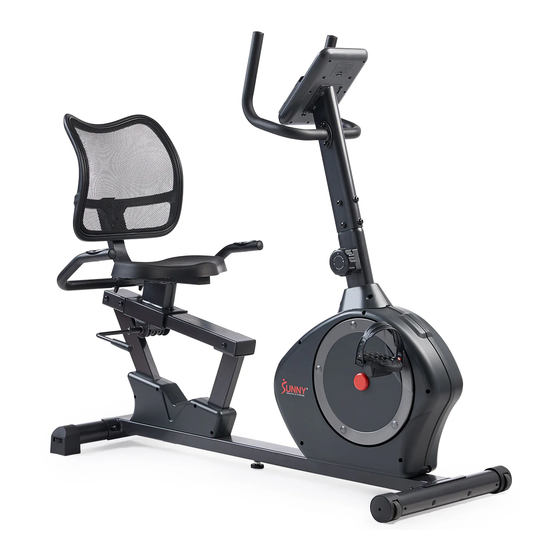
MAGNETIC RECUMBENT EXERCISE BIKE
WITH 350LB WEIGHT CAPACITY
SF-RB424002
USER MANUAL
IMPORTANT! Please retain owner's manual for maintenance and adjustment instructions.
Your satisfaction is very important to us, PLEASE DO NOT RETURN UNTIL YOU HAVE
CONTACTED US: support@sunnyhealthfitness.com or 1-877-90SUNNY (877-907-8669).
Advertisement
Table of Contents

Summary of Contents for Sunny Health & Fitness SF-RB424002
- Page 1 SMART HEAVY-DUTY MAGNETIC RECUMBENT EXERCISE BIKE WITH 350LB WEIGHT CAPACITY SF-RB424002 USER MANUAL IMPORTANT! Please retain owner’s manual for maintenance and adjustment instructions. Your satisfaction is very important to us, PLEASE DO NOT RETURN UNTIL YOU HAVE CONTACTED US: support@sunnyhealthfitness.com or 1-877-90SUNNY (877-907-8669).
-
Page 2: Important Safety Information
IMPORTANT SAFETY INFORMATION We thank you for choosing our product. To ensure your safety and health, please use this equipment correctly. It is important to read this entire manual before assembling and using the equipment. Safe and effective use can only be achieved if the equipment is assembled, maintained and used properly. -
Page 3: Pre-Assembly Check List
PRE-ASSEMBLY CHECK LIST Before you start to assemble, please make sure all parts are included. Description Spec. Qty. Description Spec. Qty. 1 Main Frame Seat 2 Handlebar Post Backrest KX838 4 Rear Handlebar Backrest Cover 5 Rail Meter HR6035BSP 6L Left Handlebar 79L Left Seat Cover 6R Right Handlebar 79R Right Seat Cover... -
Page 4: Hardware Package
HARDWARE PACKAGE Ordering Replacement Parts (U.S. and Canadian Customers only) Please provide the following information in order for us to accurately identify the part(s) needed: ✓ The model number (found on cover of manual) ✓ The product name (found on cover of manual) ✓... - Page 5 ASSEMBLY INSTRUCTIONS We value your experience using Sunny Health and Fitness products. For assistance with parts or troubleshooting, please contact us at support@sunnyhealthfitness.com or 1-877-90SUNNY (877-907-8669). STEP 1: Remove 2 Plastic Tubes (No. E) from the Main Frame (No. 1). Attach the Front Stabilizer (No.
- Page 6 We value your experience using Sunny Health and Fitness products. For assistance with parts or troubleshooting, please contact us at support@sunnyhealthfitness.com or 1-877-90SUNNY (877-907-8669). STEP 3: Align the Left Pedal (No. 29L) with Left Crank (No. 3L) at a 90° angle and gently insert the pedal into the crank arm.
- Page 7 We value your experience using Sunny Health and Fitness products. For assistance with parts or troubleshooting, please contact us at support@sunnyhealthfitness.com or 1-877-90SUNNY (877-907-8669). STEP 5: Remove 4 Allen Bolts (No. 15) and 4 Flat Washers (No. 17) from the Handlebar Post (No.
- Page 8 We value your experience using Sunny Health and Fitness products. For assistance with parts or troubleshooting, please contact us at support@sunnyhealthfitness.com or 1-877-90SUNNY (877-907-8669). STEP 7: First, remove 2 Allen Bolts (No. 25) from the Adjustment Axle (No. 22) using Allen Wrench (No.
- Page 9 We value your experience using Sunny Health and Fitness products. For assistance with parts or troubleshooting, please contact us at support@sunnyhealthfitness.com or 1-877-90SUNNY (877-907-8669). STEP 9: Remove 4 Screws (No. 86) from the Meter (No. 43) using Spanner (No. 87). Connect the Sensor Extension Wire (No.
-
Page 10: Adjustment Guide
ADJUSTMENT GUIDE ADJUSTING THE TENSION Adjust the tension by rotating the Tension Controller (No. 31) clockwise to increase the level of resistance. Rotate the Tension Controller (No. 31) counter-clockwise to decrease the level of resistance. Tension levels are set at Level 1 being the lowest and Level 15 being the highest. -
Page 11: Battery Installation And Replacement
BATTERY INSTALLATION & REPLACEMENT Battery Battery Cover BATTERY INSTALLATION 1. Take out 2 AAA batteries from meter box. 2. Press the buckle of battery cover on the Meter (No. 43), then remove battery cover. 3. Install 2 AAA batteries into the battery case on the back of the Meter (No. 43). Pay attention to the battery + and –... - Page 12 EXERCISE METER SPECIFICATIONS: TIME…………………………………..…...0:00-99:59 SPEED..……………………………………0.0-99.9 MPH DIST (DISTANCE)………………………...0.00-999.9 M (MILES) CAL (CALORIES)………………………….0.0-9999 KCAL ODO (ODOMETER)……………………….0.0-9000 M (MILES) PULSE……..........0-255 BPM KEY FUNCTIONS: MODE: Press the key to select and lock on to a particular function you want. Press and hold the key for 2 seconds to clear data, except for ODO (ODOMETER) when Bluetooth is not connected.
- Page 13 pulse value surpasses the target value, the meter will “Beep“ every 5 seconds. NOTE: This data is for reference only and cannot be used for medical treatment. 7. SCAN: Automatically cycles through functions every 6 seconds. BATTERY: If meter display is not functioning correctly, please reinstall the batteries. BLUETOOTH 1.
-
Page 14: Parts List
PARTS LIST Description Spec. Qty. Description Spec. Qty. Main Frame 44b Pulse Wire B 650mm Handlebar Post 45 Sensor Wire 600mm Left Crank 46a Pulse Extension Wire 1 A 12100mm 3R Right Crank 46b Pulse Extension Wire 1 B 12100mm Rear Handlebar 47a Pulse Extension Wire 2 A 500mm... -
Page 15: Exploded Diagram
EXPLODED DIAGRAM 1... - Page 16 EXPLODED DIAGRAM 2 Version: 1.0...


Need help?
Do you have a question about the SF-RB424002 and is the answer not in the manual?
Questions and answers
I need a replacement drive belt (#83 on the diagram) (part # 370PJ6) Where can I get one?