Table of Contents
Advertisement
Available languages
Available languages
Quick Links
PERFORMANCE INTERACTIVE SERIES
English, Pages 1~15
Español, Páginas 16~30 IMPORTANTE Por favor, conserve el manual del propietario para las instrucciones de mantenimiento y
Français, Pages 31~45
Deutsch, Seiten 46~60
Italiano, Pagine 61~75
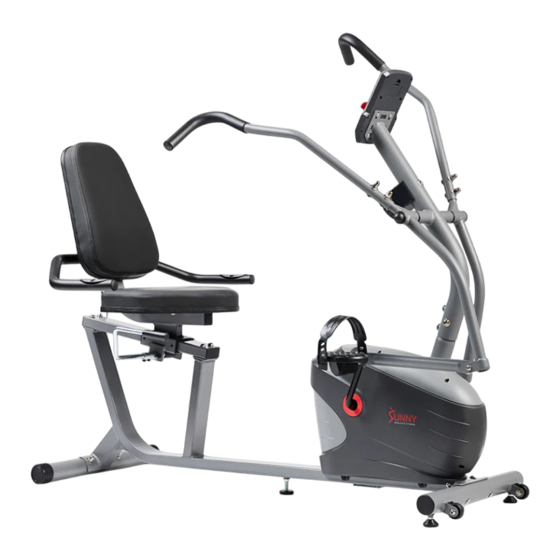
RECUMBENT BIKE
WITH ARM EXERCISER
SF-RB420032
USER MANUAL
IMPORTANT! Please retain owner's manual for maintenance and adjustment instructions. Your
satisfaction is very important to us, PLEASE DO NOT RETURN UNTIL YOU HAVE CONTACTED US:
support@sunnyhealthfitness.com or 1-877-90SUNNY (877-907-8669).
ajuste. Su satisfacció n es muy importante para nosotros, POR FAVOR NO DEVUELVA EL
PRODUCTO HASTA QUE SE HAYA COMUNICADO CON NOSOTROS:
support@sunnyhealthfitness.com o 1-877-90SUNNY (877-907-8669).
IMPORTANT ! Veuillez conserver le manuel du propriétaire pour les instructions d'entretien et de
réglage. Votre satisfaction est très importante pour nous, VEUILLEZ NE PAS RETOURNER AVANT
DE NOUS AVOIR CONTACTE : support@sunnyhealthfitness.com ou 1-877-90SUNNY
(877-907-8669).
WICHTIG! Bitte bewahren Sie das Benutzerhandbuch für Wartungs- und Einstellanweisungen auf. Ihre
Zufriedenheit ist uns sehr wichtig. BITTE SENDEN SIE NICHT ZURÜCK, BEVOR SIE UNS
KONTAKTIERT HABEN: support@sunnyhealthfitness.com oder 1-877-90SUNNY (877-907-8669).
IMPORTANTE! Conservare il manuale d'uso per le istruzioni di manutenzione e regolazione. La vostra
soddisfazione è molto importante per noi, VI PREGO DI NON RESTITUIRE IL PRODOTTO PRIMA DI
AVERCI CONTATTATO: support@sunnyhealthfitness.com o 1-877-90SUNNY (877-907-8669).
Advertisement
Table of Contents

Related Manuals for Sunny Health & Fitness PERFORMANCE INTERACTIVE SF-RB420032


Summary of Contents for Sunny Health & Fitness PERFORMANCE INTERACTIVE SF-RB420032
- Page 1 PERFORMANCE INTERACTIVE SERIES RECUMBENT BIKE WITH ARM EXERCISER SF-RB420032 USER MANUAL IMPORTANT! Please retain owner’s manual for maintenance and adjustment instructions. Your English, Pages 1~15 satisfaction is very important to us, PLEASE DO NOT RETURN UNTIL YOU HAVE CONTACTED US: support@sunnyhealthfitness.com or 1-877-90SUNNY (877-907-8669).
-
Page 2: Important Safety Information
IMPORTANT SAFETY INFORMATION We thank you for choosing our product. To ensure your safety and health, please use this equipment correctly. It is important to read this entire manual before assembling and using the equipment. Safe and effective use can only be achieved if the equipment is assembled, maintained and used properly. -
Page 3: Pre-Assembly Check List
PRE-ASSEMBLY CHECK LIST .Before you start to assemble, please make sure all parts are included. Description Spec. Qty. Description Spec. Qty. Φ19×300 Main Frame Long Axle Front Stabilizer 45L-1 Left Pedal YH-30 Rear Stabilizer 45R-1 Right Pedal YH-30 Handlebar Post Support Pad Left Swing Bar Seat... -
Page 4: Hardware Package
HARDWARE PACKAGE Ordering Replacement Parts (U.S. and Canadian Customers only) Please provide the following information in order for us to accurately identify the part(s) needed: ✓ The model number (found on cover of manual) ✓ The product name (found on cover of manual) ✓... - Page 5 ASSEMBLY INSTRUCTIONS We value your experience using Sunny Health and Fitness products. For assistance with parts or troubleshooting, please contact us at support@sunnyhealthfitness.com or 1-877-90SUNNY (877-907-8669). STEP 1 Remove the 2 Paper Tubes (No. E), 4 Carriage Bolts (No. 27), 4 Arc Washers (No. 26) and 4 Cap Nuts (No.
- Page 6 We value your experience using Sunny Health and Fitness products. For assistance with parts or troubleshooting, please contact us at support@sunnyhealthfitness.com or 1-877-90SUNNY (877-907-8669). STEP 2 Remove 4 Screws (No. 22), 4 Spring Washers (No. 41) and 4 Arc Washers (No. 26) from the Main Frame (No.
- Page 7 We value your experience using Sunny Health and Fitness products. For assistance with parts or troubleshooting, please contact us at support@sunnyhealthfitness.com or 1-877-90SUNNY (877-907-8669). STEP 3 Remove 2 Hex Screws (No. 30), 2 Spring Washers (No. 41), 2 Flat Washers (No. 38) and 2 Wave Washers (No.
- Page 8 We value your experience using Sunny Health and Fitness products. For assistance with parts or troubleshooting, please contact us at support@sunnyhealthfitness.com or 1-877-90SUNNY (877-907- 8669). STEP 4 Remove Left and Right Nylon Nuts (No. 23L & No. 23R) and 2 Spring Washers (No. 78) from the Left and Right Pedals (No.
- Page 9 We value your experience using Sunny Health and Fitness products. For assistance with parts or troubleshooting, please contact us at support@sunnyhealthfitness.com or 1-877-90SUNNY (877-907- 8669). STEP 5 Attach Left and Right Handlebars (No. 7L & No. 7R) to Left and Right Swing Bars (No. 5L &...
- Page 10 We value your experience using Sunny Health and Fitness products. For assistance with parts or troubleshooting, please contact us at support@sunnyhealthfitness.com or 1-877-90SUNNY (877-907-8669). STEP 7 Remove 1 Screw (No. 22), 1 Spring Washer (No. 41) and 1 Flat Washer (No. 39) from the Seat Support (No.
-
Page 11: Adjustment Guide
ADJUSTMENT GUIDE ADJUSTING THE BALANCE In order to achieve a smooth and comfortable ride, you must ensure that the bike is stabled and secured. If you notice that the bike is unbalanced during use, you should adjust the Adjustable Pads (No. -
Page 12: Battery Installation And Replacement
BATTERY INSTALLATION & REPLACEMENT Battery Battery Cover BATTERY INSTALLATION 1. Take out 2 AAA batteries from meter box. 2. Press the buckle of battery cover on the Meter (No. 65), then remove battery cover. 3. Install 2 AAA batteries into the battery case on the back of the Meter (No. 65). Pay attention to the battery + and –... -
Page 13: Function Buttons
EXERCISE METER FUNCTION BUTTONS: MODE: Press the button to select TMR (TIME), DST (DISTANCE), and CAL (CALORIES) to preset. Press the button for selection function display value on LCD or enter after setting. Press the button and hold for 3 seconds to reset all values except odometer to zero. -
Page 14: App Connection
Automatically counts down from targeting value during exercise. NOTE: This data is a rough guide which cannot be used in medical treatment. 8. ODO (ODOMETER): Displays the total accumulated distance from 0.0 to 9999 M (miles). User can also press MODE button to display the odometer value. -
Page 15: Parts List
PARTS LIST Description Spec. Qty. Description Spec. Qty. Φ19×300 Main Frame Long Axle Front Stabilizer 45L-1 Left Pedal YH-30 Rear Stabilizer 45R-1 Right Pedal YH-30 Φ24×T3×290 Handlebar Post Foam Grip Φ24×T3×480 Left Swing Bar Foam Grip Right Swing Bar Grip Black Left Connecting Φ50... - Page 16 Description Spec. Qty. Description Spec. Qty. Bearing Housing 72×56×11 Adjustable Belt Bolt M6×36 Φ39×24 Φ12×61 Idler Wheel Magnetic Board Axle D12×Φ15.5×0. Screw ST4.2×19 Wave Washer Phillips Head D6×Φ16×1.5 ST4.2×18 Flat Washer Screw Phillips Head M6×10 Flat Washer D6×D12×1.2 Screw D10×Φ14×1 Screw M6×8 Flat Washer...
- Page 17 INFORMACIÓN IMPORTANTE SOBRE SEGURIDAD Le agradecemos que haya elegido nuestro producto. Para garantizar su seguridad y su salud, utilice este equipo correctamente. Es importante leer este manual en su totalidad antes de montar y utilizar el equipo. Sólo se puede lograr un uso seguro y eficaz si el equipo se monta, mantiene y utiliza correctamente.
- Page 18 LISTA DE COMPROBACIÓN PREVIA AL MONTAJE Antes de empezar a montar, asegúrese de que todas las piezas está n incluidas. n.º Descripción Espec. Cant. n.º Descripción Espec. Cant. Φ19×300 Bastidor Principal Eje Largo Estabilizador Delantero 45L-1 Pedal Izquierdo YH-30 Estabilizador Trasero 45R-1 Pedal Derecho YH-30...
- Page 19 PAQUETE DE HARDWARE Solicitud de piezas de repuesto (sólo para clientes de EE.UU. y Canadá) Proporcione la siguiente informació n para que podamos identificar con precisión la(s) pieza(s) necesaria(s): ✓ El nú mero de modelo (se encuentra en la portada del manual) ✓...
-
Page 20: Instrucciones De Montaje
INSTRUCCIONES DE MONTAJE Valoramos su experiencia con los productos Sunny Health and Fitness. Para obtener ayuda con las piezas o la resolución de problemas, póngase en contacto con nosotros en support@sunnyhealthfitness.com o en el 1-877-90SUNNY (877-907-8669). PASO 1 Retire los 2 Tubos de Papel (n.º E), los 4 Pernos de Carro (n.º... - Page 21 Valoramos su experiencia con los productos Sunny Health and Fitness. Para obtener ayuda con las piezas o la resolución de problemas, pó ngase en contacto con nosotros en support@sunnyhealthfitness.com o en el 1-877-90SUNNY (877-907-8669). PASO 2 Retire 4 Tornillos (n.º 22), 4 Arandelas Elásticas (n.º...
- Page 22 Valoramos su experiencia con los productos Sunny Health and Fitness. Para obtener ayuda con las piezas o la resolución de problemas, pó ngase en contacto con nosotros en support@sunnyhealthfitness.com o en el 1-877-90SUNNY (877-907-8669). PASO 3 Retire 2 Tornillos Hexagonales (n.º 30), 2 Arandelas Elásticas (n.º...
- Page 23 Valoramos su experiencia con los productos Sunny Health and Fitness. Para obtener ayuda con las piezas o la resolución de problemas, pó ngase en contacto con nosotros en support@sunnyhealthfitness.com o en el 1-877-90SUNNY (877-907-8669). PASO 4 Retire las 2 Tuercas de Nylon Izquierdo & Derecho (n.º...
- Page 24 Valoramos su experiencia con los productos Sunny Health and Fitness. Para obtener ayuda con las piezas o la resolución de problemas, póngase en contacto con nosotros en support@sunnyhealthfitness.com o en el 1-877-90SUNNY (877-907-8669). PASO 5 Fije Manillares Izquierdo & Derecho (n.º 7L &...
- Page 25 Valoramos su experiencia con los productos Sunny Health and Fitness. Para obtener ayuda con las piezas o la resolución de problemas, póngase en contacto con nosotros en support@sunnyhealthfitness.com o en el 1-877-90SUNNY (877-907-8669). PASO 7 Retire 1 Tornillo (n.º 22), 1 Arandela Elástica (n.º...
- Page 26 GUÍ A DE AJUSTE AJUSTE DE LA BALANZA Para lograr una conducción suave y cómoda, debe asegurarse de que la bicicleta esté estable y segura. Si nota que la bicicleta está desequilibrada durante el uso, debe ajustar las Almohadillas Ajustables (n.º 51) situadas en el Estabilizador Delantero (n.º...
-
Page 27: Instalación De La Batería
INSTALACIÓN Y SUSTITUCIÓN DE BATERÍ AS Baterí a Tapa de la Baterí a INSTALACIÓN DE LA BATERÍ A 1. Saque 2 baterí as AAA de la caja del medidor. 2. Presione la hebilla de la tapa de las baterí as en el Medidor (n.º 65) y, a continuación, retire la tapa de las baterí... -
Page 28: Botones De Función
MEDIDOR DE EJERCICIO BOTONES DE FUNCIÓN: MODE (MODO): Pulse el botón para seleccionar TMR (TIEMPO), DST (DISTANCIA) y CAL (CALORÍ AS) a preajustar. Pulse el botón para que la funció n de selección muestre el valor en la pantalla LCD o introdúzcalo después del ajuste. - Page 29 SET y MODE (MODO). Cada incremento de ajuste es de 1 Cal. Cuenta regresiva automática a partir del valor objetivo durante el ejercicio. NOTA: Estos datos son una guí a aproximada que no puede utilizarse en tratamientos médicos. 8. ODO (ODÓMETRO): Muestra la distancia total acumulada de 0,0 a 9999 M (millas).
-
Page 30: Lista De Piezas
LISTA DE PIEZAS n.º Descripción Espec. Cant. n.º Descripción Espec. Cant. Φ20×Φ28×0.3 Bastidor Principal Arandela Ondulada Estabilizador Tapón Redondo 25×3 Delantero Estabilizador D8×Φ32×2 Arandela Plana Trasero Poste del Manillar Arandela Plana D8×D16×1.5 Barra Oscilante Φ25×38 Rueda Excéntrica Izquierdo Barra Oscilante Arandela Elástica Derecho Brazo de Conexión... - Page 31 n.º Descripción Espec. Cant. n.º Descripción Espec. Cant. Cable de Tensión Tuerca 4.5×32×32 Φ22.6×Φ28×2. Gancho de Tensión 1150 mm Arandela Cable de Extensión Φ45×H3.5 650 mm Tuerca de Bloqueo-L del Sensor 1 Cable de Extensión Rodamiento de Cara Φ45.8×8.8 650 mm del Sensor 2 Abierta Alojamiento del...
- Page 32 INFORMATIONS IMPORTANTES SUR LA SÉCURITÉ Nous vous remercions d'avoir choisi notre produit. Pour garantir votre sécurité et votre santé, veuillez utiliser cet appareil correctement. Il est important de lire l'intégralité de ce manuel avant d'assembler et d'utiliser l'appareil. Une utilisation sûre et efficace n'est possible que si l'é quipement est assemblé, entretenu et utilisé...
- Page 33 LISTE DE CONTRÔLE POUR LE PRÉ-ASSEMBLAGE Avant de commencer l'assemblage, assurez-vous que toutes les piè ces sont incluses. N° Description Spéc. Qté. N° Description Spéc. Qté. Φ19×300 Cadre Principal Axe Long Stabilisateur Avant 45L-1 Pédale Gauche YH-30 Stabilisateur Arrière 45R-1 Pédale Droite YH-30 Poteau de Guidon...
- Page 34 PAQUET DE MATÉRIEL Commande de pièces de rechange (clients américains et canadiens uniquement) Veuillez fournir les informations suivantes afin que nous puissions identifier avec précision la ou les pièces nécessaires : ✓ Numéro du modèle (sur la couverture du manuel) ✓...
-
Page 35: Instructions D'assemblage
INSTRUCTIONS D'ASSEMBLAGE Nous apprécions votre expérience d'utilisation des produits Sunny Health and Fitness. Pour obtenir de l'aide concernant les pièces ou le dépannage, veuillez nous contacter à l'adresse support@sunnyhealthfitness.com ou au 1-877-90SUNNY (877-907-8669). ÉTAPE 1 Retirez les 2 Tubes de Papier (N° E), les 4 Boulons de Chariot (N°... - Page 36 Nous apprécions votre expérience d'utilisation des produits Sunny Health and Fitness. Pour obtenir de l'aide concernant les pièces ou le dépannage, veuillez nous contacter à l'adresse support@sunnyhealthfitness.com ou au 1-877-90SUNNY (877-907-8669). ÉTAPE 2 Retirez les 4 Vis (N° 22), les 4 Rondelles Elastiques (N°...
- Page 37 Nous apprécions votre expérience d'utilisation des produits Sunny Health and Fitness. Pour obtenir de l'aide concernant les pièces ou le dépannage, veuillez nous contacter à l'adresse support@sunnyhealthfitness.com ou au 1-877-90SUNNY (877-907-8669). ÉTAPE 3 Retirez les 2 Vis Hexagonales (N° 30), les 2 Rondelles Elastiques (N°...
- Page 38 Nous apprécions votre expérience d'utilisation des produits Sunny Health and Fitness. Pour obtenir de l'aide concernant les pièces ou le dépannage, veuillez nous contacter à l'adresse support@sunnyhealthfitness.com ou au 1-877-90SUNNY (877-907-8669). ÉTAPE 4 Retirez les Écrous en Nylon Gauche & Droite (N° 23L &...
- Page 39 Nous apprécions votre expérience d'utilisation des produits Sunny Health and Fitness. Pour obtenir de l'aide concernant les pièces ou le dépannage, veuillez nous contacter à l'adresse support@sunnyhealthfitness.com ou au 1-877-90SUNNY (877-907-8669). ÉTAPE 5 Fixez Guidons Gauche & Droite (N° 7L & N° 7R) à...
- Page 40 Nous apprécions votre expérience d'utilisation des produits Sunny Health and Fitness. Pour obtenir de l'aide concernant les pièces ou le dépannage, veuillez nous contacter à l'adresse support@sunnyhealthfitness.com ou au 1-877-90SUNNY (877-907-8669). ÉTAPE 7 Retirez 1 Vis (N° 22), 1 Rondelle Elastique (N°...
- Page 41 GUIDE D'AJUSTEMENT RÉGLAGE DE L'ÉQUILIBRE Afin d'obtenir une conduite souple et confortable, vous devez vous assurer que le vélo est stable et sûr. Si vous remarquez que le vélo est déséquilibré pendant l'utilisation, vous devez ajuster les Coussin Réglables (N° 51) situés sur le Stabilisateur Avant (N°...
-
Page 42: Installation De La Batterie
INSTALLATION ET REMPLACEMENT DES BATTERIES Batterie Couvercle de la Batterie INSTALLATION DE LA BATTERIE 1. Retirer 2 batteries AAA du boî tier de l'appareil de mesure. 2. Appuyer sur la boucle du couvercle des batteries sur le Compteur (N° 65), puis retirer le couvercle des batteries. -
Page 43: Boutons De Fonction
COMPTEUR D'EXERCICE BOUTONS DE FONCTION: MODE: Appuyez sur le bouton pour sélectionner la TMR (TEMPS), la DST (DISTANCE) et les CAL (CALORIES) à préré gler. Appuyez sur le bouton pour que la fonction de sélection affiche la valeur sur l'é cran LCD ou entrez après le réglage. -
Page 44: Reset (Réinitialiser)
Le décompte se fait automatiquement à partir de la valeur cible pendant l'exercice. REMARQUE : Ces données sont un guide approximatif qui ne peut être utilisé dans le cadre d'un traitement médical. 8. ODO (ODOMETRE) : Affiche la distance totale accumulé e de 0,0 à 9999 M (miles). L'utilisateur peut également appuyer sur le bouton MODE pour afficher la valeur de l'odomètre. -
Page 45: Liste De Pièces
LISTE DE PIÈCES N° Description Spéc. Qté. N° Description Spéc. Qté. Φ25×38 Cadre Principal Roue Excentrique Stabilisateur Avant Rondelle Elastique Φ18×Φ8.1×10 Stabilisateur Arrière Bague en Alliage D28.5×Φ34×3. Poteau de Guidon 43-1 Entretoise Barre Oscillante Φ19×300 Axe Long Gauche Barre Oscillante 45L-1 Pédale Gauche YH-30... - Page 46 N° Description Spéc. Qté. N° Description Spéc. Qté. Tringlerie de Roue Logement de Palier 2.5×76×76 Libre Couvercle de Φ45×H3.5 Ecrou de Blocage-R Courroie Gauche Couvercle de Φ25.2×Φ38×1 Grande Rondelle Plate Courroie Droite Couvercle de Φ60×Φ30×8.5 Support du Capteur Manivelle Boulon de Ceinture Φ50 Scellage M6×36...
-
Page 47: Wichtige Sicherheitsinformationen
WICHTIGE SICHERHEITSINFORMATIONEN Wir danken Ihnen, dass Sie sich für unser Produkt entschieden haben. Um Ihre Sicherheit und Gesundheit zu gewä hrleisten, bitten wir Sie, dieses Gerä t richtig zu benutzen. Es ist wichtig, dass Sie diese Anleitung vor dem Zusammenbau und der Verwendung des Geräts vollständig lesen. Eine sichere und effektive Nutzung kann nur erreicht werden, wenn das Gerät richtig zusammengebaut, gewartet und benutzt wird. - Page 48 CHECKLISTE VOR DEM ZUSAMMENBAU Bevor Sie mit dem Zusammenbau beginnen, vergewissern Sie sich bitte, dass alle Teile vorhanden sind. Beschreibung Spez. Anz. Beschreibung Spez. Anz. Φ19×300 Hauptrahmen Lange Achse Vorderer Stabilisator 45L-1 Linken Pedal YH-30 Hinterer Stabilisator 45R-1 Rechten Pedal YH-30 Lenkersäule Stützpolster...
- Page 49 HARDWARE-PAKET Bestellung von Ersatzteilen (nur für Kunden aus den USA und Kanada) Bitte geben Sie die folgenden Informationen an, damit wir das/die benötigte(n) Teil(e) genau identifizieren können: ✓ Die Modellnummer (auf dem Umschlag des Handbuchs zu finden) ✓ Der Produktname (auf dem Umschlag des Handbuchs zu finden) ✓...
- Page 50 MONTAGEANLEITUNG Wir schätzen Ihre Erfahrung mit den Produkten von Sunny Health and Fitness. Wenn Sie Hilfe bei der Beschaffung von Ersatzteilen oder bei der Fehlersuche benötigen, wenden Sie sich bitte an support@sunnyhealthfitness.com oder 1-877-90SUNNY (877-907-8669). SCHRITT 1 Entfernen Sie die 2 Papierhülsen (Nr. E), 4 Schlittenbolzen (Nr.
- Page 51 Wir schätzen Ihre Erfahrung mit den Produkten von Sunny Health and Fitness. Wenn Sie Hilfe bei der Beschaffung von Ersatzteilen oder bei der Fehlersuche benötigen, wenden Sie sich bitte an support@sunnyhealthfitness.com oder 1-877-90SUNNY (877-907-8669). SCHRITT 2 Entfernen Sie 4 Schrauben (Nr. 22), 4 Federscheiben (Nr.
- Page 52 Wir schätzen Ihre Erfahrung mit den Produkten von Sunny Health and Fitness. Wenn Sie Hilfe bei der Beschaffung von Ersatzteilen oder bei der Fehlersuche benötigen, wenden Sie sich bitte an support@sunnyhealthfitness.com oder 1-877-90SUNNY (877-907-8669). SCHRITT 3 Entfernen Sie 2 Sechskantschrauben (Nr. 30), 2 Federscheiben (Nr.
- Page 53 Wir schätzen Ihre Erfahrung mit den Produkten von Sunny Health and Fitness. Wenn Sie Hilfe bei der Beschaffung von Ersatzteilen oder bei der Fehlersuche benötigen, wenden Sie sich bitte an support@sunnyhealthfitness.com oder 1-877-90SUNNY (877-907-8669). SCHRITT 4 Entfernen Sie die Linken & Rechten Nylon-Muttern (Nr. 23L &...
- Page 54 Wir schätzen Ihre Erfahrung mit den Produkten von Sunny Health and Fitness. Wenn Sie Hilfe bei der Beschaffung von Ersatzteilen oder bei der Fehlersuche benötigen, wenden Sie sich bitte an support@sunnyhealthfitness.com oder 1-877-90SUNNY (877-907-8669). SCHRITT 5 Befestigen Sie Linken & Rechten Lenkern (Nr.
- Page 55 Wir schätzen Ihre Erfahrung mit den Produkten von Sunny Health and Fitness. Wenn Sie Hilfe bei der Beschaffung von Ersatzteilen oder bei der Fehlersuche benötigen, wenden Sie sich bitte an support@sunnyhealthfitness.com oder 1-877-90SUNNY (877-907-8669). SCHRITT 7 Entfernen Sie 1 Schraube (Nr. 22), 1 Federscheibe (Nr.
-
Page 56: Einstellen Des Sitzes
EINSTELLANLEITUNG EINSTELLEN DES GLEICHGEWICHTS Um eine reibungslose und komfortable Fahrt zu gewährleisten, müssen Sie sicherstellen, dass das Fahrrad stabil und sicher steht. Wenn Sie bemerken, dass das Fahrrad während der Fahrt aus dem Gleichgewicht gerät, sollten Sie die Verstellbares Polstern (Nr. 51) am Vorderen Stabilisator (Nr. - Page 57 EINBAU UND AUSTAUSCH VON BATTERIEN Batterie Batterieabdeckung BATTERIEANLAGE 1. Nehmen Sie 2 AAA-Batterien aus der Messgerätebox. 2. Drücken Sie die Schnalle der Batterieabdeckung auf das Messgerät (Nr. 65) und nehmen Sie die Batterieabdeckung ab. 3. Legen Sie 2 AAA-Batterien in das Batteriefach auf der Rückseite des Messgerät (Nr. 65) ein. Achten Sie vor dem Einlegen der Batterien auf die + und - Pole.
- Page 58 TRAININGSMESSGERÄT FUNKTIONSTASTEN: MODE: Drücken Sie die Taste zur Auswahl von TMR (ZEIT), DST (DISTANZ) und CAL (KALORIEN) zur Voreinstellung. Drücken Sie die Taste, um den Wert der Auswahlfunktion auf dem LCD-Display anzuzeigen oder nach der Einstellung einzugeben. Drücken Sie die Taste und halten Sie sie 3 Sekunden lang gedrückt, um alle Werte außer dem Kilometerzähler auf Null zurückzusetzen.
-
Page 59: Reset (Zurücksetzen)
voreinstellen. Jeder Einstellschritt entspricht 1 Cal. Während des Trainings wird automatisch vom Zielwert heruntergezählt. HINWEIS: Diese Daten sind ein grober Richtwert, der nicht für die medizinische Behandlung verwendet werden kann. 8. ODO (ODOMETER): Zeigt die akkumulierte Gesamtstrecke von 0,0 bis 9999 M (Meilen) an. Der Benutzer kann auch die MODE-Taste drücken, um den Kilometerzählerwert anzuzeigen. - Page 60 TEILELISTE Beschreibung Spez. Anz. Beschreibung Spez. Anz. Φ25×38 Hauptrahmen Exzenterrad Vorderer Stabilisator Federscheibe Φ18×Φ8.1×10 Hinterer Stabilisator Legierungsbuchse D28.5×Φ34×3. Lenkersäule 43-1 Abstandshalter Linken Φ19×300 Lange Achse Schaukelstange Rechten 45L-1 Linken Pedal YH-30 Schaukelstange Linken 6L-1 45R-1 Rechten Pedal YH-30 Verbindungsarm Rechten Φ24×T3×290 Schaumstoffgriff Verbindungsarm...
- Page 61 Beschreibung Spez. Anz. Beschreibung Spez. Anz. Impuls- Lager mit Offener Φ45.8×8.8 Verlängerungsdraht 650 mm Fläche Federscheibe Lagergehäuse 2.5×76×76 Zwischenradgestän Φ45×H3.5 Sicherungsmutter-R Linken Große Φ25.2×Φ38×1 Riemenabdeckung Unterlegscheibe Rechten Sensor-Halterung Riemenabdeckung Verstellbarer Φ60×Φ30×8.5 Kurbelabdeckung M6×36 Gürtelbolzen Φ50 Φ12×61 Dichtung Magnettafel-Achse D12×Φ15.5×0. Φ220 Riemenscheibe Wellenunterlegscheibe Flache...
-
Page 62: Importanti Informazioni Sulla Sicurezza
IMPORTANTI INFORMAZIONI SULLA SICUREZZA Vi ringraziamo per aver scelto il nostro prodotto. Per garantire la vostra sicurezza e la vostra salute, vi invitiamo a utilizzare questa apparecchiatura in modo corretto. Prima di assemblare e utilizzare l'apparecchiatura, è importante leggere il presente manuale per intero. Un utilizzo sicuro ed efficace è... - Page 63 LISTA DI CONTROLLO PRE-ASSEMBLAGGIO Prima di iniziare l'assemblaggio, accertarsi che tutti i componenti siano inclusi. Descrizione Spec. Qtà. Descrizione Spec. Qtà. Φ19×300 Telaio Principale Asse Lungo Stabilizzatore Anteriore 45L-1 Pedale YH-30 Stabilizzatore Posteriore 45R-1 Pedale YH-30 Montante del Manubrio Cuscinetto di Supporto Barra Oscillante Sinistro Sedile Barra Oscillante Destro...
- Page 64 PACCHETTO HARDWARE Ordinazione di parti di ricambio (solo per clienti statunitensi e canadesi) Si prega di fornire le seguenti informazioni per consentirci di identificare con precisione i pezzi di ricambio necessari: ✓ Il numero del modello (riportato sulla copertina del manuale) ✓...
-
Page 65: Istruzioni Di Montaggio
ISTRUZIONI DI MONTAGGIO Teniamo molto alla vostra esperienza con i prodotti Sunny Health and Fitness. Per assistenza sui ricambi o per la risoluzione dei problemi, contattateci all'indirizzo support@sunnyhealthfitness.com o al numero 1-877-90SUNNY (877-907-8669). FASE 1 Rimuovere i 2 Tubi di Carta (n. E), i 4 Bulloni del Carrello (n. - Page 66 Teniamo molto alla vostra esperienza con i prodotti Sunny Health and Fitness. Per assistenza sui ricambi o per la risoluzione dei problemi, contattateci all'indirizzo support@sunnyhealthfitness.com o al numero 1-877-90SUNNY (877-907-8669). FASE 2 Rimuovere le 4 Viti (n. 22), le 4 Rondelle Elastica (n.
- Page 67 Teniamo molto alla vostra esperienza con i prodotti Sunny Health and Fitness. Per assistenza sui ricambi o per la risoluzione dei problemi, contattateci all'indirizzo support@sunnyhealthfitness.com o al numero 1-877-90SUNNY (877-907-8669). FASE 3 Rimuovere le 2 Viti Esagonali (n. 30), le 2 Rondelle Elastica (n.
- Page 68 Teniamo molto alla vostra esperienza con i prodotti Sunny Health and Fitness. Per assistenza sui ricambi o per la risoluzione dei problemi, contattateci all'indirizzo support@sunnyhealthfitness.com o al numero 1-877-90SUNNY (877-907-8669). FASE 4 Rimuovere i Dadi in Nylon Sinistro & Destro (n. 23L & n.
- Page 69 Teniamo molto alla vostra esperienza con i prodotti Sunny Health and Fitness. Per assistenza sui ricambi o per la risoluzione dei problemi, contattateci all'indirizzo support@sunnyhealthfitness.com o al numero 1-877-90SUNNY (877-907-8669). FASE 5 Fissare Manubri Sinistro & Destro (n. 7L & n. 7R) a Barre Oscillanti Sinistro &...
- Page 70 Teniamo molto alla vostra esperienza con i prodotti Sunny Health and Fitness. Per assistenza sui ricambi o per la risoluzione dei problemi, contattateci all'indirizzo support@sunnyhealthfitness.com o al numero 1-877-90SUNNY (877-907-8669). FASE 7 Rimuovere 1 Vite (n. 22), 1 Rondella Elastica (n.
- Page 71 GUIDA ALLA REGOLAZIONE REGOLAZIONE DEL BILANCIAMENTO Per ottenere una guida fluida e confortevole, è necessario assicurarsi che la bicicletta sia stabile e sicura. Se durante l'uso notate che la bicicletta è sbilanciata, dovete regolare i Cuscinetto Regolabili (n. 51) situati sullo Stabilizzatore Anteriore (n. 2) fino a quando la bicicletta non sarà...
-
Page 72: Installazione Della Batteria
INSTALLAZIONE E SOSTITUZIONE DELLA BATTERIA Batteria Coperchio della Batteria INSTALLAZIONE DELLA BATTERIA 1. Estrarre 2 batterie AAA dalla scatola dello misuratore. 2. Premere la fibbia del coperchio della batteria sullo Misuratore (n. 65), quindi rimuovere il coperchio della batteria. 3. Installare 2 batterie AAA nell'alloggiamento della batteria sul retro dello Misuratore (n. 65). Prima dell'installazione, prestare attenzione ai poli + e - delle batterie. -
Page 73: Pulsanti Funzione
MISURATORE DI SFORZO PULSANTI FUNZIONE: MODE: Premere il pulsante per selezionare TMR (TEMPO), DST (DISTANZA) e CAL (CALORIE) da preimpostare. Premere il pulsante per visualizzare il valore della funzione di selezione sul display LCD o inserire dopo l'impostazione. Premere il pulsante e tenerlo premuto per 3 secondi per azzerare tutti i valori, tranne il odometro. - Page 74 8. ODO (ODOMETRO): Visualizza la distanza totale accumulata da 0,0 a 9999 M (miglia). L'utente può anche premere il pulsante MODE per visualizzare il valore del odometro. 9. PUL (MPULSO): Il misuratore visualizza la frequenza cardiaca dell'utente in battiti al minuto (BPM) durante l'allenamento.
-
Page 75: Elenco Parti
ELENCO PARTI Descrizione Spec. Qtà. Descrizione Spec. Qtà. D8×Φ32×2 Telaio Principale Rondella Piatta Stabilizzatore Rondella Piatta D8×D16×1.5 Anteriore Stabilizzatore Φ25×38 Ruota Eccentrica Posteriore Montante del Manubrio Rondella Elastica Barra Oscillante Φ18×Φ8.1×10 Boccola in Lega Sinistro Barra Oscillante D28.5×Φ34×3. 43-1 Distanziale Destro Braccio di Φ19×300... - Page 76 Descrizione Spec. Qtà. Descrizione Spec. Qtà. Φ45×H3.5 Filo di Impulso 700 mm Dado di Bloccaggio-L Filo di Prolunga per Cuscinetto a Faccia Φ45.8×8.8 2000 mm Impulso 1 Aperta Filo di Prolunga per Alloggiamento del 650 mm 2.5×76×76 Impulso 2 Cuscinetto Φ45×H3.5 Rondella Elastica Dado di Bloccaggio-R...
-
Page 77: Exploded Diagram
EXPLODED DIAGRAM Version 2.0...
Need help?
Do you have a question about the PERFORMANCE INTERACTIVE SF-RB420032 and is the answer not in the manual?
Questions and answers